Note
Access to this page requires authorization. You can try signing in or changing directories.
Access to this page requires authorization. You can try changing directories.
When you deploy a highly available Hyper-V solution, you must consider and plan for several different types of network traffic. Design your network configuration with the following goals in mind:
- Ensure network quality of service
- Provide network redundancy
- Isolate traffic to defined networks
- Where applicable, take advantage of Server Message Block (SMB) Multichannel
This topic provides network configuration recommendations that are specific to a Hyper-V cluster running Windows Server. It includes an overview of the different network traffic types, recommendations for how to isolate traffic, recommendations for features such as NIC Teaming, Quality of Service (QoS), and Virtual Machine Queue (VMQ), and a Windows PowerShell script that shows an example of converged networking, where the network traffic on a Hyper-V cluster routes through one external virtual switch.
Windows Server supports the concept of converged networking, where different types of network traffic share the same Ethernet network infrastructure. Features such as Hyper-V QoS and the ability to add virtual network adapters to the management operating system enable you to consolidate the network traffic on fewer physical adapters. Combined with traffic isolation methods such as VLANs, you can isolate and control the network traffic.
Note
If you use System Center Virtual Machine Manager (VMM) to create or manage Hyper-V clusters, you must use VMM to configure the network settings that are described in this topic.
Overview of different network traffic types
When you deploy a Hyper-V cluster, you must plan for several types of network traffic. The following table summarizes the different traffic types.
| Network Traffic Type | Description |
|---|---|
| Management | Provides connectivity between the server that is running Hyper-V and basic infrastructure functionality. Use it to manage the Hyper-V management operating system and virtual machines. |
| Cluster | Use it for inter-node cluster communication such as the cluster heartbeat and Cluster Shared Volumes (CSV) redirection. |
| Live migration | Use it for virtual machine live migration. |
| Storage | Use it for SMB traffic or for iSCSI traffic. |
| Replica traffic | Use it for virtual machine replication through the Hyper-V Replica feature. |
| Virtual machine access | Use it for virtual machine connectivity. Typically requires external network connectivity to service client requests. |
The following sections provide more detailed information about each network traffic type.
Management traffic
A management network provides connectivity between the operating system of the physical Hyper-V host (also known as the management operating system) and basic infrastructure functionality such as Active Directory Domain Services (AD DS), Domain Name System (DNS), and Windows Server Update Services (WSUS). It also manages the server that is running Hyper-V and the virtual machines.
The management network must have connectivity between all required infrastructure, and to any location from which you want to manage the server.
Cluster traffic
A failover cluster monitors and communicates the cluster state between all members of the cluster. This communication is very important to maintain cluster health. If a cluster node doesn't communicate a regular health check (known as the cluster heartbeat), the cluster considers the node down and removes the node from cluster membership. The cluster then transfers the workload to another cluster node.
Inter-node cluster communication also includes traffic that's associated with CSV. For CSV, where all nodes of a cluster can access shared block-level storage simultaneously, the nodes in the cluster must communicate to orchestrate storage-related activities. Also, if a cluster node loses its direct connection to the underlying CSV storage, CSV has resiliency features which redirect the storage I/O over the network to another cluster node that can access the storage.
Live migration traffic
Live migration enables the transparent movement of running virtual machines from one Hyper-V host to another without a dropped network connection or perceived downtime.
Use a dedicated network or VLAN for live migration traffic to ensure quality of service and for traffic isolation and security. Live migration traffic can saturate network links. This saturation can cause other traffic to experience increased latency. The time it takes to fully migrate one or more virtual machines depends on the throughput of the live migration network. Therefore, you must ensure that you configure the appropriate quality of service for this traffic. To provide the best performance, live migration traffic isn't encrypted.
You can designate multiple networks as live migration networks in a prioritized list. For example, you might have one migration network for cluster nodes in the same cluster that is fast (10 GB), and a second migration network for cross-cluster migrations that is slower (1 GB).
All Hyper-V hosts that can initiate or receive a live migration must have connectivity to a network that is configured to allow live migrations. Because live migration can occur between nodes in the same cluster, between nodes in different clusters, and between a cluster and a stand-alone Hyper-V host, make sure that all these servers can access a live migration-enabled network.
Storage traffic
For a virtual machine to be highly available, all members of the Hyper-V cluster must access the virtual machine state. This state includes the configuration state and the virtual hard disks. To meet this requirement, you must have shared storage.
In Windows Server, you can provide shared storage in two ways:
- Shared block storage. Shared block storage options include Fibre Channel, Fibre Channel over Ethernet (FCoE), iSCSI, and shared Serial Attached SCSI (SAS).
- File-based storage. Remote file-based storage is provided through SMB 3.0.
SMB 3.0 includes new functionality known as SMB Multichannel. SMB Multichannel automatically detects and uses multiple network interfaces to deliver high performance and highly reliable storage connectivity.
By default, SMB Multichannel is enabled and requires no additional configuration. Use at least two network adapters of the same type and speed so that SMB Multichannel is in effect. Network adapters that support RDMA (Remote Direct Memory Access) are recommended but not required.
SMB 3.0 also automatically discovers and takes advantage of available hardware offloads, such as RDMA. A feature known as SMB Direct supports the use of network adapters that have RDMA capability. SMB Direct provides the best performance possible while also reducing file server and client overhead.
Note
The NIC Teaming feature is incompatible with RDMA-capable network adapters. Therefore, if you intend to use the RDMA capabilities of the network adapter, don't team those adapters.
Both iSCSI and SMB use the network to connect the storage to cluster members. Because reliable storage connectivity and performance are very important for Hyper-V virtual machines, use multiple networks (physical or logical) to ensure that these requirements are achieved.
For more information about SMB Direct and SMB Multichannel, see Improve Performance of a File Server with SMB Direct.
Replica traffic
Hyper-V Replica provides asynchronous replication of Hyper-V virtual machines between two hosting servers or Hyper-V clusters. Replica traffic occurs between the primary and Replica sites.
Hyper-V Replica automatically discovers and uses available network interfaces to transmit replication traffic. To throttle and control the replica traffic bandwidth, define QoS policies with minimum bandwidth weight.
If you use certificate-based authentication, Hyper-V Replica encrypts the traffic. If you use Kerberos-based authentication, traffic isn't encrypted.
Virtual machine access traffic
Most virtual machines require some form of network or Internet connectivity. For example, workloads that run on virtual machines typically need external network connectivity to service client requests. This connectivity can include tenant access in a hosted cloud implementation. Because multiple subclasses of traffic exist, such as traffic that's internal to the datacenter and traffic that's external (for example, to a computer outside the datacenter or to the Internet), these virtual machines need one or more networks to communicate.
To separate virtual machine traffic from the management operating system, use VLANs that aren't exposed to the management operating system.
How to isolate the network traffic on a Hyper-V cluster
To provide the most consistent performance and functionality and to improve network security, isolate the different types of network traffic.
Note
If you want to have a physical or logical network that's dedicated to a specific traffic type, you must assign each physical or virtual network adapter to a unique subnet. For each cluster node, Failover Clustering recognizes only one IP address per subnet.
Isolate traffic on the management network
Use a firewall or IPsec encryption, or both, to isolate management traffic. In addition, use auditing to ensure that only defined and allowed communication is transmitted through the management network.
Isolate traffic on the cluster network
To isolate inter-node cluster traffic, configure a network to either allow cluster network communication or not to allow cluster network communication. For a network that allows cluster network communication, you can also configure whether to allow clients to connect through the network. This configuration includes client and management operating system access.
A failover cluster can use any network that allows cluster network communication for cluster monitoring, state communication, and for CSV-related communication.
To configure a network to allow or not to allow cluster network communication, use Failover Cluster Manager or Windows PowerShell. To use Failover Cluster Manager, select Networks in the navigation tree. In the Networks pane, right-click a network, then select Properties.
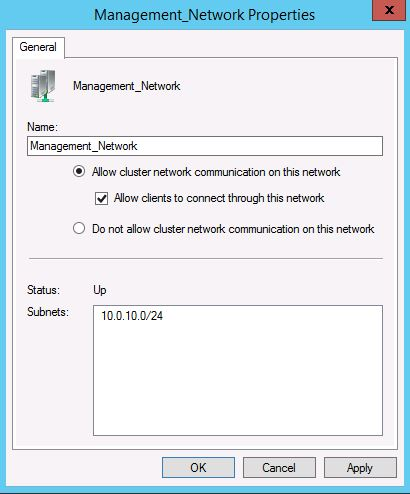
The following Windows PowerShell example configures a network named Management Network to allow cluster and client connectivity.
(Get-ClusterNetwork -Name "Management Network").Role = 3
The Role property has the following possible values.
| Value | Network Setting |
|---|---|
| 0 | Do not allow cluster network communication |
| 1 | Allow cluster network communication only |
| 3 | Allow cluster network communication and client connectivity |
The following table shows the recommended settings for each type of network traffic. Virtual machine access traffic isn't listed because you should isolate these networks from the management operating system by using VLANs that aren't exposed to the host. Therefore, virtual machine networks shouldn't appear in Failover Cluster Manager as cluster networks.
| Network Type | Recommended Setting |
|---|---|
| Management | Both of the following: - Allow cluster network communication on this network - Allow clients to connect through this network |
| Cluster | Allow cluster network communication on this network Note: Clear the Allow clients to connect through this network check box. |
| Live migration | Allow cluster network communication on this network Note: Clear the Allow clients to connect through this network check box. |
| Storage | Do not allow cluster network communication on this network |
| Replica traffic | Both of the following: - Allow cluster network communication on this network - Allow clients to connect through this network |
Isolate traffic on the live migration network
By default, live migration traffic uses the cluster network topology to discover available networks and to establish priority. However, you can manually configure live migration preferences to isolate live migration traffic to only the networks that you define. To do this, you can use Failover Cluster Manager or Windows PowerShell. To use Failover Cluster Manager, in the navigation tree, right-click Networks, then select Live Migration Settings.

The following Windows PowerShell example enables live migration traffic only on a network named Migration_Network.
Get-ClusterResourceType -Name "Virtual Machine" | Set-ClusterParameter -Name MigrationExcludeNetworks -Value ([String]::Join(";",(Get-ClusterNetwork | Where-Object {$_.Name -ne "Migration_Network"}).ID))
Isolate traffic on the storage network
To isolate SMB storage traffic, use Windows PowerShell to set SMB Multichannel constraints. SMB Multichannel constraints restrict SMB communication between a given file server and the Hyper-V host to one or more defined network interfaces.
For example, the following Windows PowerShell command sets a constraint for SMB traffic from the file server FileServer1 to the network interfaces SMB1, SMB2, SMB3, and SMB4 on the Hyper-V host from which you run this command.
New-SmbMultichannelConstraint -ServerName "FileServer1" -InterfaceAlias "SMB1", "SMB2", "SMB3", "SMB4"
Note
- You must run this command on each node of the Hyper-V cluster.
- To find the interface name, use the Get-NetAdapter cmdlet.
For more information, see New-SmbMultichannelConstraint.
To isolate iSCSI traffic, configure the iSCSI target with interfaces on a dedicated network (logical or physical). Use the corresponding interfaces on the cluster nodes when you configure the iSCSI initiator.
Isolate traffic for replication
To isolate Hyper-V Replica traffic, use a different subnet for the primary and Replica sites.
If you want to isolate the replica traffic to a particular network adapter, define a persistent static route that redirects the network traffic to the defined network adapter. To specify a static route, use the following command:
route add <destination> mask <subnet mask and gateway> if <interface> -p
For example, to add a static route to the 10.1.17.0 network (example network of the Replica site) that uses a subnet mask of 255.255.255.0, a gateway of 10.0.17.1 (example IP address of the primary site), where the interface number for the adapter that you want to dedicate to replica traffic is 8, run the following command:
route add 10.1.17.1 mask 255.255.255.0 10.0.17.1 if 8 -p
NIC Teaming (LBFO) recommendations
Team physical network adapters in the management operating system. This configuration provides bandwidth aggregation and network traffic failover if a network hardware failure or outage occurs.
The NIC Teaming feature, also known as load balancing and failover (LBFO), provides two basic sets of algorithms for teaming.
- Switch-dependent modes. Requires the switch to participate in the teaming process. Typically requires all the network adapters in the team to be connected to the same switch.
- Switch-independent modes. Doesn't require the switch to participate in the teaming process. Although not required, team network adapters can be connected to different switches.
Both modes provide bandwidth aggregation and traffic failover if a network adapter failure or network disconnection occurs. However, in most cases only switch-independent teaming provides traffic failover for a switch failure.
NIC Teaming also provides a traffic distribution algorithm that's optimized for Hyper-V workloads. This algorithm is referred to as the Hyper-V port load balancing mode. This mode distributes the traffic based on the MAC address of the virtual network adapters. The algorithm uses round robin as the load-balancing mechanism. For example, on a server that has two teamed physical network adapters and four virtual network adapters, the first and third virtual network adapter use the first physical adapter, and the second and fourth virtual network adapter use the second physical adapter. Hyper-V port mode also enables the use of hardware offloads such as virtual machine queue (VMQ) which reduces CPU overhead for networking operations.
NIC Teaming recommendations
For a clustered Hyper-V deployment, use the following settings when you configure the additional properties of a team.
| Property Name | Recommended Setting |
|---|---|
| Teaming mode | Switch Independent (the default setting) |
| Load balancing mode | Hyper-V Port |
Note
NIC teaming disables the RDMA capability of the network adapters. To use SMB Direct and the RDMA capability of the network adapters, don't use NIC Teaming.
For more information about the NIC Teaming modes and how to configure NIC Teaming settings, see Hyper-V Virtual Switch.
Quality of Service (QoS) recommendations
Use QoS technologies that are available in Windows Server to meet the service requirements of a workload or an application. QoS provides the following features:
- Measures network bandwidth, detects changing network conditions (such as congestion or availability of bandwidth), and prioritizes or throttles network traffic.
- Enables you to converge multiple types of network traffic on a single adapter.
- Includes a minimum bandwidth feature that guarantees a certain amount of bandwidth to a given type of traffic.
Configure appropriate Hyper-V QoS on the virtual switch to ensure that network requirements are met for all appropriate types of network traffic on the Hyper-V cluster.
Note
You can use QoS to control outbound traffic, but not the inbound traffic. For example, with Hyper-V Replica, you can use QoS to control outbound traffic (from the primary server), but not the inbound traffic (from the Replica server).
QoS recommendations
For a Hyper-V cluster, configure Hyper-V QoS that applies to the virtual switch. When you configure QoS, complete the following steps:
- Configure minimum bandwidth in weight mode instead of in bits per second. Minimum bandwidth specified by weight is more flexible and it's compatible with other features, such as live migration and NIC Teaming. For more information, see the MinimumBandwidthMode parameter in New-VMSwitch.
- Enable and configure QoS for all virtual network adapters. Assign a weight to all virtual adapters. For more information, see Set-VMNetworkAdapter. To make sure that all virtual adapters have a weight, configure the DefaultFlowMinimumBandwidthWeight parameter on the virtual switch to a reasonable value. For more information, see Set-VMSwitch.
The following table recommends some generic weight values. You can assign a value from 1 to 100. For guidelines to consider when you assign weight values, see QoS minimum bandwidth best practices.
| Network Classification | Weight |
|---|---|
| Default weight | 0 |
| Virtual machine access | 1, 3, or 5 (low, medium, and high-throughput virtual machines) |
| Cluster | 10 |
| Management | 10 |
| Replica traffic | 10 |
| Live migration | 40 |
| Storage | 40 |
Virtual machine queue (VMQ) recommendations
Virtual machine queue (VMQ) is a feature that's available to computers that have VMQ-capable network hardware. VMQ uses hardware packet filtering to deliver packet data from an external virtual network directly to virtual network adapters. This feature reduces the overhead of routing packets. When you enable VMQ, a dedicated queue is established on the physical network adapter for each virtual network adapter that requests a queue.
Not all physical network adapters support VMQ. Those that support VMQ have a fixed number of queues available, and the number varies. To determine whether a network adapter supports VMQ, and how many queues it supports, use the Get-NetAdapterVmq cmdlet.
You can assign virtual machine queues to any virtual network adapter. This capability includes virtual network adapters that you expose to the management operating system. Assign queues according to a weight value, in a first-come first-serve manner. By default, all virtual adapters have a weight of 100.
VMQ recommendations
Increase the VMQ weight for interfaces with heavy inbound traffic, such as storage and live migration networks. To do this, use the Set-VMNetworkAdapter Windows PowerShell cmdlet.
Example of converged networking: routing traffic through one Hyper-V virtual switch
The following Windows PowerShell script shows an example of how you can route traffic on a Hyper-V cluster through one Hyper-V external virtual switch. The example uses two physical 10 GB network adapters that are teamed by using the NIC Teaming feature. The script configures a Hyper-V cluster node with a management interface, a live migration interface, a cluster interface, and four SMB interfaces. After the script, there is more information about how to add an interface for Hyper-V Replica traffic. The following diagram shows the example network configuration.

The example also configures network isolation which restricts cluster traffic from the management interface, restricts SMB traffic to the SMB interfaces, and restricts live migration traffic to the live migration interface.
# Create a network team using switch independent teaming and Hyper-V port mode
New-NetLbfoTeam "PhysicalTeam" –TeamMembers "10GBPort1", "10GBPort2" –TeamNicName "PhysicalTeam" -TeamingMode SwitchIndependent -LoadBalancingAlgorithm HyperVPort

# Create a Hyper-V virtual switch connected to the network team
# Enable QoS in Weight mode
New-VMSwitch "TeamSwitch" –NetAdapterName "PhysicalTeam" –MinimumBandwidthMode Weight –AllowManagementOS $false

# Configure the default bandwidth weight for the switch
# Ensures all virtual NICs have a weight
Set-VMSwitch -Name "TeamSwitch" -DefaultFlowMinimumBandwidthWeight 0

# Create virtual network adapters on the management operating system
# Connect the adapters to the virtual switch
# Set the VLAN associated with the adapter
# Configure the VMQ weight and minimum bandwidth weight
Add-VMNetworkAdapter –ManagementOS –Name "Management" –SwitchName "TeamSwitch"
Set-VMNetworkAdapterVlan -ManagementOS -VMNetworkAdapterName "Management" -Access -VlanId 10
Set-VMNetworkAdapter -ManagementOS -Name "Management" -VmqWeight 80 -MinimumBandwidthWeight 10

Add-VMNetworkAdapter –ManagementOS –Name "Cluster" –SwitchName "TeamSwitch"
Set-VMNetworkAdapterVlan -ManagementOS -VMNetworkAdapterName "Cluster" -Access -VlanId 11
Set-VMNetworkAdapter -ManagementOS -Name "Cluster" -VmqWeight 80 -MinimumBandwidthWeight 10

Add-VMNetworkAdapter –ManagementOS –Name "Migration" –SwitchName "TeamSwitch"
Set-VMNetworkAdapterVlan -ManagementOS -VMNetworkAdapterName "Migration" -Access -VlanId 12
Set-VMNetworkAdapter -ManagementOS -Name "Migration" -VmqWeight 90 -MinimumBandwidthWeight 40

Add-VMNetworkAdapter –ManagementOS –Name "SMB1" –SwitchName "TeamSwitch"
Set-VMNetworkAdapterVlan -ManagementOS -VMNetworkAdapterName "SMB1" -Access -VlanId 13
Set-VMNetworkAdapter -ManagementOS -Name "SMB1" -VmqWeight 100 -MinimumBandwidthWeight 40

Add-VMNetworkAdapter –ManagementOS –Name "SMB2" –SwitchName "TeamSwitch"
Set-VMNetworkAdapterVlan -ManagementOS -VMNetworkAdapterName "SMB2" -Access -VlanId 14
Set-VMNetworkAdapter -ManagementOS -Name "SMB2" -VmqWeight 100 -MinimumBandwidthWeight 40

Add-VMNetworkAdapter –ManagementOS –Name "SMB3" –SwitchName "TeamSwitch"
Set-VMNetworkAdapterVlan -ManagementOS -VMNetworkAdapterName "SMB3" -Access -VlanId 15
Set-VMNetworkAdapter -ManagementOS -Name "SMB3" -VmqWeight 100 -MinimumBandwidthWeight 40

Add-VMNetworkAdapter –ManagementOS –Name "SMB4" –SwitchName "TeamSwitch"
Set-VMNetworkAdapterVlan -ManagementOS -VMNetworkAdapterName "SMB4" -Access -VlanId 16
Set-VMNetworkAdapter -ManagementOS -Name "SMB4" -VmqWeight 100 -MinimumBandwidthWeight 40

# Rename the cluster networks if desired
(Get-ClusterNetwork | Where-Object {$_.Address -eq "10.0.10.0"}).Name = "Management_Network"
(Get-ClusterNetwork | Where-Object {$_.Address -eq "10.0.11.0"}).Name = "Cluster_Network"
(Get-ClusterNetwork | Where-Object {$_.Address -eq "10.0.12.0"}).Name = "Migration_Network"
(Get-ClusterNetwork | Where-Object {$_.Address -eq "10.0.13.0"}).Name = "SMB_Network1"
(Get-ClusterNetwork | Where-Object {$_.Address -eq "10.0.14.0"}).Name = "SMB_Network2"
(Get-ClusterNetwork | Where-Object {$_.Address -eq "10.0.15.0"}).Name = "SMB_Network3"
(Get-ClusterNetwork | Where-Object {$_.Address -eq "10.0.16.0"}).Name = "SMB_Network4"

# Configure the cluster network roles
(Get-ClusterNetwork -Name "Management_Network").Role = 3
(Get-ClusterNetwork -Name "Cluster_Network").Role = 1
(Get-ClusterNetwork -Name "Migration_Network").Role = 1
(Get-ClusterNetwork -Name "SMB_Network1").Role = 0
(Get-ClusterNetwork -Name "SMB_Network2").Role = 0
(Get-ClusterNetwork -Name "SMB_Network3").Role = 0
(Get-ClusterNetwork -Name "SMB_Network4").Role = 0

# Configure an SMB Multichannel constraint
# This ensures that SMB traffic from the named server only uses SMB interfaces
New-SmbMultichannelConstraint -ServerName "FileServer1" -InterfaceAlias "vEthernet (SMB1)", "vEthernet (SMB2)", "vEthernet (SMB3)", "vEthernet (SMB4)"

# Configure the live migration network
Get-ClusterResourceType -Name "Virtual Machine" | Set-ClusterParameter -Name MigrationExcludeNetworks -Value ([String]::Join(";",(Get-ClusterNetwork | Where-Object {$_.Name -ne "Migration_Network"}).ID))
Hyper-V Replica considerations
If you also use Hyper-V Replica in your environment, you can add another virtual network adapter to the management operating system for replica traffic. For example:
Add-VMNetworkAdapter –ManagementOS –Name "Replica" –SwitchName "TeamSwitch"
Set-VMNetworkAdapterVlan -ManagementOS -VMNetworkAdapterName "Replica" –Access –VlanId 17
Set-VMNetworkAdapter -ManagementOS -Name "Replica" -VmqWeight 80 -MinimumBandwidthWeight 10

# If the host is clustered – configure the cluster name and role
(Get-ClusterNetwork | Where-Object {$_.Address -eq "10.0.17.0"}).Name = "Replica"
(Get-ClusterNetwork -Name "Replica").Role = 3
Note
If you're instead using policy-based QoS, where you can throttle outgoing traffic regardless of the interface on which it is sent, you can use either of the following methods to throttle Hyper-V Replica traffic: Create a QoS policy that is based on the destination port. In the following example, the network listener on the Replica server or cluster is configured to use port 8080 to receive replication traffic.
Appendix: Encryption
Cluster traffic encryption
By default, cluster communication isn't encrypted. You can enable encryption if you want. However, encryption adds performance overhead. To enable encryption, use the following Windows PowerShell command to set the security level for the cluster.
(Get-Cluster). SecurityLevel = 2
The following table shows the different security level values.
| Security Description | Value |
|---|---|
| Clear text | 0 |
| Signed (default) | 1 |
| Encrypted | 2 |
Live migration traffic encryption
Live migration traffic isn't encrypted. You can enable IPsec or other network layer encryption technologies if you want. However, encryption technologies typically affect performance.
SMB traffic
By default, SMB traffic isn't encrypted. Therefore, use a dedicated network (physical or logical) or use encryption. For SMB traffic, you can use SMB encryption, layer-2, or layer-3 encryption. SMB encryption is the preferred method.
Replica traffic encryption
If you use Kerberos-based authentication, Hyper-V Replica traffic isn't encrypted. Encrypt replication traffic that transits public networks over the WAN or the Internet. Use Secure Sockets Layer (SSL) encryption as the encryption method. You can also use IPsec. However, using IPsec might significantly affect performance.