Note
Access to this page requires authorization. You can try signing in or changing directories.
Access to this page requires authorization. You can try changing directories.
This article describes how to configure graphics processing unit (GPU) partitions and assign a partition to a virtual machine (VM). It provides instructions on how to configure GPU partition count, assign GPU partitions, and unassign GPU partitions via Windows Admin Center and PowerShell.
To provision the GPU partitioning feature, you need to complete the following steps:
- Complete all the prerequisites.
- Verify GPU driver installation.
- Configure partition count.
- Assign GPU partition to a VM.
- If necessary, unassign a GPU partition from a VM.
Prerequisites
There are several requirements and things to consider before you begin to use the GPU partitioning feature:
Prerequisites for the host server
You must have Windows Server 2025 installed on the host server. If clustering is required when live migrating a virtual machine host, Windows Server 2025 Datacenter must be installed.
The Hyper-V role installed and configured on your server. See Install the Hyper-V role on Windows Server to found out how to get stared.
Install the physical GPU device of the same make, model, and size on every server of the cluster. Refer to your OEM-provided documentation when installing the GPU device on your physical servers in the cluster.
Install the GPU drivers on every server of the cluster by following instructions from your GPU IHVs. For NVIDIA GPU drivers, see the NVIDIA vGPU documentation.
Ensure that the virtualization support and SR-IOV are enabled in the BIOS of each server in the cluster. Reach out to your system vendor if you're unable to identify the correct setting in your BIOS.
Cluster hosts need to have Input/Output Memory Management Unit (IOMMU) DMA bit tracking capable processors. For example, processors supporting Intel VT-D or AMD-Vi.
Note
When live migrating a virtual machine with a GPU partition assigned, Hyper-V live migration will automatically fall back to using TCP/IP with compression. This has the potential effect of increasing the CPU utilization of a host. In addition, live migrations could take longer than with virtual machines without GPU partitions attached.
Prerequisites for the VMs
Deploy a VM using a guest operating system from the Supported guest operating systems list.
Install the GPU drivers on the VM by following instructions from your GPU IHVs. For NVIDIA GPU drivers, see the NVIDIA vGPU documentation.
Prerequisites for Windows Admin Center
If you're using Windows Admin Center to provision GPU partitioning, you must install the latest version of Windows Admin Center with the GPUs extension, version 2.8.0 or later. For instructions on how to install the GPUs extensions in Windows Admin Center, see Installing an extension.
After you install the extension, it appears under the Installed extensions tab as shown in the following screenshot. Make sure the version of the GPUs extension is 2.8.0 or later.

Prerequisites for PowerShell
If you're using PowerShell to provision GPU partitioning, you must run all PowerShell commands as the Administrator user.
For detailed information on how to use PowerShell commands for GPU partitioning, see the Add-VMGpuPartitionAdapter, Get-VMGpuPartitionAdapter, and Remove-VMGpuPartitionAdapter reference documentation.
Verify GPU driver installation
After you complete all the prerequisites, you must verify if the GPU driver is installed and partitionable.
Follow these steps to verify if the GPU driver is installed and partitionable using Windows Admin Center:
Launch Windows Admin Center and make sure the GPUs extension is already installed.
Select Cluster Manager from the top dropdown menu and connect to your cluster.
From the Settings menu, select Extensions > GPUs.
The GPUs tab on the GPU page displays inventory of all the servers and the physical GPUs that are installed on each server.
Check the Assigned status column for each GPU for all the servers. The Assigned status column can have one of these statuses:
Ready for DDA assignment. Indicates that the GPU is available for DDA assignment. You can't use it for GPU partitioning.
Partitioned. Indicates that the GPU is partitionable.
Paravirtualization. Indicates that the GPU has the partitioned driver capability installed but SR-IOV on the server isn't enabled.
Not assignable. Indicates that the GPU isn't assignable because it's an older PCI-style device or switch port.
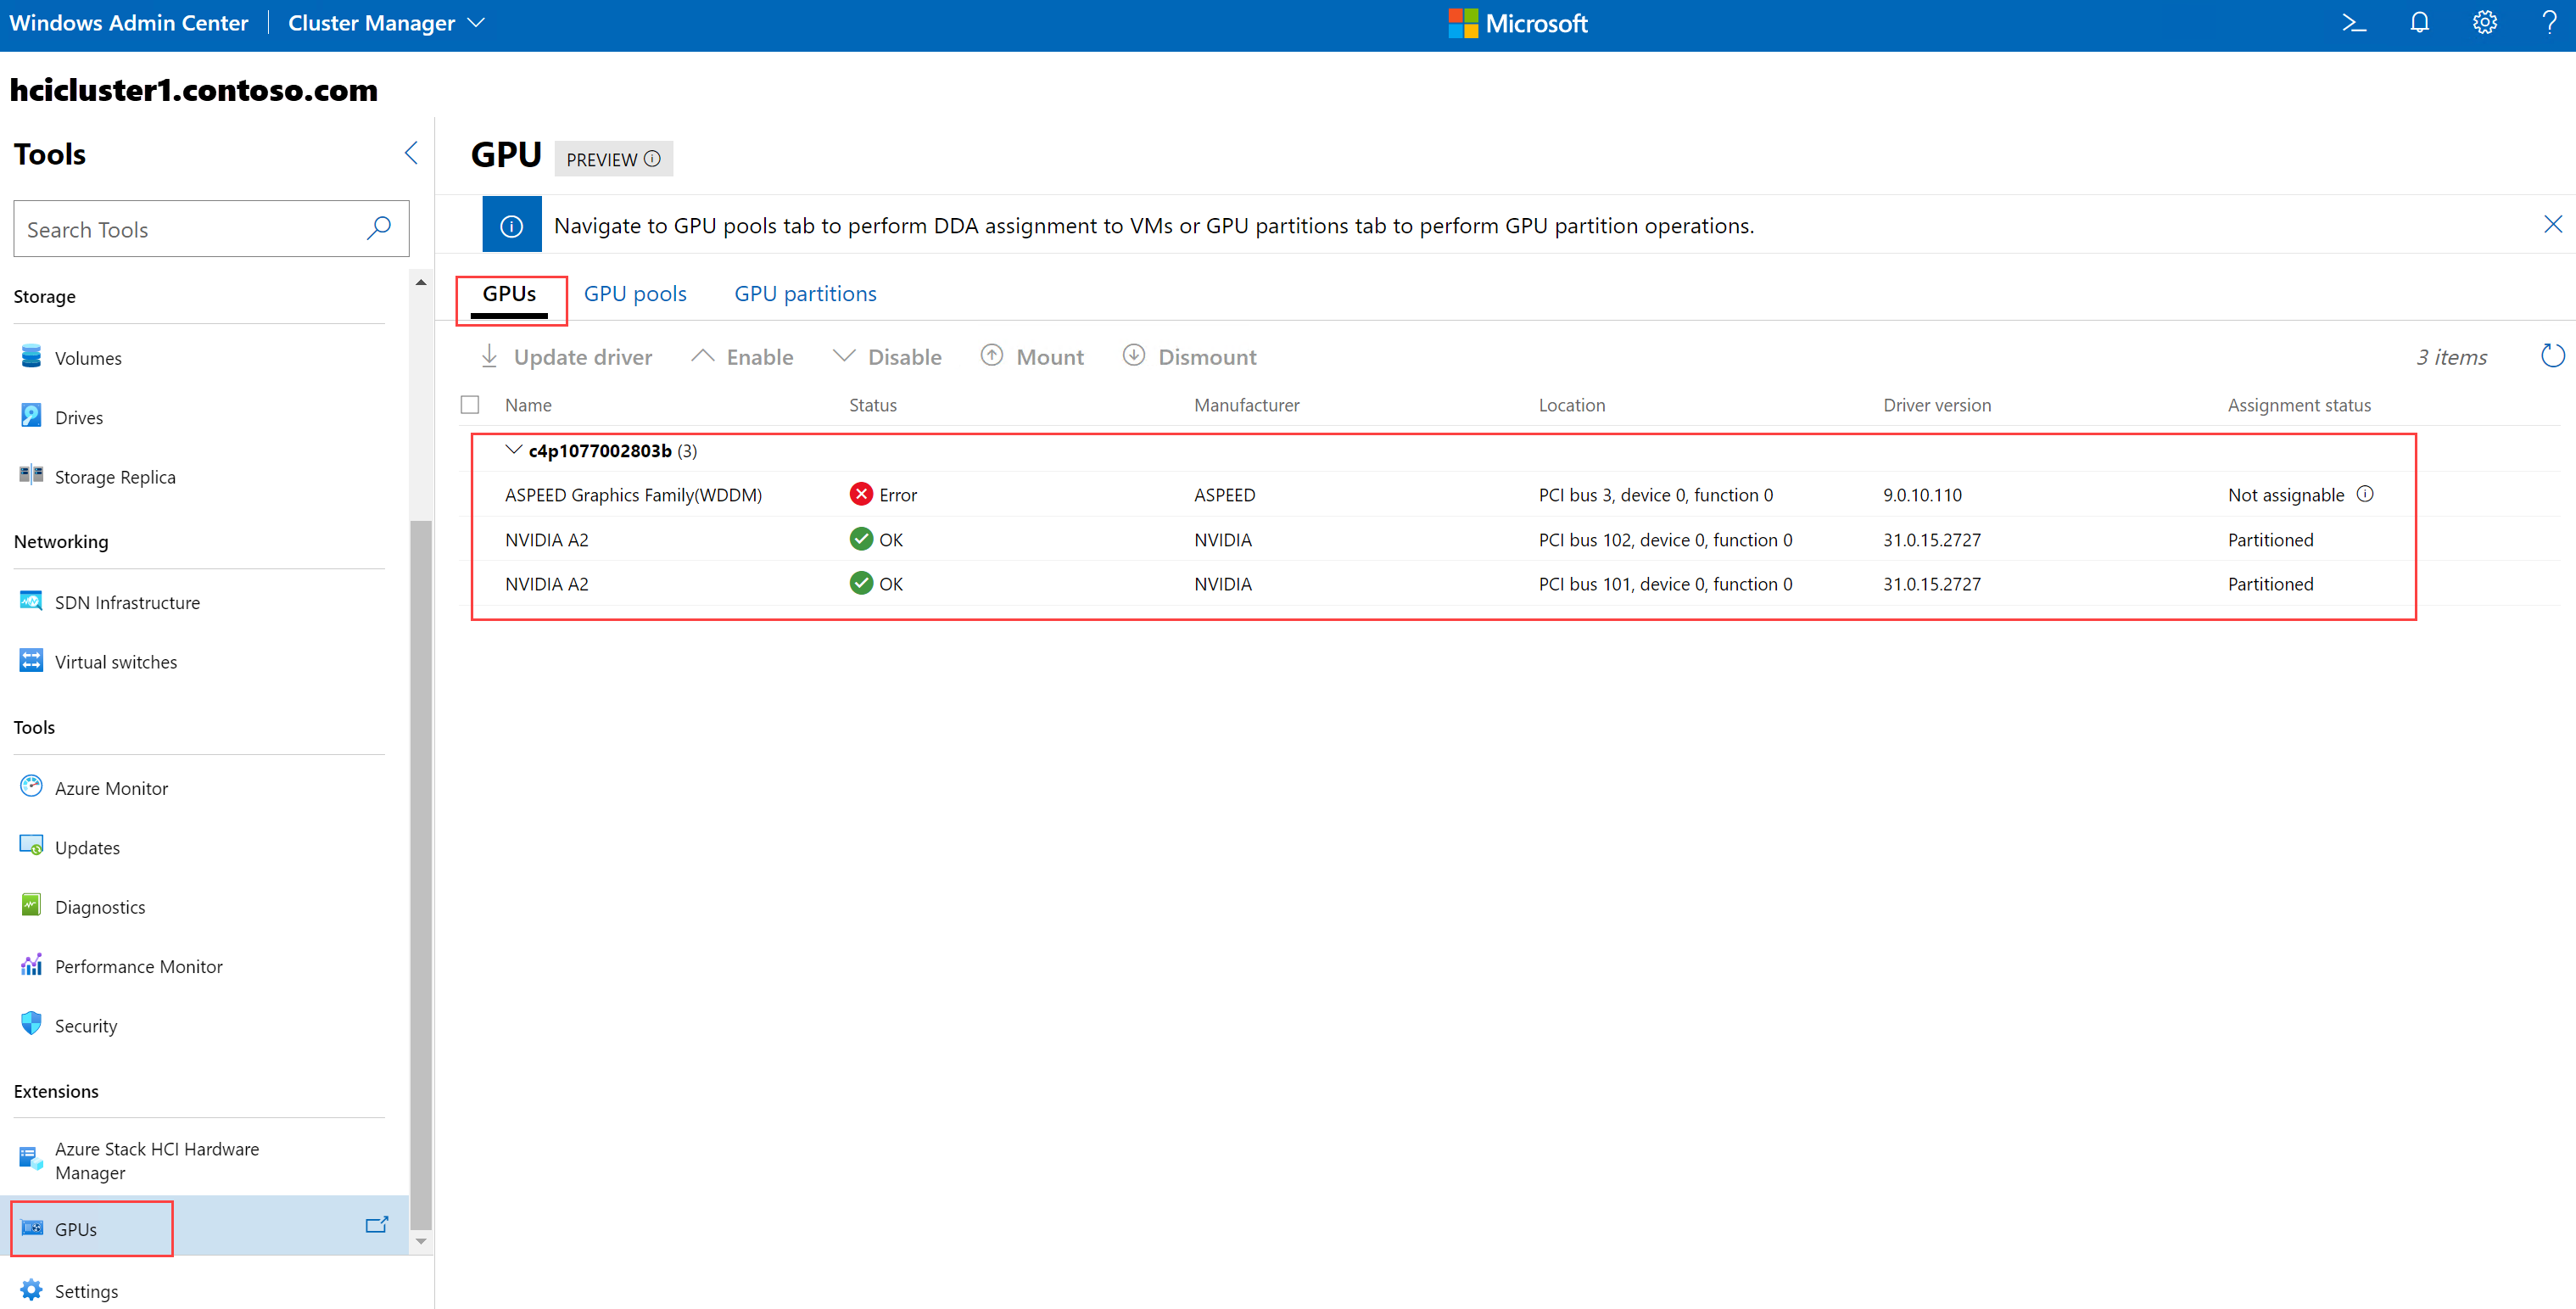
Proceed further in the GPU partitioning workflow only if the Assigned status column shows Partitioned for the GPUs in all the servers in your cluster.

Configure GPU partition count
Each partitionable GPU comes with a set of valid partition counts that's predefined by its OEM. You can't define the number of partitions a GPU can have. However, you can configure the partition count to any of the valid count from within the supported set.
Follow these steps to configure partition count via Windows Admin Center:
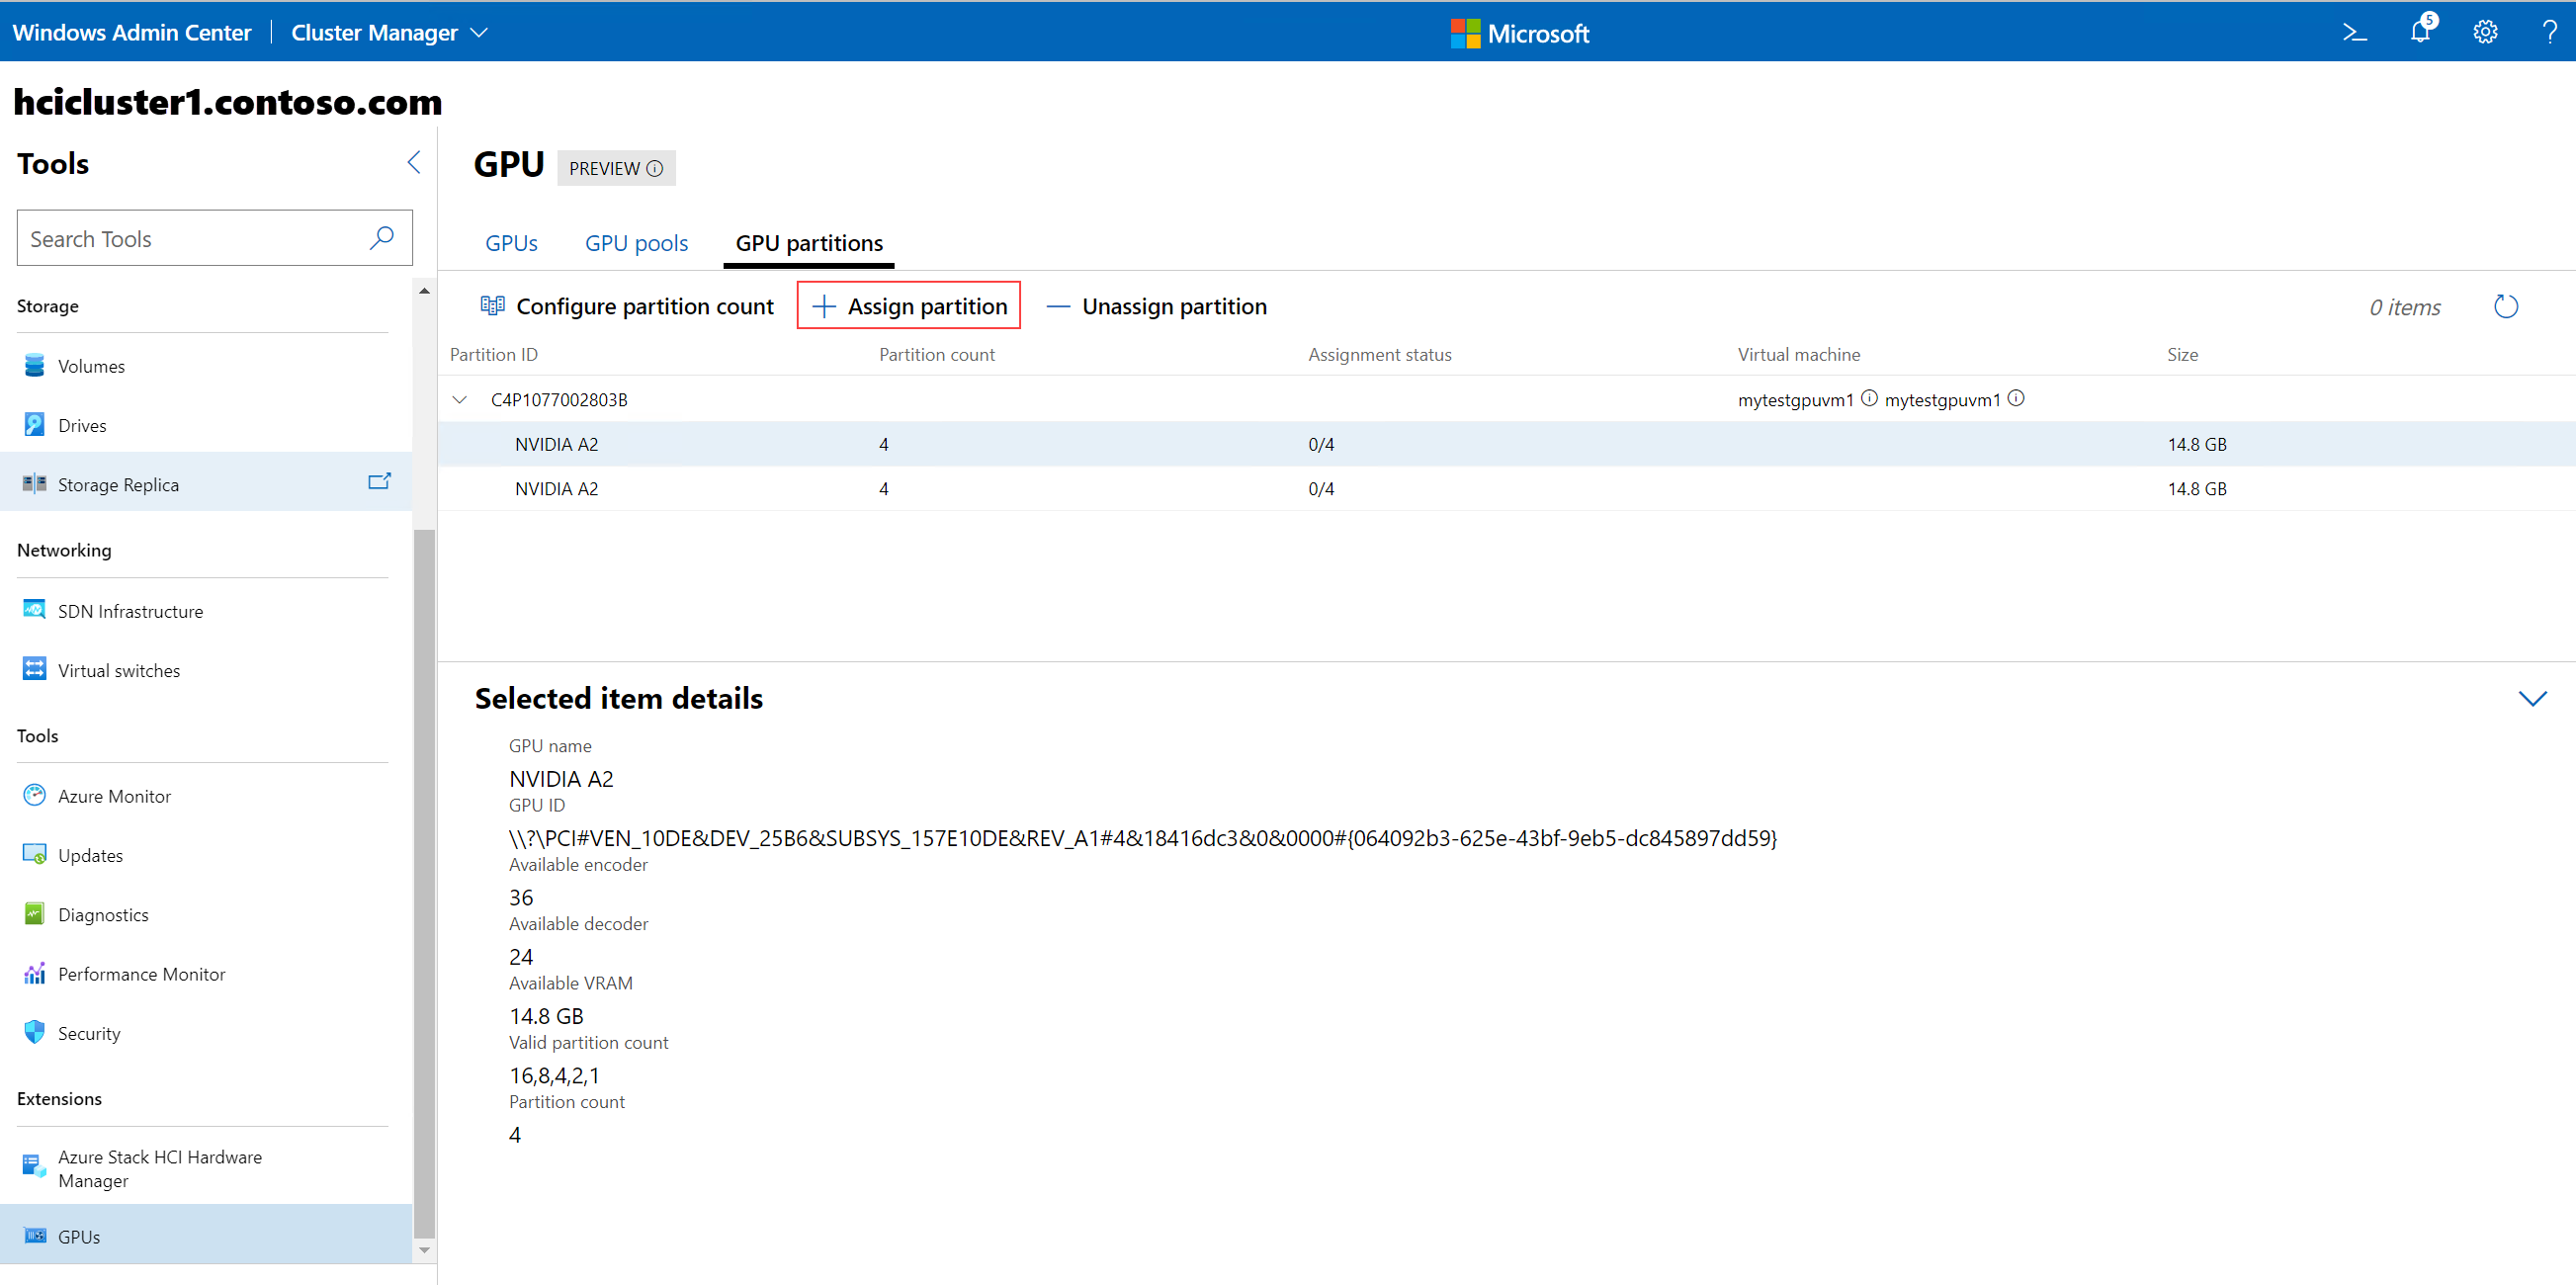
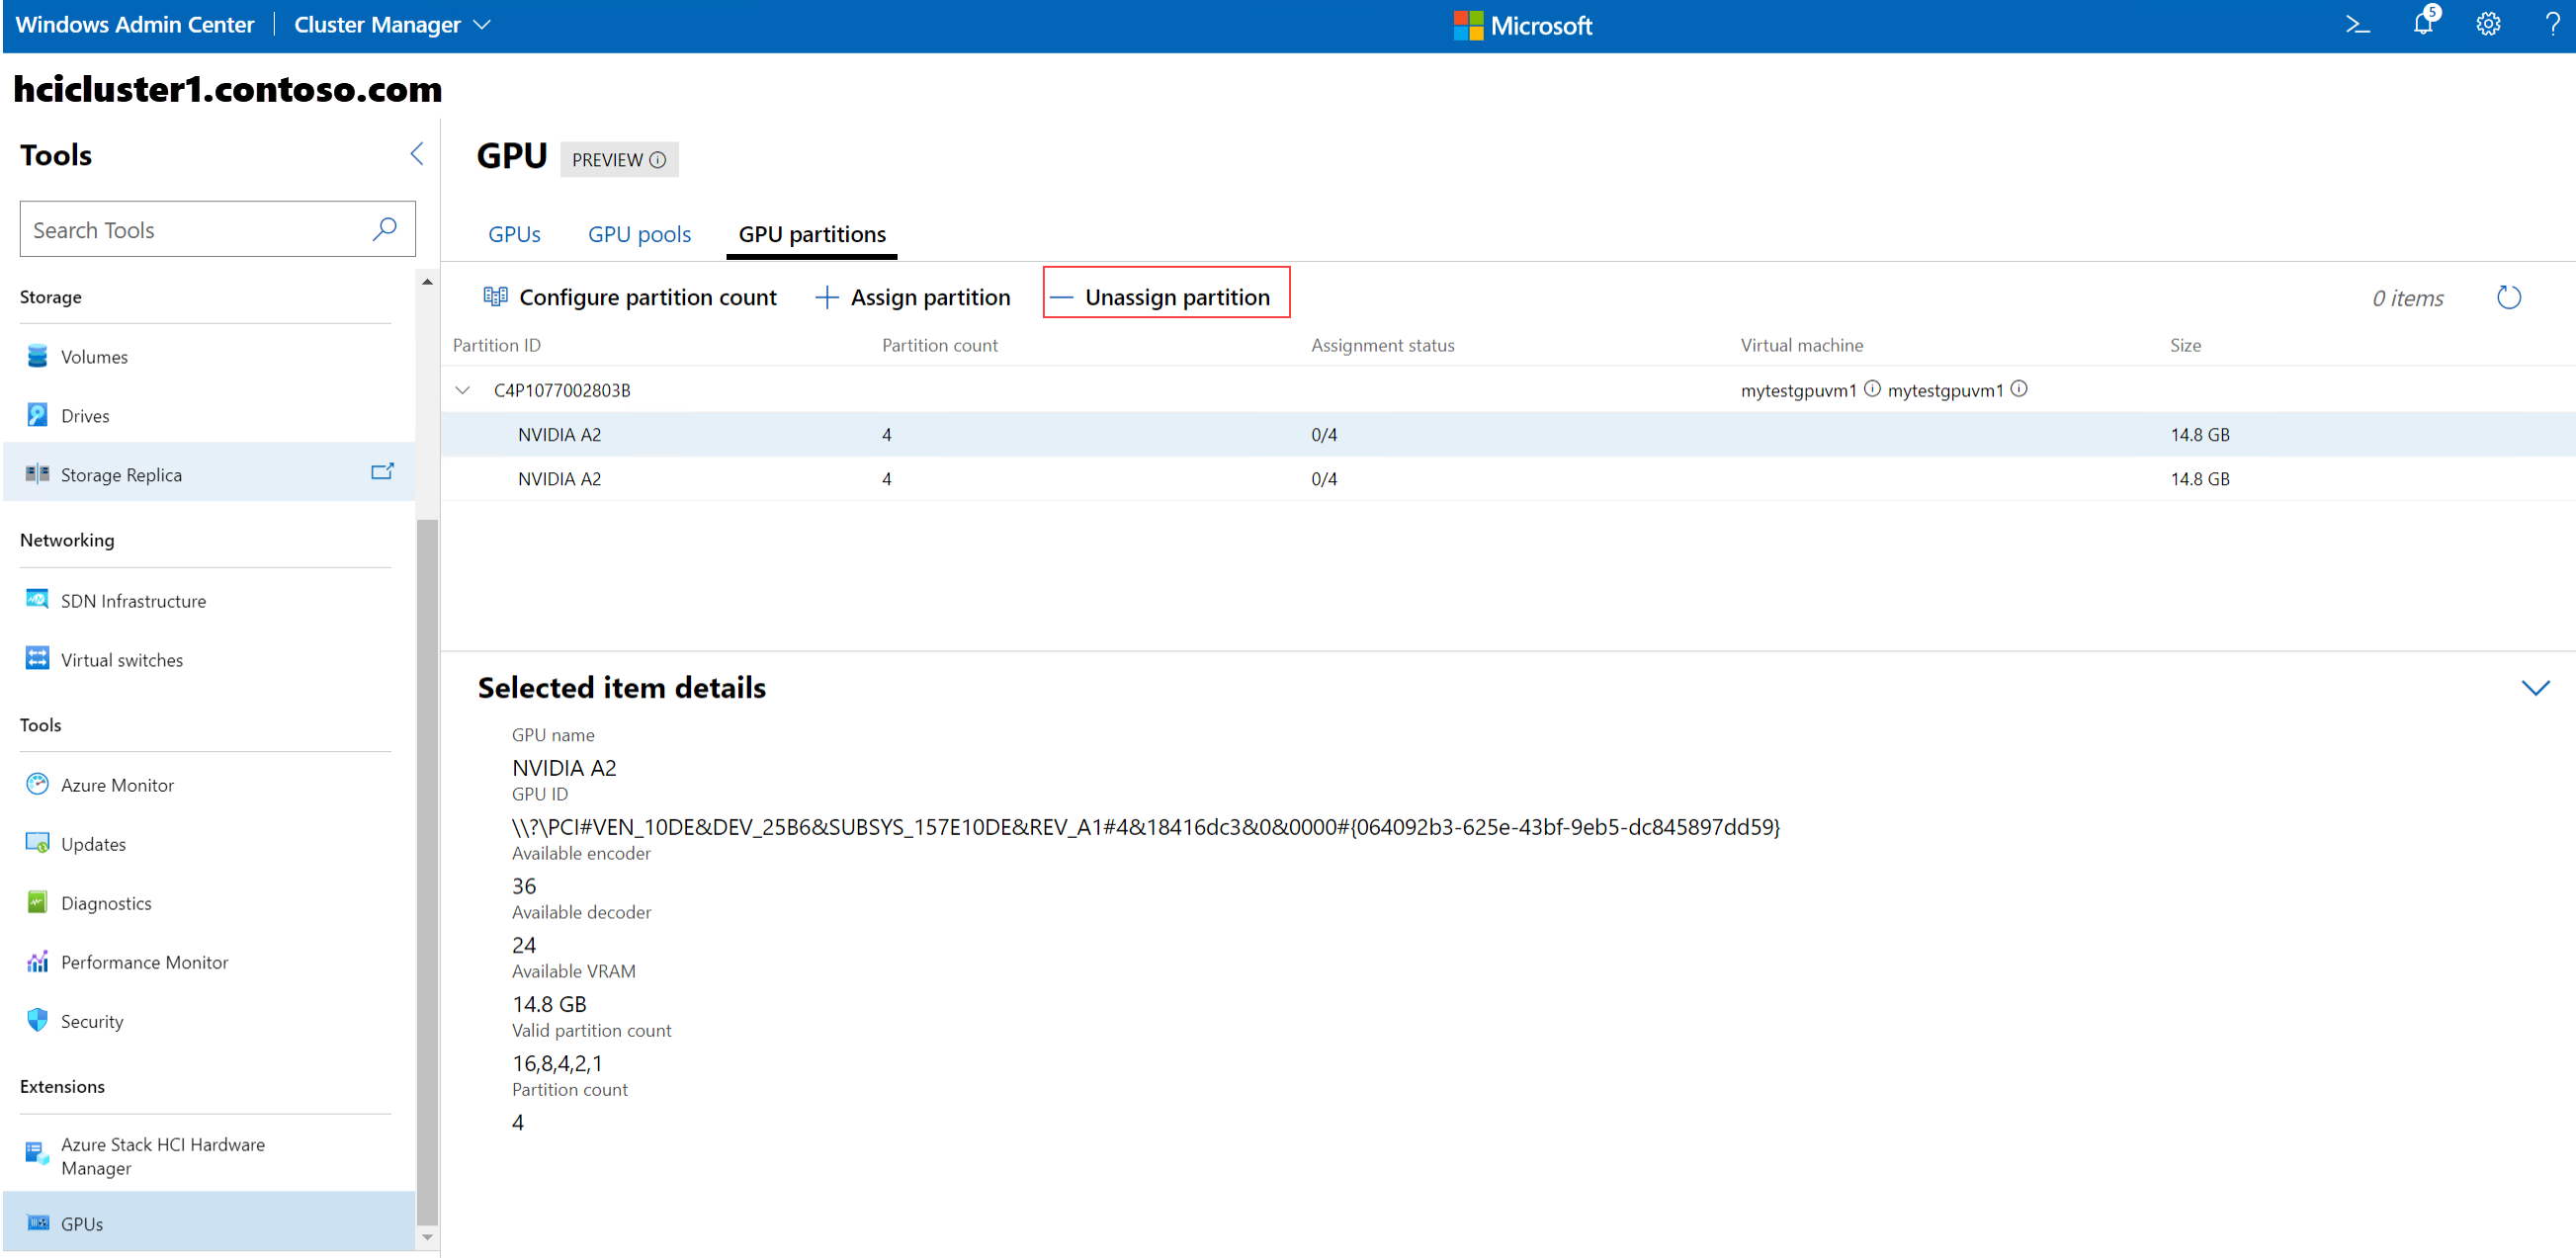
Select the GPU partitions tab to configure partition counts. You can also assign partition to VMs and unassign partitions from VMs using this tab.
Note
If there are no partitionable GPUs available in your cluster or the correct GPU partitioning driver isn't installed, the GPU partitions tab displays the following message:
No partitionable GPUs have been found. Please check that you have a GPU with the correct GPU-P driver to proceed.
Select a GPU or a GPU partition to display its details in the bottom section of the page, under Selected item details. For example, if you select a GPU, it displays the GPU name, GPU ID, available encoder and decoder, available VRAM, valid partition count, and the current partition count. If you select a GPU partition, it displays the partition ID, VM ID, instance path, partition VRAM, partition encode, and partition decode.
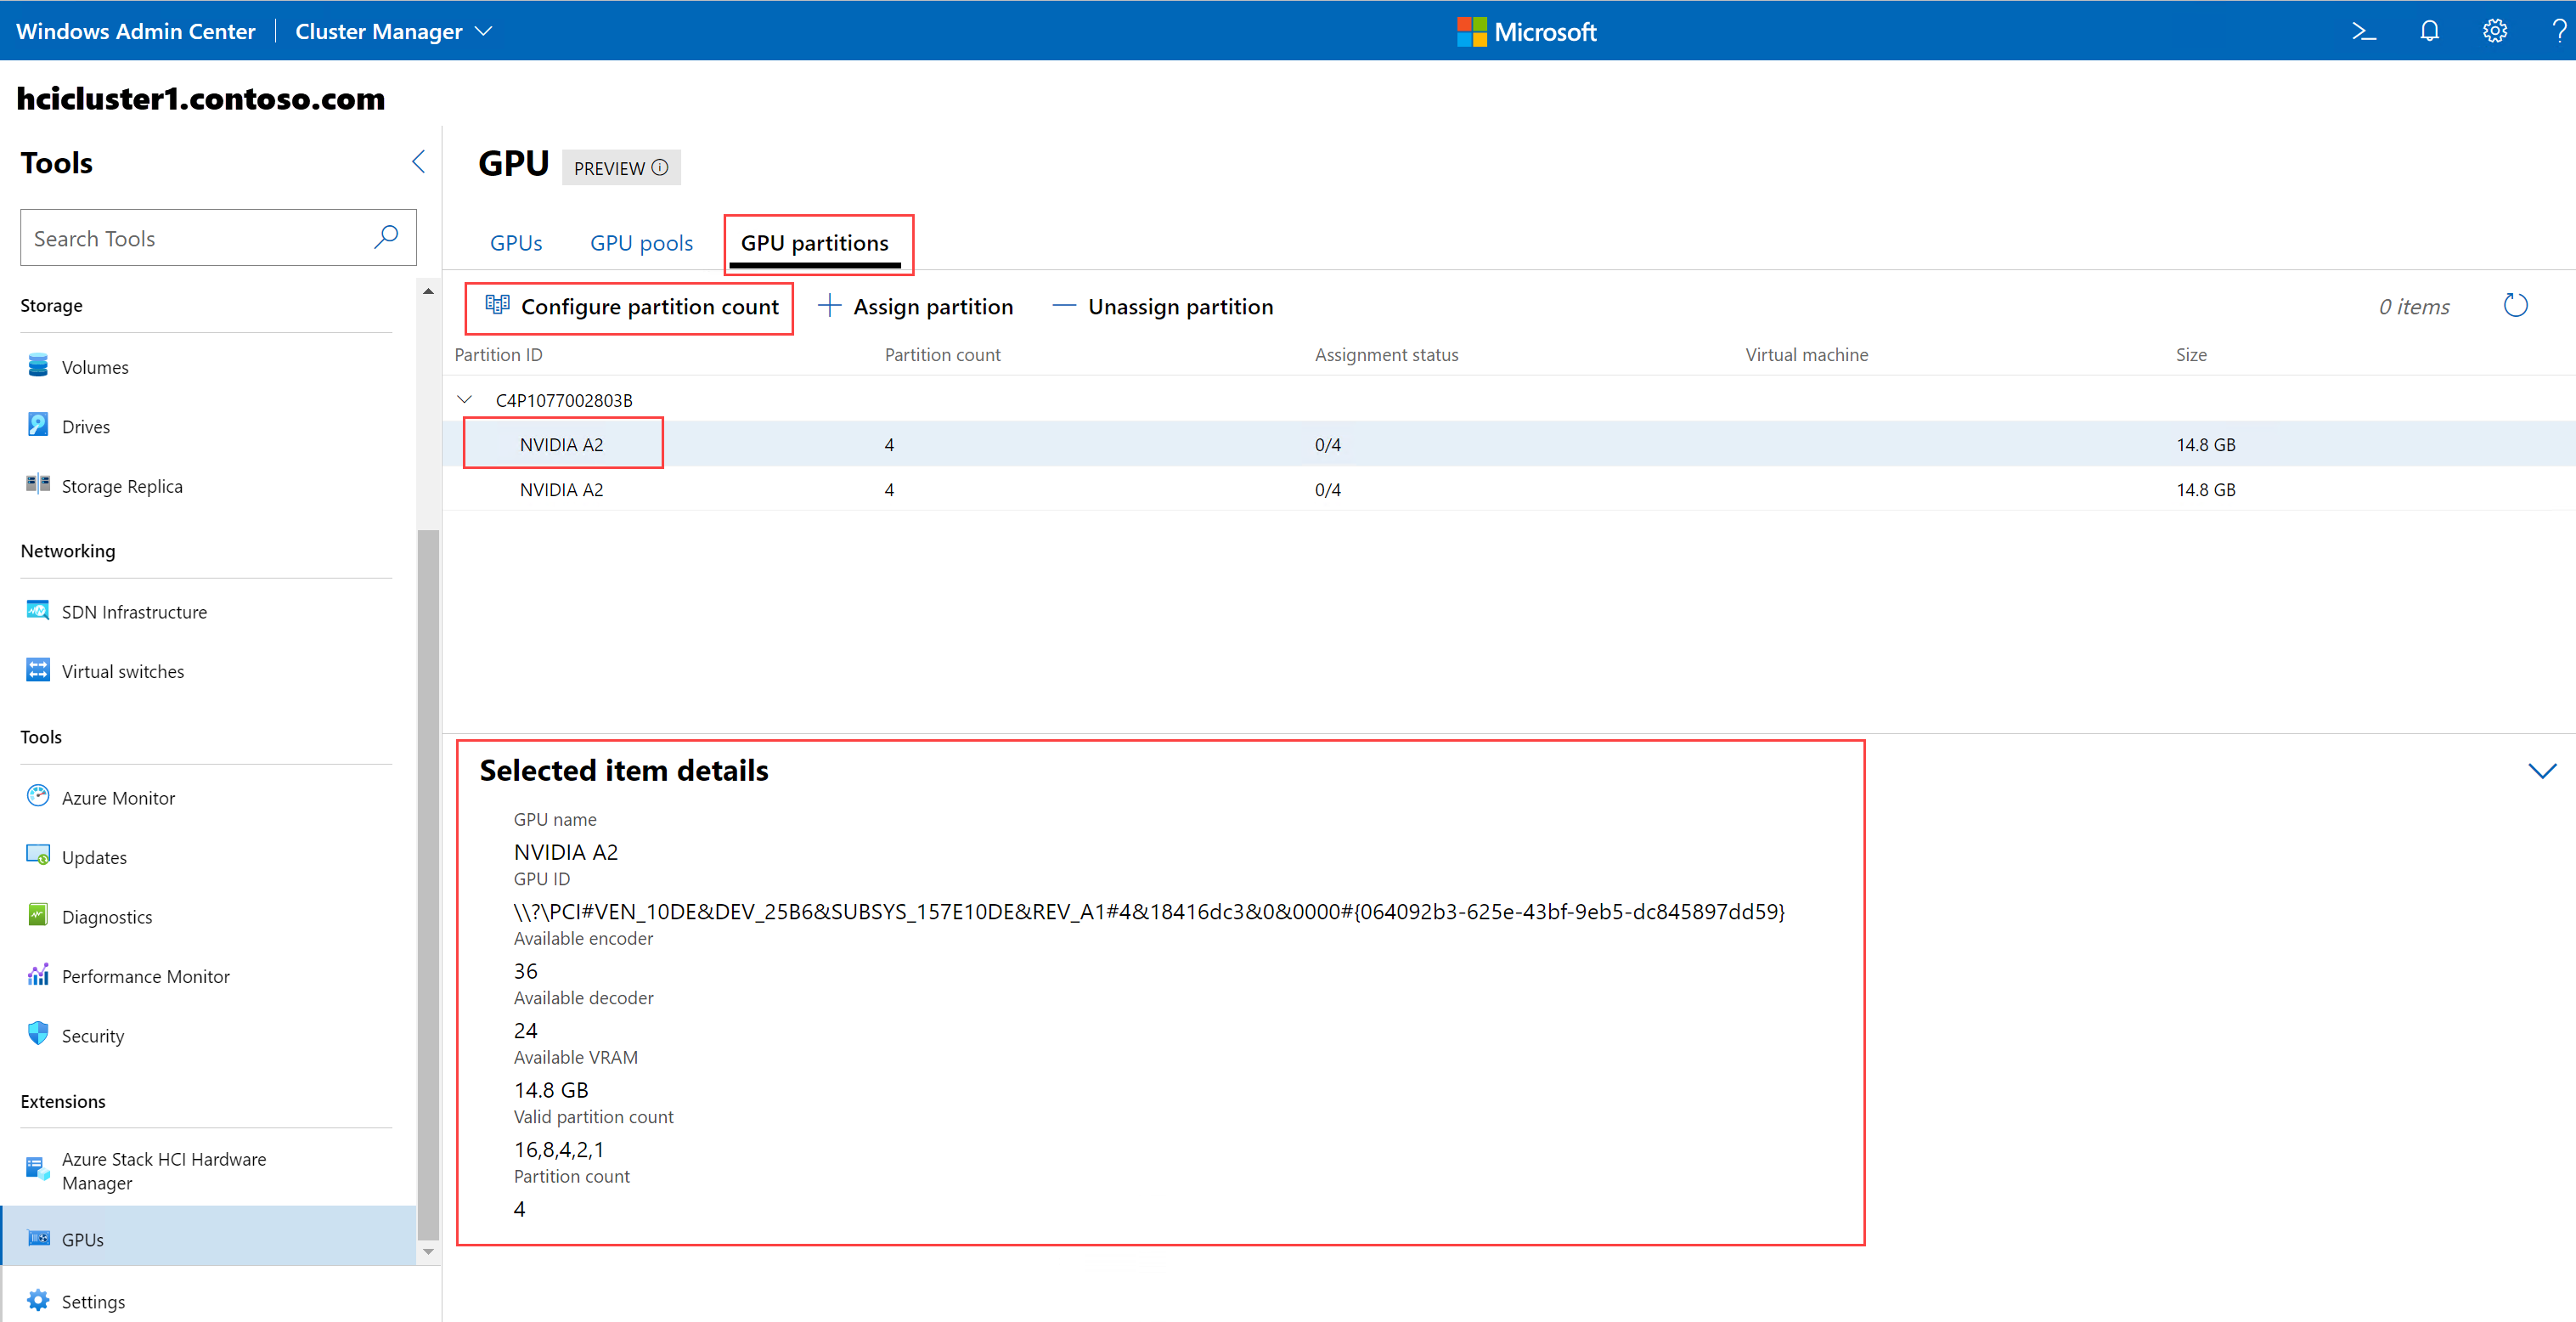
Select Configure partition count.
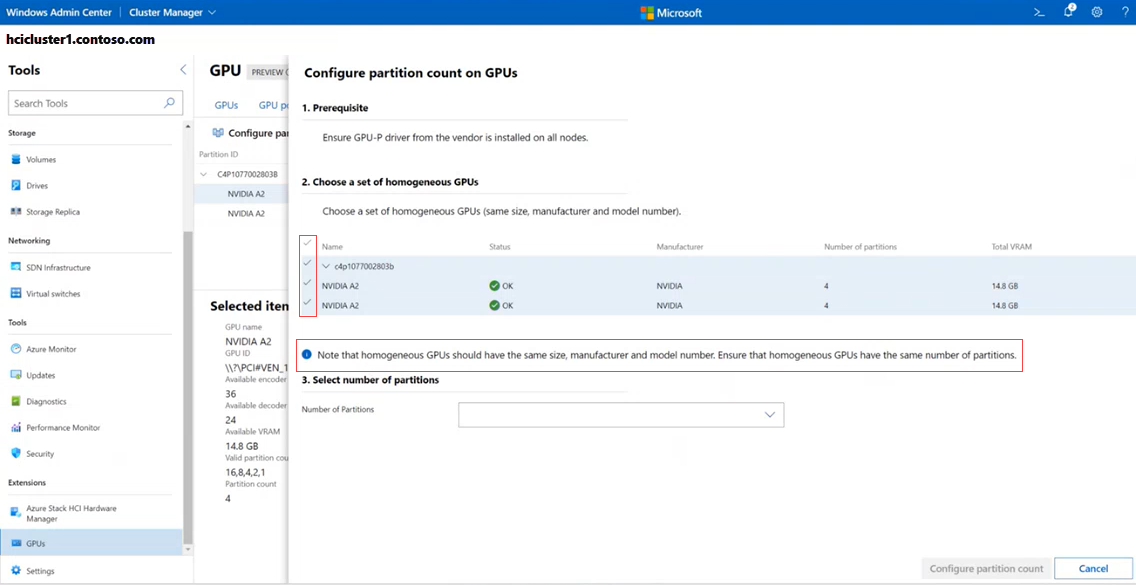
The Configure partition count on GPUs page is displayed. For each server, it displays the GPU devices installed on them.
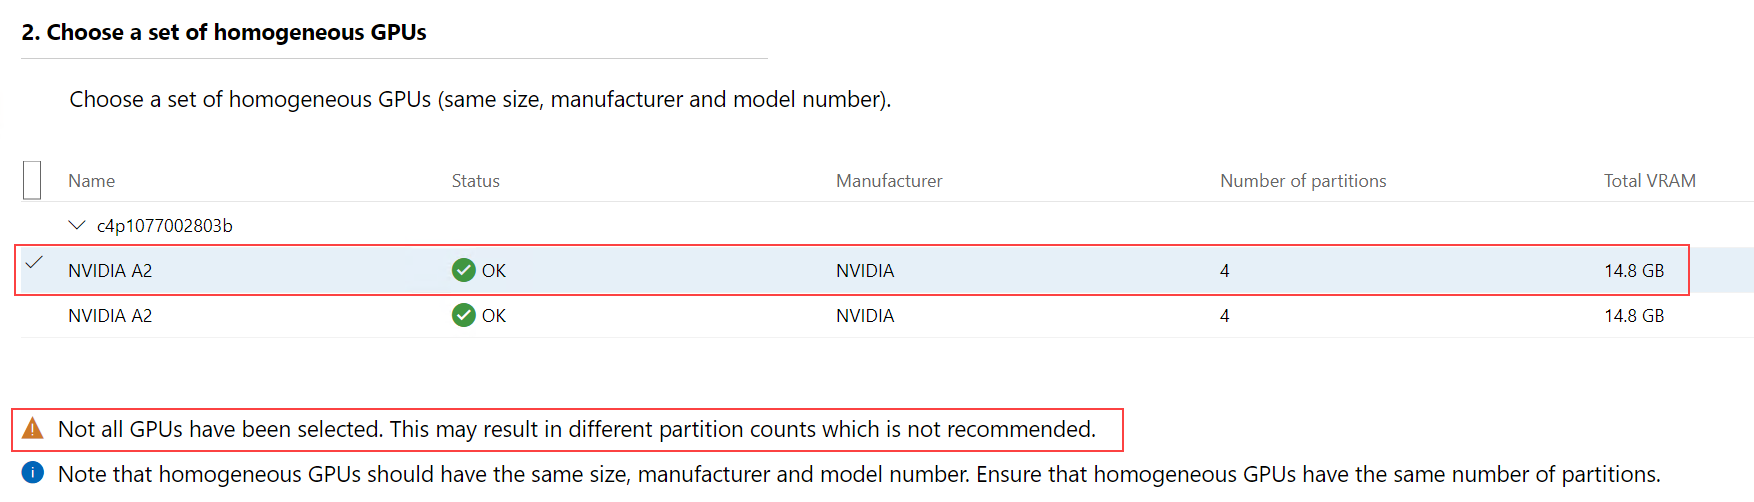
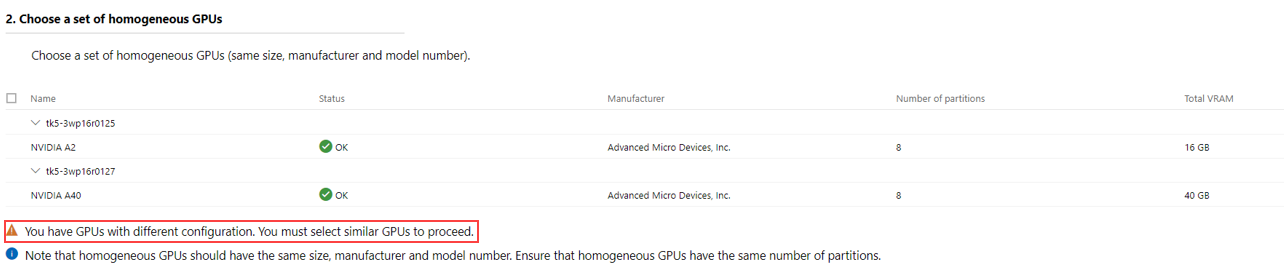
Select a set of homogeneous GPUs. A set of homogeneous GPUs is the one that has GPUs of the same size, manufacturer, model number, and number of partitions. By default, Windows Admin Center automatically selects a set of homogenous GPUs if it detects one, as shown in the following screenshot:
You might see a warning or an error depending on what selections you make:
Warning. If you deselect one or more GPUs from the homogeneous set of GPUs, Windows Admin Center gives you a warning, but doesn't stop you from proceeding further. Warning text indicates that you're not selecting all the GPUs and it might result in different partition count, which isn't recommended.
Warning. If not all the GPUs across all the servers have the same configuration, Windows Admin Center gives a warning. You must manually select the GPUs with the same configuration to proceed further.
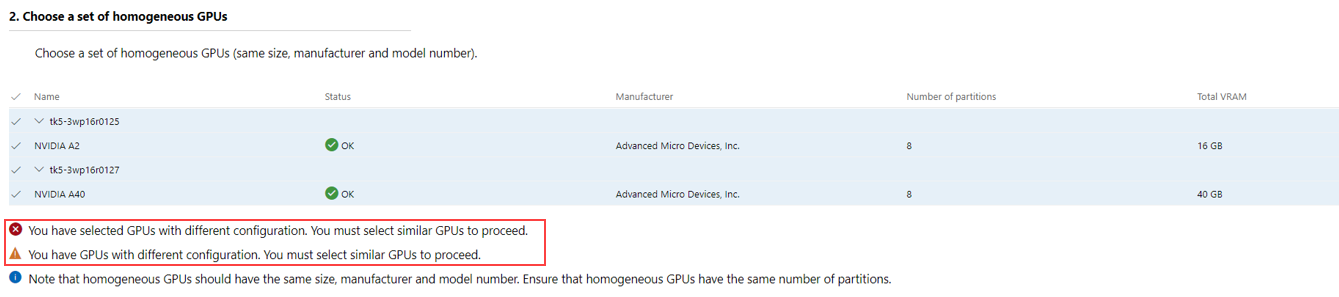
Error. If you select GPUs with different configurations, Windows Admin Center gives you an error, and doesn't let you proceed.
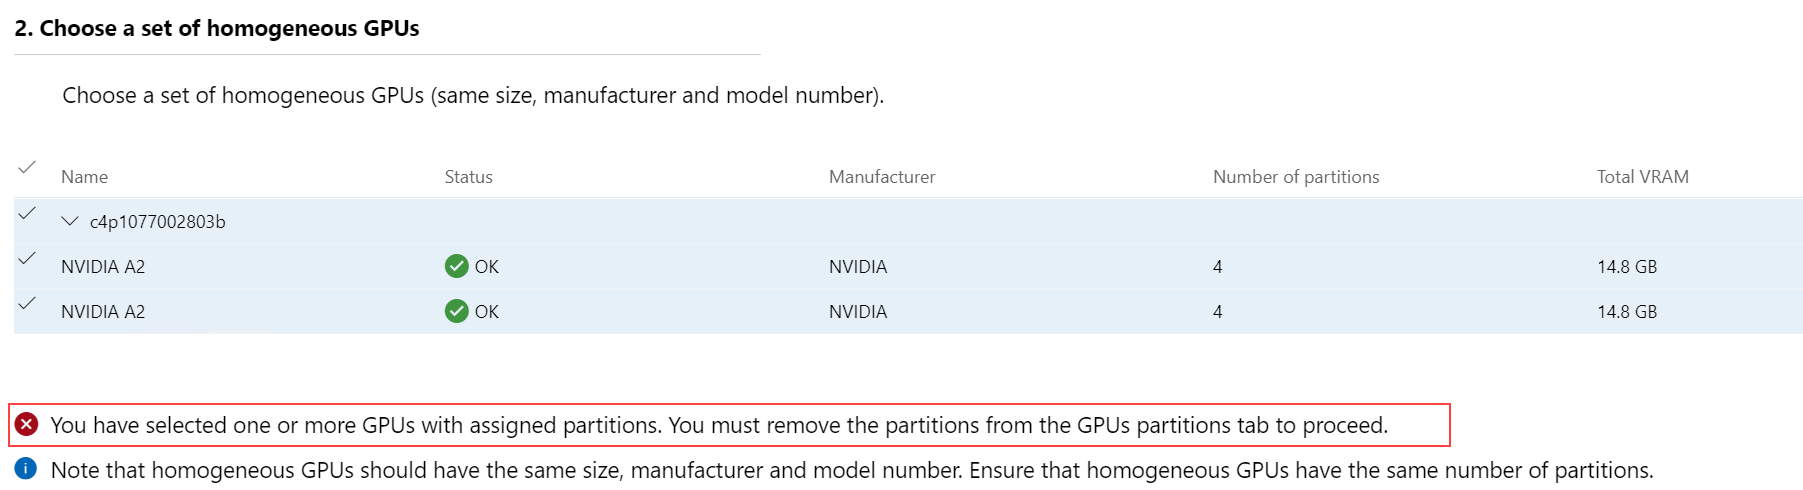
Error. If you select a GPU partition that is already assigned to a VM, Windows Admin Center gives you an error, and doesn't let you proceed. You must first unassign the partition from the VM before proceeding further. See Unassign a partition from a VM.
After you select a homogeneous set of GPUs, select the partition count from the Number of Partitions dropdown list. This list automatically populates the partition counts configured by your GPU manufacturer. The counts displayed in the list can vary depending on the type of GPU you selected.
As soon as you select a different partition count, a tooltip appears below the dropdown list, which dynamically displays the size of VRAM that each partition gets. For example, if the total VRAM is 16 GB for 16 partitions in the GPU, changing the partition count from 16 to 8 assigns each partition with 1.85 GB of VRAM.

Select Configure partition count.
After the partition count is configured, Windows Admin Center notifies you that the partition count is successfully configured and displays the GPU partitions tab again. You can see the new partition count for the GPU partition under the Partition count column.


Assign GPU partition to a VM
Save your workloads before assigning partition to the VM.
Note
Currently, you can assign only a single GPU partition to a VM. Both the VM and the GPU partition need to be on the same host machine. We recommend that you plan ahead and determine the GPU partition size based on your workload performance requirements.
You must save your workloads before assigning partitions. If your VM is currently turned on or running, Windows Admin Center automatically turns it off, assigns the partition, and then automatically turns it on.
On the GPU partitions tab, select + Assign partition.
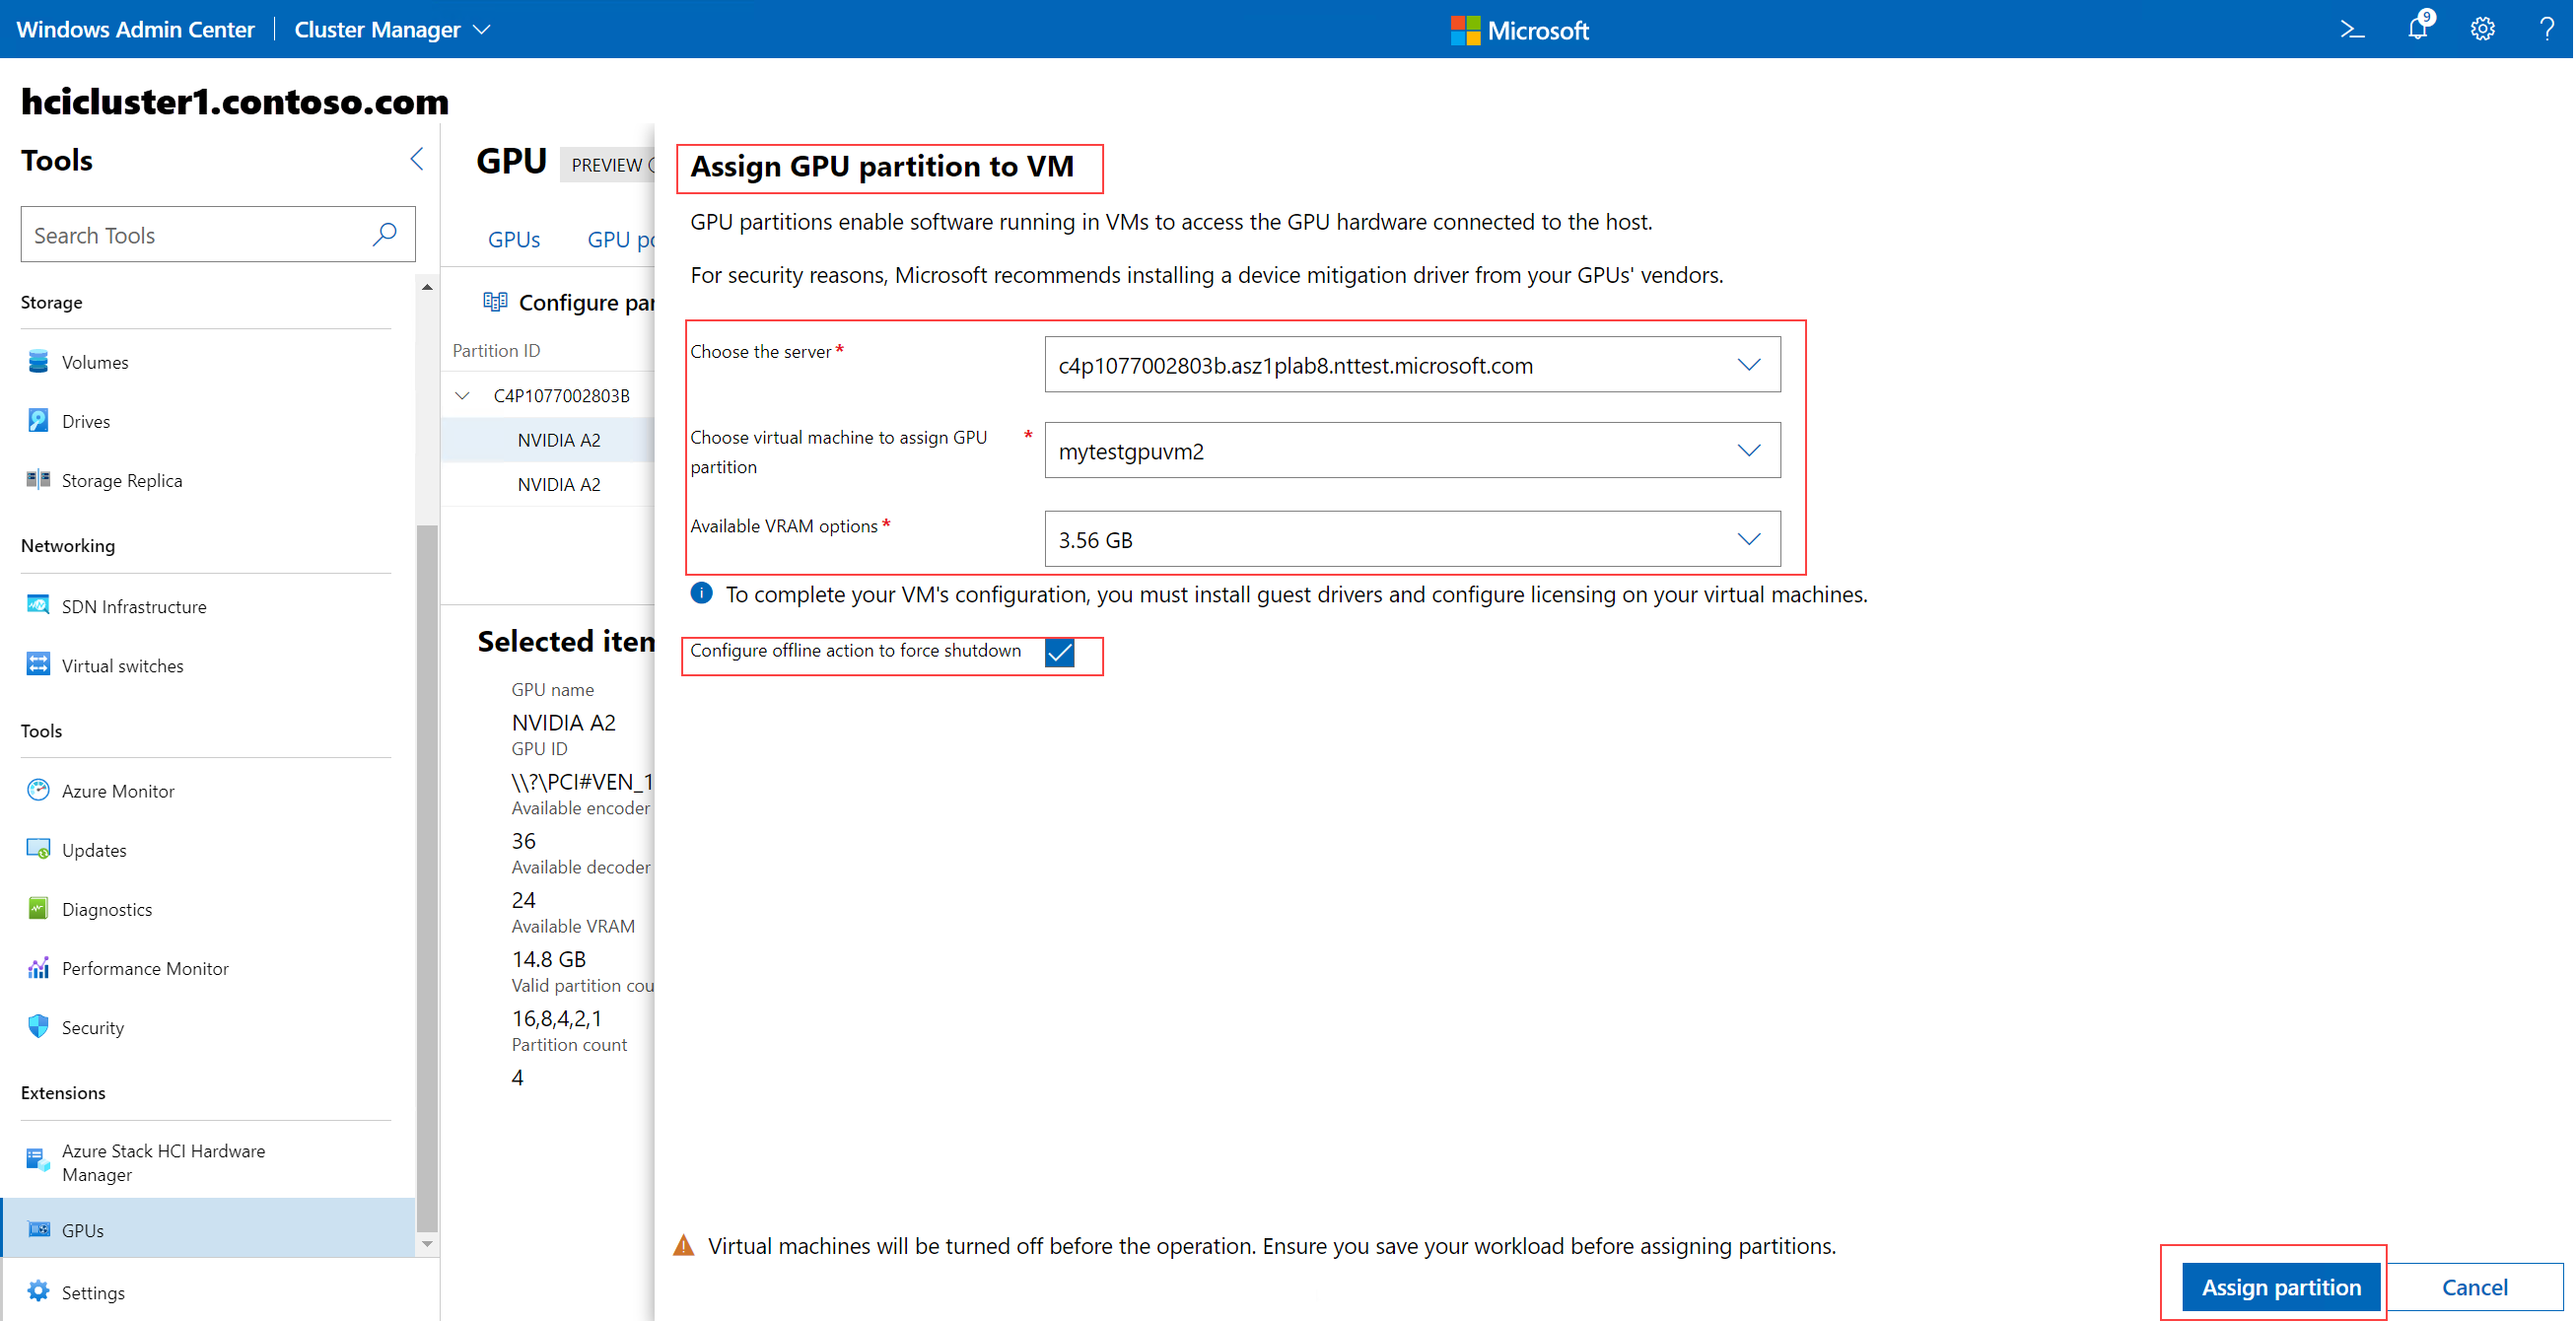
The Assign GPU partition to VM page is displayed.
From Choose the server list, select the server where the VM resides. This list displays all the servers in your cluster.
Search for and select the VM to assign the GPU partition to. The list automatically populates the VMs that reside on the server that you selected in step 2.
If a GPU partition is already assigned to a VM, that VM appears as grayed out.
Select all the VMs at once by selecting the Select All checkbox.
Select the available VRAM options. The value in this field must match the size of the partition count that you configured.
(Optional, but recommended) Select the Configure offline action for force shutdown checkbox if you want your VM to be highly available and fail over if its host server goes down.
Select Assign partition. This assigns partition of the selected VRAM size to the selected VM on the selected host server.
After the partition is assigned, Windows Admin Center notifies you that the partition is successfully assigned and displays the GPU partitions tab again. On the GPU partitions tab, the VM appears on the GPU partition row under the server it's installed on.


Unassign a partition from a VM
You can unassign a GPU partition from the VM if you no longer need it to run your workloads. Unassigning the partition frees up the GPU partition resource, which you can reassign to another VM later.
You must save your workloads before unassigning partitions.
If your VM is currently turned on or running, Windows Admin Center automatically turns it off first, unassigns the partition, then automatically turns it on.
Follow these steps to unassign a partition from a VM:
On the GPU partitions tab, select the GPU partition that you want to unassign.
Select - Unassign partition.
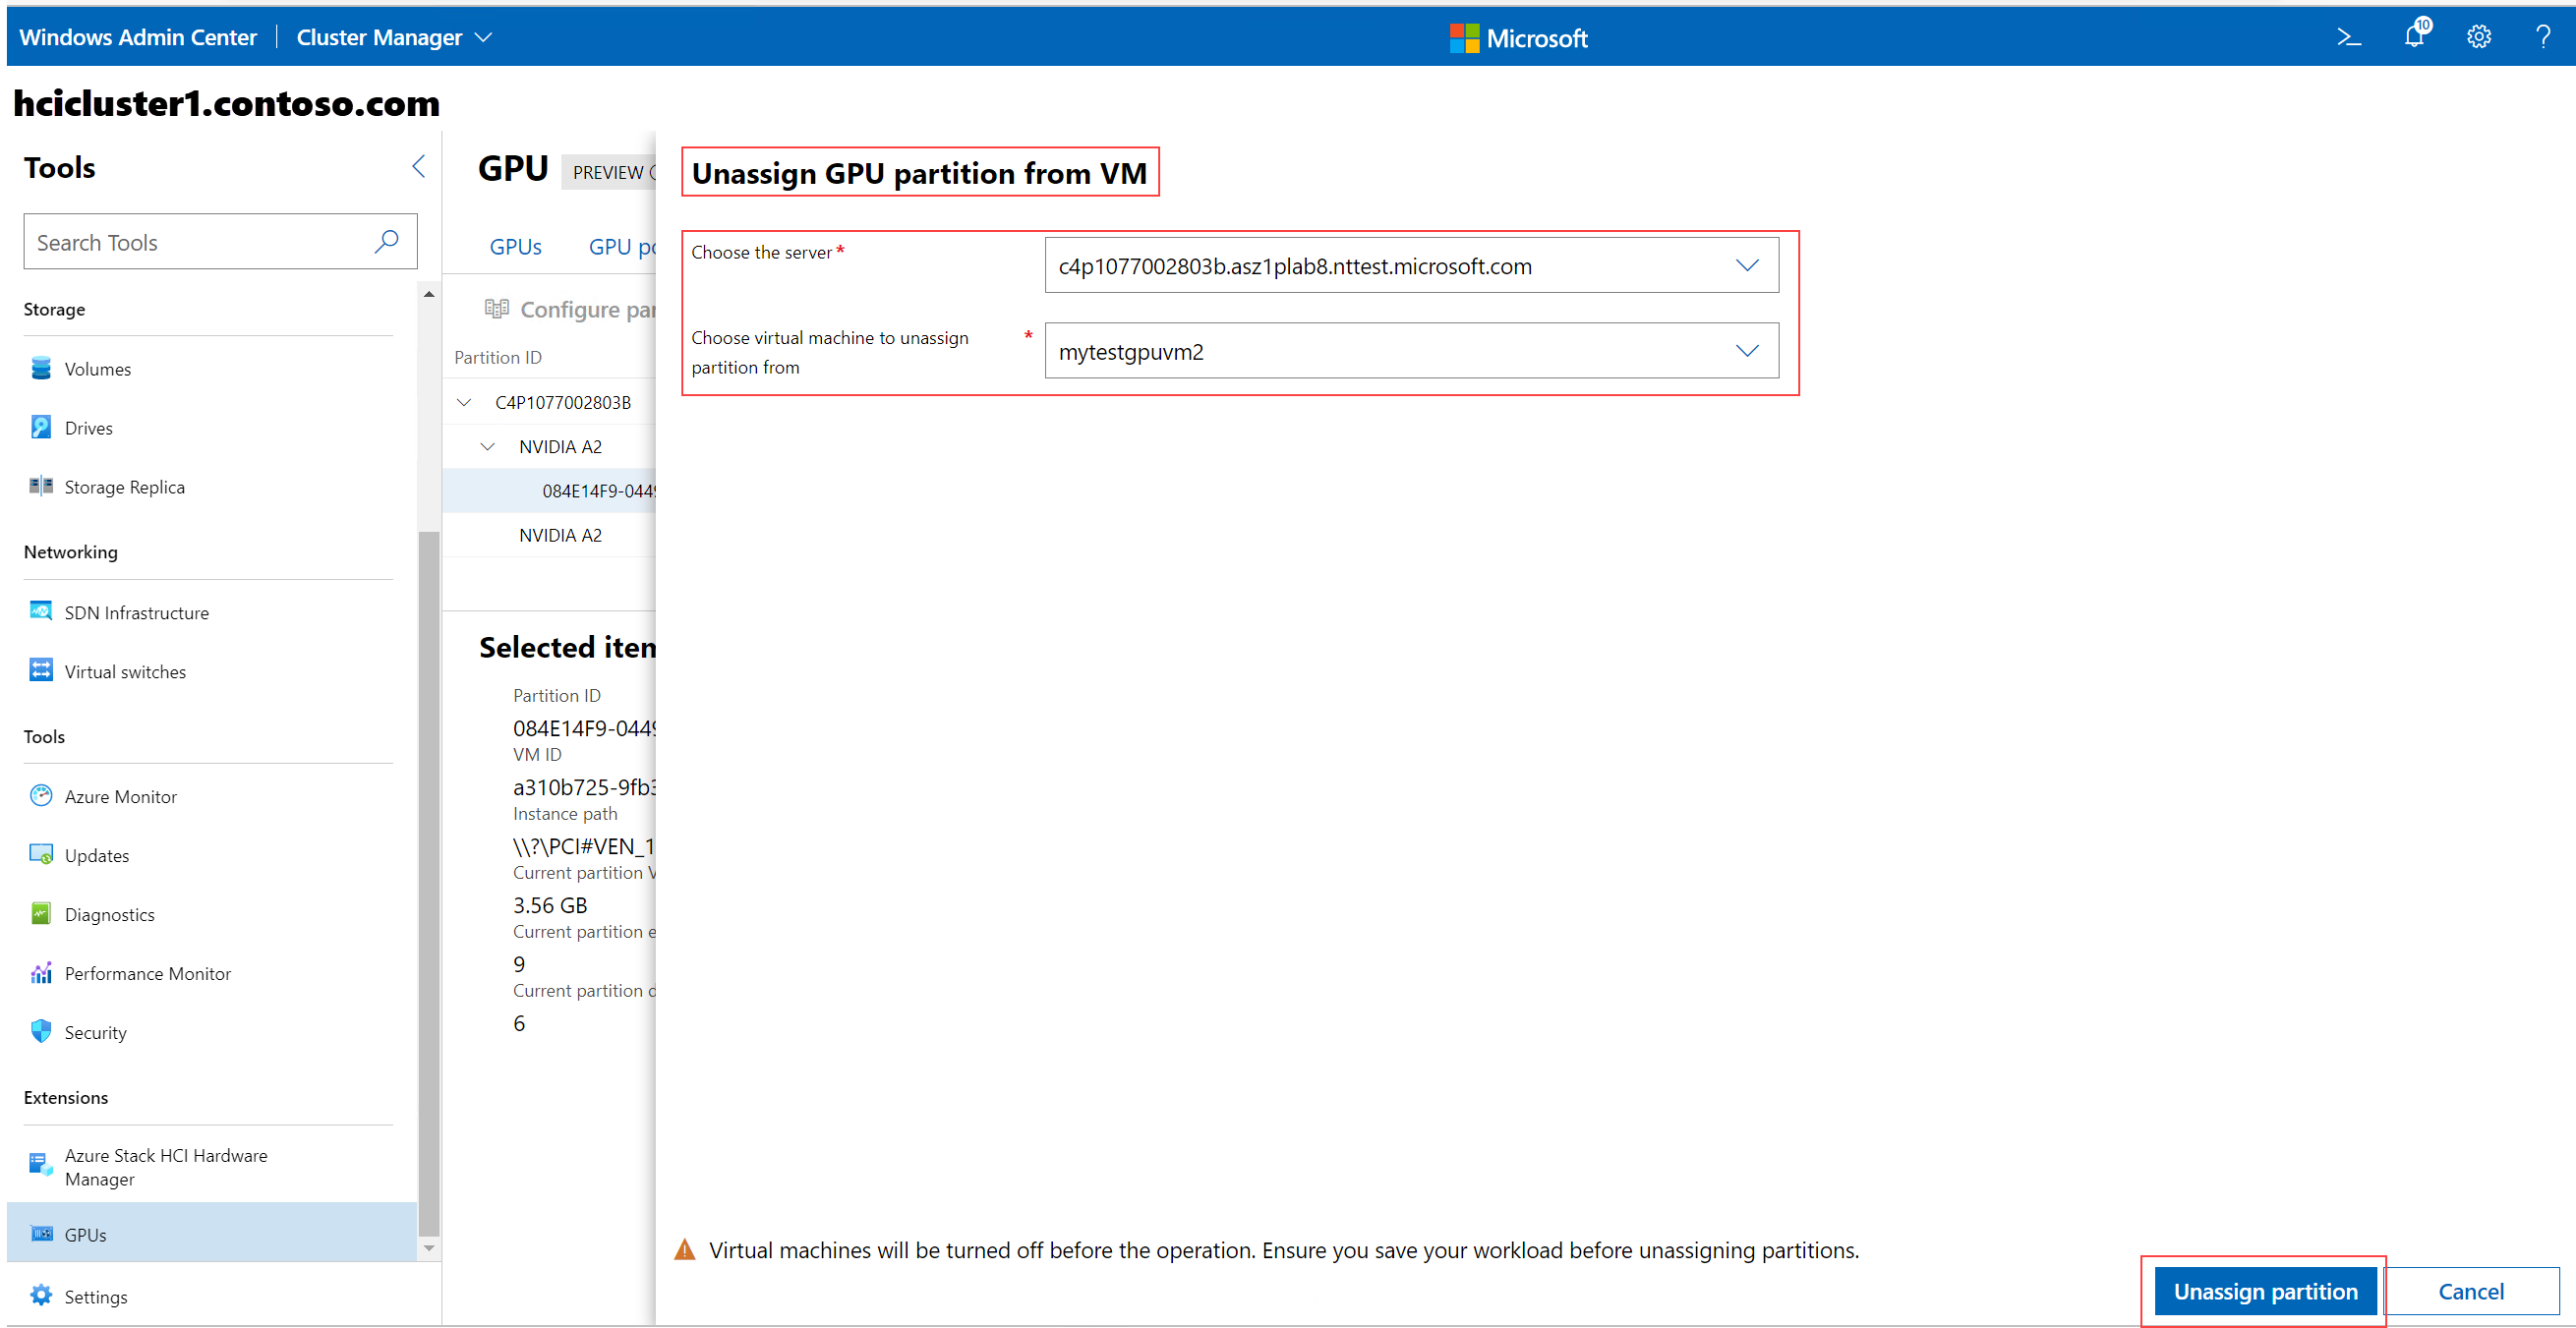
The Unassign GPU partition from VM page is displayed.
From Choose the server list, select the server that has the GPU partition that you want to unassign.
From Choose virtual machine to unassign partition from list, search, or select the VM to unassign the partition from.
Select Unassign partition.
After the partition is unassigned, Windows Admin Center notifies you that the partition is successfully unassigned and displays the GPU partitions tab again. On the GPU partitions tab, the VM from which the partition is unassigned no longer shows on the GPU partition row.

