Learn about the Windows AI API hardware requirements and how to configure your device to successfully build apps using the Windows AI APIs.
Dependencies
Ensure that your PC supports Windows AI APIs and that all dependencies are installed. You can choose to do this automatically (recommended) or manually.
Confirm that your device is a Copilot+ PC (we recommend the devices listed in the Copilot+ PCs developer guide).
Run the following command in Windows Terminal.
winget configure https://raw.githubusercontent.com/microsoft/winget-dsc/refs/heads/main/samples/Configuration%20files/Learn%20tutorials/Windows%20AI/learn_wcr.winget
This runs a WinGet Configuration file that performs the following tasks:
- Checks for minimum OS version.
- Enables Developer Mode.
- Installs Visual Studio Community Edition with WinUI and other required workloads.
- Installs the Windows App SDK.
Build a new app
The following steps describe how to build an app that uses Windows AI APIs (select the tab for your preferred UI framework).
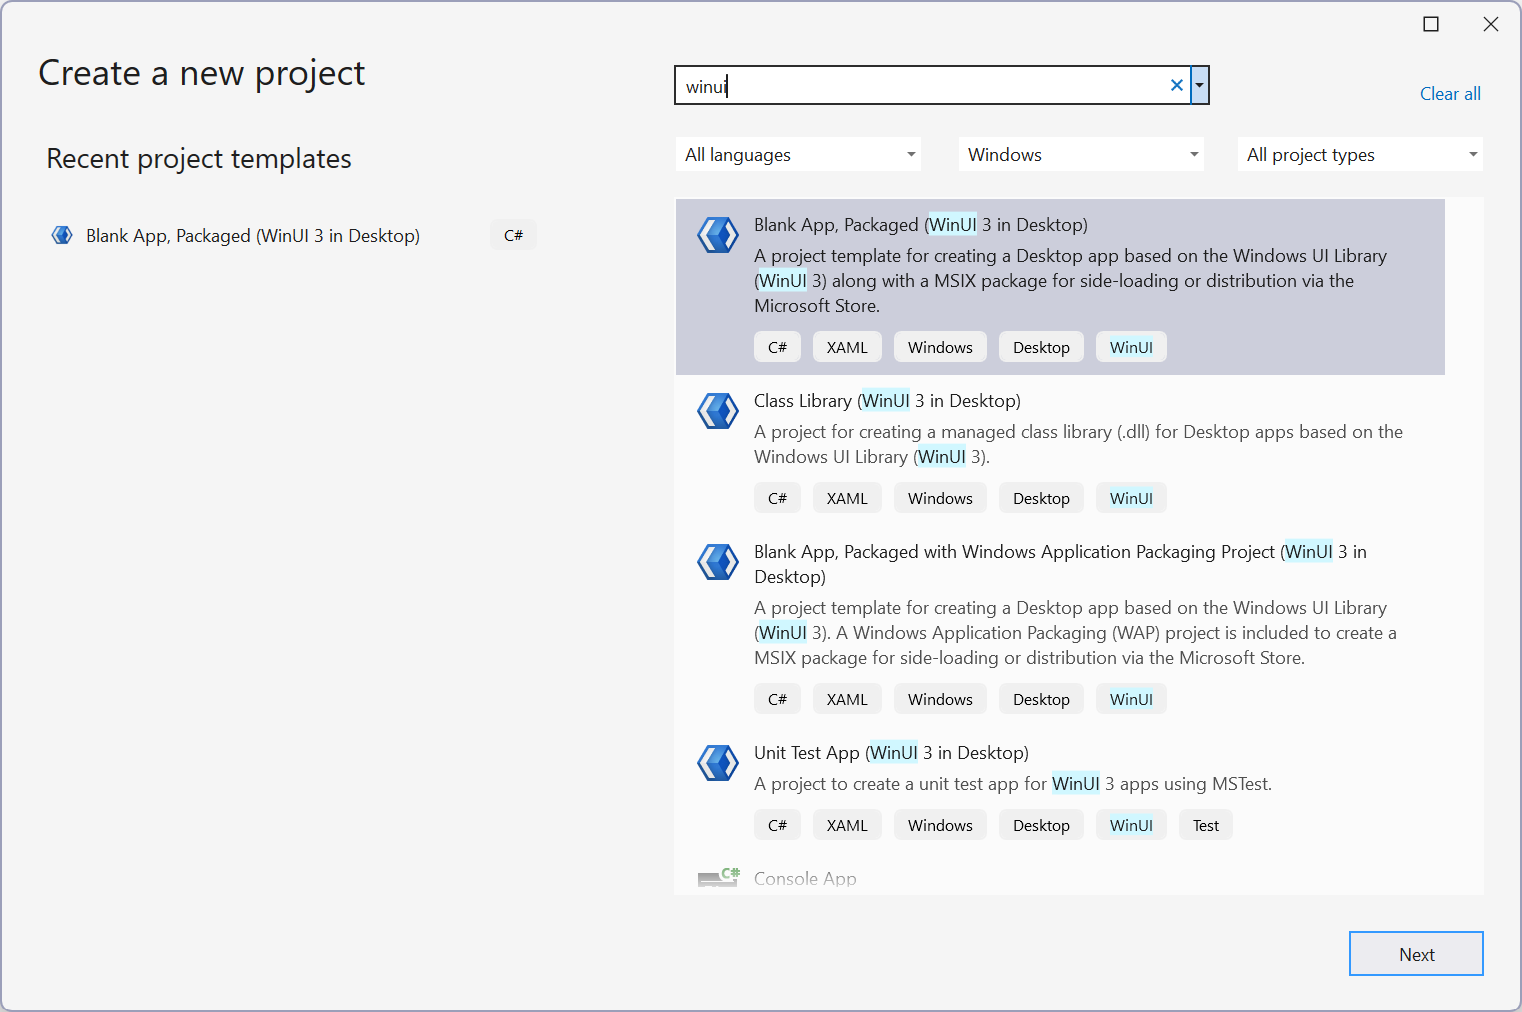
In Visual Studio, create a new WinUI project by selecting the Blank App, Packaged (WinUI 3 in Desktop) template.
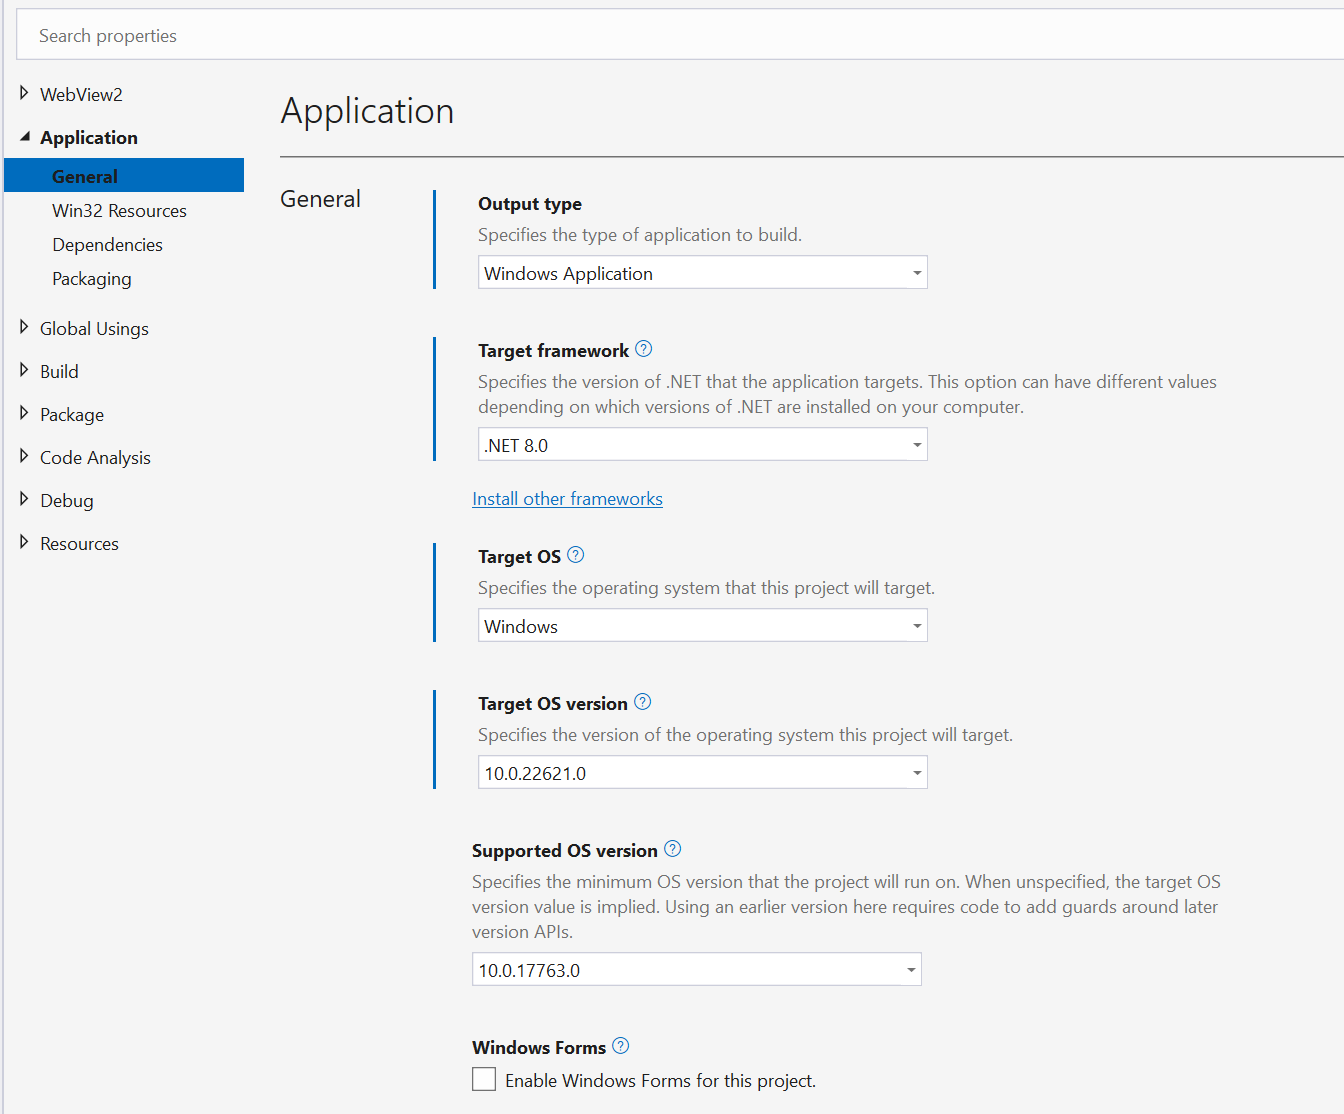
In Solution Explorer, right-click the project node, select Properties > Application > General, and ensure that the target framework is set to .NET 8.0, and the target OS is set to 10.0.22621 or later.
Edit the Package.appxmanifest file (right click and select View code) and add the following snippets.
The systemAIModels capability to the <Capabilities> node:
<Capabilities>
   <systemai:Capability Name="systemAIModels"/>
</Capabilities>
The systemai namespace specifier to "IgnorableNamespaces" in the <Package> node:
xmlns:systemai="http://schemas.microsoft.com/appx/manifest/systemai/windows10"
IgnorableNamespaces="uap rescap systemai"
The max version tested in the TargetDeviceFamily element of the <Dependencies> node needs to be at least 10.0.26226.0:
<TargetDeviceFamily Name="Windows.Desktop" MinVersion="10.0.17763.0" MaxVersionTested="10.0.26226.0" />
Add the following to your .waproj, .csproj, or .vcxproj file. This step is necessary to ensure visual studio doesn't override the max version tested.
<AppxOSMinVersionReplaceManifestVersion>false</AppxOSMinVersionReplaceManifestVersion>
<AppxOSMaxVersionTestedReplaceManifestVersion>false</AppxOSMaxVersionTestedReplaceManifestVersion>
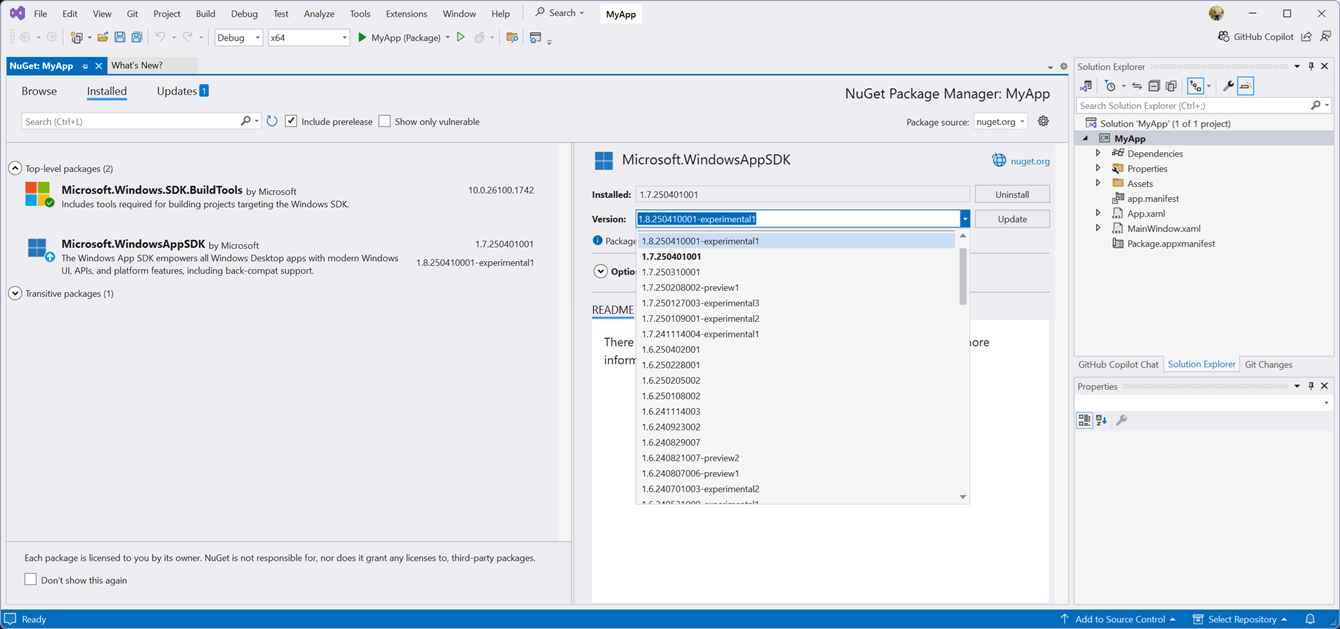
Right-click the project node and select Manage NuGet Packages....
In NuGet Package Manager, check the Include prerelease checkbox, and select Windows App SDK version 1.8.250410001-experimental1. Click Install or Update.
Ensure that your build configuration is set to ARM64.

Build and run your app.
If the app launches succesfully, then continue to Add your first AI API. Otherwise, see Troubleshooting.
In Visual Studio, create a new WPF project by selecting the WPF Application template.
In Solution Explorer, right-click the project node and select Edit Project File to open as XML. Replace everything inside <PropertyGroup> with the following:
<OutputType>WinExe</OutputType>
<TargetFramework>net8.0-windows10.0.22621.0</TargetFramework>
<RuntimeIdentifiers>win-x86;win-x64;win-arm64</RuntimeIdentifiers>
<Nullable>enable</Nullable>
<UseWPF>true</UseWPF>
<ImplicitUsings>enable</ImplicitUsings>
<WindowsPackageType>None</WindowsPackageType>
Edit the Package.appxmanifest file (right click and select View code) and add the following snippets.
The systemAIModels capability to the <Capabilities> node:
<Capabilities>
   <systemai:Capability Name="systemAIModels"/>
</Capabilities>
The systemai namespace specifier to "IgnorableNamespaces" in the <Package> node:
xmlns:systemai="http://schemas.microsoft.com/appx/manifest/systemai/windows10"
IgnorableNamespaces="uap rescap systemai"
The max version tested in the TargetDeviceFamily element of the <Dependencies> node needs to be at least 10.0.26226.0:
<TargetDeviceFamily Name="Windows.Desktop" MinVersion="10.0.17763.0" MaxVersionTested="10.0.26226.0" />
Add the following to your .waproj, .csproj, or .vcxproj file. This step is necessary to ensure visual studio doesn't override the max version tested.
<AppxOSMinVersionReplaceManifestVersion>false</AppxOSMinVersionReplaceManifestVersion>
<AppxOSMaxVersionTestedReplaceManifestVersion>false</AppxOSMaxVersionTestedReplaceManifestVersion>
In Solution Explorer, right-click the Dependencies node and select Manage Nuget Packages....
In NuGet Package Manager, check the Include prerelease checkbox, and select Windows App SDK version 1.8.250410001-experimental1. Click Install or Update.
Build and run your app.
If the app launches succesfully, then continue to Add your first AI API. Otherwise, see Troubleshooting.
For more info, see Configure your WPF project for Windows App SDK support.
Create a MAUI project by following the instructions at Build your first .NET MAUI app.
In Solution Explorer, right-click the project node > Edit Project File to open as XML.
At the bottom of the project file, add these lines to reference the correct Microsoft.WindowsAppSDK package version (when compiling for the Windows platform):
<ItemGroup Condition="$([MSBuild]::GetTargetPlatformIdentifier('$(TargetFramework)')) == 'windows'">
<PackageReference Include="Microsoft.WindowsAppSDK" Version="1.8.250410001-experimental1"/>
</ItemGroup>
Note
While you can click the project node and select the Manage NuGet Packages... option to add the required package, if your app is also building for other platforms, such as Android and iOS, you still need to edit the project file to condition the package reference for Windows-only builds.
Add the following to your .waproj, .csproj, or .vcxproj file. This step is necessary to ensure visual studio doesn't override the max version tested.
<AppxOSMinVersionReplaceManifestVersion>false</AppxOSMinVersionReplaceManifestVersion>
<AppxOSMaxVersionTestedReplaceManifestVersion>false</AppxOSMaxVersionTestedReplaceManifestVersion>
In Solution Explorer, right-click the project node, select Properties, and ensure that the Target Windows Framework is set to 10.0.22621 or later.
Edit the Package.appxmanifest file (right click and select View code) and add the following snippets.
The systemAIModels capability to the <Capabilities> node:
<Capabilities>
   <systemai:Capability Name="systemAIModels"/>
</Capabilities>
The systemai namespace specifier to "IgnorableNamespaces" in the <Package> node:
xmlns:systemai="http://schemas.microsoft.com/appx/manifest/systemai/windows10"
IgnorableNamespaces="uap rescap systemai"
The max version tested in the TargetDeviceFamily element of the <Dependencies> node needs to be at least 10.0.26226.0:
<TargetDeviceFamily Name="Windows.Desktop" MinVersion="10.0.17763.0" MaxVersionTested="10.0.26226.0" />
Build and run your app.
If the app launches succesfully, then continue to Add your first AI API. Otherwise, see Troubleshooting.
Add your first AI API
When implementing a feature using Windows AI APIs, your app should first check for the availability of the AI model that supports that feature.
The following snippet shows how to check for model availability and generate a response.
In MainWindow.xaml, add a TextBlock to display the LanguageModel response.
<TextBlock x:Name="OutputText" HorizontalAlignment="Center" VerticalAlignment="Center" />
At the top of MainWindow.xaml.cs, add the following using Microsoft.Windows.AI directive.
using Microsoft.Windows.AI;
In MainWindow.xaml.cs, replace the MainWindow class with the following code, which confirms the LanguageModel is available and then submits a prompt asking for the model to respond with the molecular formula of glucose.
public sealed partial class MainWindow : Window
{
    public MainWindow()
    {
        this.InitializeComponent();
        InitAI();
    }

    private async void InitAI()
    {
        OutputText.Text = "Loading..";

        if (LanguageModel.GetReadyState() == AIFeatureReadyState.EnsureNeeded)
        {
            var result = await LanguageModel.EnsureReadyAsync();
            if (result.Status != PackageDeploymentStatus.CompletedSuccess)
            {
                throw new Exception(result.ExtendedError().Message);
            }
        }

        using LanguageModel languageModel =
           await LanguageModel.CreateAsync();

        string prompt = "Provide the molecular formula of glucose.";
        var result = await languageModel.GenerateResponseAsync(prompt);
        OutputText.Text = result.Response;
    }
}
Build and run the app.
The formula for glucose should appear in the text block.
In MainWindow.xaml, add a TextBlock to display the LanguageModel response.
<TextBlock x:Name="OutputText" HorizontalAlignment="Center" VerticalAlignment="Center" />
At the top of MainWindow.xaml.cs, add the following using Microsoft.Windows.AI directive.
using Microsoft.Windows.AI;
In MainWindow.xaml.cs, replace the MainWindow class with the following code, which confirms the LanguageModel is available and then submits a prompt asking for the model to respond with the molecular formula of glucose.
public sealed partial class MainWindow : Window
{
    public MainWindow()
    {
        this.InitializeComponent();
        InitAI();
    }

    private async void InitAI()
    {
        OutputText.Text = "Loading..";

        if (LanguageModel.GetReadyState() == AIFeatureReadyState.EnsureNeeded)
        {
            var result = await LanguageModel.EnsureReadyAsync();
            if (result.Status != PackageDeploymentStatus.CompletedSuccess)
            {
                throw new Exception(result.ExtendedError().Message);
            }
        }

        using LanguageModel languageModel = await LanguageModel.CreateAsync();

        string prompt = "Provide the molecular formula for glucose.";
        var result = await languageModel.GenerateResponseAsync(prompt);
        OutputText.Text = result.Response;
    }
}
Build and run the app.
The formula for glucose should appear in the text block.
See Invoke platform code for details on adding platform-specific code to a MAUI app.
For this example, we use the partial classes and partial methods approach to put the Windows code in the Platform\Windows folder.
In MainPage.xaml.cs, add a partial method definition as partial void ChangeLanguageModelAvailability(); and call that partial method from the OnCounterClicked handler for the CounterBtn button created by the .NET MAUI App template.
In Solution Explorer, expand Platforms, right-click on Windows, select Add > Class…, type the name MainPage.cs, and click Add.
The new MainPage.cs should be shown in the editor window. Switch back to MainPage.xaml.cs to copy its namespace line.
Switch back to the new MainPage.cs and replace its namespace line with the line from MainPage.xaml.cs. This is to make the Platform\Windows class a partial extension of the base MainPage class.
To complete making MainPage.cs an extension, replace internal on the class declaration with partial.
Add the following code to the ChangeLanguageModelAvailability partial method defined in step 1.
partial void ChangeLanguageModelAvailability()
{
   try
   {
      AIFeatureReadyState readyState = Microsoft.Windows.AI.LanguageModel.GetReadyState();
      System.Diagnostics.Debug.WriteLine($"LanguageModel.GetReadyState: {readyState}");
   }
   catch (Exception e)
   {
      System.Diagnostics.Debug.WriteLine($"LanguageModel is not available: {e}");
   }
}
Run the app again, click the Click me button, and observe the output in the Visual Studio debug output pane.
Advanced tutorials and APIs
Now that you've successfully checked for model availability, explore the APIs further in the various Windows AI API tutorials.
Troubleshooting
If you encounter any errors, it's typically because of your hardware or the absence of a required model.
- The GetReadyState method checks whether the model required by an AI feature is available on the user's device. You must call this method before any call to the model.
- If the model isn't available on the user's device, then you can call the method EnsureReadyAsync to install the required model. Model installation runs in the background, and the user can check the install progress on the Windows Settings > Windows Update Settings page.
- The EnsureReadyAsync method has a status option that can show a loading UI. If the user has unsupported hardware, then EnsureReadyAsync will fail with an error.
See Windows AI API troubleshooting and FAQ for more assistance.
See also