Note
Access to this page requires authorization. You can try signing in or changing directories.
Access to this page requires authorization. You can try changing directories.
This article describes how to use the Windows Security app to manage Microsoft Defender Antivirus. You can run scans, check security intelligence updates, verify real-time protection, add exclusions, review threat detection history, and configure ransomware protection. These features are available in Windows 10, version 1703 and later. For more information about built-in security features, see Windows Security.
Important
Disabling the Windows Security app doesn't disable Microsoft Defender Antivirus or Windows Firewall. These capabilities are disabled or set to passive mode when non-Microsoft antivirus/antimalware software is installed on the device and kept up to date. If you do disable the Windows Security app, or configure its associated Group Policy settings to prevent it from starting or running, the Windows Security app might display stale or inaccurate information about any antivirus or firewall products that are installed on the device. It might also prevent Microsoft Defender Antivirus from re-enabling when you uninstall any non-Microsoft antivirus/antimalware software. Disabling the Windows Security app can significantly lower the level protection of your device and could lead to malware infection.
Review virus and threat protection settings in the Windows Security app
Use the following steps to open Virus & threat protection settings in the Windows Security app.
Open the Windows Security app by searching the start menu for Windows Security.
Select Virus & threat protection.
From Virus & threat protection, you can run scans, check protection updates, verify real-time protection, add exclusions, review protection history, and configure ransomware protection as described in the following sections.
Note
If these settings are configured and deployed using Group Policy, the Virus & threat protection settings described in this procedure are grayed-out and unavailable for use on individual endpoints. Changes made through a Group Policy Object must first be deployed to individual endpoints before the setting are updated in Windows Settings. The Configure end-user interaction with Microsoft Defender Antivirus topic describes how local policy override settings can be configured.
Run a scan with the Windows Security app
Use the following steps to run a malware scan in the Windows Security app.
Open the Windows Security app by searching the start menu for Security, and then selecting Windows Security.
Select the Virus & threat protection tile (or the shield icon on the left menu bar).
Select Quick scan. Or, to run a full scan, select Scan options, and then select an option, such as Full scan.
Review the security intelligence update version and download the latest updates in the Windows Security app
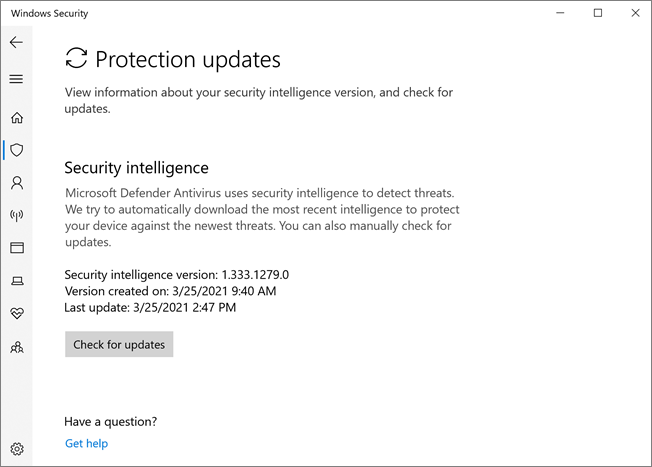
Use this section to review the current security intelligence version and check for new protection updates.
Note
The security intelligence version (previously called the definition version) is the version number of the antimalware definitions that Microsoft Defender Antivirus uses. To check your version, use the following steps:
Open the Windows Security app by searching the start menu for Security, and then selecting Windows Security.
Select the Virus & threat protection tile (or the shield icon on the left menu bar).
Select Virus & threat protection updates. The installed version and its download date are shown. You can compare it to the latest version available for manual download, or review the change log. For more information, see Security intelligence updates for Microsoft Defender Antivirus and other Microsoft antimalware.
Select Check for updates to download new protection updates (if there are any).
Tip
If you have your Microsoft Defender Antivirus updates (Security intelligence, Engine, and Platform), pointing to a WSUS or Software Update Point, and if you have the Windows Update policy set to 3 - Auto download and notify for install, when you select Check for updates, all available Microsoft Defender Antivirus updates are installed.
Ensure Microsoft Defender Antivirus is enabled in the Windows Security app
Use the following steps to verify that Microsoft Defender Antivirus real-time protection is enabled.
Open the Windows Security app by searching the start menu for Security, and then selecting Windows Security.
Select the Virus & threat protection tile (or the shield icon on the left menu bar).
Select Virus & threat protection settings.
Toggle the Real-time protection switch to On.
Note
If you switch Real-time protection off, it will automatically turn back on after a short delay. This automatic enablement is to ensure you're protected from malware and threats. If you install another antivirus product, Microsoft Defender Antivirus automatically disables itself and is indicated as such in the Windows Security app. A setting appears that allows you to enable limited periodic scanning.
Add exclusions for Microsoft Defender Antivirus in the Windows Security app
Use the following steps to add exclusions for Microsoft Defender Antivirus in the Windows Security app. For more information, see Exclusions in Microsoft Defender Antivirus.
- In the Windows security app on the device, go to Virus & threat protection.
- In the Virus & threat protection pane, in the Virus & threat protection settings section, select Manage settings.
- In the Virus & threat protection settings pane, in the Exclusions section, select Add or remove exclusions.
- In the Exclusions pane, select + Add an exclusion and then select one of the following values that appear:
- File or Folder: Also known as path exclusions. For more information, see File and folder exclusions.
- File type: Exclusions by file type extension. The exclusion applies to any files with that extension, regardless of location. For more information, see File extension exclusions.
- Process: Exclusions for files opened by specified processes. The processes themselves aren't excluded. To exclude the processes, use File or Folder exclusions. For more information, see Process exclusions.
Review threat detection history in the Windows Security app
Use the following steps to review threat detection history in the Windows Security app.
Open the Windows Security app by searching the start menu for Security, and then selecting Windows Security.
Select the Virus & threat protection tile (or the shield icon on the left menu bar).
Select Protection history. Any recent items are listed.
Set ransomware protection and recovery options
Use the following steps to configure ransomware protection and recovery options in the Windows Security app.
Open the Windows Security app by searching the start menu for Security, and then selecting Windows Security.
Select the Virus & threat protection tile (or the shield icon on the left menu bar).
Under Ransomware protection, select Manage ransomware protection.
To change Controlled folder access (CFA) settings, see Configure controlled folder access (CFA).
To set up ransomware recovery options, select Set up under Ransomware data recovery and follow the instructions for linking or setting up your OneDrive account so you can easily recover from a ransomware attack.