Note
Access to this page requires authorization. You can try signing in or changing directories.
Access to this page requires authorization. You can try changing directories.
AppWindow and its related APIs simplify the creation of multi-window apps by letting you show your app content in secondary windows while still working on the same UI thread across each window.
Note
AppWindow is currently in preview. This means you can submit apps that use AppWindow to the Store, but some platform and framework components are known to not work with AppWindow (see Limitations).
Here, we show some scenarios for multiple windows with a sample app called HelloAppWindow. The sample app demonstrates the following functionality:
- Un-dock a control from the main page and open it in a new window.
- Open new instances of a Page in new windows.
- Programmatically size and position new windows in the app.
- Associate a ContentDialog with the appropriate window in the app.
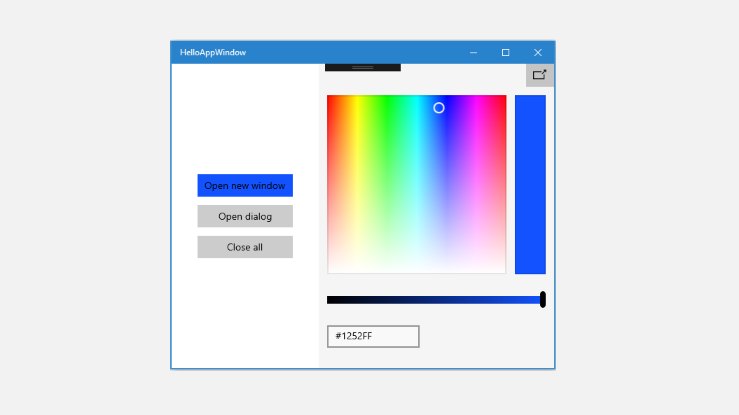
Sample app with a single window
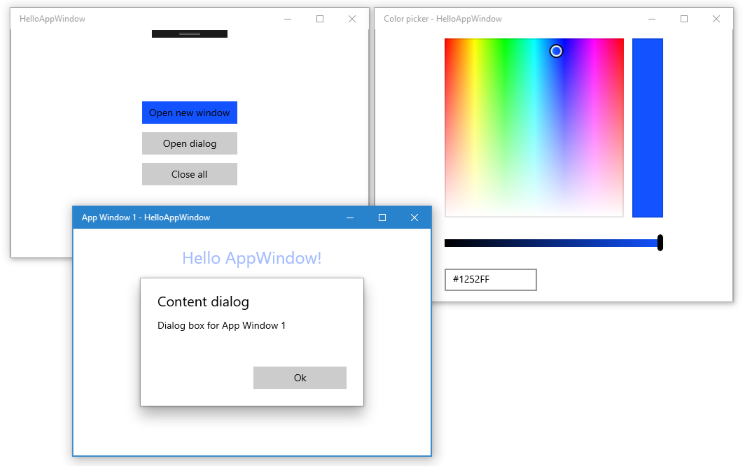
Sample app with un-docked color picker and secondary window
Important APIs: Windows.UI.WindowManagement namespace, AppWindow class
API overview
The AppWindow class and other APIs in the WindowManagement namespace are available starting in Windows 10, version 1903 (SDK 18362). If your app targets earlier versions of Windows 10, you must use ApplicationView to create secondary windows. WindowManagement APIs are still under development and have limitations as described in the API reference docs.
Here are some of the important APIs you use to show content in an AppWindow.
AppWindow
The AppWindow class can be used to display a portion of a UWP app in a secondary window. It is similar in concept to an ApplicationView, but not the same in behavior and lifetime. A main feature of AppWindow is that each instance shares the same UI processing thread (including the event dispatcher) from which they were created, which simplifies multi-window apps.
You can only connect XAML content to your AppWindow, there is no support for native DirectX or Holographic content. However, you can show a XAML SwapChainPanel that hosts DirectX content.
WindowingEnvironment
The WindowingEnvironment API lets you know about the environment where your app is being presented so you can adapt your app as needed. It describes the kind of window the environment supports; for example, Overlapped if the app is running on a PC, or Tiled if the app is running on an Xbox. It also provides a set of DisplayRegion objects that describe the areas in which an app may be shown on a logical display.
DisplayRegion
The DisplayRegion API describes the region in which a view can be shown to a user on a logical display; for example, on a desktop PC, this is the full display minus the area of the taskbar. It is not necessarily a 1:1 mapping with the physical display area of the backing monitor. There can be multiple display regions within the same monitor, or a DisplayRegion can be configured to span across multiple monitors if those monitors are homogenous in all aspects.
AppWindowPresenter
The AppWindowPresenter API lets you easily switch windows into pre-defined configurations like FullScreen or CompactOverlay. These configurations give the user a consistent experience across any device that supports the configuration.
UIContext
UIContext is a unique identifier for an app window or view. It's created automatically, and you can use the UIElement.UIContext property to retrieve the UIContext. Every UIElement in the XAML tree has the same UIContext.
UIContext is important because APIs like Window.Current and the GetForCurrentView pattern rely on having a single ApplicationView/CoreWindow with a single XAML tree per thread to work with. This isn't the case when you use an AppWindow, so you use UIContext to identify a particular window instead.
XamlRoot
The XamlRoot class holds a XAML element tree, connects it to the window host object (for example, the AppWindow or ApplicationView), and provides info such as size and visibility. You don't create a XamlRoot object directly. Instead, one is created when you attach a XAML element to an AppWindow. You can then use the UIElement.XamlRoot property to retrieve the XamlRoot.
For more info about UIContext and XamlRoot, see Make code portable across windowing hosts.
Show a new window
Let's take a look at the steps to show content in a new AppWindow.
To show a new window
Call the static AppWindow.TryCreateAsync method to create a new AppWindow.
AppWindow appWindow = await AppWindow.TryCreateAsync();Create the window content.
Typically, you create a XAML Frame, then navigate the Frame to a XAML Page where you've defined your app content. For more info about frames and pages, see Peer-to-peer navigation between two pages.
Frame appWindowContentFrame = new Frame();
appWindowContentFrame.Navigate(typeof(AppWindowMainPage));
However, you can show any XAML content in the AppWindow, not just a Frame and Page. For example, you can show just a single control, like ColorPicker, or you can show a SwapChainPanel that hosts DirectX content.
Call the ElementCompositionPreview.SetAppWindowContent method to attach the XAML content to the AppWindow.
ElementCompositionPreview.SetAppWindowContent(appWindow, appWindowContentFrame);The call to this method creates a XamlRoot object and sets it as the XamlRoot property for the specified UIElement.
You may only call this method once per AppWindow instance. After the content has been set, further calls to SetAppWindowContent for this AppWindow instance will fail. Also, if you attempt to disconnect the AppWindow content by passing in a null UIElement object, the call will fail.
Call the AppWindow.TryShowAsync method to show the new window.
await appWindow.TryShowAsync();
Release resources when a window is closed
You should always handle the AppWindow.Closed event to release XAML resources (the AppWindow content) and references to the AppWindow.
appWindow.Closed += delegate
{
    appWindowContentFrame.Content = null;
    appWindow = null;
};
Tip
You should keep the amount of code in your Closed event handler to the minimum amount possible to avoid unexpected issues.
Track instances of AppWindow
Depending on how you use multiple windows in your app, you may or may not need to keep track of the instances of AppWindow you create. The HelloAppWindow example shows some different ways you might typically use an AppWindow. Here, we'll look at why these windows should be tracked, and how to do it.
Simple tracking
The color picker window hosts a single XAML control, and the code for interacting with the color picker all resides in the MainPage.xaml.cs file. The color picker window only allows a single instance and is essentially an extension of MainWindow. To ensure that only one instance is created, the color picker window is tracked with a page level variable. Before creating a new color picker window, you check whether an instance exists, and if it does, skip the steps to create a new window and just call TryShowAsync on the existing window.
AppWindow colorPickerAppWindow;

// ...

private async void DetachColorPickerButton_Click(object sender, RoutedEventArgs e)
{
    // Create the color picker window.
    if (colorPickerAppWindow == null)
    {
        // ...
        // Create a new window
        colorPickerAppWindow = await AppWindow.TryCreateAsync();
        // ...
    }
    // Show the window.
    await colorPickerAppWindow.TryShowAsync();
}
Track an AppWindow instance in its hosted content
The AppWindowPage window hosts a complete XAML page, and the code for interacting with the page resides in AppWindowPage.xaml.cs. It allows multiple instances, each of which functions independently.
The functionality of the page lets you manipulate the window, setting it to FullScreen or CompactOverlay, and also listens for AppWindow.Changed events to show information about the window. In order to call these APIs, AppWindowPage needs a reference to the AppWindow instance that is hosting it.
If that's all that you need, you can create a property in AppWindowPage and assign the AppWindow instance to it when you create it.
AppWindowPage.xaml.cs
In AppWindowPage, create a property to hold the AppWindow reference.
public sealed partial class AppWindowPage : Page
{
    public AppWindow MyAppWindow { get; set; }

    // ...
}
MainPage.xaml.cs
In MainPage, get a reference to the page instance and assign the newly created AppWindow to the property in AppWindowPage.
private async void ShowNewWindowButton_Click(object sender, RoutedEventArgs e)
{
    // Create a new window.
    AppWindow appWindow = await AppWindow.TryCreateAsync();

    // Create a Frame and navigate to the Page you want to show in the new window.
    Frame appWindowContentFrame = new Frame();
    appWindowContentFrame.Navigate(typeof(AppWindowPage));

    // Get a reference to the page instance and assign the
    // newly created AppWindow to the MyAppWindow property.
    AppWindowPage page = (AppWindowPage)appWindowContentFrame.Content;
    page.MyAppWindow = appWindow;

    // ...
}
Tracking app windows using UIContext
You might also want to have access to the AppWindow instances from other parts of your app. For example, MainPage could have a 'close all' button that closes all the tracked instances of AppWindow.
In this case, you should use the UIContext unique identifier to track the window instances in a Dictionary.
MainPage.xaml.cs
In MainPage, create the Dictionary as a static property. Then, add the page to the Dictionary when you create it, and remove it when the page is closed. You can get the UIContext from the content Frame (appWindowContentFrame.UIContext) after you call ElementCompositionPreview.SetAppWindowContent.
public sealed partial class MainPage : Page
{
    // Track open app windows in a Dictionary.
    public static Dictionary<UIContext, AppWindow> AppWindows { get; set; }
        = new Dictionary<UIContext, AppWindow>();

    // ...

    private async void ShowNewWindowButton_Click(object sender, RoutedEventArgs e)
    {
        // Create a new window.
        AppWindow appWindow = await AppWindow.TryCreateAsync();

        // Create a Frame and navigate to the Page you want to show in the new window.
        Frame appWindowContentFrame = new Frame();
        appWindowContentFrame.Navigate(typeof(AppWindowPage));

        // Attach the XAML content to the window.
        ElementCompositionPreview.SetAppWindowContent(appWindow, appWindowContentFrame);

        // Add the new page to the Dictionary using the UIContext as the Key.
        AppWindows.Add(appWindowContentFrame.UIContext, appWindow);
        appWindow.Title = "App Window " + AppWindows.Count.ToString();

        // When the window is closed, be sure to release
        // XAML resources and the reference to the window.
        appWindow.Closed += delegate
        {
            MainPage.AppWindows.Remove(appWindowContentFrame.UIContext);
            appWindowContentFrame.Content = null;
            appWindow = null;
        };

        // Show the window.
        await appWindow.TryShowAsync();
    }

    private async void CloseAllButton_Click(object sender, RoutedEventArgs e)
    {
        while (AppWindows.Count > 0)
        {
            await AppWindows.Values.First().CloseAsync();
        }
    }
    // ...
}
AppWindowPage.xaml.cs
To use the AppWindow instance in your AppWindowPage code, use the page's UIContext to retrieve it from the static Dictionary in MainPage. You should do this in the page's Loaded event handler rather than in the constructor so that UIContext is not null. You can get the UIContext from the Page: this.UIContext.
public sealed partial class AppWindowPage : Page
{
    AppWindow window;

    // ...
    public AppWindowPage()
    {
        this.InitializeComponent();

        Loaded += AppWindowPage_Loaded;
    }

    private void AppWindowPage_Loaded(object sender, RoutedEventArgs e)
    {
        // Get the reference to this AppWindow that was stored when it was created.
        window = MainPage.AppWindows[this.UIContext];

        // Set up event handlers for the window.
        window.Changed += Window_Changed;
    }
    // ...
}
Note
The HelloAppWindow example shows both ways to track the window in AppWindowPage, but you will typically use one or the other, not both.
Request window size and placement
The AppWindow class has several methods you can use to control the size and placement of the window. As implied by the method names, the system may or may not honor the requested changes depending on environmental factors.
Call RequestSize to specify a desired window size, like this.
colorPickerAppWindow.RequestSize(new Size(300, 428));
The methods to manage window placement are named RequestMove*: RequestMoveAdjacentToCurrentView, RequestMoveAdjacentToWindow, RequestMoveRelativeToDisplayRegion, RequestMoveToDisplayRegion.
In this example, this code moves the window to be next to the main view that the window is spawned from.
colorPickerAppWindow.RequestMoveAdjacentToCurrentView();
To get information about the current size and placement of the window, call GetPlacement. This returns an AppWindowPlacement object that provides the current DisplayRegion, Offset, and Size of the window.
For example, you could call this code to move the window to the upper-right corner of the display. This code has to be called after the window has been displayed; otherwise, the window Size returned by the call to GetPlacement will be 0,0 and the offset will be incorrect.
DisplayRegion displayRegion = window.GetPlacement().DisplayRegion;
double displayRegionWidth = displayRegion.WorkAreaSize.Width;
double windowWidth = window.GetPlacement().Size.Width;
int horizontalOffset = (int)(displayRegionWidth - windowWidth);
window.RequestMoveRelativeToDisplayRegion(displayRegion, new Point(horizontalOffset, 0));
Request a presentation configuration
The AppWindowPresenter class lets you show an AppWindow using a pre-defined configuration appropriate for the device it's shown on. You can use an AppWindowPresentationConfiguration value to place the window in FullScreen or CompactOverlay mode.
This example shows how to do the following:
- Use the AppWindow.Changed event to be notified if the available window presentations change.
- Use the AppWindow.Presenter property to get the current AppWindowPresenter.
- Call IsPresentationSupported to see if a specific AppWindowPresentationKind is supported.
- Call GetConfiguration to check what kind of configuration is currently used.
- Call RequestPresentation to change the current configuration.
private void Window_Changed(AppWindow sender, AppWindowChangedEventArgs args)
{
    if (args.DidAvailableWindowPresentationsChange)
    {
        EnablePresentationButtons(sender);
    }

    if (args.DidWindowPresentationChange)
    {
        ConfigText.Text = window.Presenter.GetConfiguration().Kind.ToString();
    }

    if (args.DidSizeChange)
    {
        SizeText.Text = window.GetPlacement().Size.ToString();
    }
}

private void EnablePresentationButtons(AppWindow window)
{
    // Check whether the current AppWindowPresenter supports CompactOverlay.
    if (window.Presenter.IsPresentationSupported(AppWindowPresentationKind.CompactOverlay))
    {
        // Show the CompactOverlay button...
        compactOverlayButton.Visibility = Visibility.Visible;
    }
    else
    {
        // Hide the CompactOverlay button...
        compactOverlayButton.Visibility = Visibility.Collapsed;
    }

    // Check whether the current AppWindowPresenter supports FullScreen?
    if (window.Presenter.IsPresentationSupported(AppWindowPresentationKind.FullScreen))
    {
        // Show the FullScreen button...
        fullScreenButton.Visibility = Visibility.Visible;
    }
    else
    {
        // Hide the FullScreen button...
        fullScreenButton.Visibility = Visibility.Collapsed;
    }
}

private void CompactOverlayButton_Click(object sender, RoutedEventArgs e)
{
    if (window.Presenter.GetConfiguration().Kind != AppWindowPresentationKind.CompactOverlay)
    {
        window.Presenter.RequestPresentation(AppWindowPresentationKind.CompactOverlay);
        fullScreenButton.IsChecked = false;
    }
    else
    {
        window.Presenter.RequestPresentation(AppWindowPresentationKind.Default);
    }
}

private void FullScreenButton_Click(object sender, RoutedEventArgs e)
{
    if (window.Presenter.GetConfiguration().Kind != AppWindowPresentationKind.FullScreen)
    {
        window.Presenter.RequestPresentation(AppWindowPresentationKind.FullScreen);
        compactOverlayButton.IsChecked = false;
    }
    else
    {
        window.Presenter.RequestPresentation(AppWindowPresentationKind.Default);
    }
}
Reuse XAML elements
An AppWindow lets you have multiple XAML trees with the same UI thread. However, a XAML element can only be added to a XAML tree once. If you want to move a part of your UI from one window to another, you have to manage it's placement in the XAML tree.
This example shows how to reuse a ColorPicker control while moving it between the main window and a secondary window.
The color picker is declared in the XAML for MainPage, which places it in the MainPage XAML tree.
<StackPanel x:Name="colorPickerContainer" Grid.Column="1" Background="WhiteSmoke">
<Button Click="DetachColorPickerButton_Click" HorizontalAlignment="Right">
<FontIcon FontFamily="Segoe MDL2 Assets" Glyph="" />
</Button>
<ColorPicker x:Name="colorPicker" Margin="12" Width="288"
IsColorChannelTextInputVisible="False"
ColorChanged="ColorPicker_ColorChanged"/>
</StackPanel>
When the color picker is detached to be placed in a new AppWindow, you first have to remove it from the MainPage XAML tree by removing it from its parent container. Though not required, this example also hides the parent container.
colorPickerContainer.Children.Remove(colorPicker);
colorPickerContainer.Visibility = Visibility.Collapsed;
Then you can add it to the new XAML tree. Here, you first create a Grid that will be the parent container for the ColorPicker, and add the ColorPicker as a child of the Grid. (This lets you easily remove the ColorPicker from this XAML tree later.) You then set the Grid as the root of the XAML tree in the new window.
Grid appWindowRootGrid = new Grid();
appWindowRootGrid.Children.Add(colorPicker);

// Create a new window
colorPickerAppWindow = await AppWindow.TryCreateAsync();

// Attach the XAML content to our window
ElementCompositionPreview.SetAppWindowContent(colorPickerAppWindow, appWindowRootGrid);
When the AppWindow is closed, you reverse the process. First, remove the ColorPicker from the Grid, then add it as a child of the StackPanel in MainPage.
// When the window is closed, be sure to release XAML resources
// and the reference to the window.
colorPickerAppWindow.Closed += delegate
{
    appWindowRootGrid.Children.Remove(colorPicker);
    appWindowRootGrid = null;
    colorPickerAppWindow = null;

    colorPickerContainer.Children.Add(colorPicker);
    colorPickerContainer.Visibility = Visibility.Visible;
};
private async void DetachColorPickerButton_Click(object sender, RoutedEventArgs e)
{
    ColorPickerContainer.Visibility = Visibility.Collapsed;

    // Create the color picker window.
    if (colorPickerAppWindow == null)
    {
        ColorPickerContainer.Children.Remove(colorPicker);

        Grid appWindowRootGrid = new Grid();
        appWindowRootGrid.Children.Add(colorPicker);

        // Create a new window
        colorPickerAppWindow = await AppWindow.TryCreateAsync();
        colorPickerAppWindow.RequestMoveAdjacentToCurrentView();
        colorPickerAppWindow.RequestSize(new Size(300, 428));
        colorPickerAppWindow.Title = "Color picker";

        // Attach the XAML content to our window
        ElementCompositionPreview.SetAppWindowContent(colorPickerAppWindow, appWindowRootGrid);

        // When the window is closed, be sure to release XAML resources
        // and the reference to the window.
        colorPickerAppWindow.Closed += delegate
        {
            appWindowRootGrid.Children.Remove(colorPicker);
            appWindowRootGrid = null;
            colorPickerAppWindow = null;

            ColorPickerContainer.Children.Add(colorPicker);
            ColorPickerContainer.Visibility = Visibility.Visible;
        };
    }
    // Show the window.
    await colorPickerAppWindow.TryShowAsync();
}
Show a dialog box
By default, content dialogs display modally relative to the root ApplicationView. When you use a ContentDialog inside an AppWindow, you need to manually set the XamlRoot on the dialog to the root of the XAML host.
To do so, set the ContentDialog's XamlRoot property to the same XamlRoot as an element already in the AppWindow. Here, this code is inside a button's Click event handler, so you can use the sender (the clicked Button) to get the XamlRoot.
if (ApiInformation.IsApiContractPresent("Windows.Foundation.UniversalApiContract", 8))
{
    simpleDialog.XamlRoot = ((Button)sender).XamlRoot;
}
If you have one or more AppWindows open in addition to the main window (ApplicationView), each window can attempt to open a dialog, because the modal dialog will block only the window that it's rooted in. However, there can only be one ContentDialog open per thread at a time. Attempting to open two ContentDialogs will throw an exception, even if they are attempting to open in separate AppWindows.
To manage this, you should at the least open the dialog in a try/catch block to catch the exception in case another dialog is already open.
try
{
    ContentDialogResult result = await simpleDialog.ShowAsync();
}
catch (Exception)
{
    // The dialog didn't open, probably because another dialog is already open.
}
Another way to manage dialogs is to track the currently open dialog, and close it before trying to open a new dialog. Here, you create a static property in MainPage called CurrentDialog for this purpose.
public sealed partial class MainPage : Page
{
    // Track the last opened dialog so you can close it if another dialog tries to open.
    public static ContentDialog CurrentDialog { get; set; } = null;

   // ...
}
Then, you check whether there is a currently opened dialog, and if there is, call the Hide method to close it. Finally, assign the new dialog to CurrentDialog, and try to show it.
private async void DialogButton_Click(object sender, RoutedEventArgs e)
{
    ContentDialog simpleDialog = new ContentDialog
    {
        Title = "Content dialog",
        Content = "Dialog box for " + window.Title,
        CloseButtonText = "Ok"
    };

    if (MainPage.CurrentDialog != null)
    {
        MainPage.CurrentDialog.Hide();
    }
    MainPage.CurrentDialog = simpleDialog;

    // Use this code to associate the dialog to the appropriate AppWindow by setting
    // the dialog's XamlRoot to the same XamlRoot as an element that is already
    // present in the AppWindow.
    if (ApiInformation.IsApiContractPresent("Windows.Foundation.UniversalApiContract", 8))
    {
        simpleDialog.XamlRoot = ((Button)sender).XamlRoot;
    }

    try
    {
        ContentDialogResult result = await simpleDialog.ShowAsync();
    }
    catch (Exception)
    {
        // The dialog didn't open, probably because another dialog is already open.
    }
}
If it's not desirable to have a dialog closed programmatically, don't assign it as the CurrentDialog. Here, MainPage shows an important dialog that should only be dismissed when the use clicks Ok. Because it's not assigned as the CurrentDialog, no attempt is made to close it programmatically.
public sealed partial class MainPage : Page
{
    // Track the last opened dialog so you can close it if another dialog tries to open.
    public static ContentDialog CurrentDialog { get; set; } = null;

    // ...
    private async void DialogButton_Click(object sender, RoutedEventArgs e)
    {
        ContentDialog importantDialog = new ContentDialog
        {
            Title = "Important dialog",
            Content = "This dialog can only be dismissed by clicking Ok.",
            CloseButtonText = "Ok"
        };

        if (MainPage.CurrentDialog != null)
        {
            MainPage.CurrentDialog.Hide();
        }
        // Do not track this dialog as the MainPage.CurrentDialog.
        // It should only be closed by clicking the Ok button.
        MainPage.CurrentDialog = null;

        try
        {
            ContentDialogResult result = await importantDialog.ShowAsync();
        }
        catch (Exception)
        {
            // The dialog didn't open, probably because another dialog is already open.
        }
    }
    // ...
}
Complete code
MainPage.xaml
<Page
x:Class="HelloAppWindow.MainPage"
xmlns="http://schemas.microsoft.com/winfx/2006/xaml/presentation"
xmlns:x="http://schemas.microsoft.com/winfx/2006/xaml"
xmlns:local="using:HelloAppWindow"
xmlns:d="http://schemas.microsoft.com/expression/blend/2008"
xmlns:mc="http://schemas.openxmlformats.org/markup-compatibility/2006"
mc:Ignorable="d"
Background="{ThemeResource ApplicationPageBackgroundThemeBrush}">
<Grid>
<Grid.ColumnDefinitions>
<ColumnDefinition/>
<ColumnDefinition Width="Auto"/>
</Grid.ColumnDefinitions>
<StackPanel VerticalAlignment="Center" HorizontalAlignment="Center">
<Button x:Name="NewWindowButton" Content="Open new window"
Click="ShowNewWindowButton_Click" Margin="0,12"/>
<Button Content="Open dialog" Click="DialogButton_Click"
HorizontalAlignment="Stretch"/>
<Button Content="Close all" Click="CloseAllButton_Click"
Margin="0,12" HorizontalAlignment="Stretch"/>
</StackPanel>
<StackPanel x:Name="colorPickerContainer" Grid.Column="1" Background="WhiteSmoke">
<Button Click="DetachColorPickerButton_Click" HorizontalAlignment="Right">
<FontIcon FontFamily="Segoe MDL2 Assets" Glyph="" />
</Button>
<ColorPicker x:Name="colorPicker" Margin="12" Width="288"
IsColorChannelTextInputVisible="False"
ColorChanged="ColorPicker_ColorChanged"/>
</StackPanel>
</Grid>
</Page>
MainPage.xaml.cs
using System;
using System.Collections.Generic;
using System.Linq;
using Windows.Foundation;
using Windows.UI;
using Windows.UI.WindowManagement;
using Windows.UI.Xaml;
using Windows.UI.Xaml.Controls;
using Windows.UI.Xaml.Hosting;
using Windows.UI.Xaml.Media;

// The Blank Page item template is documented at https://go.microsoft.com/fwlink/?LinkId=402352&clcid=0x409

namespace HelloAppWindow
{
    /// <summary>
    /// An empty page that can be used on its own or navigated to within a Frame.
    /// </summary>
    public sealed partial class MainPage : Page
    {
        AppWindow colorPickerAppWindow;

        // Track open app windows in a Dictionary.
        public static Dictionary<UIContext, AppWindow> AppWindows { get; set; }
            = new Dictionary<UIContext, AppWindow>();

        // Track the last opened dialog so you can close it if another dialog tries to open.
        public static ContentDialog CurrentDialog { get; set; } = null;

        public MainPage()
        {
            this.InitializeComponent();
        }

        private async void ShowNewWindowButton_Click(object sender, RoutedEventArgs e)
        {
            // Create a new window.
            AppWindow appWindow = await AppWindow.TryCreateAsync();

            // Create a Frame and navigate to the Page you want to show in the new window.
            Frame appWindowContentFrame = new Frame();
            appWindowContentFrame.Navigate(typeof(AppWindowPage));

            // Get a reference to the page instance and assign the
            // newly created AppWindow to the MyAppWindow property.
            AppWindowPage page = (AppWindowPage)appWindowContentFrame.Content;
            page.MyAppWindow = appWindow;
            page.TextColorBrush = new SolidColorBrush(colorPicker.Color);

            // Attach the XAML content to the window.
            ElementCompositionPreview.SetAppWindowContent(appWindow, appWindowContentFrame);

            // Add the new page to the Dictionary using the UIContext as the Key.
            AppWindows.Add(appWindowContentFrame.UIContext, appWindow);
            appWindow.Title = "App Window " + AppWindows.Count.ToString();

            // When the window is closed, be sure to release XAML resources
            // and the reference to the window.
            appWindow.Closed += delegate
            {
                MainPage.AppWindows.Remove(appWindowContentFrame.UIContext);
                appWindowContentFrame.Content = null;
                appWindow = null;
            };

            // Show the window.
            await appWindow.TryShowAsync();
        }

        private async void DialogButton_Click(object sender, RoutedEventArgs e)
        {
            ContentDialog importantDialog = new ContentDialog
            {
                Title = "Important dialog",
                Content = "This dialog can only be dismissed by clicking Ok.",
                CloseButtonText = "Ok"
            };

            if (MainPage.CurrentDialog != null)
            {
                MainPage.CurrentDialog.Hide();
            }
            // Do not track this dialog as the MainPage.CurrentDialog.
            // It should only be closed by clicking the Ok button.
            MainPage.CurrentDialog = null;

            try
            {
                ContentDialogResult result = await importantDialog.ShowAsync();
            }
            catch (Exception)
            {
                // The dialog didn't open, probably because another dialog is already open.
            }
        }

        private async void DetachColorPickerButton_Click(object sender, RoutedEventArgs e)
        {
            // Create the color picker window.
            if (colorPickerAppWindow == null)
            {
                colorPickerContainer.Children.Remove(colorPicker);
                colorPickerContainer.Visibility = Visibility.Collapsed;

                Grid appWindowRootGrid = new Grid();
                appWindowRootGrid.Children.Add(colorPicker);

                // Create a new window
                colorPickerAppWindow = await AppWindow.TryCreateAsync();
                colorPickerAppWindow.RequestMoveAdjacentToCurrentView();
                colorPickerAppWindow.RequestSize(new Size(300, 428));
                colorPickerAppWindow.Title = "Color picker";

                // Attach the XAML content to our window
                ElementCompositionPreview.SetAppWindowContent(colorPickerAppWindow, appWindowRootGrid);

                // Make sure to release the reference to this window,
                // and release XAML resources, when it's closed
                colorPickerAppWindow.Closed += delegate
                {
                    appWindowRootGrid.Children.Remove(colorPicker);
                    appWindowRootGrid = null;
                    colorPickerAppWindow = null;

                    colorPickerContainer.Children.Add(colorPicker);
                    colorPickerContainer.Visibility = Visibility.Visible;
                };
            }
            // Show the window.
            await colorPickerAppWindow.TryShowAsync();
        }

        private void ColorPicker_ColorChanged(ColorPicker sender, ColorChangedEventArgs args)
        {
            NewWindowButton.Background = new SolidColorBrush(args.NewColor);
        }

        private async void CloseAllButton_Click(object sender, RoutedEventArgs e)
        {
            while (AppWindows.Count > 0)
            {
                await AppWindows.Values.First().CloseAsync();
            }
        }
    }
}
AppWindowPage.xaml
<Page
    x:Class="HelloAppWindow.AppWindowPage"
    xmlns="http://schemas.microsoft.com/winfx/2006/xaml/presentation"
    xmlns:x="http://schemas.microsoft.com/winfx/2006/xaml"
    xmlns:local="using:HelloAppWindow"
    xmlns:d="http://schemas.microsoft.com/expression/blend/2008"
    xmlns:mc="http://schemas.openxmlformats.org/markup-compatibility/2006"
    mc:Ignorable="d"
    Background="{ThemeResource ApplicationPageBackgroundThemeBrush}">

    <Grid>
        <TextBlock x:Name="TitleTextBlock" Text="Hello AppWindow!" FontSize="24" HorizontalAlignment="Center" Margin="24"/>

        <StackPanel VerticalAlignment="Center" HorizontalAlignment="Center">
            <Button Content="Open dialog" Click="DialogButton_Click"
                    Width="200" Margin="0,4"/>
            <Button Content="Move window" Click="MoveWindowButton_Click"
                    Width="200" Margin="0,4"/>
            <ToggleButton Content="Compact Overlay" x:Name="compactOverlayButton" Click="CompactOverlayButton_Click"
                          Width="200" Margin="0,4"/>
            <ToggleButton Content="Full Screen" x:Name="fullScreenButton" Click="FullScreenButton_Click"
                          Width="200" Margin="0,4"/>
            <Grid>
                <TextBlock Text="Size:"/>
                <TextBlock x:Name="SizeText" HorizontalAlignment="Right"/>
            </Grid>
            <Grid>
                <TextBlock Text="Presentation:"/>
                <TextBlock x:Name="ConfigText" HorizontalAlignment="Right"/>
            </Grid>
        </StackPanel>
    </Grid>
</Page>
AppWindowPage.xaml.cs
using System;
using Windows.Foundation;
using Windows.Foundation.Metadata;
using Windows.UI;
using Windows.UI.WindowManagement;
using Windows.UI.Xaml;
using Windows.UI.Xaml.Controls;
using Windows.UI.Xaml.Media;

// The Blank Page item template is documented at https://go.microsoft.com/fwlink/?LinkId=234238

namespace HelloAppWindow
{
    /// <summary>
    /// An empty page that can be used on its own or navigated to within a Frame.
    /// </summary>
    public sealed partial class AppWindowPage : Page
    {
        AppWindow window;

        public AppWindow MyAppWindow { get; set; }

        public SolidColorBrush TextColorBrush { get; set; } = new SolidColorBrush(Colors.Black);

        public AppWindowPage()
        {
            this.InitializeComponent();

            Loaded += AppWindowPage_Loaded;
        }

        private void AppWindowPage_Loaded(object sender, RoutedEventArgs e)
        {
            // Get the reference to this AppWindow that was stored when it was created.
            window = MainPage.AppWindows[this.UIContext];

            // Set up event handlers for the window.
            window.Changed += Window_Changed;

            TitleTextBlock.Foreground = TextColorBrush;
        }

        private async void DialogButton_Click(object sender, RoutedEventArgs e)
        {
            ContentDialog simpleDialog = new ContentDialog
            {
                Title = "Content dialog",
                Content = "Dialog box for " + window.Title,
                CloseButtonText = "Ok"
            };

            if (MainPage.CurrentDialog != null)
            {
                MainPage.CurrentDialog.Hide();
            }
            MainPage.CurrentDialog = simpleDialog;

            // Use this code to associate the dialog to the appropriate AppWindow by setting
            // the dialog's XamlRoot to the same XamlRoot as an element that is already
            // present in the AppWindow.
            if (ApiInformation.IsApiContractPresent("Windows.Foundation.UniversalApiContract", 8))
            {
                simpleDialog.XamlRoot = ((Button)sender).XamlRoot;
            }

            try
            {
                ContentDialogResult result = await simpleDialog.ShowAsync();
            }
            catch (Exception)
            {
                // The dialog didn't open, probably because another dialog is already open.
            }
        }

        private void Window_Changed(AppWindow sender, AppWindowChangedEventArgs args)
        {
            if (args.DidAvailableWindowPresentationsChange)
            {
                EnablePresentationButtons(sender);
            }

            if (args.DidWindowPresentationChange)
            {
                ConfigText.Text = window.Presenter.GetConfiguration().Kind.ToString();
            }

            if (args.DidSizeChange)
            {
                SizeText.Text = window.GetPlacement().Size.ToString();
            }
        }

        private void EnablePresentationButtons(AppWindow window)
        {
            // Check whether the current AppWindowPresenter supports CompactOverlay.
            if (window.Presenter.IsPresentationSupported(AppWindowPresentationKind.CompactOverlay))
            {
                // Show the CompactOverlay button...
                compactOverlayButton.Visibility = Visibility.Visible;
            }
            else
            {
                // Hide the CompactOverlay button...
                compactOverlayButton.Visibility = Visibility.Collapsed;
            }

            // Check whether the current AppWindowPresenter supports FullScreen?
            if (window.Presenter.IsPresentationSupported(AppWindowPresentationKind.FullScreen))
            {
                // Show the FullScreen button...
                fullScreenButton.Visibility = Visibility.Visible;
            }
            else
            {
                // Hide the FullScreen button...
                fullScreenButton.Visibility = Visibility.Collapsed;
            }
        }

        private void CompactOverlayButton_Click(object sender, RoutedEventArgs e)
        {
            if (window.Presenter.GetConfiguration().Kind != AppWindowPresentationKind.CompactOverlay)
            {
                window.Presenter.RequestPresentation(AppWindowPresentationKind.CompactOverlay);
                fullScreenButton.IsChecked = false;
            }
            else
            {
                window.Presenter.RequestPresentation(AppWindowPresentationKind.Default);
            }
        }

        private void FullScreenButton_Click(object sender, RoutedEventArgs e)
        {
            if (window.Presenter.GetConfiguration().Kind != AppWindowPresentationKind.FullScreen)
            {
                window.Presenter.RequestPresentation(AppWindowPresentationKind.FullScreen);
                compactOverlayButton.IsChecked = false;
            }
            else
            {
                window.Presenter.RequestPresentation(AppWindowPresentationKind.Default);
            }
        }

        private void MoveWindowButton_Click(object sender, RoutedEventArgs e)
        {
            DisplayRegion displayRegion = window.GetPlacement().DisplayRegion;
            double displayRegionWidth = displayRegion.WorkAreaSize.Width;
            double windowWidth = window.GetPlacement().Size.Width;
            int horizontalOffset = (int)(displayRegionWidth - windowWidth);
            window.RequestMoveRelativeToDisplayRegion(displayRegion, new Point(horizontalOffset, 0));
        }
    }
}