Create a WinUI app
This tutorial series demonstrates how to create a WinUI 3 app using XAML and C#. The app you'll create is a note app, where the user can create, save, and load multiple notes.
In this tutorial, you learn how to:
- Use XAML markup to define the user interface of the app.
- Interact with XAML elements through C# code.
- Save and load files from the local file system.
- Create views and bind them to data.
- Use navigation to move to and from pages in the app.
- Use resources like documentation and sample apps to create your own app.
You'll use Visual Studio 2022 to create an app that you can use to enter a note and save it to local app storage. The app will have two pages:
NotePage
- a page for editing a single note.AllNotesPage
- a page to show all the saved notes.
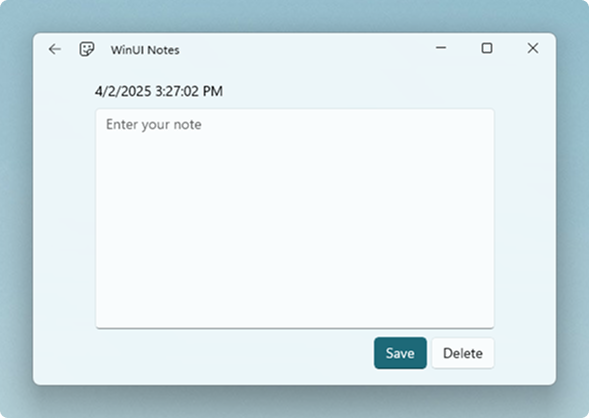
The final application is shown below:
AllNotesPage
NotePage
Create the Visual Studio project
To begin this tutorial, you must create a WinUI 3 app project in Visual Studio using the Blank App, Packaged (WinUI 3 in Desktop)
C# project template. When creating the project, use the following settings:
Project Name
This must be set to
WinUINotes
. If the project is named something different, the code you copy and paste from this tutorial may result in build errors. This is because Visual Studio uses the project name as the default namespace for your app code.Windows App SDK
This tutorial uses features that are new in Windows App SDK 1.7. You must make sure the Windows App SDK NuGet package is updated to version 1.7 or later.
Important
If you have not created a WinUI 3 project before, follow the steps in Start developing Windows apps to make sure your dev environment and Visual Studio project are set up correctly.
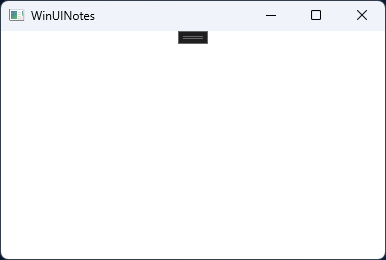
When you run your blank app project (as outlined in Start developing Windows apps), you should see an empty window that looks like this:
Tip
You'll frequently refer to API reference docs and conceptual docs while building Windows apps. In this tutorial, you'll see links inline in the text, and in groups labeled, "Learn more in the docs:". These links are optional; you don't need to follow them to complete the tutorial. They're provided in case you want to make note of where to find the information you'll need when you start to create your own apps.
Project setup
Before you get into coding the app, we'll take a quick look at the Visual Studio project and take care of some project setup. When Visual Studio creates a WinUI 3 project, several important folders and code files are generated. These can be seen in the Solution Explorer pane of Visual Studio:
The items listed here are the ones you'll primarily interact with. These files help get the WinUI 3 app configured and running. Each file serves a different purpose, described below:
Assets folder
This folder contains your app's logo, images, and other media assets. It starts out populated with placeholder files for your app's logo. This logo represents your app in the Windows Start Menu, the Windows taskbar, and in the Microsoft Store when your app is published there.
App.xaml and App.xaml.cs
The App.xaml file contains app-wide XAML resources, such as colors, styles, or templates. The App.xaml.cs file generally contains code that instantiates and activates the application window. In this project, it points to the
MainWindow
class.MainWindow.xaml and MainWindow.xaml.cs
These files represent your app's window.
Package.appxmanifest
This package manifest file lets you configure publisher information, logos, processor architectures, and other details that determine how your app appears in the Microsoft Store.
XAML files and partial classes
Extensible Application Markup Language (XAML) is a declarative language that can initialize objects and set properties of objects. You can create visible UI elements in the declarative XAML markup. You can then associate a separate code file for each XAML file (typically called a code-behind file) that can respond to events and manipulate the objects that you originally declare in XAML.
There are generally two files with any XAML file, the .xaml
file itself, and a corresponding code-behind file that is a child item of it in the Solution Explorer.
- The
.xaml
file contains XAML markup that defines your app UI. The class name is declared with thex:Class
attribute. - The code file contains code you create to interact with the XAML markup and a call to the
InitializeComponent
method. The class is defined as apartial class
.
When you build your project, the InitializeComponent
method is called to parse the .xaml
file and generate code that's joined with the code partial class
to create the complete class.
Learn more in the docs:
- XAML Overview
- Partial Classes and Methods (C# Programming Guide)
- x:Class attribute, x:Class Directive
Update MainWindow
The MainWindow
class included with the project is a sub-class of the XAML Window class, which is used to define the shell of the app. The app's window has two parts:
- The client portion of the window is where your content goes.
- The non-client portion is the part controlled by the Windows Operating System. It includes the title bar, where the caption controls (Min/Max/Close buttons), app icon, title, and drag area are. It also includes the frame around the outside of the window.
To make the WinUI Notes app consistent with Fluent Design guidelines, you'll make a few modifications to MainWindow
. First, you'll apply Mica material as the window backdrop. Mica is an opaque, dynamic material that incorporates theme and desktop wallpaper to paint the background of the window. Then, you'll extend your app's content into the title bar area and replace the system title bar with a XAML TitleBar control. This makes better use of space and gives you more control over the design, while providing all the functionality required of the title bar.
You'll also add a Frame as the content of the window. The Frame
class works with the Page class to let you navigate between pages of content in your app. You'll add the pages in a later step.
Tip
You can download or view the code for this tutorial from the GitHub repo. To see the code as it is in this step, see this commit: note page - initial.
Double-click MainWindow.xaml in Solution Explorer to open it.
Between the opening and closing
<Window.. >
tags, replace any existing XAML with this:<Window.SystemBackdrop> <MicaBackdrop Kind="Base"/> </Window.SystemBackdrop> <Grid> <Grid.RowDefinitions> <!-- Title Bar --> <RowDefinition Height="Auto" /> <!-- App Content --> <RowDefinition Height="*" /> </Grid.RowDefinitions> <TitleBar x:Name="AppTitleBar" Title="WinUI Notes"> <TitleBar.IconSource> <FontIconSource Glyph=""/> </TitleBar.IconSource> </TitleBar> <!-- App content --> <Frame x:Name="rootFrame" Grid.Row="1"/> </Grid>
Save the file by pressing CTRL + S, clicking the Save icon in the tool bar, or by selecting the menu File > Save MainPage.xaml.
Don't worry if you don't understand what all this XAML markup does right now. As you build the rest of the app UI, we'll explain XAML concepts in more detail.
Note
In this markup, you see two different ways to set properties in XAML. The first and shortest way is to use XAML attribute syntax, like this: <object attribute="value">
. This works great for simple values, such as <MicaBackdrop Kind="Base"/>
. But it only works for values where the XAML parser knows how to convert the string to the expected value type.
If the property value is more complex, or the XAML parser doesn't know how to convert it, you must use property element syntax to create the object. like this:
<object ... >
<object.property>
value
</object.property>
</object>
For example, to set the Window.SystemBackdrop
property, you have to use property element syntax and explicitly create the MicaBackdrop
element. But you can use simple attribute syntax to set the MicaBackdrop.Kind
property.
<Window ... >
<Window.SystemBackdrop>
<MicaBackdrop Kind="Base"/>
</Window.SystemBackdrop>
...
</Window>
In MainWindow.xaml
, <Window.SystemBackdrop>
, <Grid.RowDefinitions>
, and <TitleBar.IconSource>
contain complex values that must be set with property element syntax.
Learn more in the docs:
If you run the app now, you'll see the XAML TitleBar
element you added, but it will be below the system title bar, which is still showing.
You need to write a bit of code to finish replacing the system title bar.
Open MainWindow.xaml.cs. You can open the code-behind for MainWindow.xaml (or any XAML file) in three ways:
- If the MainWindow.xaml file is open and is the active document being edited, press F7.
- If the MainWindow.xaml file is open and is the active document being edited, right-click in the text editor and select View Code.
- Use Solution Explorer to expand the MainWindow.xaml entry, revealing the MainWindow.xaml.cs file. Double-click the file to open it.
In the constructor for
MainWindow
, add this code after the call toInitializeComponent
:public MainWindow() { this.InitializeComponent(); // ↓ Add this. ↓ // Hide the default system title bar. ExtendsContentIntoTitleBar = true; // Replace system title bar with the WinUI TitleBar. SetTitleBar(AppTitleBar); // ↑ Add this. ↑ }
The ExtendsContentIntoTitleBar property hides the default system title bar and extends your app XAML into that area. The call to SetTitleBar then tells the system to treat the XAML element you specified (
AppTitleBar
) as the title bar for the app.Build and run the project by pressing F5, clicking the Debug "Start" button in the tool bar, or by selecting the menu Run > Start Debugging.
When you run the app now, you'll see an empty window with a mica background and the XAML title bar that's replaced the system title bar.
Create a page for a note
Now you'll create a page that allows a user to edit a note, and then you'll write the code to save or delete the note.
Tip
You can download or view the code for this tutorial from the GitHub repo. To see the code as it is in this step, see this commit: note page - initial.
First, add the new page to the project:
In the Solution Explorer pane of Visual Studio, right-click on the WinUINotes project > Add > New Item....
In the Add New Item dialog, select WinUI in the template list on the left-side of the window. Next, select the Blank Page (WinUI 3) template. Name the file NotePage.xaml, and then select Add.
The NotePage.xaml file will open in a new tab, displaying all of the XAML markup that represents the UI of the page. Replace the
<Grid> ... </Grid>
element in the XAML with the following markup:<Grid Padding="16" RowSpacing="8"> <Grid.RowDefinitions> <RowDefinition Height="*"/> <RowDefinition Height="Auto"/> </Grid.RowDefinitions> <Grid.ColumnDefinitions> <ColumnDefinition Width="*"/> <ColumnDefinition Width="400"/> <ColumnDefinition Width="*"/> </Grid.ColumnDefinitions> <TextBox x:Name="NoteEditor" AcceptsReturn="True" TextWrapping="Wrap" PlaceholderText="Enter your note" Header="New note" ScrollViewer.VerticalScrollBarVisibility="Auto" Width="400" Grid.Column="1"/> <StackPanel Orientation="Horizontal" HorizontalAlignment="Right" Spacing="4" Grid.Row="1" Grid.Column="1"> <Button Content="Save"/> <Button Content="Delete"/> </StackPanel> </Grid>
Save the file by pressing CTRL + S, clicking the Save icon in the tool bar, or by selecting the menu File > Save NotePage.xaml.
If you run the app right now, you won't see the note page you just created. That's because you still need to set it as the content of the
Frame
control inMainWindow
.Open MainWindow.xaml and set
NotePage
as the SourcePageType on theFrame
, like this:<Frame x:Name="rootFrame" Grid.Row="1" SourcePageType="local:NotePage"/>
Now when you run the app, the
Frame
will load an instance ofNotePage
and show it to the user.
Important
XAML namespace (xmlns) mappings are the XAML counterpart to the C# using
statement. local:
is a prefix that is mapped for you within the XAML pages for your app project (xmlns:local="using:WinUINotes"
). It's mapped to refer to the same namespace that's created to contain the x:Class
attribute and code for all the XAML files including App.xaml. As long as you define any custom classes you want to use in XAML in this same namespace, you can use the local:
prefix to refer to your custom types in XAML.
Let's break down the key parts of the XAML controls placed on the page:
The Grid.RowDefinitions and Grid.ColumnDefinitions define a grid with 2 rows and 3 columns (placed below the title bar).
- The bottom row is automatically (
Auto
) sized to fit its content, the two buttons. The top row uses all the remaining vertical space (*
). - The middle column is
400
epx wide and is where the note editor goes. The columns on either side are empty and split all the remaining horizontal space between them (*
).
Note
Because of how the scaling system works, when you design your XAML app, you're designing in effective pixels, not actual physical pixels. Effective pixels (epx) are a virtual unit of measurement, and they're used to express layout dimensions and spacing, independent of screen density.
- The bottom row is automatically (
<TextBox x:Name="NoteEditor" ... > ... </TextBox>
is a text entry control (TextBox) configured for multi-line text entry, and is placed in the top center cell of theGrid
(Grid.Column="1"
). Row and column indexes are 0-based, and by default, controls are placed in row 0 and column 0 of the parentGrid
. So this is the equivalent of specifying Row 0, Column 1.<StackPanel Orientation="Horizontal" ... > ... </StackPanel>
defines a layout control (StackPanel) that stacks its children either vertically (default) or horizontally. It's placed in the bottom center cell of theGrid
(Grid.Row="1" Grid.Column="1"
).Note
Grid.Row="1" Grid.Column="1"
is an example of XAML attached properties. Attached properties let one XAML object set a property that belongs to a different XAML object. Often, as in this case, child elements can use attached properties to inform their parent element of how they are to be presented in the UI.Two
<Button>
controls are inside the<StackPanel>
and arranged horizontally. You'll add the code to handle the buttons' Click events in the next section.
Learn more in the docs:
Load and save a note
Open the NotePage.xaml.cs code-behind file. When you add a new XAML file, the code-behind contains a single line in the constructor, a call to the InitializeComponent
method:
namespace WinUINotes
{
public sealed partial class NotePage : Page
{
public NotePage()
{
this.InitializeComponent();
}
}
}
The InitializeComponent
method reads the XAML markup and initializes all of the objects defined by the markup. The objects are connected in their parent-child relationships, and the event handlers defined in code are attached to events set in the XAML.
Now you're going to add code to the NotePage.xaml.cs code-behind file to handle loading and saving notes.
Add the following variable declarations to the
NotePage
class:public sealed partial class NotePage : Page { private StorageFolder storageFolder = ApplicationData.Current.LocalFolder; private StorageFile? noteFile = null; private string fileName = "note.txt";
When a note is saved, it's saved to the app's local storage as a text file.
You use the StorageFolder class to access the app's local data folder. This folder is specific to your app, so notes saved here can't be accessed by other apps. You use the StorageFile class to access the text file saved in this folder. The name of the file is represented by the
fileName
variable. For now, setfileName
to "note.txt".Create an event handler for the note page's Loaded event.
public NotePage() { this.InitializeComponent(); // ↓ Add this. ↓ Loaded += NotePage_Loaded; } // ↓ Add this event handler method. ↓ private async void NotePage_Loaded(object sender, RoutedEventArgs e) { noteFile = (StorageFile)await storageFolder.TryGetItemAsync(fileName); if (noteFile is not null) { NoteEditor.Text = await FileIO.ReadTextAsync(noteFile); } }
In this method, you call TryGetItemAsync to retrieve the text file from the folder. If the file doesn't exist, it returns
null
. If the file does exist, call ReadTextAsync to read the text from the file into theNoteEditor
control's Text property. (Remember,NoteEditor
is theTextBox
control you created in the XAML file. You reference it here in your code-behind file using thex:Name
you assigned to it.)Important
You need to mark this method with the
async
keyword because the file access calls are asynchronous. In short, if you call a method that ends in...Async
(likeTryGetItemAsync
), you can add the await operator to the call. This keeps subsequent code from executing until the awaited call completes and keeps your UI responsive. When you useawait
, the method that you're calling from needs to be marked with the async keyword. For more info, see Call asynchronous APIs in C#.
Learn more in the docs:
Add event handlers
Next, add the Click event handlers for the for the Save and Delete buttons. Adding event handlers is something that you'll do often while creating your apps, so Visual Studio provides several features to make it easier.
In the NotePage.xaml file, place your cursor after the
Content
attribute in the SaveButton
control. TypeClick=
. At this point, Visual Studio should pop up an auto-complete UI that looks like this:- Press the down-arrow key to select <New Event Handler>, then press Tab. Visual Studio will complete the attribute with
Click="Button_Click"
and add an event handler method namedButton_Click
in the NotePage.xaml.cs code-behind file.
Now, you should rename the
Button_Click
method to something more meaningful. You'll do that in the following steps.- Press the down-arrow key to select <New Event Handler>, then press Tab. Visual Studio will complete the attribute with
In NotePage.xaml.cs, find the method that was added for you:
private void Button_Click(object sender, RoutedEventArgs e) { }
Tip
To locate code in your app, click Search in the Visual Studio title bar and use the Code Search option. Double-click the search result to open the code in the code editor.
Place your cursor before the "B" in
Button
and typeSave
. Wait a moment, and the method name will be highlighted in green.When you hover over the method name, Visual Studio will show a tooltip with a screwdriver or lightbulb icon. Click the down-arrow button next to the icon, then click Rename 'Button_Click' to 'SaveButton_Click'.
Visual Studio will rename the method everywhere in your app, including in the XAML file where you first added it to the
Button
.Repeat these steps for the Delete button, and rename the method to
DeleteButton_Click
.
Now that the event handlers are hooked up, you can add the code to save and delete the note file.
Add this code in the
SaveButton_Click
method to save the file. Notice that you also need to update the method signature with theasync
keyword.private async void SaveButton_Click(object sender, RoutedEventArgs e) { if (noteFile is null) { noteFile = await storageFolder.CreateFileAsync(fileName, CreationCollisionOption.ReplaceExisting); } await FileIO.WriteTextAsync(noteFile, NoteEditor.Text); }
In the
SaveButton_Click
method, you first check to see ifnoteFile
has been created. If it'snull
, then you have to create a new file in the local storage folder with the name represented by thefileName
variable, and assign the file to thenoteFile
variable. Then, you write the text in theTextBox
control to the file represented bynoteFile
.Add this code in the
DeleteButton_Click
method to delete the file. You need to update the method signature with theasync
keyword here, too.private async void DeleteButton_Click(object sender, RoutedEventArgs e) { if (noteFile is not null) { await noteFile.DeleteAsync(); noteFile = null; NoteEditor.Text = string.Empty; } }
In the
DeleteButton_Click
method, you first check to see ifnoteFile
exists. If it does, delete the file represented bynoteFile
from the local storage folder and setnoteFile
tonull
. Then, reset the text in theTextBox
control to an empty string.Important
After the text file is deleted from the file system, it's important to set
noteFile
tonull
. Remember thatnoteFile
is a StorageFile that provides access to the system file in your app. After the system file is deleted,noteFile
still points to where the system file was, but doesn't know that it no longer exists. If you try to read, write, or delete the system file now, you'll get an error.Save the file by pressing CTRL + S, clicking the Save icon in the tool bar, or by selecting the menu File > Save NotePage.xaml.cs.
The final code for the code-behind file should look like this:
using Microsoft.UI.Xaml;
using Microsoft.UI.Xaml.Controls;
using System;
using Windows.Storage;
namespace WinUINotes
{
public sealed partial class NotePage : Page
{
private StorageFolder storageFolder = ApplicationData.Current.LocalFolder;
private StorageFile? noteFile = null;
private string fileName = "note.txt";
public NotePage()
{
this.InitializeComponent();
Loaded += NotePage_Loaded;
}
private async void NotePage_Loaded(object sender, RoutedEventArgs e)
{
noteFile = (StorageFile)await storageFolder.TryGetItemAsync(fileName);
if (noteFile is not null)
{
NoteEditor.Text = await FileIO.ReadTextAsync(noteFile);
}
}
private async void SaveButton_Click(object sender, RoutedEventArgs e)
{
if (noteFile is null)
{
noteFile = await storageFolder.CreateFileAsync(fileName, CreationCollisionOption.ReplaceExisting);
}
await FileIO.WriteTextAsync(noteFile, NoteEditor.Text);
}
private async void DeleteButton_Click(object sender, RoutedEventArgs e)
{
if (noteFile is not null)
{
await noteFile.DeleteAsync();
noteFile = null;
NoteEditor.Text = string.Empty;
}
}
}
}
Test the note
With this code in place, you can test the app to make sure the note saves and loads correctly.
- Build and run the project by pressing F5, clicking the Debug "Start" button in the tool bar, or by selecting the menu Run > Start Debugging.
- Type into the text entry box and press the Save button.
- Close the app, then restart it. The note you entered should be loaded from the device's storage.
- Press the Delete button.
- Close the app, restart it. You should be presented with a new blank note.
Important
After you've confirmed that saving and deleting a note works correctly, create and save a new note again. You'll want to have a saved note to test the app in later steps.
Add a view and model for the note
This portion of the tutorial introduces the concepts of data views and models.
In the previous steps of the tutorial, you added a new page to the project that lets the user save, edit, or delete a single note. However, because the app needs to handle more than one note, you need to add another page that displays all the notes (call it AllNotesPage
). This page let's the user choose a note to open in the editor page so they can view, edit, or delete it. It should also let the user create a new note.
To accomplish this, AllNotesPage
needs to have a collection of notes, and a way to display the collection. This is where the app runs into trouble because the note data is tightly bound to the NotePage
file. In AllNotesPage
, you just want to display all the notes in a list or other collection view, with information about each note, like the date it was created and a preview of the text. With the note text being tightly bound to the TextBox
control, there's no way to do this.
Before you add a page to show all the notes, let's make some changes to separate the note data from the note presentation.
Views and models
Typically, a WinUI app has at least a view layer and a data layer.
The view layer defines the UI using XAML markup. The markup includes data binding expressions (such as x:Bind) that define the connection between specific UI components and data members. Code-behind files are sometimes used as part of the view layer to contain additional code needed to customize or manipulate the UI, or to extract data from event handler arguments before calling a method that performs the work on the data.
The data layer, or model, defines the types that represent your app data and related logic. This layer is independent of the view layer, and you can create multiple different views that interact with the data.
Currently, the NotePage
represents a view of data (the note text). However, after the data is read into the app from the system file, it exists only in the Text
property of the TextBox
in NotePage
. It's not represented in the app in a way that lets you present the data in different ways or in different places; that is, the app doesn't have a data layer. You'll restructure the project now to create the data layer.
Separate the view and model
Tip
You can download or view the code for this tutorial from the GitHub repo. To see the code as it is in this step, see this commit: note page - view-model.
Refactor the existing code to separate the model from the view. The next few steps will organize the code so that views and models are defined separately from each other.
In Solution Explorer, right-click on the WinUINotes project and select Add > New Folder. Name the folder Models.
Right-click on the WinUINotes project again and select Add > New Folder. Name the folder Views.
Find the NotePage.xaml item and drag it to the Views folder. The NotePage.xaml.cs file should move with it.
Note
When you move a file, Visual Studio usually prompts you with a warning about how the move operation may take a long time. This shouldn't be a problem here, press OK if you see this warning.
Visual Studio may also ask you if you want to adjust the namespace of the moved file. Select No. You'll change the namespace in the next steps.
Update the view namespace
Now that the view has been moved to the Views folder, you'll need to update the namespaces to match. The namespace for the XAML and code-behind files of the pages is set to WinUINotes
. This needs to be updated to WinUINotes.Views
.
In the Solution Explorer pane, expand NotePage.xaml to reveal the code-behind file.
Double-click on the NotePage.xaml.cs item to open the code editor if it's not already open. Change the namespace to
WinUINotes.Views
:namespace WinUINotes.Views
Double-click on the NotePage.xaml item to open the XAML editor if it's not already open. The old namespace is referenced through the
x:Class
attribute, which defines which class type is the code-behind for the XAML. This entry isn't just the namespace, but the namespace with the type. Change thex:Class
value toWinUINotes.Views.NotePage
:x:Class="WinUINotes.Views.NotePage"
Fix the namespace reference in MainWindow
In the previous step, you created the note page and updated MainWindow.xaml
to navigate to it. Remember that it was mapped with the local:
namespace mapping. It's common practice to map the name local
to the root namespace of your project, and the Visual Studio project template already does this for you (xmlns:local="using:WinUINotes"
). Now that the page has moved to a new namespace, the type mapping in the XAML is now invalid.
Fortunately, you can add your own namespace mappings as needed. You need to do this to access items in different folders you create in your project. This new XAML namespace will map to the namespace of WinUINotes.Views
, so name it views
. The declaration should look like the following attribute: xmlns:views="using:WinUINotes.Views"
.
In the Solution Explorer pane, double-click on the MainWindow.xaml entry to open it in the XAML editor.
Add this new namespace mapping on the line below the mapping for
local
:xmlns:views="using:WinUINotes.Views"
The
local
XAML namespace was used to set theFrame.SourcePageType
property, so change it toviews
there. Your XAML should now look like this:<Window x:Class="WinUINotes.MainWindow" xmlns="http://schemas.microsoft.com/winfx/2006/xaml/presentation" xmlns:x="http://schemas.microsoft.com/winfx/2006/xaml" xmlns:local="using:WinUINotes" xmlns:views="using:WinUINotes.Views" xmlns:d="http://schemas.microsoft.com/expression/blend/2008" xmlns:mc="http://schemas.openxmlformats.org/markup-compatibility/2006" mc:Ignorable="d" Title="WinUI Notes"> <!-- ... Unchanged XAML not shown. --> <Frame x:Name="rootFrame" Grid.Row="1" SourcePageType="views:NotePage"/> <!-- ... Unchanged XAML not shown. --> </Window>
Build and run the app. The app should run without any compiler errors, and everything should still work as before.
Define the model
Currently, the model (the data) is embedded in the note view. You'll create a new class to represent a note page's data:
In the Solution Explorer pane, right-click on the Models folder and select Add > Class....
Name the class Note.cs and press Add. The Note.cs file will open in the code editor.
Replace the code in the Note.cs file with this code, which makes the class
public
and adds properties and methods for handling a note:using System; using System.Threading.Tasks; using Windows.Storage; namespace WinUINotes.Models { public class Note { private StorageFolder storageFolder = ApplicationData.Current.LocalFolder; public string Filename { get; set; } = string.Empty; public string Text { get; set; } = string.Empty; public DateTime Date { get; set; } = DateTime.Now; public Note() { Filename = "notes" + DateTime.Now.ToBinary().ToString() + ".txt"; } public async Task SaveAsync() { // Save the note to a file. StorageFile noteFile = (StorageFile)await storageFolder.TryGetItemAsync(Filename); if (noteFile is null) { noteFile = await storageFolder.CreateFileAsync(Filename, CreationCollisionOption.ReplaceExisting); } await FileIO.WriteTextAsync(noteFile, Text); } public async Task DeleteAsync() { // Delete the note from the file system. StorageFile noteFile = (StorageFile)await storageFolder.TryGetItemAsync(Filename); if (noteFile is not null) { await noteFile.DeleteAsync(); } } } }
Save the file.
You'll notice that this code is very similar to the code in NotePage.xaml.cs, with a few changes and additions.
Filename
and Text
have been changed to public
properties, and a new Date
property has been added.
The code to save and delete the files has been placed in public
methods. It is mostly identical to the code you used in the button Click
event handlers in NotePage
, but extra code to update the view after the file is deleted has been removed. It's not needed here because you'll be using data binding to keep the model and view synchronized.
These async method signatures return Task instead of void
. The Task
class represents a single asynchronous operation that does not return a value. Unless the method signature requires void
, as is the case for the Click
event handlers, async
methods should return a Task
.
You also won't be keeping a reference to the StorageFile
that holds the note anymore. You just try to get the file when you need it to save or delete.
In NotePage
, you used a placeholder for the file name: note.txt
. Now that the app supports more than one note, file names for saved notes need to be different and unique. To do this, set the Filename
property in the constructor. You can use the DateTime.ToBinary method to create a part of the file name based on the current time and make the file names unique. The generated file name looks like this: notes-8584626598945870392.txt
.
Update the note page
Now you can update the NotePage
view to use the Note
data model and delete code that was moved to the Note
model.
Open the Views\NotePage.xaml.cs file if it's not already open in the editor.
After the last
using
statement at the top of the page, add a newusing
statement to give your code access to the classes in theModels
folder and namespace.using WinUINotes.Models;
Delete these lines from the class:
private StorageFolder storageFolder = ApplicationData.Current.LocalFolder; private StorageFile? noteFile = null; private string fileName = "note.txt";
Instead, add a
Note
object namednoteModel
in their place. This represents the note data thatNotePage
provides a view of.private Note? noteModel;
You also don't need the
NotePage_Loaded
event handler anymore. You won't be reading text directly from the text file into the TextBox. Instead, the note text will be read intoNote
objects. You'll add the code for this when you add theAllNotesPage
in a later step. Delete these lines.Loaded += NotePage_Loaded; ... private async void NotePage_Loaded(object sender, RoutedEventArgs e) { noteFile = (StorageFile)await storageFolder.TryGetItemAsync(fileName); if (noteFile is not null) { NoteEditor.Text = await FileIO.ReadTextAsync(noteFile); } }
Replace the code in the
SaveButton_Click
method with this:if (noteModel is not null) { await noteModel.SaveAsync(); }
Replace the code in the
DeleteButton_Click
method with this:if (noteModel is not null) { await noteModel.DeleteAsync(); }
Now you can update the XAML file to use the Note
model. Previously, you read the text directly from the text file into the TextBox.Text
property in the code-behind file. Now, you use data binding for the Text
property.
Open the Views\NotePage.xaml file if it's not already open in the editor.
Add a
Text
attribute to theTextBox
control. Bind it to theText
property ofnoteModel
:Text="{x:Bind noteModel.Text, Mode=TwoWay}"
.Update the
Header
to bind to theDate
property ofnoteModel
:Header="{x:Bind noteModel.Date.ToString()}"
.<TextBox x:Name="NoteEditor" <!-- ↓ Add this line. ↓ --> Text="{x:Bind noteModel.Text, Mode=TwoWay}" AcceptsReturn="True" TextWrapping="Wrap" PlaceholderText="Enter your note" <!-- ↓ Update this line. ↓ --> Header="{x:Bind noteModel.Date.ToString()}" ScrollViewer.VerticalScrollBarVisibility="Auto" Width="400" Grid.Column="1"/>
Data binding is a way for your app's UI to display data, and optionally to stay in sync with that data. The Mode=TwoWay
setting on the binding means that the TextBox.Text
and noteModel.Text
properties are automatically synchronized. When the text is updated in the TextBox
, the changes are reflected in the Text
property of the noteModel
, and if noteModel.Text
is changed, the updates are reflected in the TextBox
.
The Header
property uses the default Mode
of OneTime
because the noteModel.Date
property doesn't change after the file is created. This code also demonstrates a powerful feature of x:Bind
called function binding, which lets you use a function like ToString
as a step in the binding path.
Important
It's important to choose the correct BindingMode; otherwise, your data binding might not work as expected. (A common mistake with {x:Bind}
is to forget to change the default BindingMode
when OneWay
or TwoWay
is needed.)
Name | Description |
---|---|
OneTime |
Updates the target property only when the binding is created. Default for {x:Bind} . |
OneWay |
Updates the target property when the binding is created. Changes to the source object can also propagate to the target. Default for {Binding} . |
TwoWay |
Updates either the target or the source object when either changes. When the binding is created, the target property is updated from the source. |
Data binding supports the separation of your data and UI, and that results in a simpler conceptual model as well as better readability, testability, and maintainability of your app.
In WinUI, there are two kinds of binding you can choose from:
- The
{x:Bind}
markup extension is processed at compile-time. Some of its benefits are improved performance and compile-time validation of your binding expressions. It's recommended for binding in WinUI apps. - The
{Binding}
markup extension is processed at run-time and uses general-purpose runtime object inspection.
Learn more in the docs:
Data binding and MVVM
Model-View-ViewModel (MVVM) is a UI architectural design pattern for decoupling UI and non-UI code that is popular with .NET developers. You'll probably see and hear it mentioned as you learn more about creating WinUI apps. Separating the views and models, as you've done here, is the first step towards a full MVVM implementation of the app, but it's as far as you'll go in this tutorial.
Note
We've used the term "model" to refer to the data model in this tutorial, but it's important to note that this model is more closely aligned with the ViewModel in a full MVVM implementation, while also incorporating aspects of the Model.
To learn more about MVVM, see these resources:
Add a view and model for all notes
This portion of the tutorial adds a new page to the app, a view that displays all of the notes previously created.
Multiple notes and navigation
Currently the note view displays a single note. To display all your saved notes, create a new view and model: AllNotes.
- In the Solution Explorer pane, right-click on the Views folder and select Add > New Item...
- In the Add New Item dialog, select WinUI in the template list on the left-side of the window. Next, select the Blank Page (WinUI 3) template. Name the file AllNotesPage.xaml and press Add.
- In the Solution Explorer pane, right-click on the Models folder and select Add > Class...
- Name the class AllNotes.cs and press Add.
Tip
You can download or view the code for this tutorial from the GitHub repo. To see the code as it is in this step, see this commit: all notes view and model.
Code the AllNotes model
The new data model represents the data required to display multiple notes. Here, you'll get all the notes from the app's local storage and create a collection of Note
objects that you'll display in the AllNotesPage
.
In the Solution Explorer pane, open the Models\AllNotes.cs file.
Replace the code in the AllNotes.cs file with this code:
using System; using System.Collections.Generic; using System.Collections.ObjectModel; using System.Threading.Tasks; using Windows.Storage; namespace WinUINotes.Models { public class AllNotes { public ObservableCollection<Note> Notes { get; set; } = new ObservableCollection<Note>(); public AllNotes() { LoadNotes(); } public async void LoadNotes() { Notes.Clear(); // Get the folder where the notes are stored. StorageFolder storageFolder = ApplicationData.Current.LocalFolder; await GetFilesInFolderAsync(storageFolder); } private async Task GetFilesInFolderAsync(StorageFolder folder) { // Each StorageItem can be either a folder or a file. IReadOnlyList<IStorageItem> storageItems = await folder.GetItemsAsync(); foreach (IStorageItem item in storageItems) { if (item.IsOfType(StorageItemTypes.Folder)) { // Recursively get items from subfolders. await GetFilesInFolderAsync((StorageFolder)item); } else if (item.IsOfType(StorageItemTypes.File)) { StorageFile file = (StorageFile)item ; Note note = new Note() { Filename = file.Name, Text = await FileIO.ReadTextAsync(file), Date = file.DateCreated.DateTime }; Notes.Add(note); } } } } }
The previous code declares a collection of Note
items, named Notes
, and uses the LoadNotes
method to load notes from the app's local storage.
The Notes
collection uses an ObservableCollection, which is a specialized collection that works well with data binding. When a control that lists multiple items, such as an ItemsView, is bound to an ObservableCollection
, the two work together to automatically keep the list of items in sync with the collection. If an item is added to the collection, the control is automatically updated with the new item. If an item is added to the list, the collection is updated.
Learn more in the docs:
- StorageFolder class, StorageFile class, IStorageItem.IsOfType method
- Access files and folders with Windows App SDK and WinRT APIs
Now that the AllNotes
model is ready to provide data for the view, you need to create an instance of the model in AllNotesPage
so the view can access the model.
In the Solution Explorer pane, open the Views\AllNotesPage.xaml.cs file.
In the
AllNotesPage
class, add this code to create anAllNotes
model named notesModel:public sealed partial class AllNotesPage : Page { // ↓ Add this. ↓ private AllNotes notesModel = new AllNotes(); // ↑ Add this. ↑ public AllNotesPage() { this.InitializeComponent(); } }
Design the AllNotes page
Next, you need to design the view to support the AllNotes
model.
In the Solution Explorer pane, open the Views\AllNotesPage.xaml file.
Replace the
<Grid> ... </Grid>
element with the following markup:<Grid> <Grid.RowDefinitions> <RowDefinition Height="Auto"/> <RowDefinition Height="*"/> </Grid.RowDefinitions> <CommandBar DefaultLabelPosition="Right"> <AppBarButton Icon="Add" Label="New note"/> <CommandBar.Content> <TextBlock Text="Quick notes" Margin="12,8" Style="{ThemeResource SubtitleTextBlockStyle}"/> </CommandBar.Content> </CommandBar> <ItemsView ItemsSource="{x:Bind notesModel.Notes}" Grid.Row="1" Margin="24" > <ItemsView.Layout> <UniformGridLayout MinItemWidth="200" MinColumnSpacing="20" MinRowSpacing="20" ItemsJustification="Start"/> </ItemsView.Layout> </ItemsView> </Grid>
The previous XAML introduces a few new concepts:
- The CommandBar control contains an AppBarButton. This button has a
Label
andIcon
, and is influenced by theCommandBar
that contains it. For example, thisCommandBar
sets the label position of its buttons toRight
. Command bars are usually displayed at the top of the app, along with the page title. - The ItemsView control displays a collection of items, and in this case, is bound to the model's
Notes
property. The way items are presented by the items view is set through theItemsView.Layout
property. Here, you use a UniformGridLayout.
Now that you've created AllNotesPage
, you need to update MainWindow.xaml
one last time so that it loads AllNotesPage
instead of an individual NotePage
.
In the Solution Explorer pane, open the MainWindow.xaml file.
Update the
rootFrame
element so that theSourcePageType
points toviews.AllNotesPage
, like this:<Frame x:Name="rootFrame" Grid.Row="1" SourcePageType="views:AllNotesPage"/>
If you run the app now, you'll see that the note you created previously is loaded into the ItemsView
control. However, it's just shown as the string representation of the object. The ItemsView
doesn't know how this item should be displayed. You'll correct this in the next section.
Add a data template
You need to specify a DataTemplate to tell the ItemsView
how your data item should be shown. The DataTemplate
is assigned to the ItemsTemplate property of the ItemsView
. For each item in the collection, the ItemsView.ItemTemplate
generates the declared XAML.
In the Solution Explorer pane, double-click on the AllNotesPage.xaml entry to open it in the XAML editor.
Add this new namespace mapping on the line below the mapping for
local
:xmlns:models="using:WinUINotes.Models"
Add a
<Page.Resources>
element after the opening<Page...>
tag. This gets the ResourceDictionary from thePage
's Resources property so that you can add XAML resources to it.<Page x:Class="WinUINotes.Views.AllNotesPage" ... > <!-- ↓ Add this. ↓ --> <Page.Resources> </Page.Resources>
Inside the
<Page.Resources>
element, add theDataTemplate
that describes how to display aNote
item.<Page.Resources> <!-- ↓ Add this. ↓ --> <DataTemplate x:Key="NoteItemTemplate" x:DataType="models:Note"> <ItemContainer> <Grid Background="LightGray"> <Grid.RowDefinitions> <RowDefinition Height="120"/> <RowDefinition Height="Auto"/> </Grid.RowDefinitions> <TextBlock Text="{x:Bind Text}" Margin="4" TextWrapping="Wrap" TextTrimming="WordEllipsis"/> <Border Grid.Row="1" Padding="4,6,0,6" Background="Gray"> <TextBlock Text="{x:Bind Date}" Foreground="White"/> </Border> </Grid> </ItemContainer> </DataTemplate> <!-- ↑ Add this. ↑ --> </Page.Resources>
In the XAML for
ItemsView
, assign theItemTemplate
property to the data template you just created:<ItemsView ItemsSource="{x:Bind notesModel.Notes}" Grid.Row="1" Margin="24" <!-- ↓ Add this. ↓ --> ItemTemplate="{StaticResource NoteItemTemplate}">
Build and run the app.
When you use the x:Bind
markup extension in a DataTemplate
, you have to specify the x:DataType
on the DataTemplate
. In this case, that's an individual Note
(so you have to add a XAML namespace reference for Models
). The template for the note uses two TextBlock
controls, which are bound to the note's Text
and Date
properties. The Grid element is used for layout and to provide a background color. A Border element is used for the background of the date. (The XAML Border
element can provide both an outline and background.)
When you run the app, the data template is applied to your Note
items and looks like this if your Windows Personalization > Colors settings use the Light mode:
However, if your Windows Personalization > Colors settings use the Dark mode, it will look like this:
This is not the intended look for the app. It happened because there are hard-coded color values in the data template for the note. By default, WinUI elements adapt to the user's Dark or Light color preference. When you define you own elements, like a data template, you need to be careful to do the same.
When you define a resource in a XAML ResourceDictionary
, you have to assign an x:Key
value to identify the resource. Then, you can use that x:Key
to retrieve the resource in XAML using the {StaticResource}
markup extension or {ThemeResource}
markup extension.
- A
{StaticResource}
is the same regardless of the color theme, so it's used for things likeFont
orStyle
settings. - A
{ThemeResource}
changes based on the selected color theme, so it's used forForeground
,Background
, and other color-related properties.
WinUI includes a variety of built-in resources that you can use to make your app follow Fluent style guidelines, as well as accessibility guidelines. You'll replace the hard-coded colors in the data template with built-in theme resources, and apply a few other resources to match the Fluent Design guidelines.
In the data template you added previously, update the sections indicated here to use built-in resources:
<DataTemplate x:Key="NoteItemTemplate" x:DataType="models:Note"> <!-- ↓ Update this. ↓ --> <ItemContainer CornerRadius="{StaticResource OverlayCornerRadius}"> <Grid Background="{ThemeResource CardBackgroundFillColorDefaultBrush}" BorderThickness="1" BorderBrush="{ThemeResource CardStrokeColorDefaultBrush}" CornerRadius="{StaticResource OverlayCornerRadius}"> <!-- ↑ Update this. ↑ --> <Grid.RowDefinitions> <RowDefinition Height="120"/> <RowDefinition Height="Auto"/> </Grid.RowDefinitions> <TextBlock Text="{x:Bind Text}" Margin="4" TextWrapping="Wrap" TextTrimming="WordEllipsis"/> <!-- ↓ Update this. ↓ --> <Border Grid.Row="1" Padding="4,6,0,6" Background="{ThemeResource ControlAltFillColorSecondaryBrush}"> <TextBlock Text="{x:Bind Date}" Style="{StaticResource CaptionTextBlockStyle}" Foreground="{ThemeResource TextFillColorSecondaryBrush}"/> <!-- ↑ Update this. ↑ --> </Border> </Grid> </ItemContainer> </DataTemplate>
Now when you run the app with a Light color setting, it will look like this:
And when you run the app with a Dark color setting, it will look like this:
Learn more in the docs:
Tip
The WinUI 3 Gallery app is a great way to learn about different WinUI controls and design guidelines. To see the theme resources used in the data template, open the WinUI 3 Gallery app to the Color guidance. From there, you can see what the resources look like and copy the values you need directly from the app.
You can also open the Typography page and Geometry page to see other built-in resources used in this data template.
The WinUI 3 Gallery app includes interactive examples of most WinUI 3 controls, features, and functionality. Get the app from the Microsoft Store or get the source code on GitHub
Navigate between pages
This portion of the tutorial adds the final piece to the app, navigation between the all notes page and the individual note page.
Before writing any code to handle in-app navigation, let's describe the expected navigation behavior.
In AllNotesPage
, there's the collection of existing notes and a New note button.
- Clicking an existing note should navigate to the note page and load the note that was clicked.
- Clicking the New note button should navigate to the note page and load an empty, unsaved note.
On the note page, you'll add a back button, and there are Save and Delete buttons .
- Clicking the back button should navigate back to the all notes page, discarding any changes made to the note.
- Clicking the Delete button should delete the note and then navigate back.
New note
First, you'll handle navigation for an new note.
Tip
You can download or view the code for this tutorial from the GitHub repo. To see the code as it is in this step, see this commit: navigation - new note.
In AllNotesPage.xaml, find the
AppBarButton
for a new note.Add a
Click
event handler and rename it toNewNoteButton_Click
. (See Add event handlers in the note page step if you need a reminder how to do this.)<AppBarButton Icon="Add" Label="New note" Click="NewNoteButton_Click"/>
In the
NewNoteButton_Click
method (in AllNotesPage.xaml.cs), add this code:private void NewNoteButton_Click(object sender, RoutedEventArgs e) { // ↓ Add this. ↓ Frame.Navigate(typeof(NotePage)); }
Each Page has a Frame property that provides a reference to the Frame instance that the Page
belongs to (if any). That's the Frame
that you call the Navigate method on here. The Navigate
method takes the Type of the page that you want to navigate to. You get that Type
in C# by using the typeof
operator.
If you run the app now, you can click the New note button to navigate to the note page, and you can type into the note editor. However, if you try to save the note, nothing will happen. This is because an instance of the Note
model hasn't been created in the note page yet. You'll do that now.
Open NotePage.xaml.cs.
Add code to override the page's OnNavigatedTo method.
public NotePage() { this.InitializeComponent(); } // ↓ Add this. ↓ protected override void OnNavigatedTo(NavigationEventArgs e) { base.OnNavigatedTo(e); noteModel = new Note(); }
Now, when you navigate to NotePage
, a new instance of the Note
model is created.
Existing notes
Now you'll add navigation for existing notes. Currently, when you click the note in the ItemsView
, the note is selected, but nothing happens. The default behavior for most collection controls is single selection, which means one item is selected at a time. You'll update the ItemsView
so that instead of selecting it, you can click an item like a button.
Tip
You can download or view the code for this tutorial from the GitHub repo. To see the code as it is in this step, see this commit: navigation - final app.
Open AllNotesPage.xaml.
Update the XAML for the
ItemsView
with SelectionMode = None and IsItemInvokedEnabled =True
.Add a handler for the ItemInvoked event.
<ItemsView ItemsSource="{x:Bind notesModel.Notes}" Grid.Row="1" Margin="24" ItemTemplate="{StaticResource NoteItemTemplate}" <!-- ↓ Add this. ↓ --> SelectionMode="None" IsItemInvokedEnabled="True" ItemInvoked="ItemsView_ItemInvoked">
In AllNotesPage.xaml.cs, find the
ItemsView_ItemInvoked
method. (If Visual Studio didn't create it for you, which could happen if you copy and paste the code, add it in the next step.)In the
ItemsView_ItemInvoked
method, add code to navigate toNotePage
. This time, you'll use an overload of the Navigate method that lets you pass an object to the other page. Pass the invokedNote
as the second navigation parameter.private void ItemsView_ItemInvoked(ItemsView sender, ItemsViewItemInvokedEventArgs args) { Frame.Navigate(typeof(NotePage), args.InvokedItem); }
Open NotePage.xaml.cs.
Update the
OnNavigatedTo
method override to handle theNote
that's passed by the call toNavigate
.protected override void OnNavigatedTo(NavigationEventArgs e) { base.OnNavigatedTo(e); // ↓ Update this. ↓ if (e.Parameter is Note note) { noteModel = note; } else { noteModel = new Note(); } // ↑ Update this. ↑ }
In this code, you first check to see if the passed parameter is a
Note
object. If it is, you assign it as theNote
model for the page. If it'snull
or not aNote
, create a newNote
as before.
Back navigation
Lastly, you need to update the app so that you can navigate back from an individual note to the all notes page.
The WinUI TitleBar control includes a back button that meets all the Fluent Design guidelines for placement and appearance. You'll use this built-in button for back navigation.
Open MainWindow.xaml.
Update the XAML for the
TitleBar
with IsBackButtonVisible =True
and IsBackButtonEnabled bound to the Frame.CanGoBack property.Add a handler for the BackRequested event. Your XAML should look like this:
<TitleBar x:Name="AppTitleBar" Title="WinUI Notes" IsBackButtonVisible="True" IsBackButtonEnabled="{x:Bind rootFrame.CanGoBack, Mode=OneWay}" BackRequested="AppTitleBar_BackRequested">
Here, the IsBackButtonVisible property is set to
true
. This makes the back button appear in the upper-left corner of the app window.Then, the IsBackButtonEnabled property is bound to the Frame.CanGoBack property, so the back button is enabled only if the frame can navigate back.
Finally, the BackRequested event handler is added. This is where you put the code to navigate back.
In MainWindow.xaml.cs, add this code to the
AppTitleBar_BackRequested
method:private void AppTitleBar_BackRequested(TitleBar sender, object args) { // ↓ Add this. ↓ if (rootFrame.CanGoBack == true) { rootFrame.GoBack(); } // ↑ Add this. ↑ }
The
Frame
class keeps track of navigation in its BackStack, so you can navigate back to previous pages simply by calling the GoBack method. It's a best practice to always check the CanGoBack property before callingGoBack
.
Next, you need to update the code in NotePage
to navigate back after the note is deleted.
Open NotePage.xaml.cs.
Update the
DeleteButton_Click
event handler method with a call to theFrame.CanGoBack
method after the note is deleted:private async void DeleteButton_Click(object sender, RoutedEventArgs e) { if (noteModel is not null) { await noteModel.DeleteAsync(); } // ↓ Add this. ↓ if (Frame.CanGoBack == true) { Frame.GoBack(); } // ↑ Add this. ↑ }
Tip
You might have noticed that in NotePage
, you call Frame.GoBack
, while in MainWindow
you called rootFrame.GoBack
. This is because the Page class has a Frame property that gets the Frame
that is hosting the Page
, if any. In this case, it gets a reference to rootFrame
.
Now you can run your app. Try adding new notes, navigating back and forth between notes, and deleting notes.
Learn more in the docs:
Congratulations!
You've completed the Create a WinUI app tutorial!
Next steps
The following links provide more information about creating apps with WinUI and the Windows App SDK:
Have an issue with this section? If so, please give us some feedback so we can improve this section.
Windows developer