Note
Access to this page requires authorization. You can try signing in or changing directories.
Access to this page requires authorization. You can try changing directories.
You can use a Group Policy to trigger autoenrollment to Mobile Device Management (MDM) for Active Directory (AD) domain-joined devices.
The group policy created on your local AD triggers enrollment into Intune without any user interaction. This cause-and-effect mechanism means you can automatically mass-enroll a large number of domain-joined corporate devices into Microsoft Intune. The enrollment process starts in the background once you sign in to the device with your Microsoft Entra account.
Requirements:
- The Active Directory joined device must be running a supported version of Windows.
- The enterprise has configured a Mobile Device Management (MDM) service.
- The on-premises Active Directory must be integrated with Microsoft Entra ID (via Microsoft Entra Connect).
- Service connection point (SCP) configuration. For more information, see configuring the SCP using Microsoft Entra Connect. For environments not publishing SCP data to AD, see Microsoft Entra hybrid join targeted deployment.
- The device shouldn't already be enrolled in Intune using the classic agents (devices managed using agents fail enrollment with
error 0x80180026). - The minimum Windows Server version requirement is based on the Microsoft Entra hybrid join requirement. For more information, see How to plan your Microsoft Entra hybrid join implementation.
Tip
For more information, see the following topics:
The autoenrollment relies on the presence of an MDM service and the Microsoft Entra registration for the PC. Once the enterprise has registered its AD with Microsoft Entra ID, a Windows PC that is domain joined is automatically Microsoft Entra registered.
Note
In Windows 10, version 1709, the enrollment protocol was updated to check whether the device is domain-joined. For details, see [MS-MDE2]: Mobile Device Enrollment Protocol Version 2. For examples, see section 4.3.1 RequestSecurityToken of the MS-MDE2 protocol documentation.
When the autoenrollment Group Policy is enabled, a task is created in the background that initiates the MDM enrollment. The task uses the existing MDM service configuration from the Microsoft Entra information of the user. If multifactor authentication is required, the user gets prompted to complete the authentication. Once the enrollment is configured, the user can check the status in the Settings page.
- Starting in Windows 10, version 1709, when the same policy is configured in Group Policy and MDM, Group Policy policy takes precedence over MDM.
- Starting in Windows 10, version 1803, a new setting allows you to change precedence to MDM. For more information, see Windows Group Policy vs. Intune MDM Policy who wins?.
For this policy to work, you must verify that the MDM service provider allows Group Policy initiated MDM enrollment for domain-joined devices.
Configure the autoenrollment for a group of devices
To configure autoenrollment using a group policy, use the following steps:
- Create a Group Policy Object (GPO) and enable the Group Policy Computer Configuration > Administrative Templates > Windows Components > MDM > Enable automatic MDM enrollment using default Microsoft Entra credentials.
- Create a Security Group for the PCs.
- Link the GPO.
- Filter using Security Groups.
If you don't see the policy, get the latest ADMX for your Windows version. To fix the issue, use the following procedures. The latest MDM.admx is backwards compatible.
Download the administrative templates for the desired version:
Install the package on the Domain Controller.
Navigate to
C:\Program Files (x86)\Microsoft Group Policy, and locate the appropriate subdirectory depending on the installed version.Copy the PolicyDefinitions folder to
\\contoso.com\SYSVOL\contoso.com\policies\PolicyDefinitions.If this folder doesn't exist, then copy the files to the central policy store for your domain.
Wait for the SYSVOL DFSR replication to be completed for the policy to be available.
Configure the autoenrollment Group Policy for a single PC
This procedure is only for illustration purposes to show how the new autoenrollment policy works. It's not recommended for the production environment in the enterprise.
Run
GPEdit.msc. Choose Start, then in the text box typegpedit.Under Best match, select Edit group policy to launch it.
In Local Computer Policy, select Administrative Templates > Windows Components > MDM.
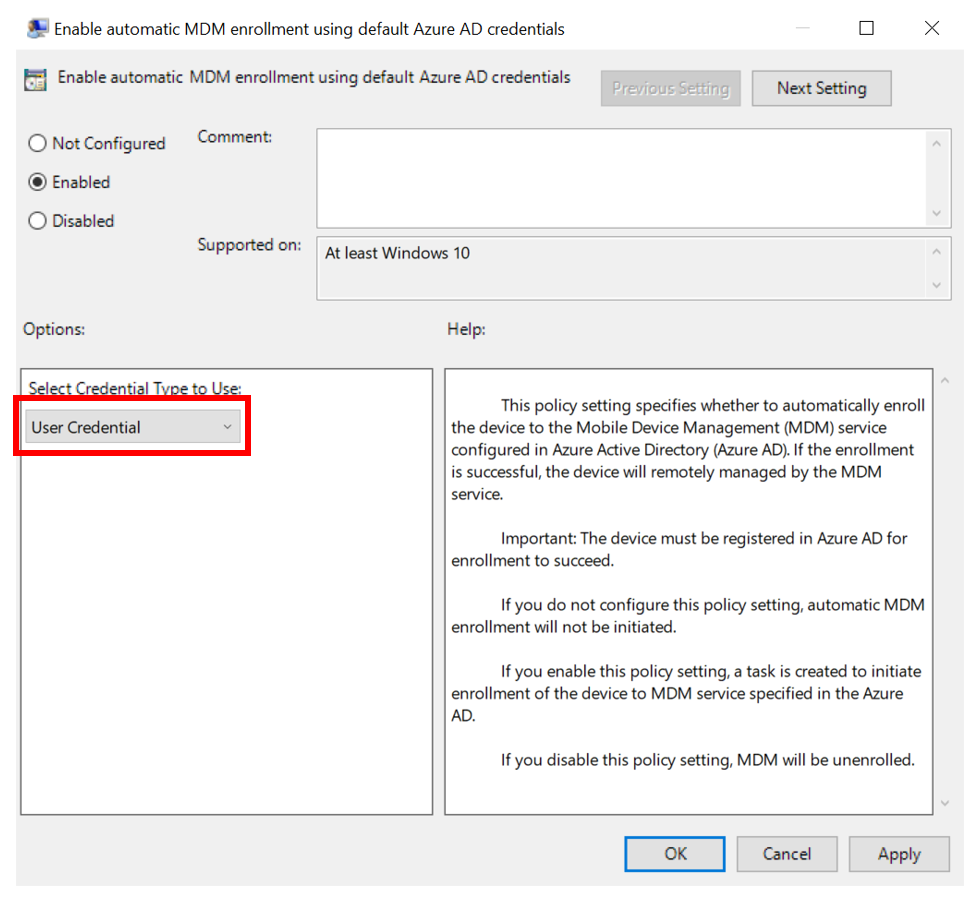
Double-click Enable automatic MDM enrollment using default Microsoft Entra credentials. Select Enable, select User Credential from the dropdown Select Credential Type to Use, then select OK.
Note
In Windows 10, version 1903 and later, the MDM.admx file was updated to include the Device Credential option to select which credential is used to enroll the device. The default behavior for older releases is to revert to User Credential.
Device Credential is only supported for Microsoft Intune enrollment in scenarios with Co-management or Azure Virtual Desktop multi-session host pools because the Intune subscription is user centric. User credentials are supported for Azure Virtual Desktop personal host pools.

When a group policy refresh occurs on the client, a task is created and scheduled to run every five minutes for one day. The task is called Schedule created by enrollment client for automatically enrolling in MDM from Microsoft Entra ID. To see the scheduled task, launch the Task Scheduler app.
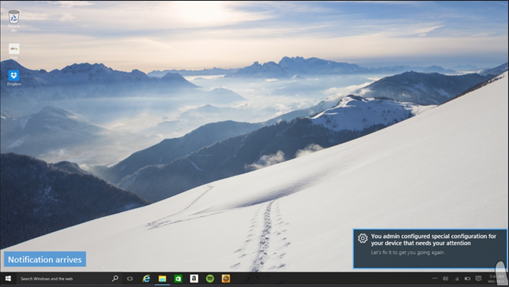
If two-factor authentication is required, you're prompted to complete the process. Here's an example screenshot.
Tip
You can avoid this behavior by using Conditional Access Policies in Microsoft Entra ID. Learn more by reading What is Conditional Access?.
Verify enrollment
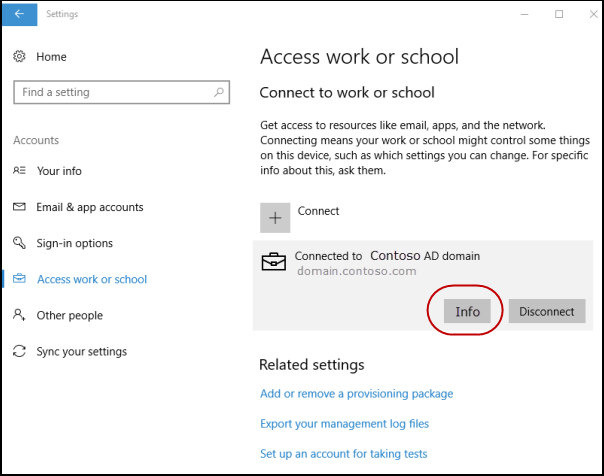
To verify successful enrollment to MDM, go to Start > Settings > Accounts > Access work or school, then select your domain account.Select Info to see the MDM enrollment information.
Note
If you don't see the Info button or the enrollment information, enrollment might have failed. Check the status in Task Scheduler app and see Diagnose MDM enrollment.
Task Scheduler app
Select Start, then in the text box type task scheduler. Under Best match, select Task Scheduler to launch it.
In Task Scheduler Library, open Microsoft > Windows , then select EnterpriseMgmt.

To see the result of the task, move the scroll bar to see the Last Run Result. You can see the logs in the History tab.
The message 0x80180026 is a failure message (MENROLL_E_DEVICE_MANAGEMENT_BLOCKED), which can be caused by enabling the Disable MDM Enrollment policy.
Note
The GPEdit console doesn't reflect the status of policies set by your organization on your device. It's only used by the user to set policies.