Configure cellular settings
This article describes how to configure cellular settings for devices that have a cellular modem using a provisioning package. After the devices are configured, users are automatically connected using the access point name (APN) defined in the provisioning package, without needing to connect manually.
For users who work in different locations, you can configure one APN to connect when the users are at work, and a different APN when the users are traveling.
Prerequisites
- Device with built-in cellular modem or plug-in USB modem dongle
- Windows Configuration Designer
- APN (the address that the device uses to connect to the Internet when using the cellular data connection)
How to configure cellular settings in a provisioning package
- In Windows Configuration Designer, start a new project using the Advanced provisioning option
- Enter a name for your project, and then select Next
- Select All Windows desktop editions, select Next, and then select Finish
- Go to Runtime settings > Connections > EnterpriseAPN
- Enter a name for the connection, and then select Add
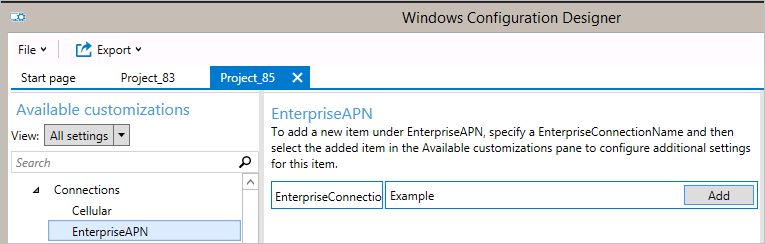
- The connection appears in the Available customizations pane. Select it to view the settings that you can configure for the connection
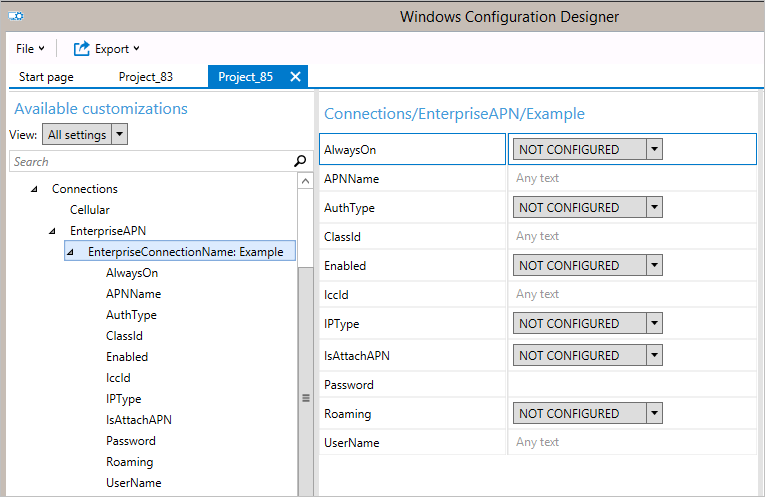
The following table describes the settings available for the connection
Setting Description AlwaysOn By default, the Connection Manager automatically attempts to connect to the APN when a connection is available. You can disable the setting. APNName Enter the name of the APN. AuthType You can select None (the default), or specify Auto, PAP, CHAP, or MSCHAPv2 authentication. If you select PAP, CHAP, or MSCHAPv2 authentication, you must also enter a user name and password. ClassId This is a GUID that defines the APN class to the modem. This is only required when IsAttachAPN is true and the attached APN isn't only used as the Internet APN. Enabled By default, the connection is enabled. You can change this setting. IccId This is the Integrated Circuit Card ID (ICCID) associated with the cellular connection profile. IPType By default, the connection can use IPv4 and IPv6 concurrently. You can change this setting to only IPv4, only IPv6, or IPv6 with IPv4 provided by 46xlat. IsAttachAPN Specify whether this APN should be requested as part of an LTE Attach. Password If you select PAP, CHAP, or MSCHAPv2 authentication, enter a password that corresponds to the user name. Roaming Select the behavior that you want when the device is roaming. The options are:
-Disallowed
-Allowed (default)
-DomesticRoaming
-Use OnlyForDomesticRoaming
-UseOnlyForNonDomesticRoaming
-UseOnlyForRoamingUserName If you select PAP, CHAP, or MSCHAPv2 authentication, enter a user name. After you configure the connection settings, build the provisioning package.
Confirm the settings
After you apply the provisioning package, you can confirm that the settings are applied.
On the configured device, open a command prompt as an administrator
Run the following command:
netsh mbn show profilesThe command lists the mobile broadband profiles. Using the Name for the listed mobile broadband profile, run:
netsh mbn show profiles name="name"This command lists the details for that profile, including Access Point Name.
Alternatively, you can also use the command:
netsh mbn show interface
From the results of that command, get the name of the cellular/mobile broadband interface and run:
netsh mbn show connection interface="name"
The result of that command shows the details for the cellular interface, including Access Point Name.