Appendix
Steps to obtain an Azure subscription ID
- Sign in to the Azure portal.
- Select Subscriptions. If you don't see Subscriptions, type Subscriptions in the search bar. As you begin typing, the list filters based on your input.
- If you already have an Azure Subscription, skip to step 5. If you don't have an Azure Subscription, select + Add on the top left.
- Select the Pay-As-You-Go subscription. You'll be asked to enter credit card information, but you'll not be charged for using the MCC service.
- On the Subscriptions page, you'll find details about your current subscription. Select the subscription name.
- After you select the subscription name, you'll find the subscription ID in the Overview tab. Select the Copy to clipboard icon next to your Subscription ID to copy the value.
Troubleshooting
If you're not able to sign up for a Microsoft Azure subscription with the Account belongs to a directory that cannot be associated with an Azure subscription. Please sign in with a different account. error, see the following articles:
- Can't sign up for a Microsoft Azure subscription.
- Troubleshoot issues when you sign up for a new account in the Azure portal.
Hardware specifications
Most customers choose to install their cache node on a Windows Server with a nested Hyper-V VM. If this isn't supported in your network, some customers have also opted to install their cache node using VMware. At this time, a Linux-only solution isn't available and Azure VMs don't support the standalone Microsoft Connected Cache.
Installing on VMware
Microsoft Connected Cache for Enterprise and Education can be successfully installed on VMware. To do so, there are a couple of additional configurations to be made. Ensure the VM is turned off before making the following configuration changes:
- Ensure that you're using ESX. In the VM settings, turn on the option Expose hardware assisted virtualization to the guest OS.
- Using the Hyper-V Manager, create an external switch. For the external switch to have internet connection, ensure "Allow promiscuous mode" and "Forged transmits" are switched to Yes.
Installing on Hyper-V
To learn more about how to configure Intel and AMD processors to support nested virtualization, see Run Hyper-V in a Virtual Machine with Nested Virtualization.
Diagnostics Script
If you're having issues with your MCC, we included a diagnostics script. The script collects all your logs and zips them into a single file. You can then send us these logs via email for the MCC team to debug.
To run this script:
Navigate to the following folder in the MCC installation files:
mccinstaller > Eflow > Diagnostics
Run the following commands:
Set-ExecutionPolicy -ExecutionPolicy Unrestricted -Scope Process
.\collectMccDiagnostics.ps1
The script stores all the debug files into a folder and then creates a tar file. After the script is finished running, it will output the path of the tar file, which you can share with us. The location should be <currentpath>\mccdiagnostics\support_bundle_$timestamp.tar.gz
Email the MCC team and attach this file asking for debugging support. Screenshots of the error along with any other warnings you saw will be helpful during out debugging process.
IoT Edge runtime
The Azure IoT Edge runtime enables custom and cloud logic on IoT Edge devices. The runtime sits on the IoT Edge device, and performs management and communication operations. The runtime performs several functions:
- Installs and update workloads (Docker containers) on the device.
- Maintains Azure IoT Edge security standards on the device.
- Ensures that IoT Edge modules (Docker containers) are always running.
- Reports module (Docker containers) health to the cloud for remote monitoring.
- Manages communication between an IoT Edge device and the cloud.
For more information on Azure IoT Edge, see the Azure IoT Edge documentation.
Routing local Windows clients to an MCC
Get the IP address of your MCC using ifconfig
There are multiple methods that can be used to apply a policy to PCs that should participate in downloading from the MCC.
Registry key
You can either set your MCC IP address or FQDN using:
Registry key (version 1709 and later):
HKEY_LOCAL_MACHINE\SOFTWARE\Policies\Microsoft\Windows\DeliveryOptimization
"DOCacheHost"=" "From an elevated command prompt:
reg add "HKEY_LOCAL_MACHINE\SOFTWARE\Policies\Microsoft\Windows\DeliveryOptimization" /v DOCacheHost /t REG_SZ /d "10.137.187.38" /fMDM path (version 1809 and later):
.Vendor/MSFT/Policy/Config/DeliveryOptimization/DOCacheHostIn Windows (release version 1809 and later), you can apply the policy via Group Policy Editor. The policy to apply is DOCacheHost. To configure the clients to pull content from the MCC using Group Policy, go to Computer Configuration > Administrative Templates > Windows Components > Delivery Optimization. Set the Cache Server Hostname to the IP address of your MCC, such as
10.137.187.38.

Verify content using the DO client
To verify that the Delivery Optimization client can download content using MCC, you can use the following steps:
Download a game or application from the Microsoft Store.

Verify downloads came from MCC by one of two methods:
Using the PowerShell Cmdlet Get-DeliveryOptimizationStatus you should see BytesFromCacheServer.

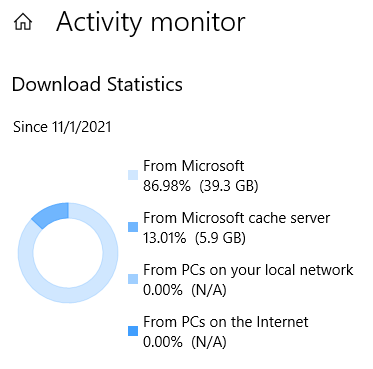
Using the Delivery Optimization Activity Monitor

EFLOW
Feedback
Coming soon: Throughout 2024 we will be phasing out GitHub Issues as the feedback mechanism for content and replacing it with a new feedback system. For more information see: https://aka.ms/ContentUserFeedback.
Submit and view feedback for