Note
Access to this page requires authorization. You can try signing in or changing directories.
Access to this page requires authorization. You can try changing directories.
This article outlines how to create, provision, and deploy your Microsoft Connected Cache nodes. The creation and provisioning of your cache node takes place in Azure portal. The deployment of your cache node requires downloading an installer script that will be run on your cache server.
Important
Before you can create your Microsoft Connected Cache, you will need to complete the sign up process. You cannot proceed without signing up for our service.
Create cache node
Open Azure portal and navigate to the Microsoft Connected Cache resource.
Navigate to Settings > Cache nodes and select Create Cache Node.
Provide a name for your cache node and select Create to create your cache node.
Configure cache node
During the configuration of your cache node, there are many fields for you to configure your cache node. To learn more about the definitions of each field, review the Configuration fields at the bottom of this article.
Client routing
Before serving traffic to your customers, client routing configuration is needed. During the configuration of your cache node in Azure portal, you're able to route your clients to your cache node.
Microsoft Connected Cache offers two ways for you to route your clients to your cache node. The first method of manual entry involves uploading a comma-separated list of CIDR blocks that represents the clients. The second method of setting BGP (Border Gateway Protocol) is more automatic and dynamic, which is set up by establishing neighborships with other ASNs. All routing methods are set up within Azure portal.
Once client routing and other settings are configured, your cache node will be able to download content and serve traffic to your customers.
At this time, only IPv4 addresses are supported. IPv6 addresses aren't supported.
Manual routing
You can manually upload a list of your CIDR blocks in Azure portal to enable manual routing of your customers to your cache node.
BGP routing
BGP (Border Gateway Protocol) routing is another method offered for client routing. BGP dynamically retrieves CIDR ranges by exchanging information with routers to understand reachable networks. For an automatic method of routing traffic, you can choose to configure BGP routing in Azure portal.
Microsoft Connected Cache includes Bird BGP, which enables the cache node to:
- Establish iBGP peering sessions with routers, route servers, or route collectors within operator networks
- Act as a route collector
The operator starts the iBGP peering session from the Microsoft Connected Cache side using the Azure management portal and then starts the session with the Microsoft Connected Cache node from the router.
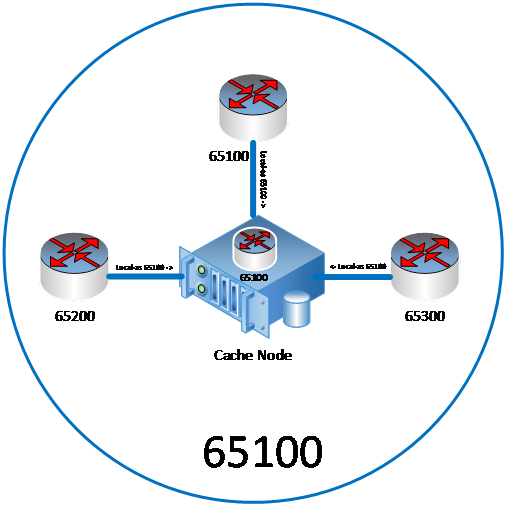
In the example configuration below:
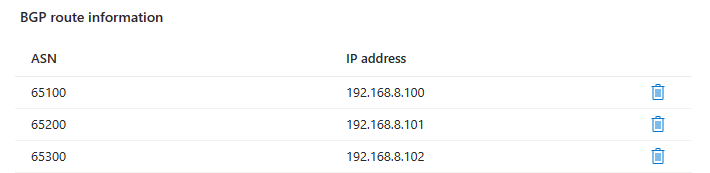
The operator ASN is 65100
The ASN of the Microsoft Connected Cache cache node is 65100 and the IP address is 192.168.8.99
iBGP peering sessions are established from the portal for ASNs 65100, 65200, and 65300.

To set up and enable BGP routing for your cache node, follow the steps below:
Navigate to Settings > Cache nodes. Select the cache node you wish to provision.
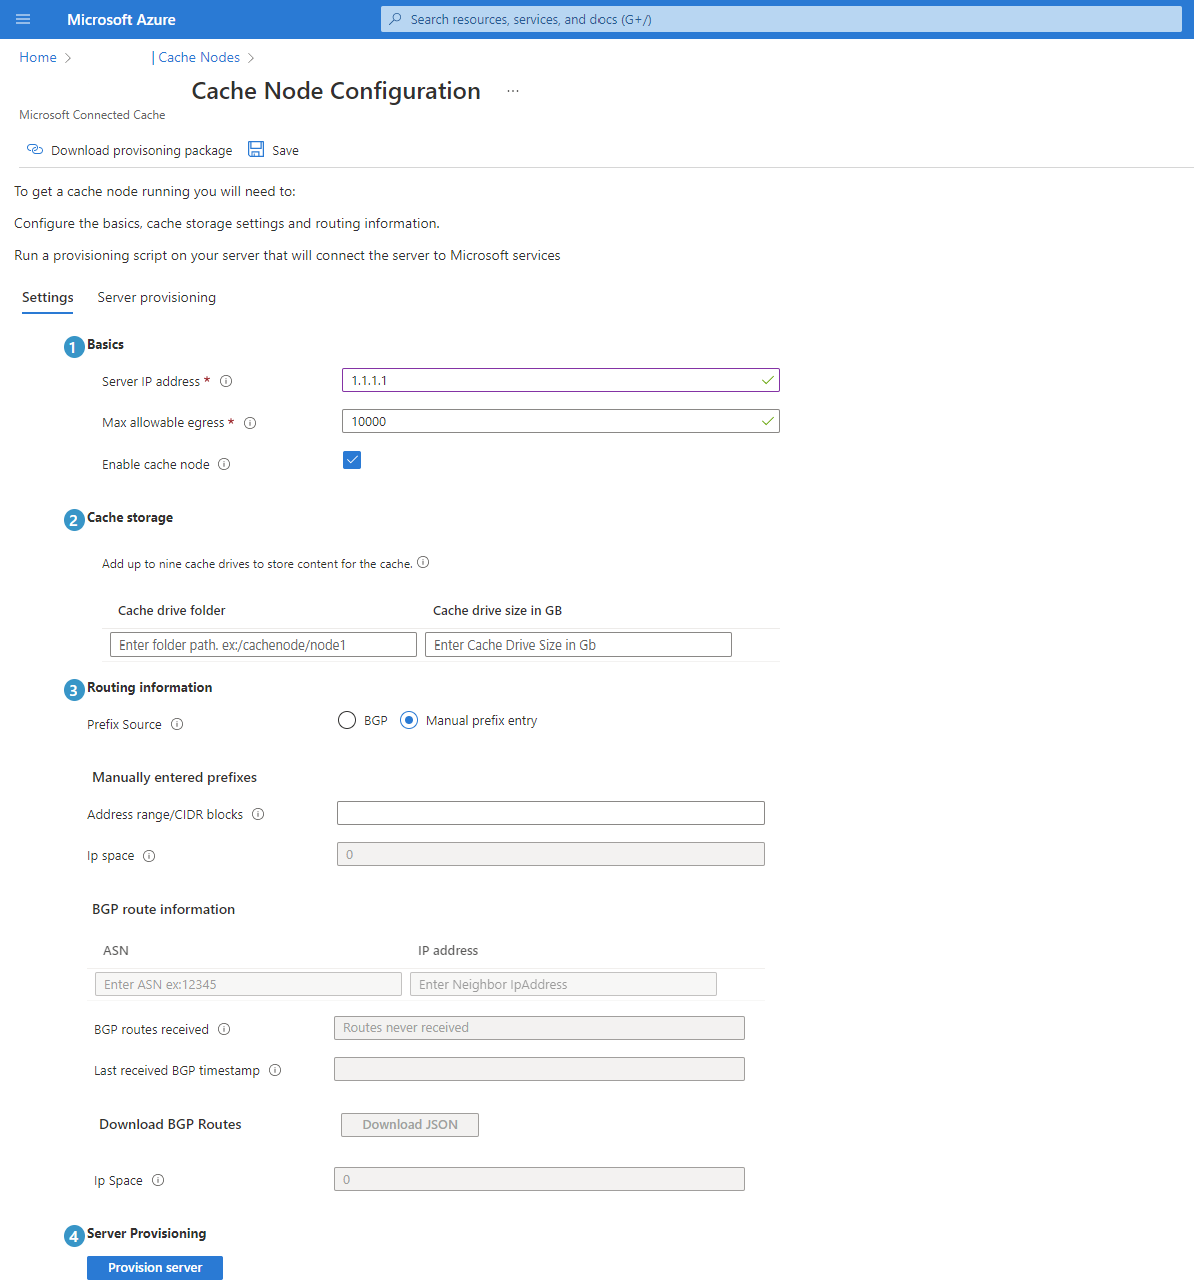
Enter the max allowable egress that your hardware can support.
Under Cache storage, specify the location of the cache drive folder to store content along with the size of the cache drives in Gigabytes. Note: This is a required field. Up to nine cache drive folders are supported.
Under Routing information, select the routing method you would like to use. For more information, see Client routing.
- If you choose Manual routing, enter your address range/CIDR blocks.
- If you choose BGP routing, enter the ASN and IP addresses of the neighborship. Use your ASN, the one used to sign up for Microsoft Connected Cache. Connected Cache will be automatically assigned as the same ASN as the neighbor.
Note
Prefix count and IP Space will stop displaying
0when BGP is successfully established.
Deploy cache node software to server
Once the user executes the cache server provisioning script, resources are created behind the scenes resulting in the successful cache node installation. The script takes the input of different IDs outlined below to register the server as an Azure IoT Edge device. Even though Microsoft Connected Cache scenario isn't related to IoT, Azure IoT Edge is installed for container management and communication operation purposes.
Components installed during provisioning
IoT Edge
IoT Edge performs several functions important to manage Connected Cache on your edge device:
- Installs and updates Connected Cache on your edge device.
- Maintains Azure IoT Edge security standards on your edge device.
- Ensures that Connected Cache is always running.
- Reports Connected Cache health and usage to the cloud for remote monitoring.
Docker container engine
Azure IoT Edge relies on an OCI-compatible container runtime. The Moby engine is the only container engine officially supported with IoT Edge and is installed as part of the server provisioning process.
Components of the device provisioning script
There are five IDs that the device provisioning script takes as input in order to successfully provision and install your cache server. The provisioning script will automatically include these keys, with no input necessary from the user.
| ID | Description |
|---|---|
| Customer ID | A unique alphanumeric ID that the cache nodes are associated with. |
| Cache node ID | The unique alphanumeric ID of the cache node being provisioned. |
| Customer key | The unique alphanumeric ID that provides secure authentication of the cache node to Delivery Optimization services. |
| Registration key | Single use device registration key used by Microsoft Delivery Optimization services. |
Provision your server
Important
Have you correctly mounted your disk? Your Connected Cache will not be successfully installed without this important step. Before provisioning your server, ensure your disk is correctly mounted by following the instructions here: Attach a data disk to a Linux VM.
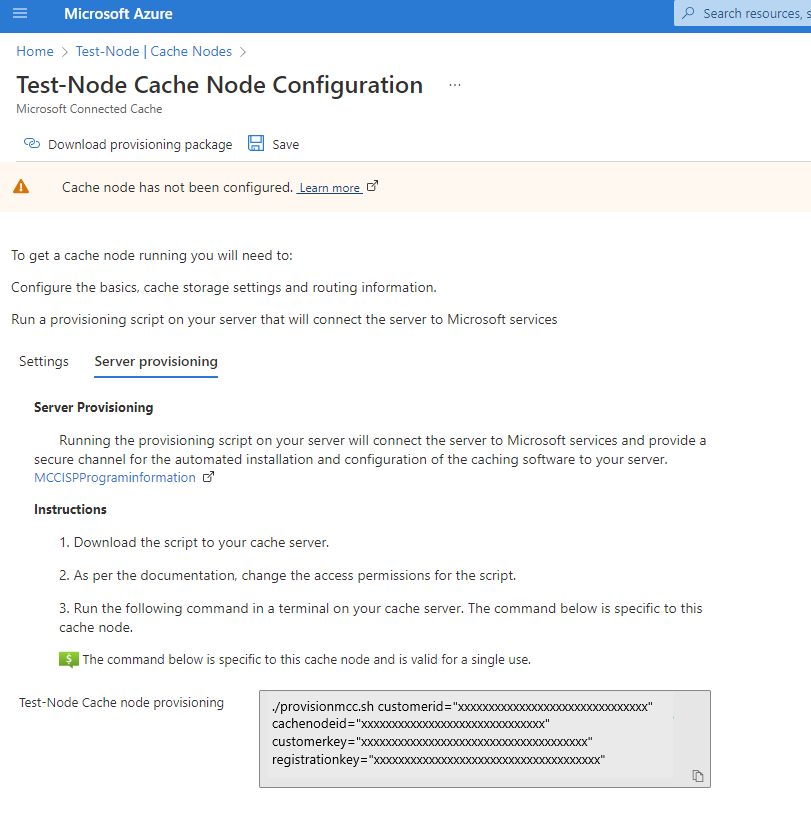
After completing cache node provisioning, navigate to the Server provisioning tab. Select Download provisioning package to download the installation package to your server.
Open a terminal window in the directory where you would like to deploy your cache node and run the following command to change the access permission to the Bash script:
sudo chmod +x provisionmcc.shCopy and paste the script command line shown in the Azure portal.
Run the script in your server terminal for your cache node. The script may take a few minutes to run. If there were no errors, you have set up your cache node successfully. To verify the server is set up correctly, follow the verification steps.
Note
The same script can be used to provision multiple cache nodes, but the command line is unique per cache node. Additionally, if you need to re-provision your server or provision a new server or VM for the cache node, you must copy the command line from the Azure portal again as the "registrationkey" value is unique for each successful execution of the provisioning script.
General configuration fields
| Field Name | Expected Value | Description |
|---|---|---|
| Cache node name | Alphanumeric string that contains no spaces | The name of the cache node. You may choose names based on location like Seattle-1. This name must be unique and can't be changed later. |
| Server IP address | IPv4 address | IP address of your Connected Cache server. This address is used to route end-user devices in your network to the server for Microsoft content downloads. The IP address must be publicly accessible. |
| Max allowable egress (Mbps) | Integer in Mbps | The maximum egress (Mbps) of your Connected Cache based on the specifications of your hardware. For example, 10,000 Mbps. |
| Enable cache node | Enable or Disable | You can choose to enable or disable a cache node at any time. |
Storage fields
Important
All cache drives must have full read/write permissions set or the cache node will not function.
For example, in a terminal you can run: sudo chmod 777 /path/to/cachedrivefolder and then restart the MCC by running sudo iotedge restart MCC.
| Field Name | Expected Value | Description |
|---|---|---|
| Cache drive folder | File path string | Up to 9 drive folders accessible by the cache node can be configured for each cache node to configure cache storage. Enter the location of the folder in Ubuntu where the external physical drive is mounted. For example: /dev/sda3/ Each cache drive should have read/write permissions configured. Ensure your disks are mounted and visit Attach a data disk to a Linux VM for more information. |
| Cache drive size in gigabytes | Integer in GB | Set the size of each drive configured for the cache node. |
Client routing fields
| Field Name | Expected Value | Description |
|---|---|---|
| Manual routing - Address range/CIDR blocks | IPv4 CIDR notation | The IP address range (CIDR blocks) that should be routed to the Connected Cache server as a comma separated list. For example: 2.21.234.0/24, 3.22.235.0/24, 4.23.236.0/24 |
| BGP - Neighbor ASN | ASN | When configuring BGP, enter the ASN(s) of your neighbors that you want to establish. |
| BGP - Neighbor IP address | IPv4 address | When configuring BGP, enter the IP address(es) of neighbors that you want to establish. |