Custom Logon
You can use the Custom Logon feature to suppress Windows UI elements that relate to the Welcome screen and shutdown screen. For example, you can suppress all elements of the Welcome screen UI and provide a custom logon UI. You can also suppress the Blocked Shutdown Resolver (BSDR) screen and automatically end applications while the OS waits for applications to close before a shutdown.
Custom Logon settings don't modify the credential behavior of Winlogon, so you can use any credential provider that is compatible with Windows 10 to provide a custom sign-in experience for your device. For more information about creating a custom logon experience, see Winlogon and Credential Providers.
Requirements
Custom Logon can be enabled on:
- Windows 10 Enterprise
- Windows 10 IoT Enterprise
- Windows 10 Education
- Windows 11 Enterprise
- Windows 11 IoT Enterprise
- Windows 11 Education
Terminology
Turn on, enable: To make the feature available and optionally apply settings to the device. Generally turn on is used in the user interface or control panel, whereas enable is used for command line.
Configure: To customize the setting or subsettings.
Embedded Logon: This feature is called Embedded Logon in Windows 10, version 1511.
Custom Logon: This feature is called Custom Logon in Windows 10, version 1607 and later.
Turn on Custom Logon
Custom Logon is an optional component and isn't turned on by default in Windows 10. It must be turned on prior to configuring. You can turn on and configure Custom Logon in a customized Windows 10 image (.wim) if Microsoft Windows hasn't been installed. If Windows has already been installed and you're applying a provisioning package to configure Custom Logon, you must first turn on Custom Logon in order for a provisioning package to be successfully applied.
The Custom Logon feature is available in the Control Panel. You can set Custom Logon by following these steps:
Turn on Custom Logon in Control Panel
- In the Windows search bar, type Turn Windows features on or off and either press Enter or tap or select Turn Windows features on or off to open the Windows Features window.
- In the Windows Features window, expand the Device Lockdown node, and select (to turn on) or clear (to turn off) the checkbox for Custom Logon.
- Select OK. The Windows Features window indicates that Windows is searching for required files and displays a progress bar. Once found, the window indicates that Windows is applying the changes. When completed, the window indicates the requested changes are completed.
Turn on Custom Logon using DISM
Open a command prompt with administrator rights.
Enable the feature using the following command.
dism /online /enable-feature /featureName:Client-EmbeddedLogon
Configure Custom Logon
Configure Custom Logon settings using Unattend
You can configure the Unattend settings in the Microsoft-Windows-Embedded-EmbeddedLogon component to add custom logon features to your image during the design or imaging phase. You can manually create an Unattend answer file or use Windows System Image Manager (Windows SIM) to add the appropriate settings to your answer file. For more information about the custom logon settings and XML examples, see the settings in Microsoft-Windows-Embedded-EmbeddedLogon.
The following example shows how to disable all Welcome screen UI elements and the Switch user button.
<settings pass="specialize">
    <component name="Microsoft-Windows-Embedded-EmbeddedLogon" processorArchitecture="x86" publicKeyToken="31bf3856ad364e35" language="neutral" versionScope="nonSxS" xmlns:xsi="http://www.w3.org/2001/XMLSchema-instance">
      <BrandingNeutral>17</BrandingNeutral>
      <AnimationDisabled>1</AnimationDisabled>
      <NoLockScreen>1</NoLockScreen>
      <UIVerbosityLevel>1</UIVerbosityLevel>
      <HideAutoLogonUI>1</HideAutoLogonUI>
    </component>
</settings>
Remove buttons from Logon screen
To remove buttons from the Welcome screen, set the appropriate value for BrandingNeutral in the following registry key:
HKLM\Software\Microsoft\Windows Embedded\EmbeddedLogon
- Make sure you have enabled Custom Logon following the instructions in Turn on Custom Logon.
- In the Windows search bar, type "Registry Editor" to open the Registry Editor window.
- Use the file navigation in the left pane to access HKLM\Software\Microsoft\Windows Embedded\EmbeddedLogon.
- In the right pane, right click on BrandingNeutral and select Modify.
- Select the correct Base and enter the value for your desired customizations according to the following table, and click OK to apply the changes.
Note
Changing the Base of BrandingNeutral will automatically convert the value field to the selected base. To ensure you are getting the correct value, select the base before entering the value.
The following table shows the possible values. To disable multiple Logon screen UI elements together, you can select the Decimal base when modifying the BrandingNeutral value, and combine actions by adding the decimal values of the desired actions and inputting the sum as the value of BrandingNeutral. For example, to disable the Power button and the Language button, select the decimal option for the base, then add the decimal values of each, in this case 2 and 4 respectively, and input the total (6) as the value for BrandingNeutral.
| Action | Description | Registry value (Hexadecimal) | Registry value (Decimal) |
|---|---|---|---|
| Disable all Logon screen UI elements | Disables the Power, Language, and Ease of Access buttons on the Logon and Ctrl+Alt+Del screens. | 0x1 |
1 |
| Disable the Power button | Disables the Power button on the Logon and Ctrl+Alt+Del screens. | 0x2 |
2 |
| Disable the Language button | Disables the Language button on the Logon and Ctrl+Alt+Del screens. | 0x4 |
4 |
| Disable the Ease of Access button | Disables the Ease of Access button on the Logon and Ctrl+Alt+Del screens. | 0x8 |
8 |
| Disable the Switch user button | Disables the Switch User button from the Ctrl+Alt+Del screen, preventing a user from switching accounts. | 0x10 |
16 |
| Disable the Blocked Shutdown Resolver (BSDR) screen | Disables the Blocked Shutdown Resolver (BSDR) screen so that restarting or shutting down the system causes the OS to immediately force close any open applications that are blocking system shut down. No UI is displayed, and users aren't given a chance to cancel the shutdown process. | 0x20 |
32 |
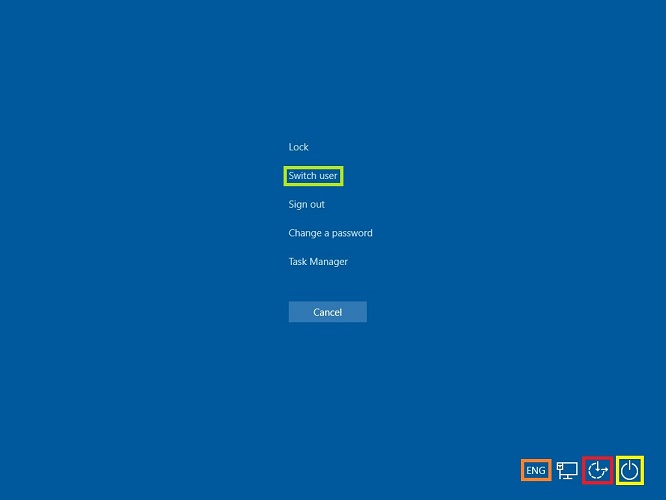
In the following image of the [ctrl + alt + del] screen, you can see the Switch user button highlighted by a light green outline, the Language button highlighted by an orange outline, the Ease of Access button highlighted by a red outline, and the power button highlighted by a yellow outline. If you disable these buttons, they're hidden from the UI.
You can remove the Wireless UI option from the Welcome screen by using Group Policy.
Remove Wireless UI from Logon screen
You use the following steps to remove Wireless UI from the Welcome screen
- From a command prompt, run gpedit.msc to open the Local Group Policy Editor.
- In the Local Group Policy Editor, under Computer Configuration, expand Administrative Templates, expand System, and then tap or click Logon.
- Double-tap or click Do not display network selection UI.
Additional Customizations
The following table shows additional customizations that can be made using registry keys.
| Action | Path | Registry Key and Value |
|---|---|---|
| Hide Autologon UI | HKEY_LOCAL_MACHINE\Software\Microsoft\Windows Embedded\EmbeddedLogon | HideAutoLogonUI = 1 |
| Hide First Logon Animation | HKEY_LOCAL_MACHINE\Software\Microsoft\Windows Embedded\EmbeddedLogon | HideFirstLogonAnimation = 1 |
| Disable Authentication Animation | HKEY_LOCAL_MACHINE\Software\Microsoft\Windows\CurrentVersion\Authentication\LogonUI | AnimationDisabled = 1 |
| Disable Lock Screen | HKEY_LOCAL_MACHINE\SOFTWARE\Policies\Microsoft\Windows\Personalization | NoLockScreen = 1 |