When you wear a mixed reality headset, it becomes the center of your holographic world. The Unity Camera component will automatically handle stereoscopic rendering and follow your head movement and rotation. However, to fully optimize visual quality and hologram stability, you should set the camera settings described below.
HoloLens vs VR immersive headsets
The default settings on the Unity Camera component are for traditional 3D applications, which need a skybox-like background as they don't have a real world.
- When running on an immersive headset, you're rendering everything the user sees, and so you'll likely want to keep the skybox.
- However, when running on a holographic headset like HoloLens, the real world should appear behind everything the camera renders. Set the camera background to be transparent (in HoloLens, black renders as transparent) instead of a Skybox texture:
- Select the Main Camera in the Hierarchy panel
- In the Inspector panel, find the Camera component and change the Clear Flags dropdown from Skybox to Solid Color
- Select the Background color picker and change the RGBA values to (0, 0, 0, 0)
- If setting this from code, you can use Unity's
Color.clear
MRTK will handle specific camera settings automatically, based on the configuration in the camera system profile.
Namespace: Microsoft.MixedReality.Toolkit.CameraSystem
Type: MixedRealityCameraSystem
To check the camera's opaqueness, the MixedRealityCamera system has an IsOpaque property.
CoreServices.CameraSystem.IsOpaque;
Namespace: UnityEngine.XR
Type: XRDisplaySubsystem
You can use script code to determine at runtime whether the headset is immersive or holographic by checking displayOpaque on the actively running XRDisplaySubsystem.
Namespace: UnityEngine.XR.WSA
Type: HolographicSettings
You can use script code to determine at runtime whether the headset is immersive or holographic by checking HolographicSettings.IsDisplayOpaque.
Camera setup
Whatever kind of experience you're developing, the Main Camera is always the primary stereo rendering component attached to your device's head-mounted display. It'll be easier to lay out your app if you imagine the starting position of the user as (X: 0, Y: 0, Z: 0). Since the Main Camera is tracking movement of the user's head, the starting position of the user can be set by setting the starting position of the Main Camera.
The central choice you need to make is whether you're developing for HoloLens or VR immersive headsets. Once you've got that, skip to whichever setup section applies.
HoloLens camera setup
For HoloLens apps, you need to use anchors for any objects you want to lock to the scene environment. We recommend using unbounded space to maximize stability and create anchors in multiple rooms.
Follow this step-by-step tutorial to add and automatically configure Mixed Reality Toolkit in your Unity project. It's also possible to work directly with the MixedRealityPlayspace class from MRTK for Unity and set the Target Scale to World:
MRTK should handle the position of the playspace and camera automatically, but it's good to double check:
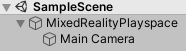
- From the Hierarchy panel, expand the MixedRealityPlayspace GameObject and find the Main Camera child object
- In the Inspector panel, find the Transform component and change the Position to (X: 0, Y: 0, Z: 0)
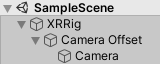
Set your tracking origin mode on the XRInputSubsystem. After obtaining the subsystem, call TrySetTrackingOriginMode:
xrInputSubsystem.TrySetTrackingOriginMode(TrackingOriginModeFlags.Device);
xrInputSubsystem.TrySetTrackingOriginMode(TrackingOriginModeFlags.Unbounded); // Recommendation for OpenXR
You can use ARSession for HoloLens applications, which works better with anchors and ARKit/ARCore.
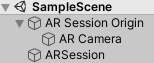
Important
AR Session and related features need AR Foundation installed.
It's also possible to apply the camera changes manually without using ARSession:
Select Main Camera in the Hierarchy panel
In the Inspector panel, find the Transform component and change the Position to (X: 0, Y: 0, Z: 0)
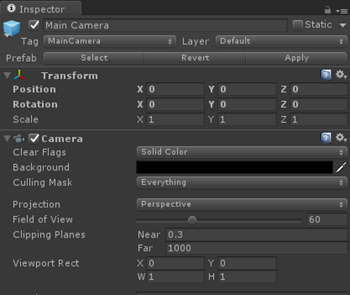
Camera in the Inspector pane in Unity
Add a TrackedPoseDriver to the Main Camera
Select Main Camera in the Hierarchy panel
In the Inspector panel, find the Transform component and change the Position to (X: 0, Y: 0, Z: 0)
Camera in the Inspector pane in Unity
Go to Other Settings section of the Windows Store Player Settings
Choose Windows Mixed Reality as the device, which may be listed as Windows Holographic in older versions of Unity
Select Virtual Reality Supported
Since the Main Camera object is automatically tagged as the camera, Unity powers all movement and translation.
Note
These settings need to be applied to the Camera in each scene of your app.
By default, when you create a new scene in Unity, it will contain a Main Camera GameObject in the Hierarchy which includes the Camera component, but may not have the settings properly applied.
VR camera setup
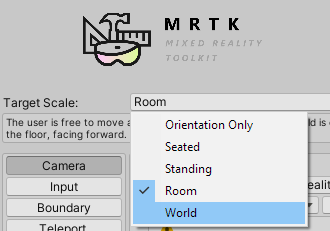
Windows Mixed Reality supports apps across a wide range of experience scales, from orientation-only and seated-scale apps up through room-scale apps. On HoloLens, you can go further and build world-scale apps that let users walk beyond 5 meters, exploring an entire floor of a building and beyond.
Your first step in building a mixed reality experience in Unity is to determine which experience scale your app will target:
Room-scale or standing experiences
Note
If you're building for HL2, we recommend creating an eye-level experience, or consider using Scene Understanding to reason about the floor of your scene.
Use the MixedRealityPlayspace class from MRTK for Unity and set the Target Scale to either Room or Standing:
MRTK should handle the position of the playspace and camera automatically, but it's good to double check:
- From the Hierarchy panel, expand the MixedRealityPlayspace GameObject and find the Main Camera child object
- In the Inspector panel, find the Transform component and change the Position to (X: 0, Y: 0, Z: 0)
- Go to Other Settings section of the Windows Store Player Settings
- Choose Windows Mixed Reality as the device, which may be listed as Windows Holographic in older versions of Unity
- Select Virtual Reality Supported
Since the Main Camera object is automatically tagged as the camera, Unity powers all movement and translation.
Note
These settings need to be applied to the Camera in each scene of your app.
By default, when you create a new scene in Unity, it will contain a Main Camera GameObject in the Hierarchy which includes the Camera component, but does not have the settings below properly applied.
Namespace: UnityEngine.XR
Type: XRDevice
For a standing-scale or room-scale experience, you'll need to place content relative to the floor. You reason about the user's floor using the spatial stage, which represents the user's defined floor-level origin and optional room boundary, set up during first run.
To ensure that Unity is operating with its world coordinate system at floor-level, you can set and test that Unity is using the RoomScale tracking space type:
if (XRDevice.SetTrackingSpaceType(TrackingSpaceType.RoomScale))
{
    // RoomScale mode was set successfully.  App can now assume that y=0 in Unity world coordinate represents the floor.
}
else
{
    // RoomScale mode was not set successfully.  App cannot make assumptions about where the floor plane is.
}
- If SetTrackingSpaceType returns true, Unity has successfully switched its world coordinate system to track the stage frame of reference.
- If SetTrackingSpaceType returns false, Unity was unable to switch to the stage frame of reference, likely because the user has not set up a floor in their environment. While a false return value isn't common, it can happen if the stage is set up in a different room and the device is moved to the current room without the user setting up a new stage.
Once your app successfully sets the RoomScale tracking space type, content placed on the y=0 plane will appear on the floor. The origin at 0, 0, 0 will be the specific place on the floor where the user stood during room setup, with -Z representing the forward direction they were facing during setup.
Seated experiences
Use the MixedRealityPlayspace class from MRTK for Unity and set the Target Scale to Seated:
MRTK should handle the position of the playspace and camera automatically, but it's good to double check:
- From the Hierarchy panel, expand the MixedRealityPlayspace GameObject and find the Main Camera child object
- In the Inspector panel, find the Transform component and change the Position to (X: 0, Y: 0, Z: 0)
- Go to Other Settings section of the Windows Store Player Settings
- Choose Windows Mixed Reality as the device, which may be listed as Windows Holographic in older versions of Unity
- Select Virtual Reality Supported
Since the Main Camera object is automatically tagged as the camera, Unity powers all movement and translation.
Note
These settings need to be applied to the Camera in each scene of your app.
By default, when you create a new scene in Unity, it will contain a Main Camera GameObject in the Hierarchy which includes the Camera component, but does not have the settings below properly applied.
Namespace: UnityEngine.XR
Type: XRDevice
To build an orientation-only or seated-scale experience, you need to set Unity to the Stationary tracking space type. Stationary tracking space sets Unity's world coordinate system to track the stationary frame of reference. In the Stationary tracking mode, content placed in the editor just in front of the camera's default location (forward is -Z) will appear in front of the user when the app launches.
XRDevice.SetTrackingSpaceType(TrackingSpaceType.Stationary);
Namespace: UnityEngine.XR
Type: InputTracking
For a pure orientation-only experience such as a 360-degree video viewer (where positional head updates would ruin the illusion), you can then set XR.InputTracking.disablePositionalTracking to true:
InputTracking.disablePositionalTracking = true;
For a seated-scale experience, to let the user later recenter the seated origin, you can call the XR.InputTracking.Recenter method:
InputTracking.Recenter();
If you're building a seated-scale experience, you can recenter Unity's world origin at the user's current head position by calling the XR.InputTracking.Recenter method.
Setting up the camera background
If you're using MRTK, the camera's background is automatically configured and managed. For XR SDK or Legacy WSA projects, we recommend setting the camera's background to solid black on HoloLens and keeping the skybox for VR.
Using multiple cameras
When there are multiple Camera components in the scene, Unity knows which camera to use for stereoscopic rendering based on which GameObject has the MainCamera tag. In legacy XR, it also uses this tag to sync head tracking. In XR SDK, head tracking is driven by a TrackedPoseDriver script attached to the camera.
Sharing depth buffers
Sharing your app's depth buffer to Windows each frame will give your app one of two boosts in hologram stability, based on the type of headset you're rendering for:
- VR immersive headsets can take care of positional reprojection when a depth buffer is provided, adjusting your holograms for misprediction in both position and orientation.
- HoloLens headsets have a few different methods. HoloLens 1 will automatically select a focus point when a depth buffer is provided, optimizing hologram stability along the plane that intersects the most content. HoloLens 2 will stabilize content using Depth LSR (see Remarks).
MRTK's configuration dialog will attempt to set depth buffer settings for both XR SDK and legacy WSA, but it's good to check those tabs and verify the settings in Unity.
To set whether your Unity app will provide a depth buffer to Windows:
- Go to Edit > Project Settings > XR Plug-in Management and ensure the menu item is expanded.
- Click on the menu item corresponding to the XR runtime you've chosen, either Windows Mixed Reality or OpenXR. Additionally, ensure the correct build platform is selected, as tabs for both Windows Standalone and Universal Windows Platform are available.
- To enable and configure:
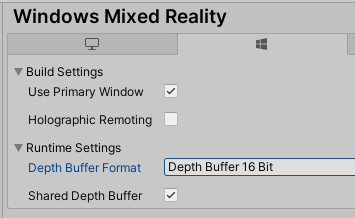
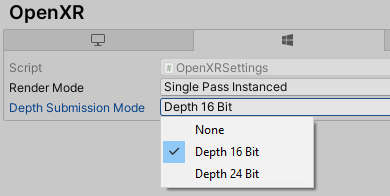
- For OpenXR, select either a depth format or "None" in the Depth Submission Mode dropdown.
- For Windows Mixed Reality, check or uncheck the Shared Depth Buffer check box. Then, select a format from the Depth Buffer Format dropdown.
Note
It is generally recommended to use 16 bit depth buffers for improved performance. However, if using 16-bit depth format, stencil buffer required effects (like some Unity UI scroll panels) will not work because Unity does not create a stencil buffer in this setting. Selecting 24-bit depth format conversely will generally create an 8-bit stencil buffer if applicable on the endpoint graphics platform.
To set whether your Unity app will provide a depth buffer to Windows:
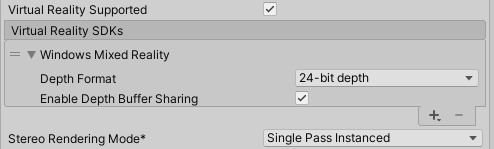
- Go to Edit > Project Settings > Player > Universal Windows Platform tab > XR Settings.
- Expand the Windows Mixed Reality SDK item.
- Check or uncheck the Enable Depth Buffer Sharing check box. Enable Depth Buffer Sharing is checked by default in new projects, but may have been unchecked by default in older projects.
A depth buffer can improve visual quality so long as Windows can accurately map the normalized per-pixel depth values in your depth buffer back to distances in meters, using the near and far planes you've set in Unity on the main camera. If your render passes handle depth values in typical ways, you should generally be fine here, though translucent render passes that write to the depth buffer while showing through to existing color pixels can confuse the reprojection. If you know that your render passes will leave many of your final depth pixels with inaccurate depth values, you are likely to get better visual quality by unchecking "Enable Depth Buffer Sharing".
Note
It is generally recommended to use 16 bit depth buffers for improved performance. However, if using 16-bit depth format, stencil buffer required effects (like some Unity UI scroll panels) will not work because Unity does not create a stencil buffer in this setting. Selecting 24-bit depth format conversely will generally create an 8-bit stencil buffer if applicable on the endpoint graphics platform.
Using clipping planes
Rendering content too close to the user can be uncomfortable in mixed reality. You can adjust the near and far clip planes on the Camera component.
- Select the Main Camera in the Hierarchy panel
- In the Inspector panel, find the Camera component Clipping Planes and change the Near textbox from 0.3 to 0.85. Content rendered even closer can lead to user discomfort and should be avoided per the render distance guidelines.
Recentering the camera
If you're building a seated-scale experience, you can recenter Unity's world origin at the user's current head position by calling the XR.InputTracking.Recenter method in legacy XR or the XRInputSubsystem.TryRecenter method in XR SDK.
Teleportation
This feature is typically reserved for VR experiences:
MRTK provides an in-box teleport system which automatically works across articulated hands and controllers.
We recommend using MRTK's teleportation implementation.
If you choose not to use MRTK, Unity provides a teleportation implementation in the XR Interaction Toolkit.
If you choose to implement your own, it's good to keep in mind that you can't move the camera directly. Due to Unity's control of the camera for head tracking, you'll need to give the camera a parent in the hierarchy and move that GameObject instead. This is the equivalent of MRTK's Playspace.
We recommend using MRTK's teleportation implementation.
If you choose to implement your own, it's good to keep in mind that you can't move the camera directly. Due to Unity's control of the camera for head tracking, you'll need to give the camera a parent in the hierarchy and move that GameObject instead. This is the equivalent of MRTK's Playspace.
Reprojection modes
Both HoloLens and immersive headsets will reproject each frame your app renders to adjust for any misprediction of the user's actual head position when photons are emitted.
By default:
- VR immersive headsets will take care of positional reprojection if the app provides a depth buffer for a given frame. Immersive headsets will also adjust your holograms for misprediction in both position and orientation. If a depth buffer isn't provided, the system will only correct mispredictions in orientation.
- Holographic headsets like HoloLens 2 will take care of positional reprojection whether the app provides its depth buffer or not. Positional reprojection is possible without depth buffers on HoloLens as rendering is often sparse with a stable background provided by the real world.
MRTK doesn't currently have helpers for the reprojection mode. Please see one of the other tabs for more information.
Next Development Checkpoint
If you're following the Unity development journey we've laid out, you're in the midst of exploring the MRTK core building blocks. From here, you can continue to the next building block:
Or jump to Mixed Reality platform capabilities and APIs:
You can always go back to the Unity development checkpoints at any time.
See also