Note
Access to this page requires authorization. You can try signing in or changing directories.
Access to this page requires authorization. You can try changing directories.
This article explains the following use case for Holographic Remoting:
- You want the resources of a PC to power your app instead of relying on the HoloLens on-board resources: You can create and build an app that has Holographic Remoting capability. The user experiences the app on the HoloLens, but the app actually runs on a PC, which allows the app to take advantage of the PC's more powerful resources. This can be especially helpful if your app has high-resolution assets or models and you don't want the frame rate to suffer. We call this a Holographic Remoting remote app. Inputs from the HoloLens--gaze, gesture, voice, and spatial mapping--are sent to the PC, where the content is rendered in a virtual immersive view. The rendered frames are then sent to the HoloLens.
This type of Holographic Remoting is also available for Windows Mixed Reality (WMR) immersive headsets. This could be useful if, for example, your WMR headset is connected to a backpack PC and you wish to stream your app from a more powerful PC to the backpack PC.
To learn more about Holographic Remoting, see Holographic Remoting Overview
Note that you can also use Holographic Remoting if you want to preview and debug your app during the development process.
Two available modes in Holographic Remoting
Mode 1: Remote app running on PC in Connect mode, Player running on the HoloLens 2 in Listen mode.
The Player listens to the incoming connections while the remote app tries to connect.
Mode 2: Remote app running on PC in Listen mode, Player running on the HoloLens 2 in connect mode.
The remote app listens for incoming connections while the Player tries to connect.
Set up the Holographic Remoting Player app
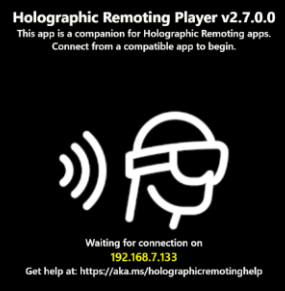
To use Holographic Remoting in Mode 1 alone, install the Holographic Remoting Player app from the Microsoft Store on your HoloLens 2 (in this article, we'll refer to it simply as "the Player"). As explained below, after you download and run the app, you'll see the version number and IP address to connect to. We recommend using the latest version of the Player available.
Holographic Remoting requires a fast PC and Wi-Fi connection. You can find more details in the Player article linked above.
To use Holographic Remoting in both modes specified above, you need to clone Holographic Remoting Sample player and deploy it to the HoloLens 2 using Visual Studio.
Build a remote app running on PC for Holographic Remoting using Unity
On the menu bar, select Edit > Project Settings.
In the left-side column, select XR plug-in Management.
Ensure that you're in the Universal Windows Platform settings tab.
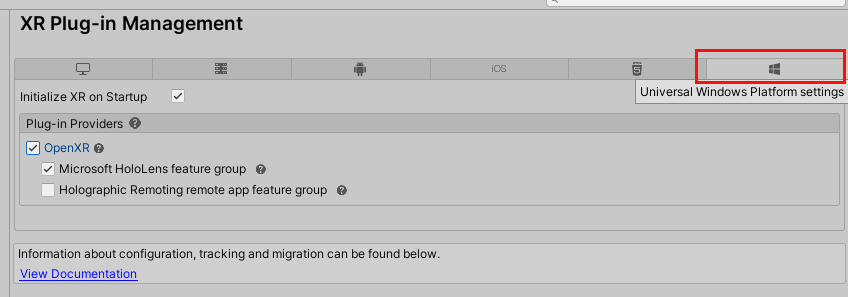
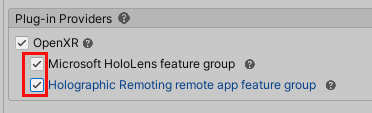
In the OpenXR plug-in section, select Microsoft HoloLens feature group and Holographic Remoting remote app feature group.
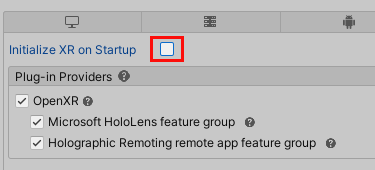
Unselect the Initialize XR on Startup check box.
Write some code to set the remoting configuration and trigger XR initialization. The app can either call into Connect function for Mode 1, or call into Listen function for Mode 2. To see an example, download our Open XR Unity Mixed Reality samples and then, in the RemotingSample project, view the AppRemoting.cs script.
For Mode 1, the Connect mode, call
Microsoft.MixedReality.OpenXR.Remoting.AppRemoting.Connectwith a filled-inRemotingConfiguration. The sample app exposes this in the Inspector and shows how to fill in the IP address from a text field. CallingConnectwill set the configuration and automatically initialize XR, which is why it must be called as a coroutine:StartCoroutine(Remoting.AppRemoting.Connect(remotingConfiguration));For Mode 2, the Listen mode, call
Microsoft.MixedReality.OpenXR.Remoting.AppRemoting.Listenwith a filled-inRemotingListenConfiguration. The sample app exposes this in the Inspector. CallingListenwill set the configuration and wait for a connection from the Holographic Remoting sample player, which is why it must be called as a coroutine:StartCoroutine(Remoting.AppRemoting.Listen(remotingListenConfiguration));While running, you can obtain the current connection state with the
AppRemoting.TryGetConnectionStateAPI, and optionally disconnect and de-initialize XR usingAppRemoting.Disconnect(). This could be used to disconnect and reconnect to a different device within the same app session. The RemotingSample app provides a tappable cube which will disconnect the remoting session if tapped.
Run the Holographic Remoting remote app and the Player app in the modes described above
Mode 1: Run the Holographic Remoting remote app on PC in Connect Mode and the Player in Listen Mode:
If the Player is already installed from the store on the HoloLens 2, skip step numbers 2 and 3 below where you build and run the Sample Player app. Instead, run the installed Player and continue on with step #4.
Open the Holographic Remoting Sample Player app using VS 2019 and then do one of the following:
To run on a HoloLens 2 using a USB cable:
- Configure the build options as shown here:

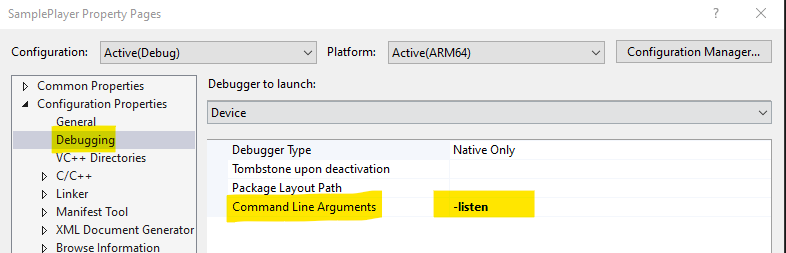
- Open the Properties page for the project, and then navigate to Configuration Properties > Debugging.
- Click the Debugger to launch drop-down, and then select Device.
- In the Command Line Arguments field, add "-listen".
To run on a HoloLens 2 using Wifi:
- Configure the build options as shown here:

- Open the Properties page for the project, and then navigate to Configuration Properties > Debugging.
- Click the Debugger to launch drop-down, and then select Remote Machine.
- In the Command Line Arguments field, add the Wifi IP address of the HoloLens.
To deploy the SamplePlayer solution to the HoloLens 2, press the play button in Visual Studio. You'll be able to see the HAR Sample player running on HoloLens 2, displaying that it's "Waiting for a connection on IP address of HoloLens 2."
In the remote app running on the host PC, add the IP address of the HoloLens 2 displayed above and then select Connect.
After the connection is established, the Player running on HoloLens 2 will start "Receiving".
Mode 2: Run the remote app on your PC in Listen Mode and the HAR player app in Connect Mode:
On the 2D UI screen in the remote app running on PC, click Listen.
Open the Properties page for the project, and then navigate to Configuration Properties > Debugging.
Click the Debugger to launch drop-down, and then select Device.
In the Command Line Arguments field, add the IP address of the host PC.
To deploy the SamplePlayer solution to the HoloLens 2, in the Visual Studio solution, click the play button. You'll be able to see the HAR Sample player running on the HoloLens 2, displaying that it's "Connecting to IP address given in command line arguments."
After the connection is established, the Holographic Remoting Sample Player app running on the HoloLens 2 will start "Receiving".
Tip
For best results, make sure your app properly sets the ../focus point. This helps Holographic Remoting to best adapt your scene to the latency of your wireless connection.
Migrate from previous Holographic Remoting APIs
To learn more about Holographic Remoting, see Holographic Remoting Overview.
UnityEngine.XR.WSA.HolographicRemoting
From the sample code on Unity's docs:
| XR.WSA.HolographicRemoting | OpenXR.Remoting.AppRemoting |
|---|---|
HolographicRemoting.ConnectRemotingSession() |
AppRemoting.Connect(RemotingConfiguration) |
HolographicRemoting.DisconnectRemotingSession() |
AppRemoting.Disconnect() |
HolographicRemoting.ConnectionState |
AppRemoting.TryGetConnectionState(out ConnectionState, out DisconnectReason) |
UnityEngine.XR.WindowsMR.WindowsMRRemoting
| XR.WindowsMR.WindowsMRRemoting | OpenXR.Remoting.AppRemoting |
|---|---|
WindowsMRRemoting.Connect() |
AppRemoting.Connect(RemotingConfiguration) |
WindowsMRRemoting.Listen() |
AppRemoting.Listen(RemotingListenConfiguration) |
WindowsMRRemoting.Disconnect() |
AppRemoting.Disconnect() |
WindowsMRRemoting.TryGetConnectionState(out ConnectionState) and WindowsMRRemoting.TryGetConnectionFailureReason(out ConnectionFailureReason) |
AppRemoting.TryGetConnectionState(out ConnectionState, out DisconnectReason) |
WindowsMRRemoting.isAudioEnabled, WindowsMRRemoting.maxBitRateKbps, WindowsMRRemoting.remoteMachineName |
Passed into AppRemoting.Connect via the RemotingConfiguration struct |
WindowsMRRemoting.isConnected |
AppRemoting.TryGetConnectionState(out ConnectionState state, out _) && state == ConnectionState.Connected |