4. Making your scene interactive
In the previous tutorial, you added an ARSession, Pawn, and Game Mode to complete the mixed reality setup for the chess app. This section focuses on using the open source Mixed Reality Toolkit UX Tools plugin, which provides tools to make the scene interactive. By the end of this section, your chess pieces will be moving by user input.
Objectives
- Installing the Mixed Reality UX Tools plugin
- Adding Hand Interaction Actors to your fingertips
- Creating and adding Manipulators to objects in the scene
- Using input simulation to validate the project
Downloading the Mixed Reality UX Tools plugin
Before you start working with user input, you'll need to add the Mixed Reality UX Tools plugin to the project. To learn more about UX Tools, you can check out the project on GitHub.
- Open the Epic Games Launcher. Navigate to Unreal Engine Marketplace and search for "Mixed Reality UX Tools". Install the plugin to your engine.

- Back in the Unreal editor, go to Project Settings > Plugins and search for "Mixed Reality UX Tools". Ensure the plugin is enabled and restart the editor if prompted.

- The UXTools plugin has a Content folder with subfolders for components, including Buttons, XR Simulation, and Pointers, and a C++ Classes folder with additional code.
Note
If you don’t see the UXTools Content section in the Content Browser, check View Options > Show Engine Content and *View Options > Show Plugin Content.

Additional plugin documentation can be found on the Mixed Reality UX Tools GitHub repository.
With the plugin installed, you're ready to start using the tools it has to offer, starting with hand interaction actors.
Spawning Hand Interaction Actors
Hand interaction with UX elements is done with Hand Interaction Actors, which create and drive the pointers and visuals for near and far interactions.
- Near interactions - pinching elements between index finger and thumb or by poking them with a fingertip.
- Far interactions - pointing a ray from the virtual hand at an element and pressing index and thumb together.
In our case, adding a Hand Interaction Actor to MRPawn will:
- Add a cursor to the tips of the Pawn’s index fingers.
- Provide articulated hand input events that can be manipulated through the Pawn.
- Allow far interaction input events through hand rays extending from the palms of the virtual hands.
We recommend reading through the documentation on hand interactions before continuing.
Once you're ready, open the MRPawn Blueprint and go to the Event Graph.
Drag and release the execution pin from Event BeginPlay to place a new node.
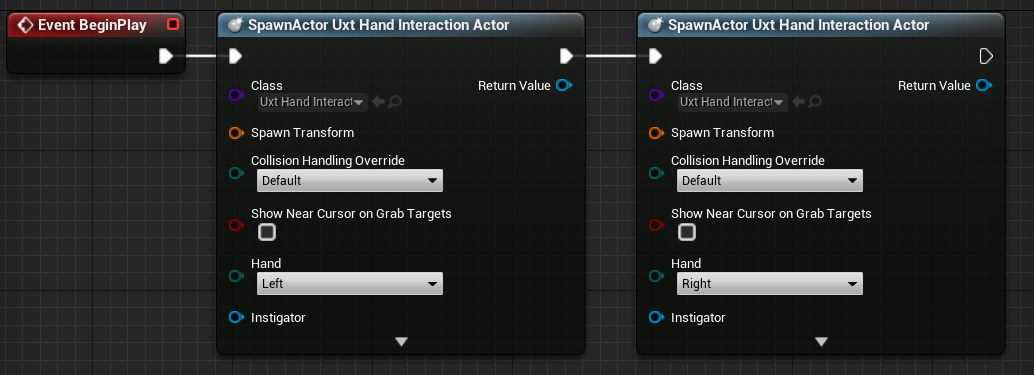
- Select Spawn Actor from Class, click the dropdown next to the Class pin and search for Uxt Hand Interaction Actor.
Spawn a second Uxt Hand Interaction Actor, this time setting the Hand to Right. When the event begins, a Uxt Hand Interaction Actor will be spawned on each hand.
Your Event Graph should match the following screenshot:
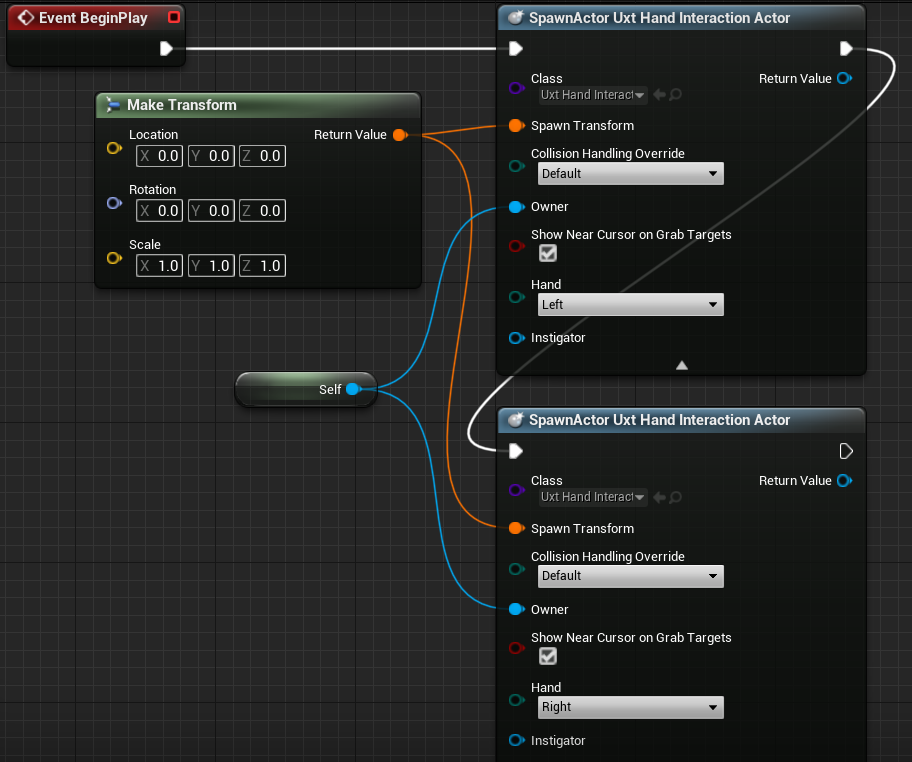
Both Uxt Hand Interaction Actors need owners and initial transform locations. The initial transform doesn’t matter in this case because UX Tools will have the Hand Interaction Actors jump to the virtual hands as soon as they're visible. However, the SpawnActor function requires a Transform input to avoid a compiler error, so you'll use the default values.
Drag and release the pin off one of the Spawn Transform pins to place a new node.
- Search for the Make Transform node, then drag the Return Value to the other hand’s Spawn Transform so that both SpawnActor nodes are connected.
Select the down arrow at the bottom of both SpawnActor nodes to reveal the Owner pin.
- Drag the pin off one of the Owner pins and release to place a new node.
- Search for self and select the Get a reference to self variable.
- Create a link between the Self object reference node and the other Hand Interaction Actor’s Owner pin.
Lastly, check the Show Near Cursor on Grab Targets box for both Hand Interaction Actors. A cursor should appear on the grab target as your index finger gets close, so you can see where your finger is relative to the target.
- Compile, save, and return to the Main window.
Make sure the connections match the following screenshot, but feel free to drag around nodes to make your Blueprint more readable.
You can find more information about Hand Interaction Actors in the UX Tools documentation.
Now the virtual hands in the project have a way of selecting objects, but they still can't manipulate them. Your last task before testing the app is to add Manipulator components to the actors in the scene.
Attaching Manipulators
A Manipulator is a component that responds to articulated hand input and can be grabbed, rotated, and translated. Applying the Manipulator’s transform to an Actors transform allows direct Actor manipulation.
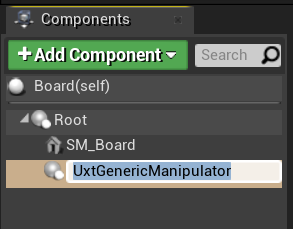
- Open the Board blueprint, click Add Component and search for Uxt Generic Manipulator in the Components panel.
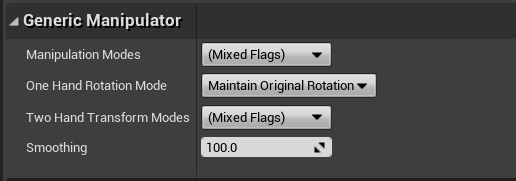
- Expand the Generic Manipulator section in the Details panel. You can set one-handed or two-handed manipulation, rotation mode, and smoothing from here. Feel free to select whichever modes you wish, then Compile and Save Board.
- Repeat the steps above for the WhiteKing Actor.
You can find more information about the Manipulator Components provided in the Mixed Reality UX Tools plugin in the documentation.
Testing the scene
Good news everyone! You're ready to test out the app with its new virtual hands and user input. Press Play in the Main Window and you'll see two mesh hands with rays extending from each hand’s palm. You can control the hands and their interactions as follows:
- Hold down the left Alt key to control the left hand and the left Shift key to control the right hand.
- Move your mouse to move the hand and scroll with your mouse wheel to move the hand forwards or backwards.
- Use the left mouse button to pinch and the middle mouse button to poke.
Note
Input simulation may not work if you have multiple headsets plugged into your PC. If you're having issues, try unplugging your other headsets.
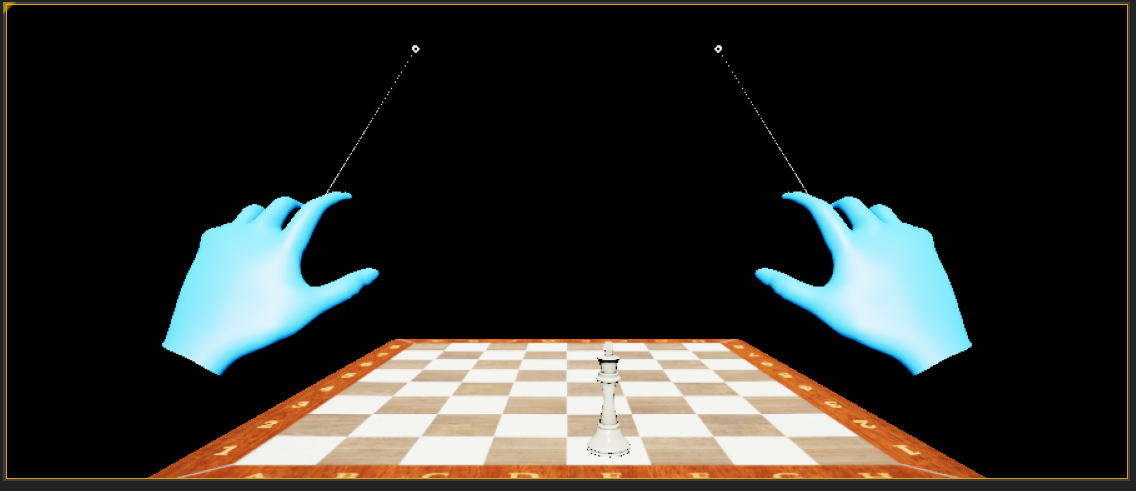
Try using the simulated hands to pick up, move, and set down the white chess king and manipulate the board! Experiment with both near and far interaction - notice that when your hands get close enough to grab the board and king directly, a finger cursor at the tip of the index finger replaces the hand ray.
You can find more information about the simulated hands feature provided by the MRTK UX Tools plugin in the documentation.
Now that your virtual hands can interact with objects, you're ready to move on to the next tutorial and add user interfaces and events.
Next Section: 5. Adding a button & resetting piece locations
Feedback
Coming soon: Throughout 2024 we will be phasing out GitHub Issues as the feedback mechanism for content and replacing it with a new feedback system. For more information see: https://aka.ms/ContentUserFeedback.
Submit and view feedback for