Note
Access to this page requires authorization. You can try signing in or changing directories.
Access to this page requires authorization. You can try changing directories.
Warning
The ms-appinstaller: URI protocol used in these web-install tutorials is disabled by default as of December 2023. Users on most devices will not be able to use the one-click browser-triggered install flow. For broad distribution, publish to the Microsoft Store instead. For enterprise-managed devices where IT can re-enable the protocol via Group Policy, see Installing Windows apps from a web page.
This tutorial demonstrates how to set up an IIS server, verify that your web app can host app packages, and invoke and use App Installer effectively.
The App Installer app allows developers and IT Pros to distribute Windows 10 apps by hosting them on their own Content Delivery Network (CDN). This is useful for enterprises that don't want or need to publish their apps to the Microsoft Store, but still want to take advantage of the Windows 10 packaging and deployment platform.
Setup
To successfully go through with this tutorial, you will need the following:
- Visual Studio 2017
- Web development tools and IIS
- Windows 10 app package - The app package that you will distribute
Optional: Starter Project on GitHub. This is helpful if you don't have app packages to work with, but would still like to learn how to use this feature.
Step 1 - Install IIS and ASP.NET
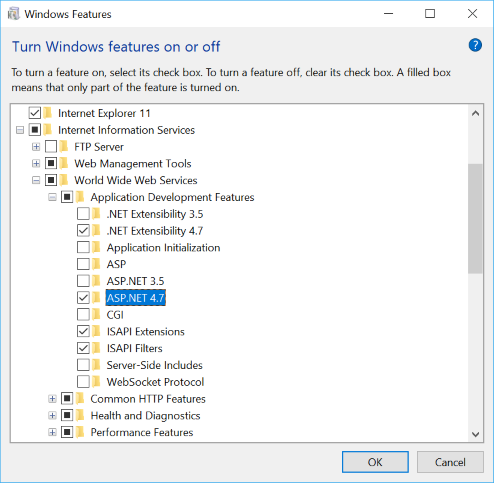
Internet Information Services is a Windows feature that can be installed via the Start menu. In Start menu search for Turn Windows features on or off.
Find and select Internet Information Services to install IIS.
Note
You don't need to select all the check boxes under Internet Information Services. Only the ones selected when you check Internet Information Services are sufficient.
You will also need to install ASP.NET 4.5 or greater. To install it, locate Internet Information Services -> World Wide Web Services -> Application Development Features. Select a version of ASP.NET that is greater than or equal to ASP.NET 4.5.
Step 2 - Install Visual Studio 2017 and Web Development tools
Install Visual Studio 2017 if you have not already installed it. If you already have Visual Studio 2017, ensure that the following workloads are installed. If the workloads are not present on your installation, follow along using the Visual Studio Installer (found from the Start menu).
During installation, select ASP.NET and Web development and any other workloads that you are interested in.
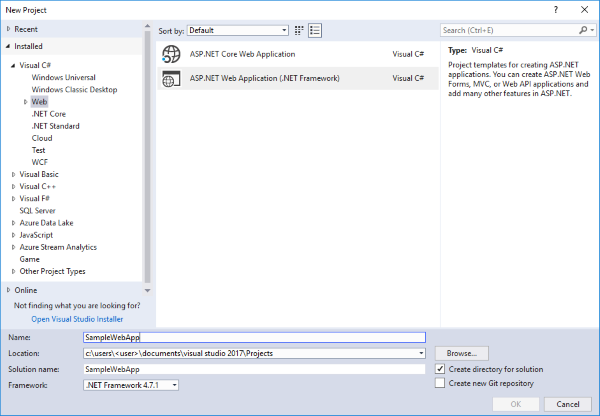
Once installation is complete, launch Visual Studio and create a new project (File -> New Project).
Step 3 - Build a Web App
Launch Visual Studio 2017 as Administrator and create a new Visual C# Web Application project with an empty project template.
Step 4 - Configure IIS with our Web App
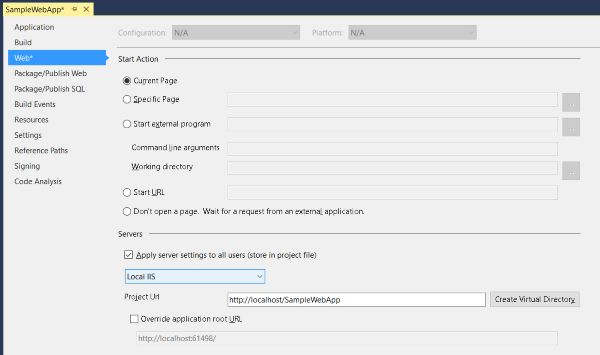
From the Solution Explorer, right click on the root project and select Properties.
In the web app properties, select the Web tab. In the Servers section, choose Local IIS from the drop down menu and click Create Virtual Directory.
Step 5 - Add an app package to a web application
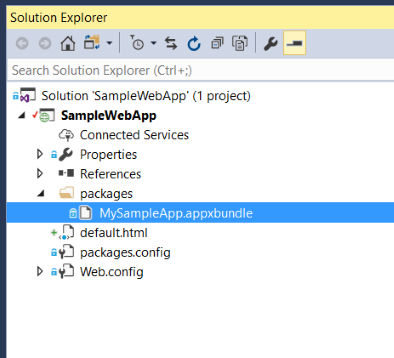
Add the app package that you are going to distribute into the web application. You can use the app package that is part of the provided starter project packages on GitHub if you don't have an app package available. The certificate (MySampleApp.cer) that the package was signed with is also with the sample on GitHub. You must have the certificate installed to your device prior to installing the app (Step 9).
In the starter project web application, a new folder was added to the web app called packages that contains the app packages to be distributed. To create the folder in Visual Studio, right click on the project node in Solution Explorer, select Add -> New Folder and name it packages. To add app packages to the folder, right click on the packages folder and select Add -> Existing Item... and browse to the app package location.
Step 6 - Create a Web Page
This sample web app uses simple HTML. You are free to build your web app as required per your needs.
Right click on the root project of the Solution explorer, select Add -> New Item, and add a new HTML Page from the Web section.
Once the HTML page is created, right click on the HTML page in the Solution Explorer and select Set As Start Page.
Double-click the HTML file to open it in the code editor window. In this tutorial, only the elements in the required in the web page to invoke the App Installer app successfully to install a Windows 10 app will be used.
Include the following HTML code in your web page. The key to successfully invoking App Installer is to use the custom scheme that App Installer registers with the OS: ms-appinstaller:?source=. See the code example below for more details.
Note
Ensure that the URL path specified after the custom scheme matches the Project Url in the web tab of your VS solution.
<html>
<head>
    <meta charset="utf-8" />
    <title> Install Page </title>
</head>
<body>
    <a href="ms-appinstaller:?source=http://localhost/SampleWebApp/packages/MySampleApp.msixbundle"> Install My Sample App</a>
</body>
</html>
Step 7 - Configure the web app for app package MIME types
Open the Web.config file from the solution explorer and add the following lines within the <configuration> element.
<system.webServer>
    <!--This is to allow the web server to serve resources with the appropriate file extension-->
    <staticContent>
      <mimeMap fileExtension=".appx" mimeType="application/appx" />
      <mimeMap fileExtension=".msix" mimeType="application/msix" />
      <mimeMap fileExtension=".appxbundle" mimeType="application/appxbundle" />
      <mimeMap fileExtension=".msixbundle" mimeType="application/msixbundle" />
      <mimeMap fileExtension=".appinstaller" mimeType="application/appinstaller" />
    </staticContent>
</system.webServer>
Note
ASP.NET Core does not use web.config MIME mappings for static content. If your hosting app is built with ASP.NET Core, configure the required content types for .appx, .msix, .appxbundle, .msixbundle, and .appinstaller in the static file middleware, typically in the Startup.Configure method. For more information, see the .NET Core documentation.
Step 8 - Add loopback exemption for App Installer
Due to network isolation, Windows 10 apps like App Installer are restricted to use IP loopback addresses like http://localhost/. When using local IIS Server, App Installer must be added to the loopback exempt list.
To do this, open Command Prompt as an Administrator and enter the following:
CheckNetIsolation.exe LoopbackExempt -a -n=microsoft.desktopappinstaller_8wekyb3d8bbwe
To verify that the app is added to the exempt list, use the following command to display the apps in the loopback exempt list:
CheckNetIsolation.exe LoopbackExempt -s
You should find microsoft.desktopappinstaller_8wekyb3d8bbwe in the list.
Once the local validation of app installation via App Installer is complete, you can remove the loopback exemption that you added in this step by:
CheckNetIsolation.exe LoopbackExempt -d -n=microsoft.desktopappinstaller_8wekyb3d8bbwe
Step 9 - Run the Web App
Build and run the web application by clicking on the run button on the VS Ribbon as shown in the image below:

A web page will open in your browser:
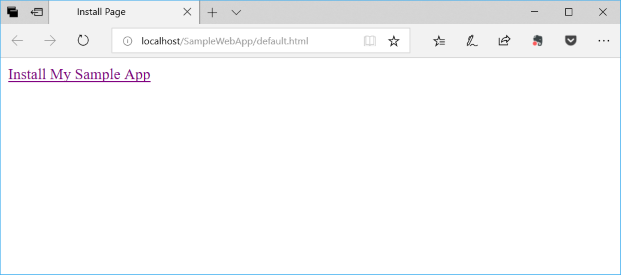
Click on the link in the web page to launch the App Installer app and install your Windows 10 app package.
Troubleshooting issues
Not sufficient privilege
If running the web app in Visual Studio displays an error such as "You do not have sufficient privilege to access IIS web sites on your machine", you will need to run Visual Studio as an administrator. Close the current instance of Visual Studio and reopen it as an admin.
Set start page
If running the web app causes the browser to load with an HTTP 403.14 - Forbidden error, it's because the web app doesn't have a defined start page. Refer to Step 6 in this tutorial to learn how to define a start page.