Note
Access to this page requires authorization. You can try signing in or changing directories.
Access to this page requires authorization. You can try changing directories.
The Package Support Framework (PSF) is an open source project that enables you to apply fixes to your existing desktop application. The PSF enables an application to run in a packaged format without modifying code. The Package Support Framework helps your application follow the best practices of the modern runtime environment.
In the following sections, we will explore how to create a new Visual Studio project, include Package Support Framework to the solution, and create runtime fixes.
Step 1: Create a package solution in Visual Studio
In Visual Studio, create a new Visual Studio Solutions, Blank Solution. Include any application projects to the newly created Blank Solution.
Step 2: Add a packaging project
If you don't already have a Windows Application Packaging Project, create one and add it to your solution. Create a new Visual C# -> Windows Universal -> Windows Application Packaging Project and add it to your newly created solution.
For more information on Windows Application Packaging project, see Package your application by using Visual Studio.
In Solution Explorer, right-click the packaging project, select Edit Project File, and then add this to the bottom of the project file:
...
  <Target Name="PSFRemoveSourceProject" AfterTargets="ExpandProjectReferences" BeforeTargets="_ConvertItems">
    <ItemGroup>
      <FilteredNonWapProjProjectOutput Include="@(_FilteredNonWapProjProjectOutput)">
      <SourceProject Condition="'%(_FilteredNonWapProjProjectOutput.SourceProject)'=='_Runtime fix project name_'" />
      </FilteredNonWapProjProjectOutput>
      <_FilteredNonWapProjProjectOutput Remove="@(_FilteredNonWapProjProjectOutput)" />
      <_FilteredNonWapProjProjectOutput Include="@(FilteredNonWapProjProjectOutput)" />
    </ItemGroup>
  </Target>
</Project>
Step 3: Add project for the runtime fix
Add a new Visual C++ -> Windows Desktop -> Dynamic-Link Library (DLL) project to the solution.
Next, right-click the that project, and then choose Properties.
In the property page, locate the Configuration Properties -> C/C++ -> Language -> C++ Language Standard field. Then select ISO C++17 Standard (/std:c++17) from the drop-down menu.
Right-click on the project, and then in the context menu, choose the Manage Nuget Packages option. Ensure that the Package source option is set to All or nuget.org.
Click the settings icon next that field.
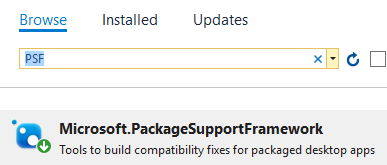
Search the Nuget packages for PSF, then install the Microsoft.PackageSupportFramework for this project.
Step 4: Add a project that starts the PSF Launcher executable
Add a new Visual C++ -> General -> Empty Project to the solution.
Do the following steps:
- Right-click that project, and then in the context menu, choose the Manage Nuget Packages option. Ensure that the Package source option is set to All or nuget.org.
- Click the settings icon next that field.
- Search the Nuget packages for PSF, then install the Microsoft.PackageSupportFramework for this project.
Open the properties pages for the project, and in the General settings page, set the Target Name property to PSFLauncher32 or PSFLauncher64 depending on the architecture of your application.
Add a project reference to the runtime fix project in your solution.
Right-click the reference, and then in the Properties window, apply these values.
| Property | Value |
|---|---|
| Copy local | True |
| Copy Local Satellite Assemblies | True |
| Reference Assembly Output | True |
| Link Library Dependencies | False |
| Link Library Dependency Inputs | False |
Step 5: Configure the packaging project
To configure the packaging project do the following steps:
- In the packaging project, right-click the Applications folder, and then choose Add Reference from the dropdown menu.
- Choose the PSF Launcher project and your desktop application project, and then choose the OK button.
- Select both the PSF Launcher and the Desktop Application project, then click the Ok button. If the application source code is not available, select only the PSF Launcher project.
- In the Applications node, right-click the PSF Launcher application, and then choose Set as Entry Point.
Add a file named config.json to your packaging project, then, copy and paste the following json text into the file. Set the Package Action property to Content.
{
    "applications": [
        {
            "id": "",
            "executable": "",
            "workingDirectory": ""
        }
    ],
    "processes": [
        {
            "executable": "",
            "fixups": [
                {
                    "dll": "",
                    "config": {
                    }
                }
            ]
        }
    ]
}
Provide a value for each key. Use this table as a guide.
| Array | key | Value |
|---|---|---|
| applications | id | Use the value of the Id attribute of the Application element in the package manifest. |
| applications | executable | The package-relative path to the executable that you want to start. In most cases, you can get this value from your package manifest file before you modify it. It's the value of the Executable attribute of the Application element. |
| applications | workingDirectory | (Optional) A package-relative path to use as the working directory of the application that starts. If you don't set this value, the operating system uses the System32 directory as the application's working directory. |
| processes | executable | In most cases, this will be the name of the executable configured above with the path and file extension removed. |
| fixups | dll | Package-relative path to the fixup DLL to load. |
| fixups | config | (Optional) Controls how the fixup DLL behaves. The exact format of this value varies on a fixup-by-fixup basis as each fixup can interpret this "blob" as it wants. |
When you're done, your config.json file will look something like this.
{
  "applications": [
    {
      "id": "DesktopApplication",
      "executable": "DesktopApplication/WinFormsDesktopApplication.exe",
      "workingDirectory": "WinFormsDesktopApplication"
    }
  ],
  "processes": [
    {
      "executable": ".*App.*",
      "fixups": [ { "dll": "RuntimeFix.dll" } ]
    }
  ]
}
Note
The applications, processes, and fixups keys are arrays. That means that you can use the config.json file to specify more than one application, process, and fixup DLL.
Debug a runtime fix
In Visual Studio, press F5 to start the debugger. The first thing that starts is the PSF Launcher application, which in turn, starts your target desktop application. To debug the target desktop application, you'll have to manually attach to the desktop application process by choosing Debug->Attach to Process, and then selecting the application process. To permit the debugging of a .NET application with a native runtime fix DLL, select managed and native code types (mixed mode debugging).
You can set break points next to lines of code in the desktop application code and the runtime fix project. If you don't have the source code to your application, you'll be able to set break points only next to lines of code in your runtime fix project.