Note
Access to this page requires authorization. You can try signing in or changing directories.
Access to this page requires authorization. You can try changing directories.
This article describes how to use the Package Support Framework (PSF) to resolve a Filesystem Write Permission error.
Windows apps redirect specific application-related directories to the C:\Program Files\WindowsApps folder. If the application attempts to write to the Windows app container, an error triggers, and the write fails. You can make enhancements to the Windows app package to resolve this issue.
Investigation
First, identify the failure, and the directory paths that the app is requesting.
Capture the Windows app failure
Filtering the results is optional, but makes it easier to see application-related failures. To filter results, you create two filter rules. The first filter includes the application process name, and the second filter includes any results that aren't successful.
Download and extract the SysInternals Process Monitor to the C:\PSF\ProcessMonitor directory.
Open Windows Explorer and navigate to the extracted SysInternals ProcessMonitor folder.
Select the SysInternals Process Monitor procmon.exe file to launch the app.
If prompted by UAC, select Yes.
In the Process Monitor Filter window, select Process Name from the first field's dropdown menu.
Verify that is appears in the next field.
In the next field, enter your app's process name, for example PSFSample.exe.
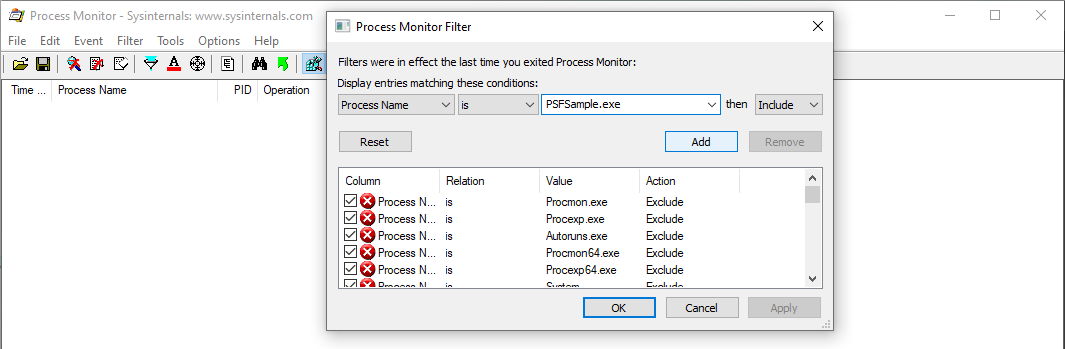
Select Add.
In the Process Monitor Filter window, select Result from the first field's dropdown menu.
In the next field, select is not from the dropdown menu.
In the text field, enter SUCCESS.
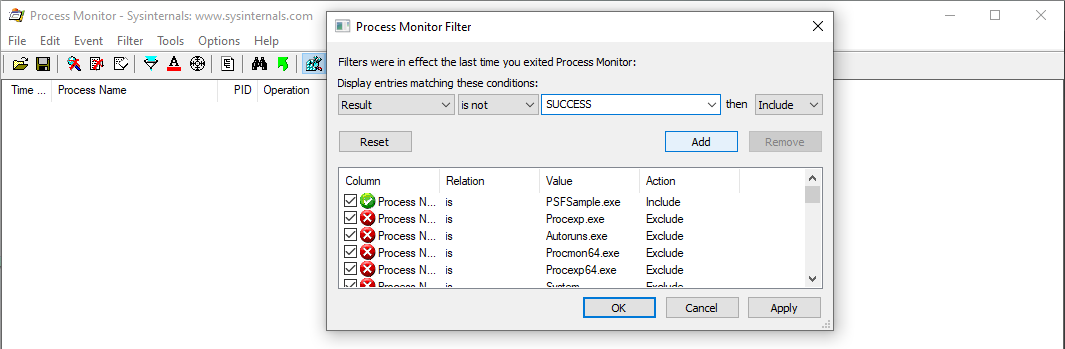
Select Add, and then select OK.
Launch the Windows app, trigger the error, and then close the Windows app.
Review the Windows app failure logs
After you capture the Windows app processes, investigate the results to determine whether the failure is related to the working directory.
Review the SysInternals Process Monitor failure results. If the results include Access denied, with a Desired Access: Generic Write detail, for your app targeting C:\Program Files\WindowsApps\...\, you've identified a write permission failure related to the working directory.
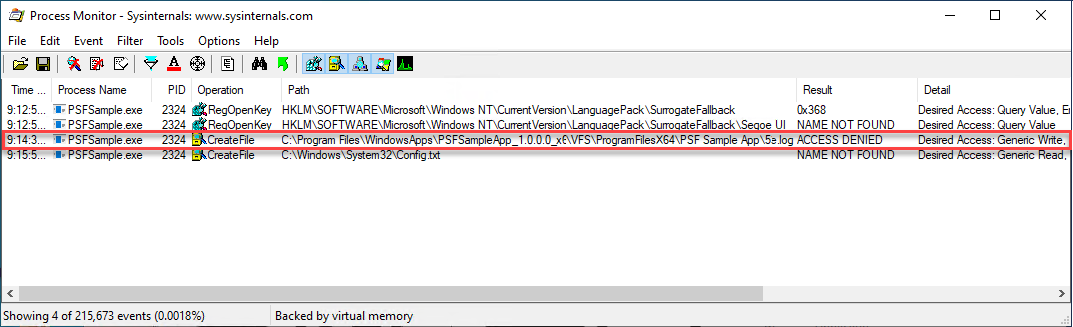
If you identify this error, apply the following PSF correction to your app.
Resolution
To resolve the issue of the Windows app failing to write to the Windows app container, follow these steps:
- Extract the content of the Windows app to a local staging directory.
- Create a config.json and inject the PSF fixup files into the staged Windows app directory.
- Configure the application launcher to point to the PSF launcher, and configure the PSF config.json file to redirect the PSF launcher, specifying the working directory.
- Update the Windows app AppxManifest file.
- Repackage and sign the Windows app.
Download and install required tools
This process requires the following tools:
- NuGet client tool
- Package Support Framework (PSF)
- Windows 10 Software Development Toolkit (Win 10 SDK), latest version
- SysInternals Process Monitor
To download and install NuGet and PSF:
Download the latest non-preview version of the NuGet client tool, and save nuget.exe in C:\PSF\nuget.
Download and install the Package Support Framework with NuGet by running the following command from an administrative PowerShell window:
Set-Location "C:\PSF"
.\nuget\nuget.exe install Microsoft.PackageSupportFramework
To download and install the Windows 10 SDK:
- Download the Win 10 SDK.
- Run winsdksetup.exe .
- Select Next.
- Select only the following three features:
- Windows SDK Signing Tools for Desktop Apps
- Windows SDK for UWP C++ Apps
- Windwos SDK for UWP Apps Localization
- Select Install, and then select OK.
Stage the Windows app
Staging the Windows app extracts and unpackages the contents of the app to a local directory. Once the Windows app is unpacked to the staging location, you can inject PSF fixup files to correct any unwanted experiences.
In an administrative PowerShell window, set the following variables to target your specific app file and Windows 10 SDK version:
$AppPath          = "C:\PSF\SourceApp\PSFSampleApp.msix"         ## Path to the MSIX App Installer
$StagingFolder    = "C:\PSF\Staging\PSFSampleApp"                ## Path to where the MSIX App will be staged
$OSArchitecture   = "x$((gwmi Win32_Processor).AddressWidth)"    ## Operating System Architecture
$Win10SDKVersion  = "10.0.19041.0"                               ## Latest version of the Win10 SDK
Unpack the Windows app to the staging folder by running the following PowerShell cmdlet:
## Sets the directory to the Windows 10 SDK
Set-Location "${env:ProgramFiles(x86)}\Windows Kits\10\Bin\$Win10SDKVersion\$OSArchitecture"

## Unpackages the Windows app to the staging folder
.\makeappx.exe unpack /p "$AppPath" /d "$StagingFolder"
Create and inject required PSF files
To correct the Windows app, you create a config.json file with information about the Windows app launcher that fails. If multiple Windows app launchers are experiencing issues, you can configure the config.json file with multiple entries.
After you create the config.json file, you move the config.json and supporting PSF fixup files into the root of the Windows app package.
Open Visual Studio Code or another text editor.
Create a new file named config.json in the Windows app staging directory, C:\PSF\Staging\PSFSampleApp.
Copy the following code to the newly created config.json file.
{
    "applications": [
        {
            "id": "",
            "executable": ""
        }
    ],
    "processes": [
        {
            "executable": "",
            "fixups": [
            {
                "dll": "",
                "config": {
                    "redirectedPaths": {
                        "packageRelative": [
                            {
                                "base": "",
                                "patterns": [
                                    ""
                                ]
                            }
                        ]
                    }
                }
            }
        ]
        }
    ]
}
Open the AppxManifest.xml file in the Windows app staging folder. The following example shows an AppxManifest.xml file:
<Applications>
    <Application Id="PSFSAMPLE" Executable="VFS\ProgramFilesX64\PS Sample App\PSFSample.exe" EntryPoint="Windows.FullTrustApplication">
    <uap:VisualElements BackgroundColor="transparent" DisplayName="PSFSample" Square150x150Logo="Assets\StoreLogo.png" Square44x44Logo="Assets\StoreLogo.png" Description="PSFSample">
        <uap:DefaultTile Wide310x150Logo="Assets\StoreLogo.png" Square310x310Logo="Assets\StoreLogo.png" Square71x71Logo="Assets\StoreLogo.png" />
    </uap:VisualElements>
    </Application>
</Applications>
Make the following changes in the config.json file:
Set the
applications.idvalue to be the same value as in theApplications.Application.IDfield of the AppxManifest.xml file.
Set the
applications.executablevalue to target the relative path to the application located in theApplications.Application.Executablefield of the AppxManifest.xml file.
Set the
applications.workingdirectoryvalue to target the relative folder path in theApplications.Application.Executablefield of the AppxManifest.xml file.
Set the
process.executablevalue to target the file name, without path and extension, in theApplications.Application.Executablefield of the AppxManifest.xml file.
Set the
processes.fixups.dllvalue to target the architecture-specificFileRedirectionFixup.dll. If the correction is for x64 architecture, set the value to beFileRedirectionFixup64.dll. If the architecture is x86, or is unknown, set the value to beFileRedirectionFixup86.dll.Set the
processes.fixups.config.redirectedPaths.packageRelative.basevalue to the package-relative folder path in theApplications.Application.Executablefield of the AppxManifest.xml file.
Set the
processes.fixups.config.redirectedPaths.packageRelative.patternsvalue to match the file type the application creates. If you use.*\\.log, the PSF redirects all log file writes in theprocesses.fixups.config.redirectedPaths.packageRelative.basedirectory and child directories.
Save the updated config.json file. The following example shows an updated config.json file:
{
    "applications": [
        {
        "id": "PSFSample",
        "executable": "VFS/ProgramFilesX64/PS Sample App/PSFSample.exe"
        }
    ],
    "processes": [
        {
            "executable": "PSFSample",
            "fixups": [
                {
                    "dll": "FileRedirectionFixup64.dll",
                    "config": {
                        "redirectedPaths": {
                            "packageRelative": [
                                {
                                    "base": "VFS/ProgramFilesX64/PS Sample App/",
                                    "patterns": [
                                        ".*\\.log"
                                    ]
                                }
                            ]
                        }
                    }
                }
            ]
        }
    ]
}
Copy the following files from the Package Support Framework for the application executable architecture to the root of the staged Windows app. You can find the files in .\Microsoft.PackageSupportFramework.\<Version>\bin.
Application (x64) Application (x86) PSFLauncher64.exe PSFLauncher32.exe PSFRuntime64.dll PSFRuntime32.dll PSFRunDll64.exe PSFRunDll32.exe FileRedirectionFixup64.dll FileRedirectionFixup64.dll
Update AppxManifest
After you create and update the config.json file, update the Windows app's AppxManifest.xml file for each Windows app launcher you included in the config.json. The AppxManifest.xml Applications must now target the PSFLauncher.exe associated with the application architecture.
- Open AppxManifest.xml in the staged MSIX app folder, C:\PSF\Staging\PSFSampleApp.
- Update AppxManifest.xml with the following code:
<Package ...>
...
<Applications>
    <Application Id="PSFSample"
                Executable="PSFLauncher32.exe"
                EntryPoint="Windows.FullTrustApplication">
    ...
    </Application>
</Applications>
</Package>
Repackage the application
After you apply all the corrections, repackage the Windows app into an MSIX and sign it with a code signing certificate.
Open an Administrative PowerShell Window.
Set the following variables:
$AppPath          = "C:\PSF\SourceApp\PSFSampleApp_Updated.msix" ## Path to the MSIX App Installer
$CodeSigningCert  = "C:\PSF\Cert\CodeSigningCertificate.pfx"     ## Path to your code signing certificate
$CodeSigningPass  = "<Password>"                                 ## Password used by the code signing certificate
$StagingFolder    = "C:\PSF\Staging\PSFSampleApp"                ## Path to where the MSIX App will be staged
$OSArchitecture   = "x$((gwmi Win32_Processor).AddressWidth)"    ## Operating System Architecture
$Win10SDKVersion  = "10.0.19041.0"                               ## Latest version of the Win10 SDK
Repack the Windows app from the staging folder by running the following PowerShell cmdlet:
Set-Location "${env:ProgramFiles(x86)}\Windows Kits\10\Bin\$Win10SDKVersion\$OSArchitecture"
.\makeappx.exe pack /p "$AppPath" /d "$StagingFolder"
Sign the Windows app by running the following PowerShell cmdlet:
Set-Location "${env:ProgramFiles(x86)}\Windows Kits\10\Bin\$Win10SDKVersion\$OSArchitecture"
.\signtool.exe sign /v /fd sha256 /f $CodeSigningCert /p $CodeSigningPass $AppPath