Note
Access to this page requires authorization. You can try signing in or changing directories.
Access to this page requires authorization. You can try changing directories.
The Device Relay functionality of Project Rome consists of a set of APIs that support two main features: remote launching (also known as commanding) and app services.
Remote Launching APIs support scenarios where a process on a remote device is started from a local device. For example, a user might be listening to the radio on their phone in the car, but when they get home they use their phone to transfer playback to their Xbox which is hooked up to the home stereo.
App Services APIs allow an application to establish a persistent pipeline between two devices through which messages containing any arbitrary content can be sent. For example, a photo sharing app running on a mobile device could establish a connection with the user's PC in order to retrieve photos.
The features of Project Rome are supported by an underlying platform called the Connected Devices Platform. This guide provides the necessary steps to get started using the Connected Devices Platform, and then explains how to use the platform to implement device relay related features.
This steps below will reference code from the Project Rome iOS sample app that is available on GitHub.
Setting up the Connected Devices Platform and Notifications
Register your app
Microsoft Account (MSA) or Azure Active Directory (AAD) authentication is required for almost all features of the Project Rome SDK (the exception being the nearby sharing APIs). If you do not already have an MSA and wish to use one, register on account.microsoft.com.
Note
Azure Active Directory (AAD) accounts are not supported with the Device Relay APIs.
Using your chosen authentication method, you must register your app with Microsoft by following the instructions on the Application Registration Portal. If you do not have a Microsoft developer account, you will need to create one.
When you register an app using an MSA, you should receive a client ID string. Save this for later. This will allow your app to access Microsoft's Connected Devices Platform resources. If you're using AAD, see Azure Active Directory Authentication Libraries for instructions on getting the client ID string.
Add the SDK
The simplest way to add the Connected Devices Platform to your iOS app is by using the CocoaPods dependency manager. Go to your iOS project's Podfile and insert the following entry:
platform :ios, "10.0"
workspace 'iOSSample'

target 'iOSSample' do
  # Uncomment the next line if you're using Swift or would like to use dynamic frameworks
  # use_frameworks!

	pod 'ProjectRomeSdk'

  # Pods for iOSSample
Note
In order to consume CocoaPod, you must use the .xcworkspace file in your project.
Set up authentication and account management
The Connected Devices Platform requires a valid OAuth token to be used in the registration process. You may use your preferred method of generating and managing the OAuth tokens. However, to help developers get started using the platform, we've included an authentication provider as a part of the iOS sample app that you can use to generate and manage refresh tokens in your app.
If you do not use the provided code, you will need to implement the MCDConnectedDevicesAccountManager interface yourself.
If you're using an MSA, include the following scopes in your sign-in request: "wl.offline_access", "ccs.ReadWrite", "dds.read", "dds.register", "wns.connect", "asimovrome.telemetry", and "https://activity.windows.com/UserActivity.ReadWrite.CreatedByApp".
Note
Azure Active Directory (AAD) accounts are not supported with the Device Relay APIs.
If you're using an AAD account, you'll need to request the following audiences: "https://cdpcs.access.microsoft.com", "https://cs.dds.microsoft.com", "https://wns.windows.com/", and "https://activity.microsoft.com".
Whether you use the provided MCDConnectedDevicesAccountManager implementation or not, if you are using AAD you'll need to specify the following permissions in your app's registration on the Azure portal (portal.azure.com > Azure Active Directory > App registrations):
- Microsoft Activity Feed Service
- Deliver and modify user notifications for this app
- Read and write app activity to users' activity feed
- Windows Notification Service
- Connect your device to Windows Notification Service
- Microsoft Device Directory Service
- See your list of devices
- Be added to your list of devices and apps
- Microsoft Command Service
- Communicate with user devices
- Read user devices
Register your app for push notifications
Register your application with Apple for Apple Push Notification support. Be sure to make note of the sender ID and server key that you receive as you'll need them later.
Once registered, you must associate push notification functionality with the Connected Devices Platform in your app.
self.notificationRegistration = [[MCDConnectedDevicesNotificationRegistration alloc] init];
    if ([[UIApplication sharedApplication] isRegisteredForRemoteNotifications])
    {
        self.notificationRegistration.type = MCDNotificationTypeAPN;
    }
    else
    {
        self.notificationRegistration.type = MCDNotificationTypePolling;
    }
    self.notificationRegistration.appId = [[NSBundle mainBundle] bundleIdentifier];
    self.notificationRegistration.appDisplayName = (NSString*)[[NSBundle mainBundle] objectForInfoDictionaryKey:@"CFBundleDisplayName"];
    self.notificationRegistration.token = deviceToken;
    self.isRegisteredWithToken = YES;
Register your app in Microsoft Windows Dev Center for cross-device experiences
Warning
This step is only required if you want to use Project Rome features to access data from or make requests of non-Windows devices. If you only target Windows devices, you do not need to complete this step.
Register your app for the cross-device experiences feature of the Microsoft Developer Dashboard. This is a different procedure from MSA and AAD app registration above. The main goal for this process is to map the platform specific app identities with a cross-platform app identity that is recognized by Connected Devices Platform. This step will also enable sending notifications using the native push notification services corresponding to the mobile platform(s) your app utilizes. For iOS, it enables notifications to be sent to iOS app endpoints via APNS – Apple Push Notification Service.
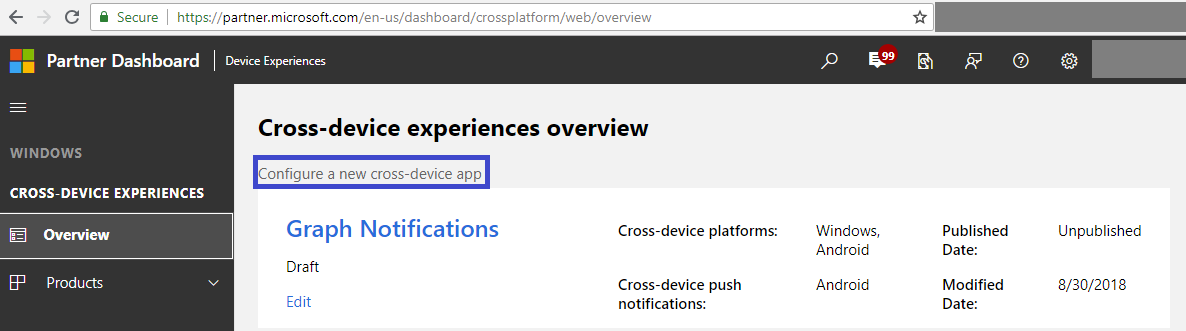
Go to Dev Center Dashboard, navigate to Cross-Device Experiences from the left side navigation pane, and select configuring a new cross-device app.
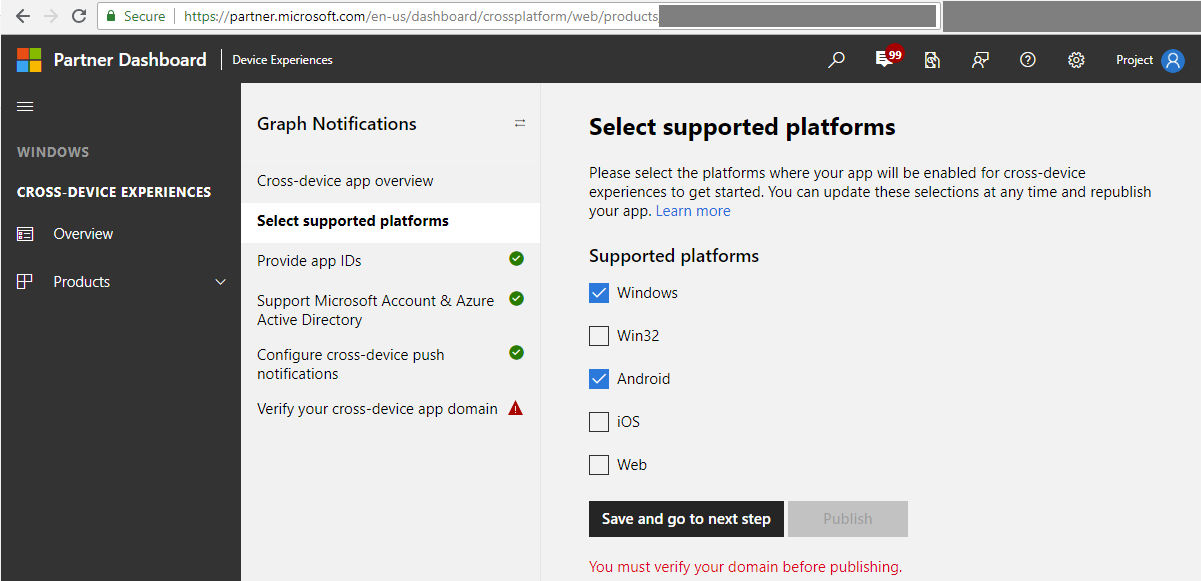
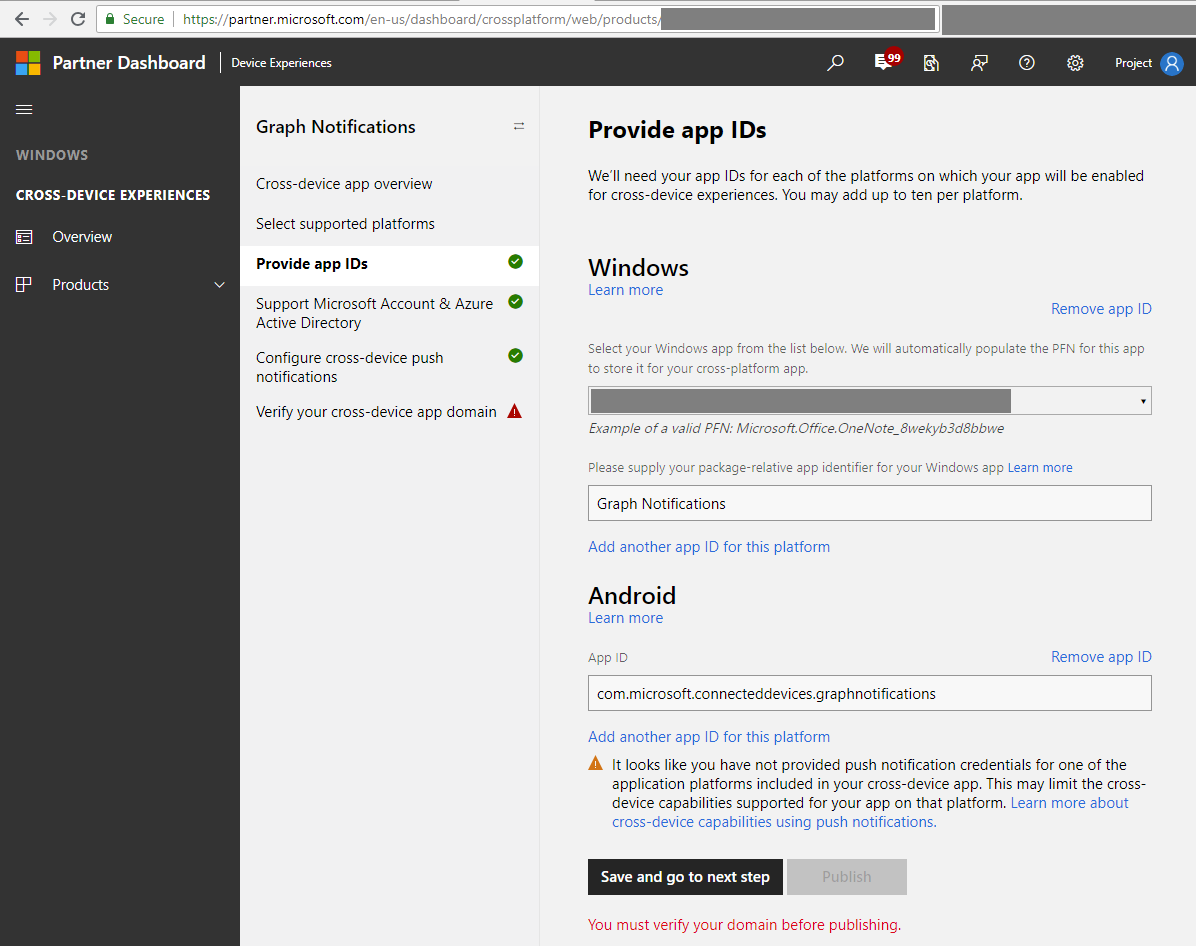
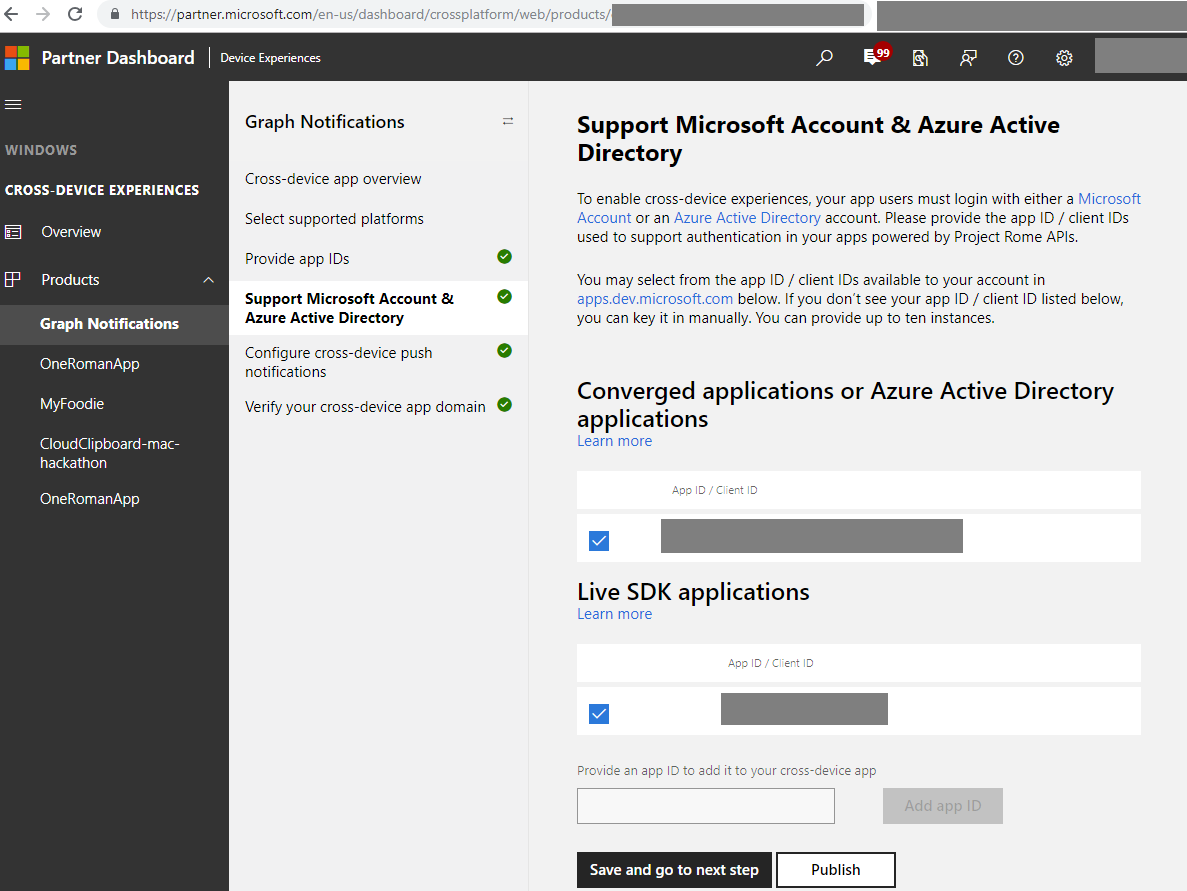
The Dev Center on-boarding process require the following steps:
Select supported platforms – select the platforms where your app will have a presence and be enabled for cross-device experiences. In the case of Graph Notifications integration, you can select from Windows, Android, and/or iOS, depending on what platforms you are using.
Provide app IDs – provide app IDs for each platform you are using. For iOS apps, this is the package name you assigned to your app when you created the project. Note that you may add different IDs (up to ten) per platform – this is in case you have multiple version of the same app, or even different apps, that want to be able to receive the same notifications sent by your app server targeted at the same user.
Provide or select the app IDs from MSA and/or AAD app registrations obtained in the previous MSA/AAD app registration steps above.
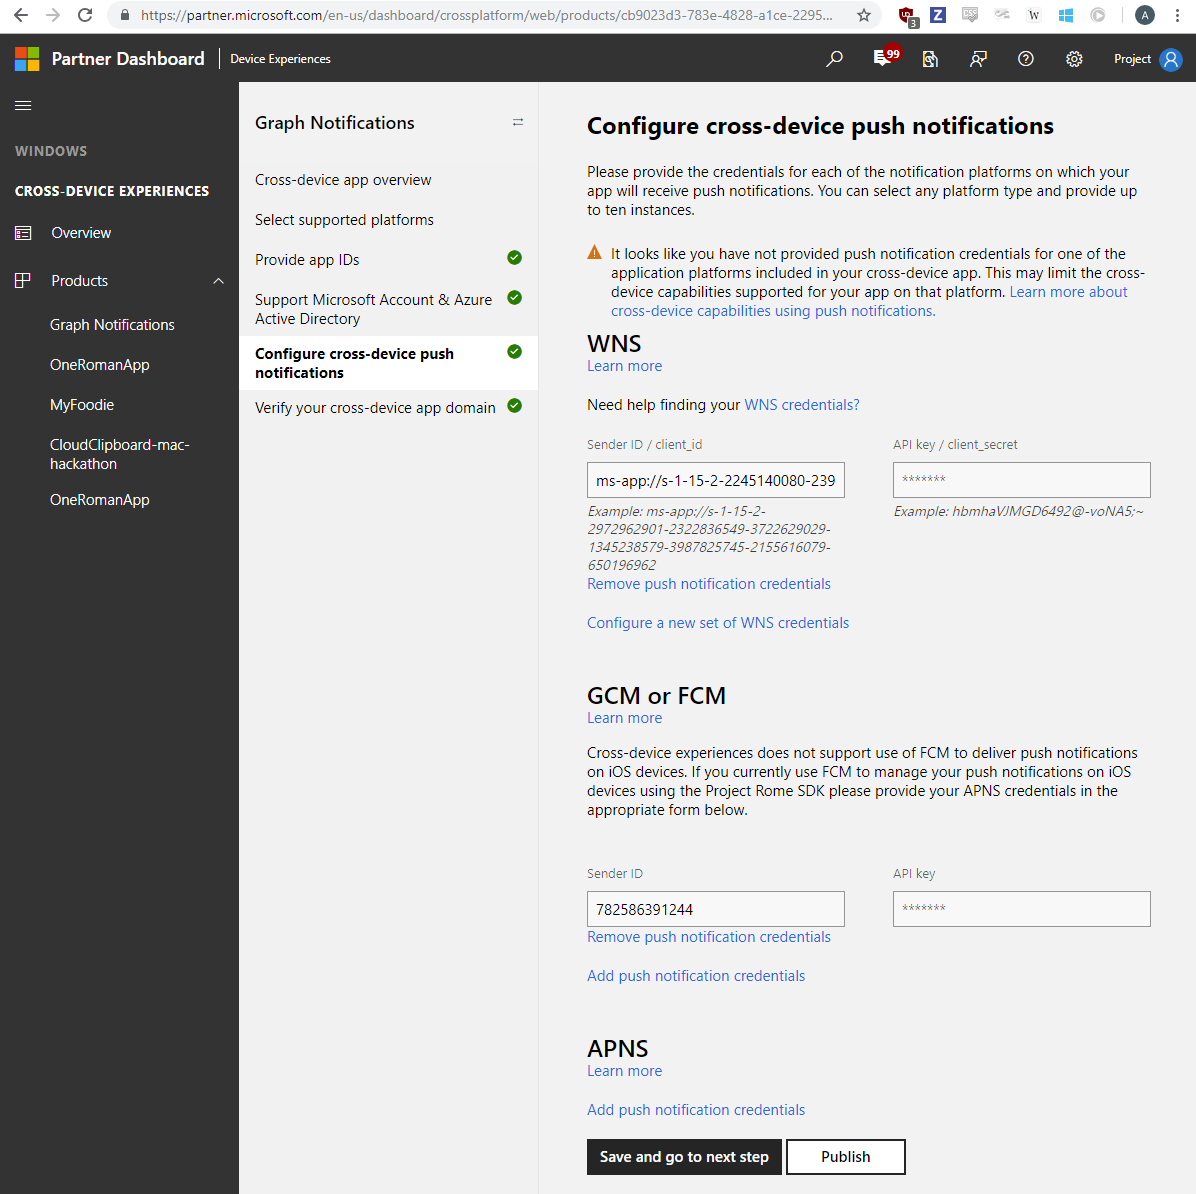
Provide your credentials for the native notification platforms relevant to your app (i.e. WNS for Windows, FCM for Android, and/or APNS for iOS) to enable delivery of notifications from your app server when you publish user-targeted notifications.
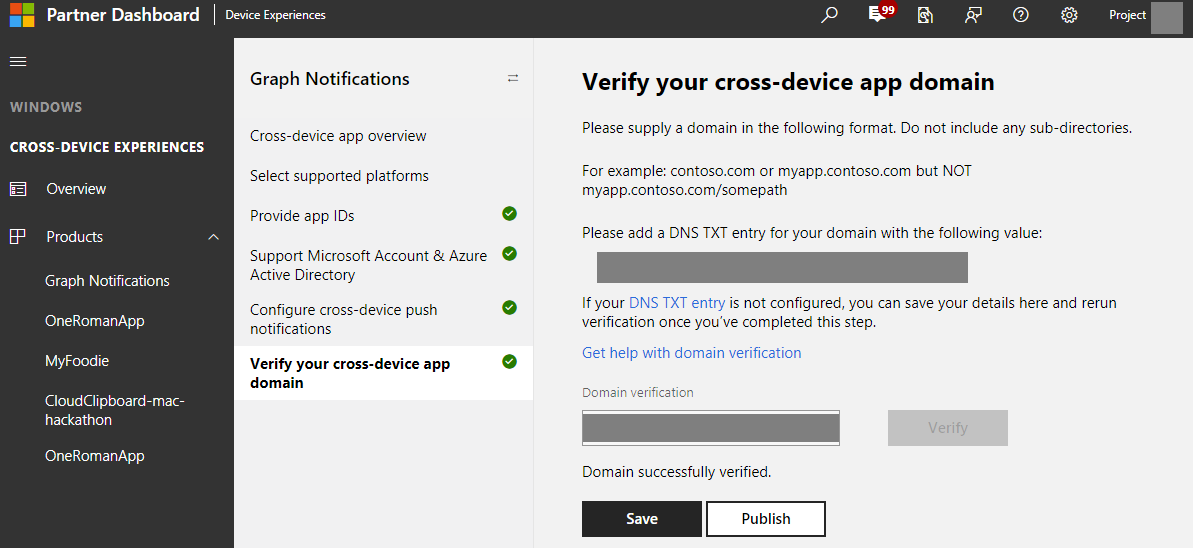
Finally, verify your cross-device app domain to make sure your app has the ownership of the domain and can use it as a cross-device identity for your app.
Using the platform
Create an instance of the platform
To get started simply instantiate the platform.
MCDConnectedDevicesPlatform* platform = [MCDConnectedDevicesPlatform new];
Subscribe to MCDConnectedDevicesAccountManager
The platform requires an authenticated user to access the platform. You'll need to subscribe to MCDConnectedDevicesAccountManager events to ensure a valid account is being used.
[MCDConnectedDevicesPlatform* platform.accountManager.accessTokenRequested
     subscribe:^(MCDConnectedDevicesAccountManager* _Nonnull manager __unused,
                 MCDConnectedDevicesAccessTokenRequestedEventArgs* _Nonnull request __unused) {

                    // Get access token

                 }
[MCDConnectedDevicesPlatform* platform.platform.accountManager.accessTokenInvalidated
     subscribe:^(MCDConnectedDevicesAccountManager* _Nonnull manager __unused,
                 MCDConnectedDevicesAccessTokenInvalidatedEventArgs* _Nonnull request) {

                      // Refresh and renew existing access token

                 }
Subscribe to MCDConnectedDevicesNotificationRegistrationManager
Similarly, the platform uses notifications to deliver commands between devices. Therefore, you must subscribe to the MCDConnectedDevicesNotificationRegistrationManager events to ensure the cloud registration states are valid for the account being used. Verify the the state using MCDConnectedDevicesNotificationRegistrationState
[MCDConnectedDevicesPlatform* platform.notificationRegistrationManager.notificationRegistrationStateChanged
     subscribe:^(MCDConnectedDevicesNotificationRegistrationManager* manager __unused,
                 MCDConnectedDevicesNotificationRegistrationStateChangedEventArgs* args __unused) {

                     // Check state using MCDConnectedDevicesNotificationRegistrationState enum

                 }
Start the platform
Now that the platform is initialized and event handlers are in place, you are ready to start discovering remote system devices.
[MCDConnectedDevicesPlatform* platform start];
Retrieve user accounts known to the app
It is important to ensure that the list of user accounts known to the app are properly synchronized with the MCDConnectedDevicesAccountManager.
Use MCDConnectedDevicesAccountManager.addAccountAsync to add a new user account.
[MCDConnectedDevicesPlatform* platform.accountManager
     addAccountAsync:self.mcdAccount
     callback:^(MCDConnectedDevicesAddAccountResult* _Nonnull result, NSError* _Nullable error) {

     // Check state using **MCDConnectedDevicesAccountAddedStatus** enum

     }
To remove an invalid account you can use MCDConnectedDevicesAccountManager.removeAccountAsync
 [MCDConnectedDevicesPlatform* platform.accountManager
     removeAccountAsync:existingAccount
     callback:^(MCDConnectedDevicesRemoveAccountResult* _Nonnull result __unused, NSError* _Nullable error) {

                    // Remove invalid user account

     }
Discover remote devices and apps
An MCDRemoteSystemWatcher instance will handle the core functionality of this section. Declare it in the class which is to discover remote systems.
MCDRemoteSystemWatcher* _watcher;
Before you create a watcher and start discovering devices, you may wish to add discovery filters to determine which kinds of devices your app will target. These can be determined by user input or hard-coded into the app, depending on your use case.
The following code from the sample app demonstrates how to create and start a watcher instance allowing your app to parse and interact with the devices that are discovered.
// Start watcher with filter for transport types, form factors
- (void)startWatcherWithFilter:(NSMutableArray<NSObject<MCDRemoteSystemFilter>*>*)remoteSystemFilter
{
    _discoveredSystems = [[NSMutableArray alloc] init];
    _devicesAdded = 0;
    _devicesUpdated = 0;
    _devicesRemoved = 0;

    // add filters (not defined here)
    _watcher = (remoteSystemFilter.count > 0) ? [[MCDRemoteSystemWatcher alloc] initWithFilters:remoteSystemFilter] :
        [[MCDRemoteSystemWatcher alloc] init];

    // add event handlers
    RemoteSystemViewController* __weak weakSelf = self;
    [_watcher addRemoteSystemAddedListener:^(
        __unused MCDRemoteSystemWatcher* watcher, MCDRemoteSystem* system) { [weakSelf _onRemoteSystemAdded:system]; }];

    [_watcher addRemoteSystemUpdatedListener:^(
        __unused MCDRemoteSystemWatcher* watcher, MCDRemoteSystem* system) { [weakSelf _onRemoteSystemUpdated:system]; }];

    [_watcher addRemoteSystemRemovedListener:^(
        __unused MCDRemoteSystemWatcher* watcher, MCDRemoteSystem* system) { [weakSelf _onRemoteSystemRemoved:system]; }];

    // start watcher
    [_watcher start];
}
The event handler methods are defined here.
// Handle when RemoteSystems are added
- (void)_onRemoteSystemAdded:(MCDRemoteSystem*)system
{
    @synchronized(self)
    {
        _devicesAdded++;
        [_discoveredSystems addObject:system];
        [_delegate remoteSystemsDidUpdate];
    }
}

// Handle when RemoteSystems are updated
- (void)_onRemoteSystemUpdated:(MCDRemoteSystem*)system
{
    @synchronized(self)
    {
        _devicesUpdated++;

        for (unsigned i = 0; i < _discoveredSystems.count; i++)
        {
            MCDRemoteSystem* cachedSystem = [_discoveredSystems objectAtIndex:i];
            if ([cachedSystem.displayName isEqualToString:system.displayName])
            {
                [_discoveredSystems replaceObjectAtIndex:i withObject:system];
                break;
            }
        }
    }
}

// Handle when RemoteSystems are removed
- (void)_onRemoteSystemRemoved:(MCDRemoteSystem*)system
{
    @synchronized(self)
    {
        _devicesRemoved++;

        for (unsigned i = 0; i < _discoveredSystems.count; i++)
        {
            MCDRemoteSystem* cachedSystem = [_discoveredSystems objectAtIndex:i];
            if ([cachedSystem.displayName isEqualToString:system.displayName])
            {
                [_discoveredSystems removeObjectAtIndex:i];
                break;
            }
        }
    }
}
We recommend that your app maintain a set of discovered devices (represented by MCDRemoteSystem instances) and display information about available devices and their apps (such as display name and device type) on the UI.
Once [_watcher start] is called, it will begin watching for remote system activity and will raise events when connected devices are discovered, updated, or removed from the set of detected devices. It will scan continuously in the background, so it is recommended that you stop the watcher (with [_watcher stop]) when you no longer need it to avoid unnecessary network communication and battery drain.
Example use case: implementing remote launching and remote app services
At this point in your code, you should have a working list of MCDRemoteSystem objects that refer to available devices. What you do with these devices will depend on the function of your app. The main types of interaction are remote launching and remote app services. They are explained in the following sections.
A) Remote launching
The following code shows how to select one of the MCDRemoteSystem objects (ideally this is done through a UI control) and then use MCDRemoteLauncher to launch an app on it by passing an app-compatible URI.
It's important to note that a remote launch can target a remote device (in which case the host device will launch the given URI with its default app for that URI scheme) or a specific remote application on that device.
As the previous section demonstrated, discovery happens at the device level first (an MCDRemoteSystem represents a device), but you can call the getApplications method on an MCDRemoteSystem instance to get an array of MCDRemoteSystemApp objects, which represent apps on the remote device that have been registered to use the Connected Devices Platform (just as you registered your own app in the preliminary steps above). Both MCDRemoteSystem and MCDRemoteSystemApp can be used to construct a MCDRemoteSystemConnectionRequest, which is what is needed to launch a URI.
The following code from the sample shows the remote launching of a URI over a connection request.
// Send a remote launch of a uri to RemoteSystemApplication
- (IBAction)launchUriButton:(id)sender
{
    NSString* uri = self.uriField.text;
    MCDRemoteLauncher* remoteLauncher = [[MCDRemoteLauncher alloc] init];
    MCDRemoteSystemConnectionRequest* connectionRequest =
        [MCDRemoteSystemConnectionRequest requestWithRemoteSystemApplication:self.selectedApplication];
    [remoteLauncher launchUriAsync:uri
        withConnectionRequest:connectionRequest
            completion:^(MCDRemoteLaunchUriStatus result, NSError* _Nullable error) {
                if (error)
                {
                    NSLog(@"LaunchURI [%@]: ERROR: %@", uri, error);
                    return;
                }

                if (result == MCDRemoteLaunchUriStatusSuccess)
                {
                    NSLog(@"LaunchURI [%@]: Success!", uri);
                }
                else
                {
                    NSLog(@"LaunchURI [%@]: Failed with code %d", uri, (int)result);
                }
            }];
}
Depending on the URI that is sent, you can launch an app in a specific state or configuration on a remote device. This allows for the ability to continue a user task, like watching a movie, on a different device without interruption.
Depending on your use, you may need to cover the cases in which no apps on the targeted system can handle the URI, or multiple apps can handle it. The MCDRemoteLauncher class and MCDRemoteLauncherOptions class describe how to do this.
B) Remote app services
Your iOS app can use the Connected Devices Portal to interact with app services on other devices. This provides many ways to communicate with other devices—all without needing to bring an app to the foreground of the host device.
Set up the app service on the target device
This guide will use the Roman Test App for Windows as its target app service. Therefore, the code below will cause an iOS app to look for that specific app service on the given remote system. If you wish to test this scenario, download the Roman Test App on a Windows device and make sure you are signed in with the same MSA that you used in the preliminary steps above.
For instructions on how to write your own UWP app service, see Create and consume an app service (UWP). You will need to make a few changes in order to make the service compatible with Connected Devices. See the UWP guide for remote app services for instructions on how to do this.
Open an app service connection on the client device
Your iOS app must acquire a reference to a remote device or application. Like the launch section, this scenario requires the use of a MCDRemoteSystemConnectionRequest, which can be constructed from either a MCDRemoteSystem or a MCDRemoteSystemApp representing an available app on the system.
Additionally, your app will need to identify its targeted app service by two strings: the app service name and package identifier. These are found in the source code of the app service provider (see Create and consume an app service (UWP) for details). Together these strings construct the MCDAppServiceDescription, which is fed into an MCDAppServiceConnection instance.
// Step #1:  Establish an app service connection
- (IBAction)connectAppServiceButton:(id)sender
{
    MCDAppServiceConnection* connection = nil;
    @synchronized(self)
    {
        connection = _appServiceConnection;
        if (!connection)
        {
            connection = _appServiceConnection = [MCDAppServiceConnection new];
            connection.appServiceDescription =
                [MCDAppServiceDescription descriptionWithName:g_appServiceName packageId:g_packageIdentifier];
            _serviceClosedRegistration = [connection addServiceClosedListener:^(__unused MCDAppServiceConnection* connection,
                MCDAppServiceClosedStatus status) { [self appServiceConnection:connection closedWithStatus:status]; }];
        }
    }

    @try
    {
        MCDRemoteSystemConnectionRequest* connectionRequest =
            [MCDRemoteSystemConnectionRequest requestWithRemoteSystemApplication:self.selectedApplication];
        [connection openRemoteAsync:connectionRequest
            completion:^(MCDAppServiceConnectionStatus status, NSError* error) {
                if (error)
                {
                    NSLog(@"ConnectAppService: ERROR: %@", error);
                    return;
                }
                if (status != MCDAppServiceConnectionStatusSuccess)
                {
                    NSLog(@"ConnectAppService: Failed with code %d", (int)status);
                    return;
                }
                NSLog(@"Successfully connected!");
                dispatch_async(
                    dispatch_get_main_queue(), ^{ self.appServiceStatusLabel.text = @"App service connected! no ping sent"; });
            }];
    }
    @catch (NSException* ex)
    {
        NSLog(@"ConnectAppService: EXCEPTION! %@", ex);
    }
}
Create a message to send to the app service
Declare a variable to store the message to send. On iOS, the messages that you send to remote app services will be of the NSDictionary type.
Note
When your app communicates with app services on other platforms, the Connected Devices Platform translates the NSDictionary into the equivalent construct on the receiving platform. For example, a NSDictionary sent from this app to a Windows app service gets translated into a ValueSet object (of the .NET Framework), which can then be interpreted by the app service. Information passed in the other direction undergoes the reverse translation.
The following method crafts a message that can be interpreted by the Roman Test App's app service for Windows.
// Create a message to send
- (NSDictionary*)_createPingMessage
{
    return @{
        @"Type" : @"ping",
        @"CreationDate" : [_dateFormatter stringFromDate:[NSDate date]],
        @"TargetId" : _selectedApplication.applicationId
    };
}
Important
The NSDictionary objects that are passed between apps and services in the remote app services scenario must adhere to the following format: Keys must be NSStrings, and the values may be: NSString, boxed numeric types (integers or floating points), boxed booleans, NSDate, NSUUID, homogeneous arrays of any of these types, or other NSDictionary objects that meet this specification.
Send messages to the app service
Once the app service connection is established and the message is created, sending it to the app service is simple and can be done from anywhere in the app that has a reference to the connection instance and the message.
The following code from the sample shows the sending of a message to an app service and the handling of the response.
//  Send a message using the app service connection
- (IBAction)sendAppServiceButton:(id)sender
{
    if (!_appServiceConnection)
    {
        return;
    }

    // Send the message and get a response
    @try
    {
        [_appServiceConnection sendMessageAsync:[self _createPingMessage]
            completion:^(MCDAppServiceResponse* response, NSError* error) {
                if (error)
                {
                    NSLog(@"SendPing: ERROR: %@", error);
                    return;
                }

                if (response.status != MCDAppServiceResponseStatusSuccess)
                {
                    NSLog(@"SendPing: Response received with bad status code %d", (int)response.status);
                    return;
                }

                NSString* creationDateString = response.message[@"CreationDate"];
                if (creationDateString)
                {
                    NSDate* date = [_dateFormatter dateFromString:creationDateString];
                    if (date)
                    {
                        NSTimeInterval diff = [[NSDate date] timeIntervalSinceDate:date];
                        dispatch_async(dispatch_get_main_queue(),
                            ^{ self.appServiceStatusLabel.text = [NSString stringWithFormat:@"%g", diff]; });
                    }
                }
            }];
    }
    @catch (NSException* ex)
    {
        NSLog(@"SendPing: EXCEPTION! %@", ex);
    }
}
In the Roman App case, the response contains the date it was created, so in this very simple use case, we can compare the dates to get the total transit time of the message response.
That concludes a single message exchange with a remote app service.
Finish app service communication
When your app is finished interacting with the target device's app service, close the connection between the two devices.
- (void)appServiceConnection:(__unused MCDAppServiceConnection*)connection closedWithStatus:(MCDAppServiceClosedStatus)status
{
    NSLog(@"AppService closed with status %d", (int)status);
    dispatch_async(
        dispatch_get_main_queue(), ^{ self.appServiceStatusLabel.text = [NSString stringWithFormat:@"disconnected (%d)", (int)status]; });
}