Note
Access to this page requires authorization. You can try signing in or changing directories.
Access to this page requires authorization. You can try changing directories.
Graph Notifications enable your app to send and manage user-targeting notifications across multiple devices.
With the Project Rome client-side SDK on iOS, your iOS app can register to receive notifications published from your app server targeted at a logged in user. The SDK enables the app client to receive new incoming notification payloads, manage the state of the existing notifications, and retreive notification history. For more information about Notifications and how it enables human-centric notification delivery, see Microsoft Graph Notifications Overview
All features in the Project Rome SDK, includng Graph Notifications and more, are built on top of an underlying platform called the Connected Devices Platform. This guide is designed to guide you through the necessary steps to get started using the Connected Devices Platform, and to explain how to consume APIs in the SDK to implement Graph Notifications -specific features.
This steps below will reference code from the Project Rome iOS sample app that is available on GitHub.
See the API reference page for links to the reference docs relevant to notification scenarios.
Setting up the Connected Devices Platform and Notifications
Register your app
Microsoft Account (MSA) or Azure Active Directory (AAD) authentication is required for almost all features of the Project Rome SDK (the exception being the nearby sharing APIs). If you do not already have an MSA and wish to use one, register on account.microsoft.com.
Note
Azure Active Directory (AAD) accounts are not supported with the Device Relay APIs.
Using your chosen authentication method, you must register your app with Microsoft by following the instructions on the Application Registration Portal. If you do not have a Microsoft developer account, you will need to create one.
When you register an app using an MSA, you should receive a client ID string. Save this for later. This will allow your app to access Microsoft's Connected Devices Platform resources. If you're using AAD, see Azure Active Directory Authentication Libraries for instructions on getting the client ID string.
Add the SDK
The simplest way to add the Connected Devices Platform to your iOS app is by using the CocoaPods dependency manager. Go to your iOS project's Podfile and insert the following entry:
platform :ios, "10.0"
workspace 'iOSSample'

target 'iOSSample' do
  # Uncomment the next line if you're using Swift or would like to use dynamic frameworks
  # use_frameworks!

	pod 'ProjectRomeSdk'

  # Pods for iOSSample
Note
In order to consume CocoaPod, you must use the .xcworkspace file in your project.
Set up authentication and account management
The Connected Devices Platform requires a valid OAuth token to be used in the registration process. You may use your preferred method of generating and managing the OAuth tokens. However, to help developers get started using the platform, we've included an authentication provider as a part of the iOS sample app that you can use to generate and manage refresh tokens in your app.
If you do not use the provided code, you will need to implement the MCDConnectedDevicesAccountManager interface yourself.
If you're using an MSA, include the following scopes in your sign-in request: "wl.offline_access", "ccs.ReadWrite", "dds.read", "dds.register", "wns.connect", "asimovrome.telemetry", and "https://activity.windows.com/UserActivity.ReadWrite.CreatedByApp".
Note
Azure Active Directory (AAD) accounts are not supported with the Device Relay APIs.
If you're using an AAD account, you'll need to request the following audiences: "https://cdpcs.access.microsoft.com", "https://cs.dds.microsoft.com", "https://wns.windows.com/", and "https://activity.microsoft.com".
Whether you use the provided MCDConnectedDevicesAccountManager implementation or not, if you are using AAD you'll need to specify the following permissions in your app's registration on the Azure portal (portal.azure.com > Azure Active Directory > App registrations):
- Microsoft Activity Feed Service
- Deliver and modify user notifications for this app
- Read and write app activity to users' activity feed
- Windows Notification Service
- Connect your device to Windows Notification Service
- Microsoft Device Directory Service
- See your list of devices
- Be added to your list of devices and apps
- Microsoft Command Service
- Communicate with user devices
- Read user devices
Register your app for push notifications
Register your application with Apple for Apple Push Notification support. Be sure to make note of the sender ID and server key that you receive as you'll need them later.
Once registered, you must associate push notification functionality with the Connected Devices Platform in your app.
self.notificationRegistration = [[MCDConnectedDevicesNotificationRegistration alloc] init];
    if ([[UIApplication sharedApplication] isRegisteredForRemoteNotifications])
    {
        self.notificationRegistration.type = MCDNotificationTypeAPN;
    }
    else
    {
        self.notificationRegistration.type = MCDNotificationTypePolling;
    }
    self.notificationRegistration.appId = [[NSBundle mainBundle] bundleIdentifier];
    self.notificationRegistration.appDisplayName = (NSString*)[[NSBundle mainBundle] objectForInfoDictionaryKey:@"CFBundleDisplayName"];
    self.notificationRegistration.token = deviceToken;
    self.isRegisteredWithToken = YES;
Register your app in Microsoft Windows Dev Center for cross-device experiences
Warning
This step is only required if you want to use Project Rome features to access data from or make requests of non-Windows devices. If you only target Windows devices, you do not need to complete this step.
Register your app for the cross-device experiences feature of the Microsoft Developer Dashboard. This is a different procedure from MSA and AAD app registration above. The main goal for this process is to map the platform specific app identities with a cross-platform app identity that is recognized by Connected Devices Platform. This step will also enable sending notifications using the native push notification services corresponding to the mobile platform(s) your app utilizes. For iOS, it enables notifications to be sent to iOS app endpoints via APNS – Apple Push Notification Service.
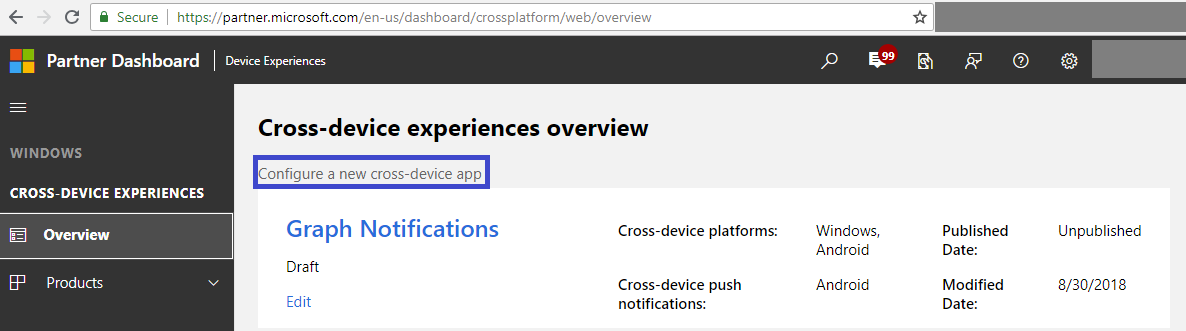
Go to Dev Center Dashboard, navigate to Cross-Device Experiences from the left side navigation pane, and select configuring a new cross-device app.
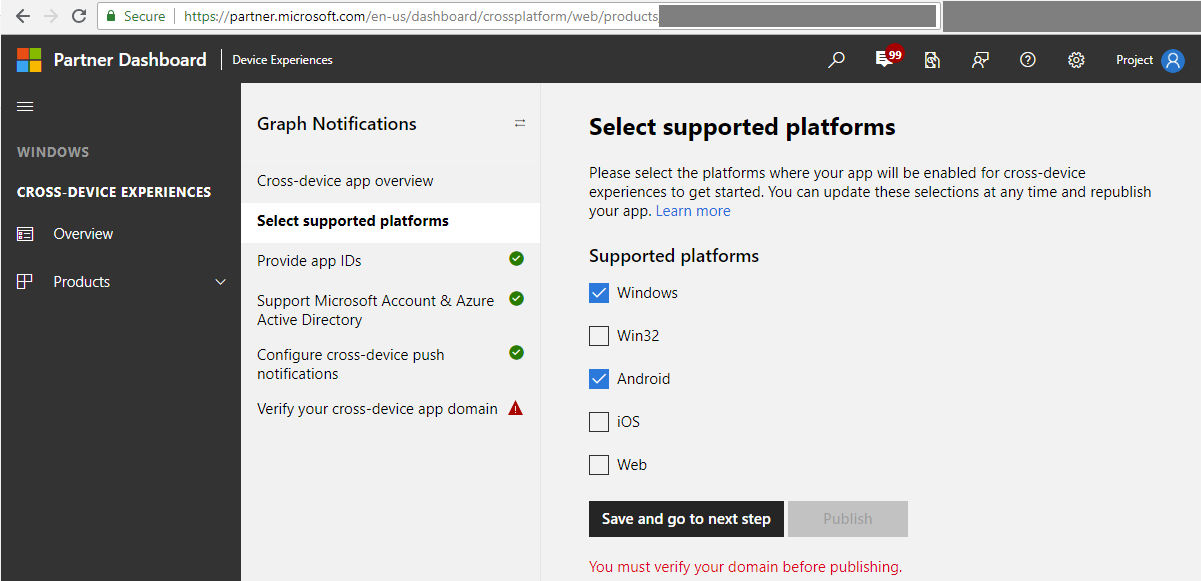
The Dev Center on-boarding process require the following steps:
Select supported platforms – select the platforms where your app will have a presence and be enabled for cross-device experiences. In the case of Graph Notifications integration, you can select from Windows, Android, and/or iOS, depending on what platforms you are using.
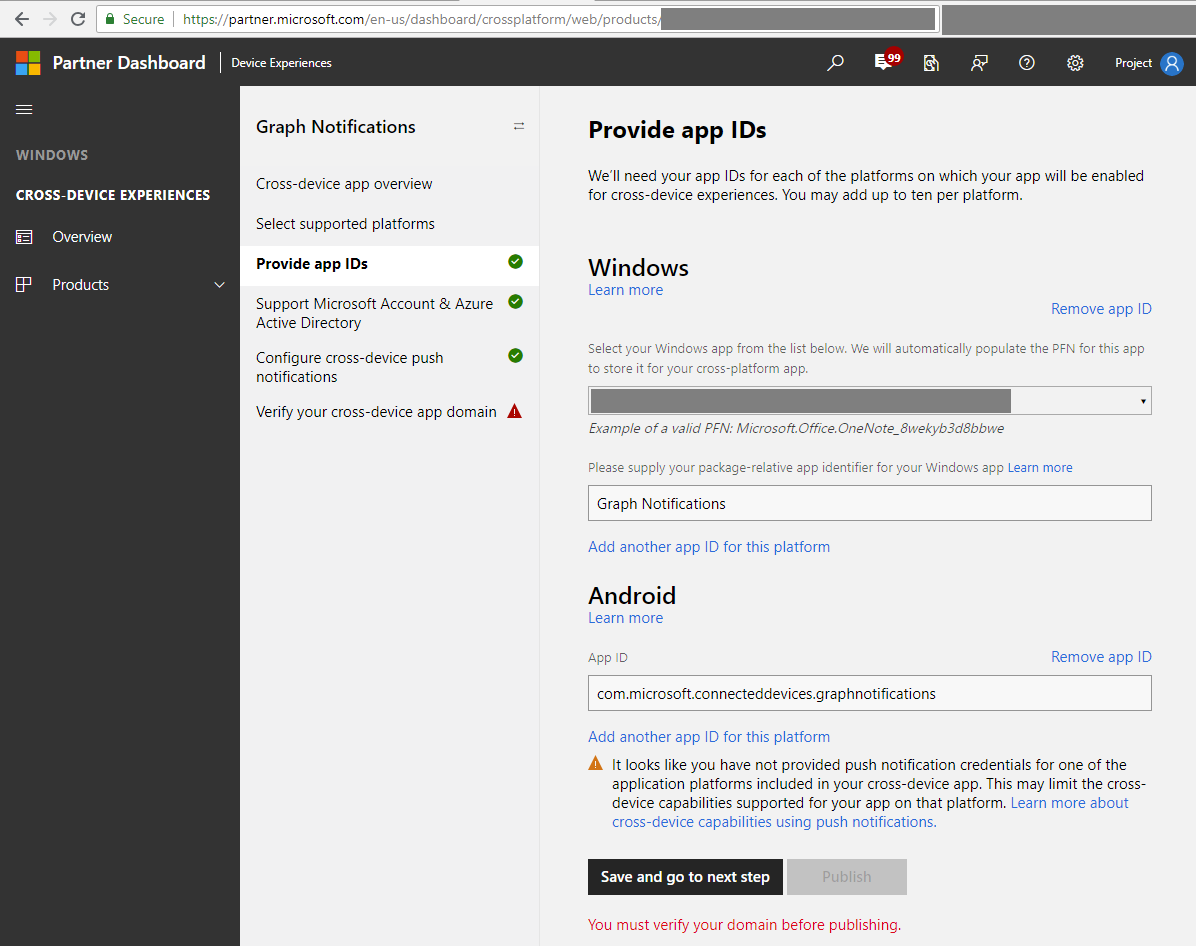
Provide app IDs – provide app IDs for each platform you are using. For iOS apps, this is the package name you assigned to your app when you created the project. Note that you may add different IDs (up to ten) per platform – this is in case you have multiple version of the same app, or even different apps, that want to be able to receive the same notifications sent by your app server targeted at the same user.
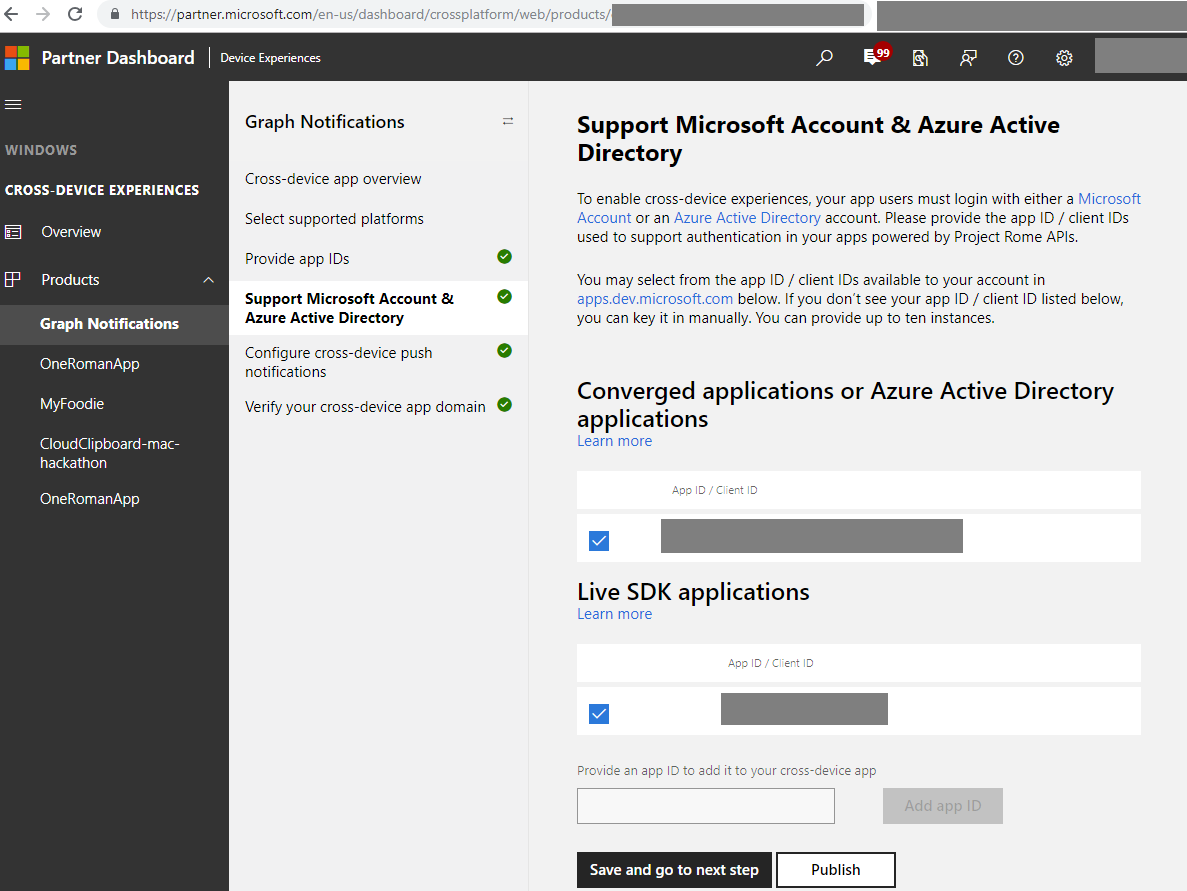
Provide or select the app IDs from MSA and/or AAD app registrations obtained in the previous MSA/AAD app registration steps above.
Provide your credentials for the native notification platforms relevant to your app (i.e. WNS for Windows, FCM for Android, and/or APNS for iOS) to enable delivery of notifications from your app server when you publish user-targeted notifications.
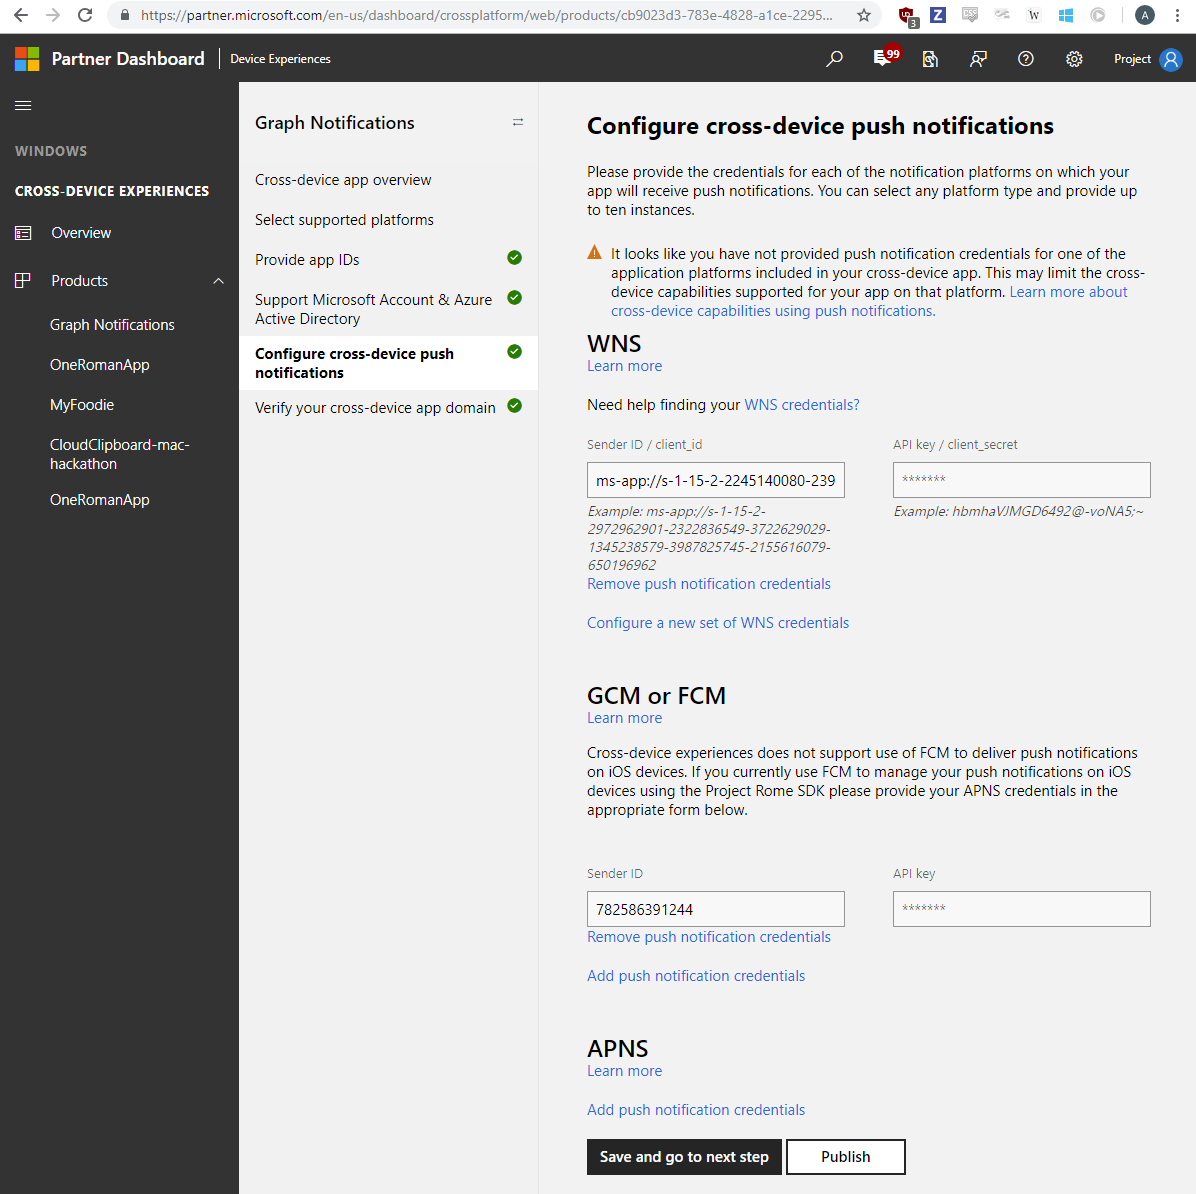
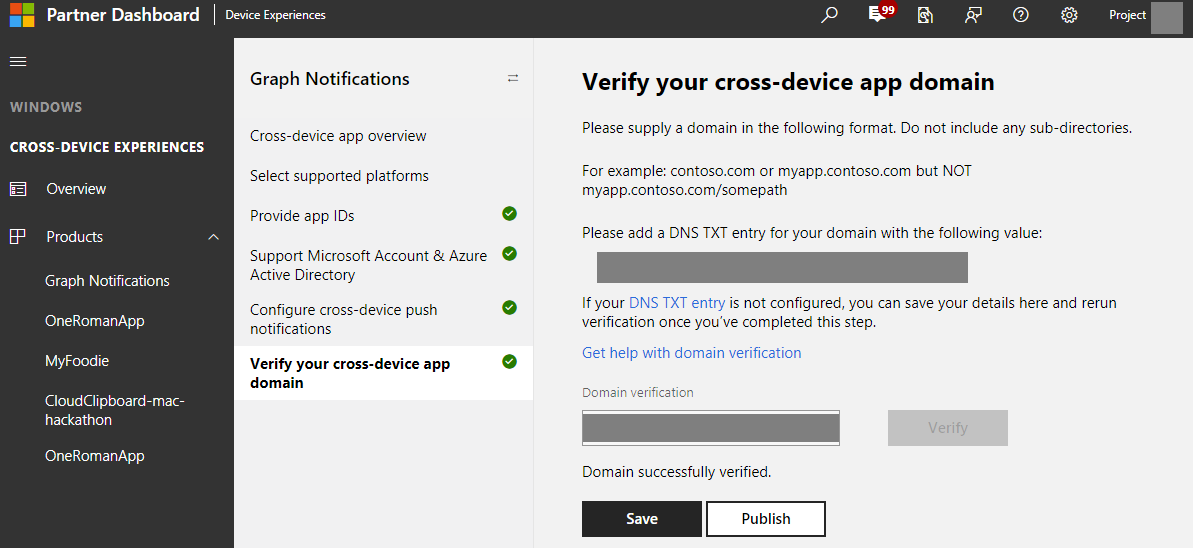
Finally, verify your cross-device app domain to make sure your app has the ownership of the domain and can use it as a cross-device identity for your app.
Using the platform
Create an instance of the platform
To get started simply instantiate the platform.
MCDConnectedDevicesPlatform* platform = [MCDConnectedDevicesPlatform new];
Subscribe to MCDConnectedDevicesAccountManager
The platform requires an authenticated user to access the platform. You'll need to subscribe to MCDConnectedDevicesAccountManager events to ensure a valid account is being used.
[MCDConnectedDevicesPlatform* platform.accountManager.accessTokenRequested
     subscribe:^(MCDConnectedDevicesAccountManager* _Nonnull manager __unused,
                 MCDConnectedDevicesAccessTokenRequestedEventArgs* _Nonnull request __unused) {

                    // Get access token

                 }
[MCDConnectedDevicesPlatform* platform.platform.accountManager.accessTokenInvalidated
     subscribe:^(MCDConnectedDevicesAccountManager* _Nonnull manager __unused,
                 MCDConnectedDevicesAccessTokenInvalidatedEventArgs* _Nonnull request) {

                      // Refresh and renew existing access token

                 }
Subscribe to MCDConnectedDevicesNotificationRegistrationManager
Similarly, the platform uses notifications to deliver commands between devices. Therefore, you must subscribe to the MCDConnectedDevicesNotificationRegistrationManager events to ensure the cloud registration states are valid for the account being used. Verify the the state using MCDConnectedDevicesNotificationRegistrationState
[MCDConnectedDevicesPlatform* platform.notificationRegistrationManager.notificationRegistrationStateChanged
     subscribe:^(MCDConnectedDevicesNotificationRegistrationManager* manager __unused,
                 MCDConnectedDevicesNotificationRegistrationStateChangedEventArgs* args __unused) {

                     // Check state using MCDConnectedDevicesNotificationRegistrationState enum

                 }
Start the platform
Now that the platform is initialized and event handlers are in place, you are ready to start discovering remote system devices.
[MCDConnectedDevicesPlatform* platform start];
Retrieve user accounts known to the app
It is important to ensure that the list of user accounts known to the app are properly synchronized with the MCDConnectedDevicesAccountManager.
Use MCDConnectedDevicesAccountManager.addAccountAsync to add a new user account.
[MCDConnectedDevicesPlatform* platform.accountManager
     addAccountAsync:self.mcdAccount
     callback:^(MCDConnectedDevicesAddAccountResult* _Nonnull result, NSError* _Nullable error) {

     // Check state using **MCDConnectedDevicesAccountAddedStatus** enum

     }
To remove an invalid account you can use MCDConnectedDevicesAccountManager.removeAccountAsync
 [MCDConnectedDevicesPlatform* platform.accountManager
     removeAccountAsync:existingAccount
     callback:^(MCDConnectedDevicesRemoveAccountResult* _Nonnull result __unused, NSError* _Nullable error) {

                    // Remove invalid user account

     }
Initialize a Graph Notification channel
The Project Rome SDK allows your app to subscribe to different channels in order to receive and manage various types of user data – including Graph Notifications, User Activities, and more. These are all stored and synced in MCDUserDataFeed. MCDUserNotification is the class and data type corresponding to a user-targeted notification sent via Graph Notifications. To integrate with Graph Notification and start receiving MCDUserNotification published by your app server, you will first need to initialize the user data feed by creating a MCDUserNotificationChannel. You should treat this like the platform initialization step above: it should be checked and possibly redone whenever the app comes to the foreground (but not before platform initialization).
The following methods initialize a MCDUserNotificationChannel.
// You must be logged in to use UserNotifications
NSArray<MCDUserAccount*>* accounts = [[AppDataSource sharedInstance].accountProvider getUserAccounts];
if (accounts.count > 0)
{
    // Get a UserNotification channel, getting the default channel
    NSLog(@"Creating UserNotificationChannel");
    NSArray<MCDUserAccount*>* accounts = [[AppDataSource sharedInstance].accountProvider getUserAccounts];
    MCDUserDataFeed* userDataFeed = [MCDUserDataFeed userDataFeedForAccount:accounts[0]
        platform:[AppDataSource sharedInstance].platform
        activitySourceHost:CROSS_PLATFORM_APP_ID];
    NSArray<MCDSyncScope*>* syncScopes = @[ [MCDUserNotificationChannel syncScope] ];
    [userDataFeed addSyncScopes:syncScopes];
    self.channel = [MCDUserNotificationChannel userNotificationChannelWithUserDataFeed:userDataFeed];
}
else
{
    NSLog(@"Must log in to receive notifications for the logged in user!");
    self.createNotificationStatusField.text = @"Need to be logged in!";
}
At this point, you should have a MCDUserNotificationChannel reference in channel.
Create a MCDUserNotificationReader to receive incoming MCDUserNotifications and access MCDUserNotification history
As we showed previously, the initial APNS silent message arriving on the app client only contains a shoulder tap, and you need to pass that shoulder tap payload to the Connected Devices Platform in order to trigger the SDK to perform a full sync with the Connected Device server, which contains all the MCDUserNotifications published by your app server. This will pull down the full notification payload published by your app server corresponding to this shoulder tap (and in case if any previous notifications were published but not received on this app client due to device connectivity or other issues, they will be pulled down as well). With these real-time syncs constantly performed by the SDK, the app client is able to have access to a local cache of this logged-in user’s MCDUserNotification data feed. A MCDUserNotificationReader in this case enables the app client’s access to this data feed – to receive latest notification payload via event listener, or to access the full MCDUserNotification collection which can be used as view model of the user’s notification history.
Receiving MCDUserNotifications
First you need to instantiate a MCDUserNotificationReader, and get all the existing MCDUserNotifications already in the reader if you are interested in consuming that information for the experience you are trying to enable. It’s safe to always assume that the app server has already published notifications to this logged in user, given that this particular device endpoint might not be the only or the first endpoint that the user has installed your app. Then, add an event listener which gets triggered when the Connected Device Platform completes a sync and has new changes to notify you about. In the case of Graph Notifications, new changes could be new incoming MCDUserNotifications published by your app server, or MCDUserNotifcation updates, deletions, and expirations that happened from the server or from other registered endpoints that the same user logged in.
Tip
This event listener is where you handle the main business logic and “consume” the content of your notification payload based on your scenarios. If you currently use APNS silent notification to construct a visual notification in the OS-level notification center, or if you use the content in the silent notification to update some in-app UI, this is the place to do that.
// Instantiate the reader from a MCDUserNotificationChannel
// Add a data change listener to subscribe to new changes when new notifications or notification updates are received
- (void)setupWithAccount:(MCDUserAccount*)account {
    dispatch_async(dispatch_get_global_queue(QOS_CLASS_DEFAULT, 0), ^{
        @synchronized (self) {
            MCDUserDataFeed* dataFeed = [MCDUserDataFeed userDataFeedForAccount:account platform:_platform activitySourceHost:@"graphnotifications.sample.windows.com"];
            [dataFeed addSyncScopes:@[[MCDUserNotificationChannel syncScope]]];
            self.channel = [MCDUserNotificationChannel userNotificationChannelWithUserDataFeed:dataFeed];
            self.reader = [self.channel createReader];

            __weak typeof(self) weakSelf = self;
            _readerRegistrationToken = [self.reader addDataChangedListener:^(__unused MCDUserNotificationReader* source) {
                NSLog(@"ME123 Got a change!");
                if (weakSelf) {
                    [weakSelf forceRead];
                } else {
                    NSLog(@"ME123 WEAKSELF FOR CHANGES IS NULL!!!");
                }
            }];

            [self forceRead];
        }
    });
}

// this is your own business logic when the event listener is fired
// In this case, the app reads the existing batch of notifications in the store and handle any new incoming notifications or notification updates after that
- (void)forceRead {
    NSLog(@"ME123 Forced to read!");
    [self.reader readBatchAsyncWithMaxSize:NSUIntegerMax completion:^(NSArray<MCDUserNotification *> * _Nullable notifications, NSError * _Nullable error) {
        if (error) {
            NSLog(@"ME123 Failed to read batch with error %@", error);
        } else {
            [self _handleNotifications:notifications];
            NSLog(@"ME123 Have %ld listeners", self.listenerMap.count);
            for (void (^listener)(void) in self.listenerMap.allValues) {
                NSLog(@"ME123 Calling a listener about an update!");
                listener();
            }
        }
    }];
}
Update the state of an existing MCDUserNotification
In the previous section, we mentioned that sometimes a MCDUserNotification change received through the reader could be a state update on an existing MCDUserNotification – whether that’s being marked as dismissed or marked as read. In this case, the app client can choose what to do, such as enabling universal dismiss by removing the corresponding visual notification on this particular device. Taking a step back, your app client is often the one that initiated this MCDUserNotification change update to begin with – from a different device. You can choose the time to update the state of your MCDUserNotifications, but usually they get updated when the corresponding visual notification is handled by the user on that device, or the notification is further handled by the user in some in-app experience you enable. Here is an example of what the flow would look like: Your app server publishes a notification targeted at User A. User A receives this notification on both his PC and his phone where the app clients are installed. The user clicks on the notification on PC, and chases into the app to handles the corresponding task. The app client on this PC will then call into Connected Devices Platform SDK to update the state of the corresponding User Notification in order to have this update synced across all this user’s devices. The other app clients, upon receiving this state update in real-time, will then remove the corresponding visual alert / message / toast notification from the device’s notification center / notification tray / Action Center. This is how notifications get universally dismissed across a user’s devices.
Tip
MCDUserNotification class currently provides 2 types of state updates – you can modify the MCDUserNotificationReadState or the MCDUserNotificationUserActionState and define your own logic on what should happen when notifications are updated. For example, you can mark the action state to be Activated or Dismissed, and pivot on that value to implement universal dismiss. Alternatively, or at the same time, you can mark read state as Read or Unread and based on that determine which notifications should show up in the in-app notification history view.
- (void)dismissNotification:(MCDUserNotification*)notification {
    @synchronized (self) {
        notification.userActionState = MCDUserNotificationUserActionStateDismissed;
        [notification saveAsync:^(__unused MCDUserNotificationUpdateResult * _Nullable result, __unused NSError * _Nullable err) {
            NSLog(@"ME123 Dismiss notification with result %d error %@", result.succeeded, err);
        }];
    }
}