Configure and enroll in Windows Hello for Business in a hybrid key trust model
This article describes Windows Hello for Business functionalities or scenarios that apply to:
- Deployment type: hybrid
- Trust type: key trust
- Join type: Microsoft Entra join
, Microsoft Entra hybrid join
Once the prerequisites are met and the PKI configuration is validated, deploying Windows Hello for Business consists of the following steps:
Configure Windows Hello for Business policy settings
There's one policy setting required to enable Windows Hello for Business in a key trust model:
Another optional, but recommended, policy setting is:
The following instructions describe how to configure your devices using either Microsoft Intune or group policy (GPO).
Note
Review the article Configure Windows Hello for Business using Microsoft Intune to learn about the different options offered by Microsoft Intune to configure Windows Hello for Business.
If the Intune tenant-wide policy is enabled and configured to your needs, you can skip to Enroll in Windows Hello for Business.
To configure devices with Microsoft Intune, create a Settings catalog policy and use the following settings:
| Category | Setting name | Value |
|---|---|---|
| Windows Hello for Business | Use Passport For Work | true |
| Windows Hello for Business | Require Security Device | true |
Assign the policy to a group that contains as members the devices or users that you want to configure.
Alternatively, you can configure devices using a custom policy with the PassportForWork CSP.
| Setting |
|---|
- OMA-URI: ./Device/Vendor/MSFT/PassportForWork/{TenantId}/Policies/UsePassportForWork- Data type: bool- Value: True |
- OMA-URI: ./Device/Vendor/MSFT/PassportForWork/{TenantId}/Policies/RequireSecurityDevice- Data type: bool- Value: True |
If you deploy Windows Hello for Business configuration using both Group Policy and Intune, Group Policy settings take precedence, and Intune settings are ignored. For more information about policy conflicts, see Policy conflicts from multiple policy sources
Other policy settings can be configured to control the behavior of Windows Hello for Business. For more information, see Windows Hello for Business policy settings.
Enroll in Windows Hello for Business
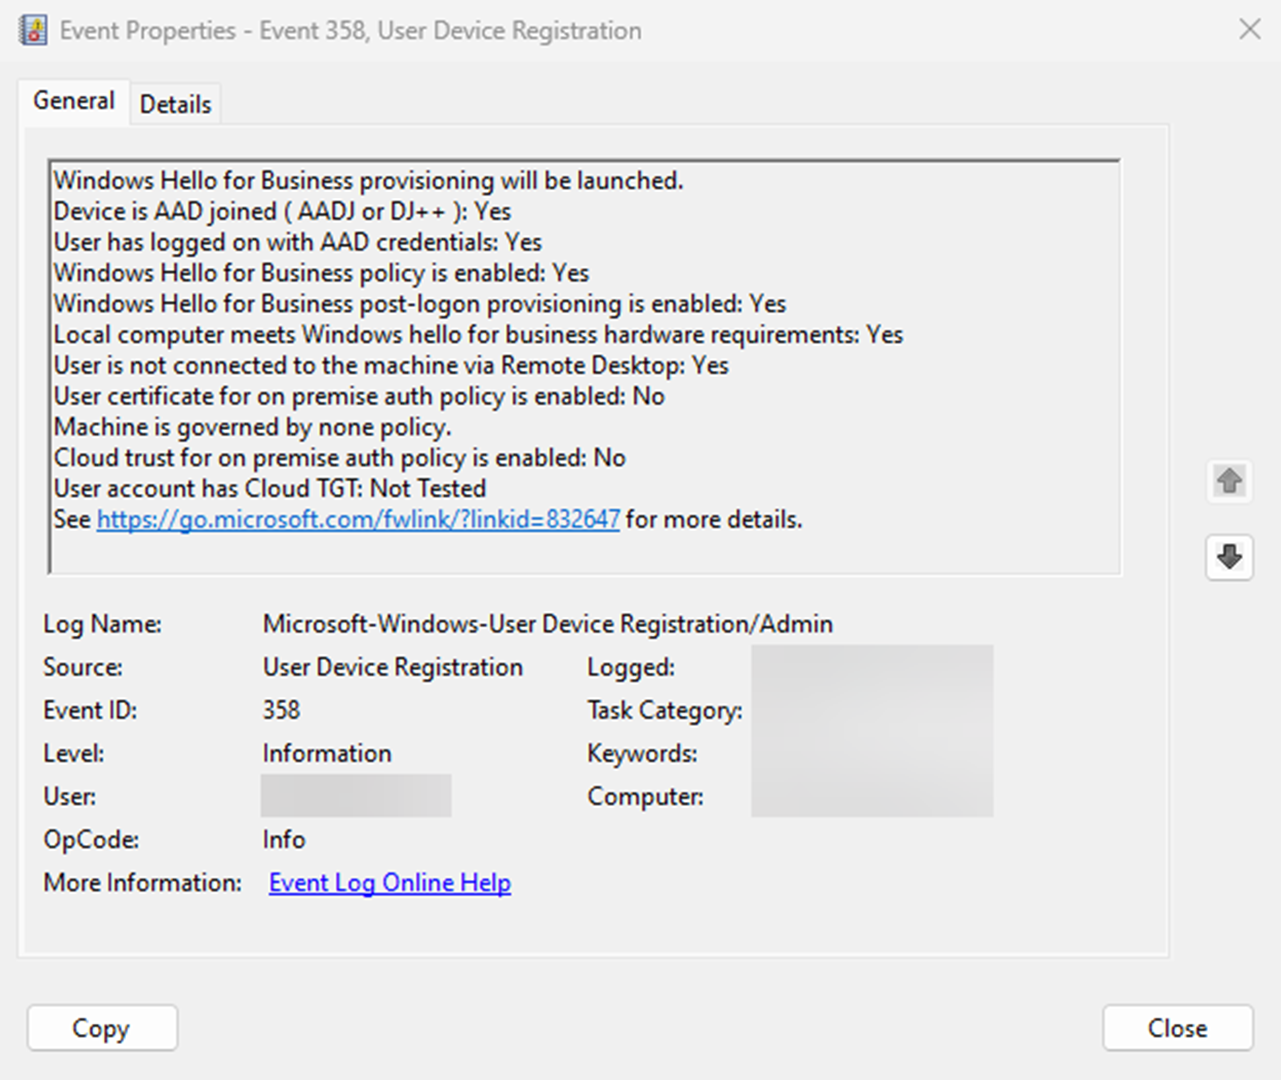
The Windows Hello for Business provisioning process begins immediately after the user profile is loaded and before the user receives their desktop. For the provisioning process to begin, all prerequisite checks must pass.
You can determine the status of the prerequisite checks by viewing the User Device Registration admin log under Applications and Services Logs > Microsoft > Windows.
This information is also available using the dsregcmd.exe /status command from a console. For more information, see dsregcmd.
User experience
After a user signs in, the Windows Hello for Business enrollment process begins:
- If the device supports biometric authentication, the user is prompted to set up a biometric gesture. This gesture can be used to unlock the device and authenticate to resources that require Windows Hello for Business. The user can skip this step if they don't want to set up a biometric gesture
- The user is prompted to use Windows Hello with the organization account. The user selects OK
- The provisioning flow proceeds to the multi-factor authentication portion of the enrollment. Provisioning informs the user that it's actively attempting to contact the user through their configured form of MFA. The provisioning process doesn't proceed until authentication succeeds, fails or times out. A failed or timeout MFA results in an error and asks the user to retry
- After a successful MFA, the provisioning flow asks the user to create and validate a PIN. This PIN must observe any PIN complexity policies configured on the device
- The remainder of the provisioning includes Windows Hello for Business requesting an asymmetric key pair for the user, preferably from the TPM (or required if explicitly set through policy). Once the key pair is acquired, Windows communicates with the IdP to register the public key. When key registration completes, Windows Hello for Business provisioning informs the user they can use their PIN to sign-in. The user may close the provisioning application and access their desktop
After enrollment, Microsoft Entra Connect synchronizes the user's key from Microsoft Entra ID to Active Directory.
Important
The minimum time needed to synchronize the user's public key from Microsoft Entra ID to the on-premises Active Directory is 30 minutes. The Microsoft Entra Connect scheduler controls the synchronization interval. This synchronization latency delays the user's ability to authenticate and use on-premises resources until the user's public key has synchronized to Active Directory. Once synchronized, the user can authenticate and access on-premises resources. Read Microsoft Entra Connect Sync: Scheduler to view and adjust the synchronization cycle for your organization.
Sequence diagrams
To better understand the provisioning flows, review the following sequence diagrams based on the device join and authentication type:
- Provisioning for Microsoft Entra joined devices with managed authentication
- Provisioning for Microsoft Entra joined devices with federated authentication
- Provisioning in a hybrid key trust deployment model with managed authentication
To better understand the authentication flows, review the following sequence diagram:
Feedback
Coming soon: Throughout 2024 we will be phasing out GitHub Issues as the feedback mechanism for content and replacing it with a new feedback system. For more information see: https://aka.ms/ContentUserFeedback.
Submit and view feedback for
