Note
Access to this page requires authorization. You can try signing in or changing directories.
Access to this page requires authorization. You can try changing directories.
Note
Some capabilities of Windows Defender Application Control (WDAC) are only available on specific Windows versions. For more information, see Windows Defender Application Control feature availability.
You can use Microsoft Intune to deploy and run critical Win32 applications, and Windows components that are normally blocked in S mode, on your Intune-managed Windows 10 in S mode devices. For example, PowerShell.exe.
With Intune, you can configure managed S mode devices using a Windows Defender Application Control (WDAC) supplemental policy that expands the S mode base policy to authorize the apps your organization uses. This feature changes the S mode security posture from "Microsoft has verified every app" to "Microsoft or your organization has verified every app".
Policy authorization process
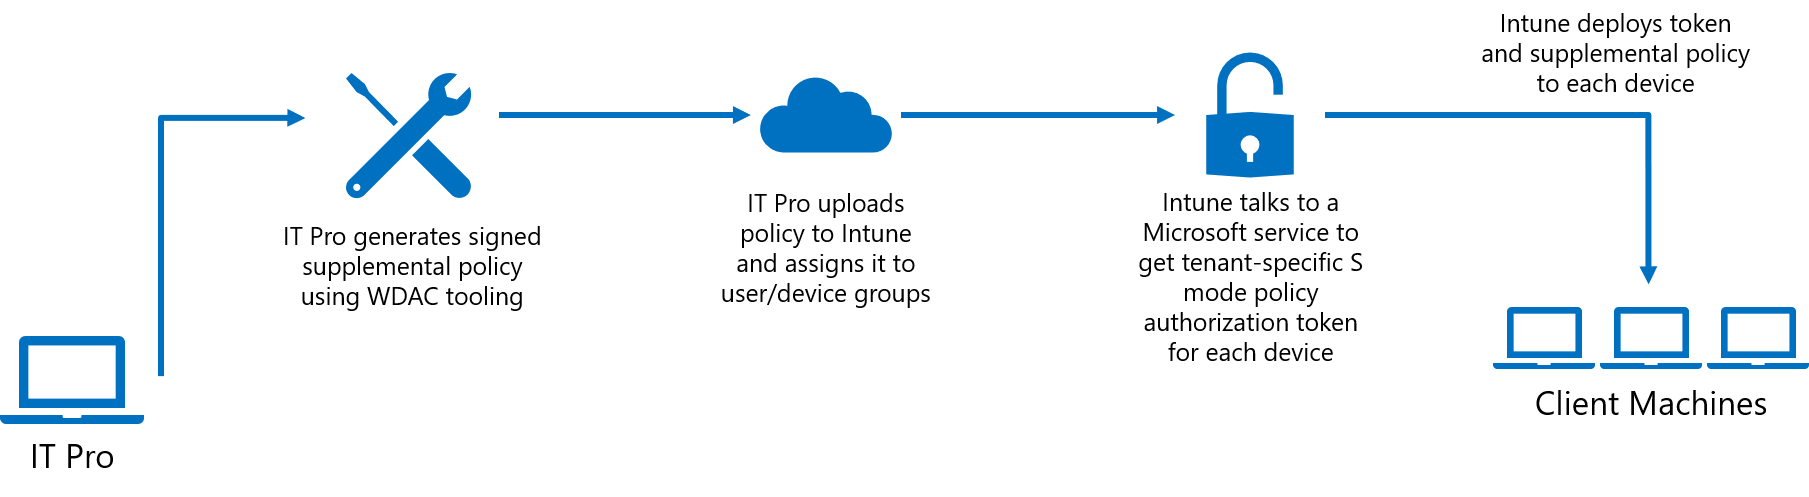
The general steps for expanding the S mode base policy on your Intune-managed Windows 10 in S mode devices are to generate a supplemental policy, sign that policy, upload the signed policy to Intune, and assign it to user or device groups. Because you need access to PowerShell cmdlets to generate your supplemental policy, you should create and manage your policies on a non-S mode device. Once the policy has been uploaded to Intune, before deploying the policy more broadly, assign it to a single test Windows 10 in S mode device to verify expected functioning.
Generate a supplemental policy with WDAC tooling.
This policy expands the S mode base policy to authorize more applications. Anything authorized by either the S mode base policy or your supplemental policy is allowed to run. Your supplemental policies can specify filepath rules, trusted publishers, and more.
For more information on creating supplemental policies, see Deploy multiple WDAC policies. For more information on the right type of rules to create for your policy, see Deploy WDAC policy rules and file rules.
The following instructions are a basic set for creating an S mode supplemental policy:
Create a new base policy using New-CIPolicy.
New-CIPolicy -MultiplePolicyFormat -ScanPath <path> -UserPEs -FilePath "<path>\SupplementalPolicy.xml" -Level FilePublisher -Fallback SignedVersion,Publisher,HashChange it to a supplemental policy using Set-CIPolicyIdInfo.
Set-CIPolicyIdInfo -SupplementsBasePolicyID 5951A96A-E0B5-4D3D-8FB8-3E5B61030784 -FilePath "<path>\SupplementalPolicy.xml"For policies that supplement the S mode base policy, use
-SupplementsBasePolicyID 5951A96A-E0B5-4D3D-8FB8-3E5B61030784. This ID is the S mode policy ID.Put the policy in enforce mode using Set-RuleOption.
Set-RuleOption -FilePath "<path>\SupplementalPolicy.xml>" -Option 3 -DeleteThis command deletes the 'audit mode' qualifier.
Since you're signing your policy, you must authorize the signing certificate you use to sign the policy. Optionally, also authorize one or more extra signers that can be used to sign updates to the policy in the future. The next step in the overall process, Sign the policy, describes it in more detail.
To add the signing certificate to the WDAC policy, use Add-SignerRule.
Add-SignerRule -FilePath <policypath> -CertificatePath <certpath> -User -UpdateConvert to
.binusing ConvertFrom-CIPolicy.ConvertFrom-CIPolicy -XmlFilePath "<path>\SupplementalPolicy.xml" -BinaryFilePath "<path>\SupplementalPolicy.bin>
Sign the policy.
Supplemental S mode policies must be digitally signed. To sign your policy, use your organization's custom Public Key Infrastructure (PKI). For more information on signing using an internal CA, see Create a code signing cert for WDAC.
Tip
For more information, see Azure Code Signing, democratizing trust for developers and consumers.
After you've signed it, rename your policy to
{PolicyID}.p7b. Get the PolicyID from the supplemental policy XML.Deploy the signed supplemental policy using Microsoft Intune.
Go to the Microsoft Intune portal, go to the Client apps page, and select S mode supplemental policies. Upload the signed policy to Intune and assign it to user or device groups. Intune generates authorization tokens for the tenant and specific devices. Intune then deploys the corresponding authorization token and supplemental policy to each device in the assigned group. Together, these tokens and policies expand the S mode base policy on the device.
Note
When you update your supplemental policy, make sure that the new version number is strictly greater than the previous one. Intune doesn't allow using the same version number. For more information on setting the version number, see Set-CIPolicyVersion.
Standard process for deploying apps through Intune
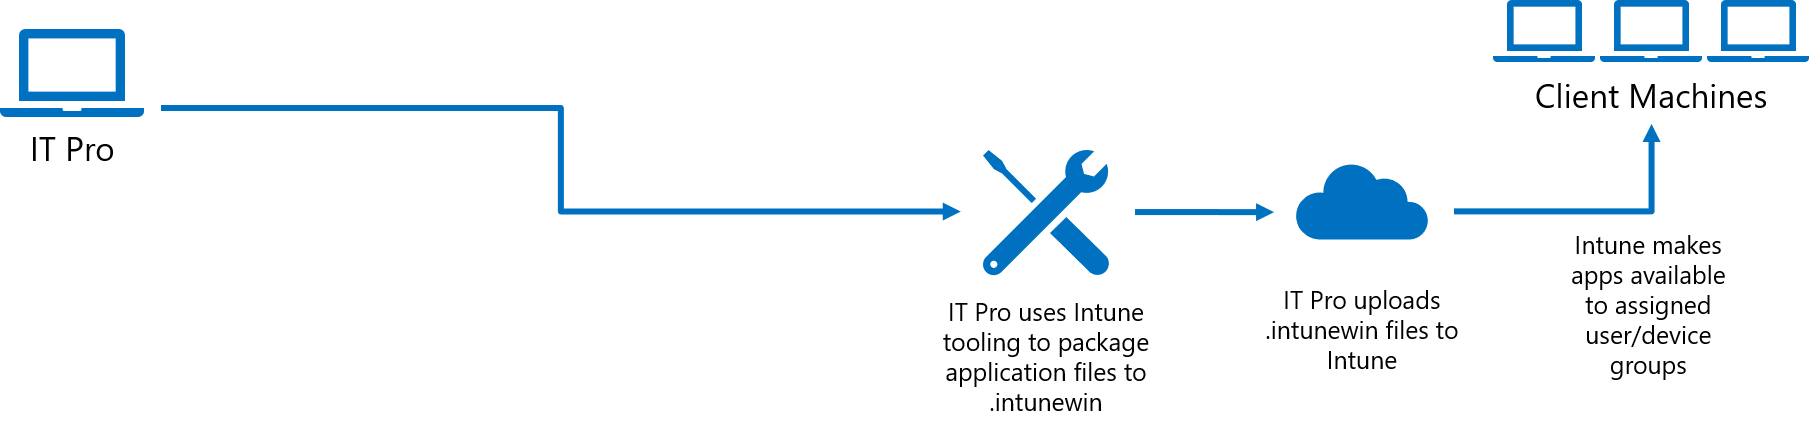
For more information on the existing procedure of packaging signed catalogs and app deployment, see Win32 app management in Microsoft Intune.
Optional: Process for deploying apps using catalogs
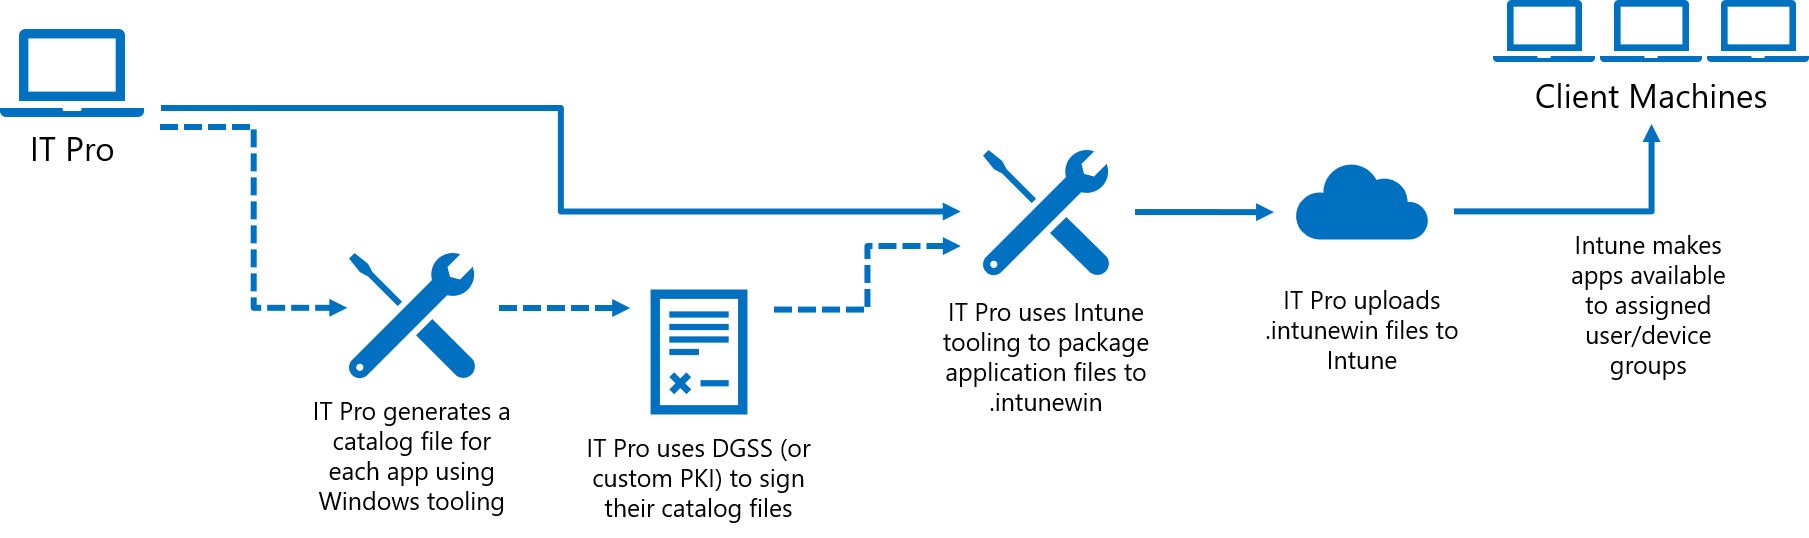
Your supplemental policy can be used to significantly relax the S mode base policy, but there are security trade-offs you must consider in doing so. For example, you can use a signer rule to trust an external signer, but that authorizes all apps signed by that certificate, which may include apps you don't want to allow as well.
Instead of authorizing signers external to your organization, Intune has functionality to make it easier to authorize existing applications by using signed catalogs. This feature doesn't require repackaging or access to the source code. It works for apps that may be unsigned or even signed apps when you don't want to trust all apps that may share the same signing certificate.
The basic process is to generate a catalog file for each app using Package Inspector, then sign the catalog files using a custom PKI. To authorize the catalog signing certificate in the supplemental policy, use the Add-SignerRule PowerShell cmdlet as shown earlier in step 1 of the Policy authorization process. After that, use the Standard process for deploying apps through Intune outlined earlier. For more information on generating catalogs, see Deploy catalog files to support WDAC.
Note
Every time an app updates, you need to deploy an updated catalog. Try to avoid using catalog files for applications that auto-update, and direct users not to update applications on their own.
Sample policy
The following policy is a sample that allows kernel debuggers, PowerShell ISE, and Registry Editor. It also demonstrates how to specify your organization's code signing and policy signing certificates.
<?xml version="1.0" encoding="utf-8"?>
<SiPolicy xmlns="urn:schemas-microsoft-com:sipolicy" PolicyType="Supplemental Policy">
  <VersionEx>10.0.0.0</VersionEx>
  <PlatformID>{2E07F7E4-194C-4D20-B7C9-6F44A6C5A234}</PlatformID>
  <!--Standard S mode GUID-->
  <BasePolicyID>{5951A96A-E0B5-4D3D-8FB8-3E5B61030784}</BasePolicyID>
  <!--Unique policy GUID-->
  <PolicyID>{52671094-ACC6-43CF-AAF1-096DC69C1345}</PolicyID>
  <!--EKUS-->
  <EKUs />
  <!--File Rules-->
  <FileRules>
    <!--Allow kernel debuggers-->
    <Allow ID="ID_ALLOW_CBD_0" FriendlyName="cdb.exe" FileName="CDB.Exe" />
    <Allow ID="ID_ALLOW_KD_0" FriendlyName="kd.exe" FileName="kd.Exe" />
    <Allow ID="ID_ALLOW_WINDBG_0" FriendlyName="windbg.exe" FileName="windbg.Exe" />
    <Allow ID="ID_ALLOW_MSBUILD_0" FriendlyName="MSBuild.exe" FileName="MSBuild.Exe" />
    <Allow ID="ID_ALLOW_NTSD_0" FriendlyName="ntsd.exe" FileName="ntsd.Exe" />
    <!--Allow PowerShell ISE and Registry Editor-->
    <Allow ID="ID_ALLOW_POWERSHELLISE_0" FriendlyName="powershell_ise.exe" FileName="powershell_ise.exe" />
    <Allow ID="ID_ALLOW_REGEDIT_0" FriendlyName="regedit.exe" FileName="regedit.exe" />
  </FileRules>
  <!--Signers-->
  <Signers>
    <!--info of the certificate you will use to do any code/catalog signing-->
    <Signer ID="EXAMPLE_ID_SIGNER_CODE" Name="Example Code Signing Certificate Friendly Name">
      <CertRoot Type="TBS" Value="<value>" />
    </Signer>

    <!--info of the certificate you will use to sign your policy-->
    <Signer ID="EXAMPLE_ID_SIGNER_POLICY" Name="Example Policy Signing Certificate Friendly Name">
      <CertRoot Type="TBS" Value="<value>" />
    </Signer>
  </Signers>
  <!--Driver Signing Scenarios-->
  <SigningScenarios>
    <SigningScenario Value="131" ID="ID_SIGNINGSCENARIO_KMCI" FriendlyName="Example Name">
      <ProductSigners />
    </SigningScenario>
    <SigningScenario Value="12" ID="ID_SIGNINGSCENARIO_UMCI" FriendlyName="Example Name">
      <ProductSigners>
        <AllowedSigners>
          <AllowedSigner SignerId="EXAMPLE_ID_SIGNER_CODE" />
        </AllowedSigners>
        <FileRulesRef>
          <FileRuleRef RuleID="ID_ALLOW_CBD_0" />
          <FileRuleRef RuleID="ID_ALLOW_KD_0" />
          <FileRuleRef RuleID="ID_ALLOW_WINDBG_0" />
          <FileRuleRef RuleID="ID_ALLOW_MSBUILD_0" />
          <FileRuleRef RuleID="ID_ALLOW_NTSD_0" />
          <FileRuleRef RuleID="ID_ALLOW_POWERSHELLISE_0" />
          <FileRuleRef RuleID="ID_ALLOW_REGEDIT_0" />
        </FileRulesRef>
      </ProductSigners>
    </SigningScenario>
  </SigningScenarios>
  <!--Specify one or more certificates that can be used to sign updated policy-->
  <UpdatePolicySigners>
    <UpdatePolicySigner SignerId="EXAMPLE_ID_SIGNER_POLICY" />
  </UpdatePolicySigners>
  <!--Specify one or more codesigning certificates to trust-->
  <CiSigners>
    <CiSigner SignerId="EXAMPLE_ID_SIGNER_CODE" />
  </CiSigners>
  <!-- example remove core isolation a.k.a. Hypervisor Enforced Code Integrity (HVCI) options, consider enabling if your system supports it-->
  <HvciOptions>0</HvciOptions>
  <Settings>
    <Setting Provider="PolicyInfo" Key="Information" ValueName="Name">
      <Value>
        <String>Example Policy Name</String>
      </Value>
    </Setting>
    <Setting Provider="PolicyInfo" Key="Information" ValueName="Id">
      <Value>
        <String>Example-Policy-10.0.0.0</String>
      </Value>
    </Setting>
  </Settings>
</SiPolicy>
Policy removal
In order to revert users to an unmodified S mode policy, remove a user or users from the targeted Intune group that received the policy. This action triggers a removal of both the policy and the authorization token from the device.
You can also delete a supplemental policy through Intune.
<?xml version="1.0" encoding="utf-8"?>
<SiPolicy xmlns="urn:schemas-microsoft-com:sipolicy" PolicyType="Supplemental Policy">
  <VersionEx>10.0.0.1</VersionEx>
  <PlatformID>{2E07F7E4-194C-4D20-B7C9-6F44A6C5A234}</PlatformID>
  <BasePolicyID>{5951A96A-E0B5-4D3D-8FB8-3E5B61030784}</BasePolicyID>
  <PolicyID>{52671094-ACC6-43CF-AAF1-096DC69C1345}</PolicyID>
  <Rules>
  </Rules>
  <!--EKUS-->
  <EKUs />
  <!--File Rules-->

  <!--Signers-->
  <Signers>
    <!--info of the certificate you will use to sign your policy-->
    <Signer ID="EXAMPLE_ID_SIGNER_POLICY" Name="Example Policy Signing Certificate Friendly Name">
      <CertRoot Type="TBS" Value="<value>" />
    </Signer>
  </Signers>
  <!--Driver Signing Scenarios-->
  <SigningScenarios>
    <SigningScenario Value="131" ID="ID_SIGNINGSCENARIO_KMCI" FriendlyName="KMCI">
      <ProductSigners>
      </ProductSigners>
    </SigningScenario>
    <SigningScenario Value="12" ID="ID_SIGNINGSCENARIO_UMCI" FriendlyName="UMCI">
      <ProductSigners>
      </ProductSigners>
    </SigningScenario>
  </SigningScenarios>
  <UpdatePolicySigners>
    <UpdatePolicySigner SignerId="EXAMPLE_ID_SIGNER_POLICY" />
  </UpdatePolicySigners>
  <!-- example remove core isolation a.k.a. Hypervisor Enforced Code Integrity (HVCI) options, consider enabling if your system is supported-->
  <HvciOptions>0</HvciOptions>
  <Settings>
    <Setting Provider="PolicyInfo" Key="Information" ValueName="Name">
      <Value>
        <String>Example Policy Name - Empty</String>
      </Value>
    </Setting>
    <Setting Provider="PolicyInfo" Key="Information" ValueName="Id">
      <Value>
        <String>Example-Policy-Empty-10.0.0.1</String>
      </Value>
    </Setting>
  </Settings>
</SiPolicy>
Errata
If a Windows 10 in S mode device with a policy authorization token and supplemental policy is rolled back from the 1909 update to the 1903 build, it will not revert to locked-down S mode until the next policy refresh. To achieve an immediate change to a locked-down S mode state, IT Pros should delete any tokens in %SystemRoot%\System32\CI\Tokens\Active.