Note
Access to this page requires authorization. You can try signing in or changing directories.
Access to this page requires authorization. You can try changing directories.
This topic walks you through the process of adding basic support for the Windows UI Library (WinUI) to your C++/WinRT UWP project. Specifically, this topic deals with WinUI 2, which is for UWP apps. For desktop apps, there's WinUI 3. Incidentally, WinUI is itself written in C++/WinRT.
Important
For desktop apps, the Windows App SDK provides Windows UI Library (WinUI) 3. WinUI 3 is not intended to work with the walkthrough in this topic, which is for UWP. Also see Migrate from UWP to the Windows App SDK.
Note
The Windows UI Library (WinUI) toolkit is available as NuGet packages that you can add to any existing or new project using Visual Studio, as we'll see in this topic. For more background, setup, and support info, see Getting started with the Windows UI Library.
Create a Blank App (HelloWinUICppWinRT)
In Visual Studio, create a new UWP project using the Blank App (C++/WinRT) project template. Make sure that you're using the (C++/WinRT) template, and not the (Universal Windows) one.
Set the name of the new project to HelloWinUICppWinRT, and (so that your folder structure will match the walkthrough) uncheck Place solution and project in the same directory.
Install the Microsoft.UI.Xaml NuGet package
Click Project > Manage NuGet Packages... > Browse, type or paste Microsoft.UI.Xaml in the search box, select the item in search results, and then click Install to install the package into your project (you'll also see a license agreement prompt). Be careful to install only the Microsoft.UI.Xaml package, and not Microsoft.UI.Xaml.Core.Direct.
Declare WinUI application resources
Open App.xaml and paste the following markup between the existing opening and closing Application tags.
<Application.Resources>
    <XamlControlsResources xmlns="using:Microsoft.UI.Xaml.Controls"/>
</Application.Resources>
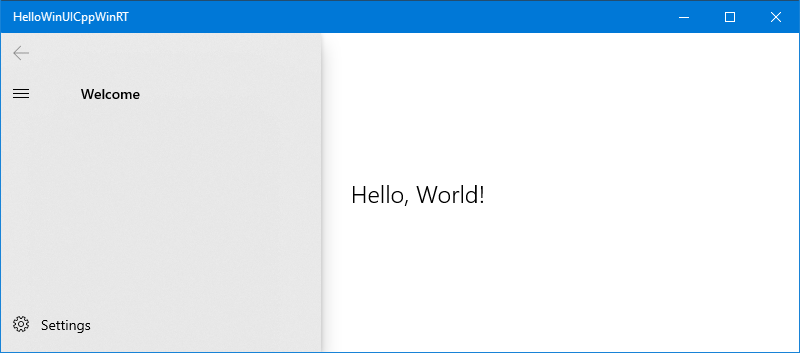
Add a WinUI control to MainPage
Next, open MainPage.xaml. In the existing opening Page tag there are some xml namespace declarations. Add the xml namespace declaration xmlns:muxc="using:Microsoft.UI.Xaml.Controls". Then, paste the following markup between the existing opening and closing Page tags, overwriting the existing StackPanel element.
<muxc:NavigationView PaneTitle="Welcome">
    <TextBlock Text="Hello, World!" VerticalAlignment="Center" HorizontalAlignment="Center" Style="{StaticResource TitleTextBlockStyle}"/>
</muxc:NavigationView>
Edit pch.h, as necessary
When you add a NuGet package to a C++/WinRT project (such as the Microsoft.UI.Xaml package, which you added earlier), and build the project, the tooling generates a set of projection header files in your project's \Generated Files\winrt folder. If you've followed along with the walkthrough, you'll now have a \HelloWinUICppWinRT\HelloWinUICppWinRT\Generated Files\winrt folder. To bring those headers files into your project, so that references to those new types resolve, you can go into your precompiled header file (typically pch.h) and include them.
You need to include only the headers that correspond to the types that you use. But here's an example that includes all of the generated header files for the Microsoft.UI.Xaml package.
// pch.h
...
#include "winrt/Microsoft.UI.Xaml.Automation.Peers.h"
#include "winrt/Microsoft.UI.Xaml.Controls.h"
#include "winrt/Microsoft.UI.Xaml.Controls.Primitives.h"
#include "winrt/Microsoft.UI.Xaml.Media.h"
#include "winrt/Microsoft.UI.Xaml.XamlTypeInfo.h"
...
Edit MainPage.cpp
In MainPage.cpp, delete the code inside your implementation of MainPage::ClickHandler, since myButton is no longer in the XAML markup.
You can now build and run the project.