Best practices for your app's startup performance
Create Universal Windows Platform (UWP) apps with optimal startup times by improving the way you handle launch and activation.
Best practices for your app's startup performance
In part, users perceive whether your app is fast or slow based on how long it takes to start up. For the purposes of this topic, an app's startup time begins when the user starts the app, and ends when the user can interact with the app in some meaningful way. This section provides suggestions on how to get better performance out of your app when it starts.
Measuring your app's startup time
Be sure to start your app a few times before you actually measure its startup time. This gives you a baseline for your measurement and ensures that you're measuring as reasonably short a startup time as possible.
By the time your UWP app arrives on your customers' computers, your app has been compiled with the .NET Native toolchain. .NET Native is an ahead-of-time compilation technology that converts MSIL into natively-runnable machine code. .NET Native apps start faster, use less memory, and use less battery than their MSIL counterparts. Applications built with .NET Native statically link in a custom runtime and the new converged .NET Core that can run on all devices, so they don’t depend on the in-box .NET implementation. On your development machine, by default your app uses .NET Native if you’re building it in “Release” mode, and it uses CoreCLR if you’re building it in “Debug” mode. You can configure this in Visual Studio from the Build page in “Properties” (C#) or Compile->Advanced in "My Project" (VB). Look for a checkbox that says “Compile with .NET Native Toolchain”.
Of course, you should take measurements that are representative of what the end user will experience. So, if you're not sure you're compiling your app to native code on your development machine, you could run the Native Image Generator (Ngen.exe) tool to precompile your app before you measure its startup time.
The following procedure describes how to run Ngen.exe to precompile your app.
To run Ngen.exe
Run your app at least one time to ensure that Ngen.exe detects it.
Open the Task Scheduler by doing one of the following:
- Search for "Task Scheduler" from the start screen.
- Run "taskschd.msc."
In the left-hand pane of Task Scheduler, expand Task Scheduler Library.
Expand Microsoft.
Expand Windows.
Select .NET Framework.
Select .NET Framework NGEN 4.x from the task list.
If you are using a 64-bit computer, there is also a .NET Framework NGEN v4.x 64. If you are building a 64-bit app, select .NET Framework NGEN v4.x 64.
From the Action menu, click Run.
Ngen.exe precompiles all the apps on the machine that have been used and do not have native images. If there are a lot of apps that need to be precompiled, this can take a long time, but subsequent runs are much faster.
When you recompile your app, the native image is no longer used. Instead, the app is just-in-time compiled, which means that it is compiled as the app runs. You must rerun Ngen.exe to get a new native image.
Defer work as long as possible
To improve your app's startup time, do only the work that absolutely needs to be done to let the user start interacting with the app. This can be especially beneficial if you can delay loading additional assemblies. The common language runtime loads an assembly the first time it is used. If you can minimize the number of assemblies that are loaded, you might be able to improve your app's startup time and its memory consumption.
Do long-running work independently
Your app can be interactive even though there are parts of the app that aren't fully functional. For example, if your app displays data that takes a while to retrieve, you can make that code execute independently of the app's startup code by retrieving the data asynchronously. When the data is available, populate the app's user interface with the data.
Many of the Universal Windows Platform (UWP) APIs that retrieve data are asynchronous, so you will probably be retrieving data asynchronously anyway. For more info about asynchronous APIs, see Call asynchronous APIs in C# or Visual Basic. If you do work that doesn't use asynchronous APIs, you can use the Task class to do long running work so that you don't block the user from interacting with the app. This will keep your app responsive to the user while the data loads.
If your app takes an especially long time to load part of its UI, consider adding a string in that area that says something like, "Getting latest data," so that your users know that the app is still processing.
Minimize startup time
All but the simplest apps require a perceivable amount of time to load resources, parse XAML, set up data structures, and run logic at activation. Here, we analyze the process of activation by breaking it into three phases. We also provide tips for reducing the time spent in each phase, and techniques for making each phase of your app's startup more palatable to the user.
The activation period is the time between the moment a user starts the app and the moment the app is functional. This is a critical time because it’s a user’s first impression of your app. They expect instant and continuous feedback from the system and apps. The system and the app are perceived to be broken or poorly designed when apps don't start quickly. Even worse, if an app takes too long to activate, the Process Lifetime Manager (PLM) might kill it, or the user might uninstall it.
Introduction to the stages of startup
Startup involves a number of moving pieces, and all of them need to be correctly coordinated for the best user experience. The following steps occur between your user clicking on your app tile and the application content being shown.
- The Windows shell starts the process and Main is called.
- The Application object is created.
- (Project template) Constructor calls InitializeComponent, which causes App.xaml to be parsed and objects created.
- Application.OnLaunched event is raised.
- (ProjectTemplate) App code creates a Frame and navigates to MainPage.
- (ProjectTemplate) Mainpage constructor calls InitializeComponent which causes MainPage.xaml to be parsed and objects created.
- ProjectTemplate) Window.Current.Activate() is called.
- XAML Platform runs the Layout pass including Measure & Arrange.
- ApplyTemplate will cause control template content to be created for each control, which is typically the bulk of Layout time for startup.
- Render is called to create visuals for all the window contents.
- Frame is presented to the Desktop Windows Manager (DWM).
Do less in your Startup path
Keep your startup code path free from anything that is not needed for your first frame.
- If you have user dlls containing controls that are not needed during first frame, consider delay loading them.
- If you have a portion of your UI dependent on data from the cloud, then split that UI. First, bring up the UI that is not dependent on cloud data and asynchronously bring up the cloud-dependent UI. You should also consider caching data locally so that the application will work offline or not be affected by slow network connectivity.
- Show progress UI if your UI is waiting for data.
- Be cautious of app designs that involve a lot of parsing of configuration files, or UI that is dynamically generated by code.
Reduce element count
Startup performance in a XAML app is directly correlated to the number of elements you create during startup. The fewer elements you create, the less time your app will take to start up. As a rough benchmark, consider each element to take 1ms to create.
- Templates used in items controls can have the biggest impact, as they are repeated multiple times. See ListView and GridView UI optimization.
- UserControls and control templates will be expanded, so those should also be taken into account.
- If you create any XAML that does not appear on the screen, then you should justify whether those pieces of XAML should be created during your startup.
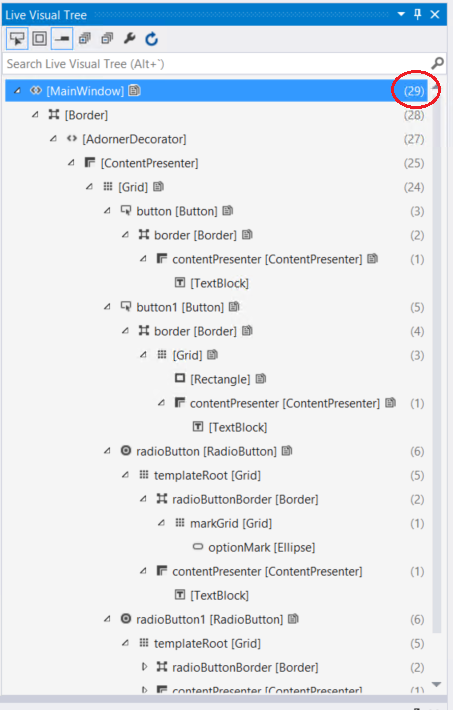
The Visual Studio Live Visual Tree window shows the child element counts for each node in the tree.
Use deferral. Collapsing an element, or setting its opacity to 0, will not prevent the element from being created. Using x:Load or x:DeferLoadStrategy, you can delay the loading of a piece of UI, and load it when needed. This is good way to delay processing UI that is not visible during the startup screen, so that you can load it when needed, or as part of a set of delayed logic. To trigger the loading, you need only call FindName for the element. For an example and more information, see x:Load attribute and x:DeferLoadStrategy attribute.
Virtualization. If you have list or repeater content in your UI then it’s highly advised that you use UI virtualization. If list UI is not virtualized then you are paying the cost of creating all the elements up front, and that can slow down your startup. See ListView and GridView UI optimization.
Application performance is not only about raw performance, it’s also about perception. Changing the order of operations so that visual aspects occur first will commonly make the user feel like the application is faster. Users will consider the application loaded when the content is on the screen. Commonly, applications need to do multiple things as part of the startup, and not all of that is required to bring up the UI, so those should be delayed or prioritized lower than the UI.
This topic talks about the “first frame” which comes from animation/TV, and is a measure of how long until content is seen by the end user.
Improve startup perception
Let’s use the example of a simple online game to identify each phase of startup and different techniques to give the user feedback throughout the process. For this example, the first phase of activation is the time between the user tapping the game’s tile and the game starting to run its code. During this time, the system doesn’t have any content to display to the user to even indicate that the correct game has started. But providing a splash screen gives that content to the system. The game then informs the user that the first phase of activation has completed by replacing the static splash screen with its own UI when it begins running code.
The second phase of activation encompasses creating and initializing structures critical for the game. If an app can quickly create its initial UI with the data available after the first phase of activation, then the second phase is trivial and you can display the UI immediately. Otherwise we recommend that the app display a loading page while it is initialized.
What the loading page looks like is up to you and it can be as simple as displaying a progress bar or a progress ring. The key point is that the app indicates that it is performing tasks before becoming responsive. In the case of the game, it would like to display its initial screen but that UI requires that some images and sounds be loaded from disk into memory. These tasks take a couple of seconds, so the app keeps the user informed by replacing the splash screen with a loading page, which shows a simple animation related to the theme of the game.
The third stage begins after the game has a minimal set of info to create an interactive UI, which replaces the loading page. At this point the only info available to the online game is the content that the app loaded from disk. The game can ship with enough content to create an interactive UI; but because it’s an online game it won’t be functional until it connects to the internet and downloads some additional info. Until it has all the info it needs to be functional, the user can interact with the UI, but features that need additional data from the web should give feedback that content is still loading. It may take some time for an app to become fully functional, so it’s important that functionality be made available as soon as possible.
Now that we have identified the three stages of activation in the online game, let’s tie them to actual code.
Phase 1
Before an app starts, it needs to tell the system what it wants to display as the splash screen. It does so by providing an image and background color to the SplashScreen element in an app’s manifest, as in the example. Windows displays this after the app begins activation.
<Package ...>
  ...
  <Applications>
    <Application ...>
      <VisualElements ...>
        ...
        <SplashScreen Image="Images\splashscreen.png" BackgroundColor="#000000" />
        ...
      </VisualElements>
    </Application>
  </Applications>
</Package>
For more info, see Add a splash screen.
Use the app’s constructor only to initialize data structures that are critical to the app. The constructor is called only the first time the app is run and not necessarily each time the app is activated. For example, the constructor isn't called for an app that has been run, placed in the background, and then activated via the search contract.
Phase 2
There are a number of reasons for an app to be activated, each of which you may want to handle differently. You can override OnActivated, OnCachedFileUpdaterActivated, OnFileActivated, OnFileOpenPickerActivated, OnFileSavePickerActivated, OnLaunched, OnSearchActivated, and OnShareTargetActivated methods to handle each reason of activation. One of the things that an app must do in these methods is create a UI, assign it to Window.Content, and then call Window.Activate. At this point the splash screen is replaced by the UI that the app created. This visual could either be loading screen or the app's actual UI if enough info is available at activation to create it.
public partial class App : Application
{
    // A handler for regular activation.
    async protected override void OnLaunched(LaunchActivatedEventArgs args)
    {
        base.OnLaunched(args);

        // Asynchronously restore state based on generic launch.

        // Create the ExtendedSplash screen which serves as a loading page while the
        // reader downloads the section information.
        ExtendedSplash eSplash = new ExtendedSplash();

        // Set the content of the window to the extended splash screen.
        Window.Current.Content = eSplash;

        // Notify the Window that the process of activation is completed
        Window.Current.Activate();
    }

    // a different handler for activation via the search contract
    async protected override void OnSearchActivated(SearchActivatedEventArgs args)
    {
        base.OnSearchActivated(args);

        // Do an asynchronous restore based on Search activation

        // the rest of the code is the same as the OnLaunched method
    }
}

partial class ExtendedSplash : Page
{
    // This is the UIELement that's the game's home page.
    private GameHomePage homePage;

    public ExtendedSplash()
    {
        InitializeComponent();
        homePage = new GameHomePage();
    }

    // Shown for demonstration purposes only.
    // This is typically autogenerated by Visual Studio.
    private void InitializeComponent()
    {
    }
}
    Partial Public Class App
    Inherits Application

    ' A handler for regular activation.
    Protected Overrides Async Sub OnLaunched(ByVal args As LaunchActivatedEventArgs)
        MyBase.OnLaunched(args)

        ' Asynchronously restore state based on generic launch.

        ' Create the ExtendedSplash screen which serves as a loading page while the
        ' reader downloads the section information.
        Dim eSplash As New ExtendedSplash()

        ' Set the content of the window to the extended splash screen.
        Window.Current.Content = eSplash

        ' Notify the Window that the process of activation is completed
        Window.Current.Activate()
    End Sub

    ' a different handler for activation via the search contract
    Protected Overrides Async Sub OnSearchActivated(ByVal args As SearchActivatedEventArgs)
        MyBase.OnSearchActivated(args)

        ' Do an asynchronous restore based on Search activation

        ' the rest of the code is the same as the OnLaunched method
    End Sub
End Class

Partial Friend Class ExtendedSplash
    Inherits Page

    Public Sub New()
        InitializeComponent()

        ' Downloading the data necessary for
        ' initial UI on a background thread.
        Task.Run(Sub() DownloadData())
    End Sub

    Private Sub DownloadData()
        ' Download data to populate the initial UI.

        ' Create the first page.
        Dim firstPage As New MainPage()

        ' Add the data just downloaded to the first page

        ' Replace the loading page, which is currently
        ' set as the window's content, with the initial UI for the app
        Window.Current.Content = firstPage
    End Sub

    ' Shown for demonstration purposes only.
    ' This is typically autogenerated by Visual Studio.
    Private Sub InitializeComponent()
    End Sub
End Class
Apps that display a loading page in the activation handler begin work to create the UI in the background. After that element has been created, its FrameworkElement.Loaded event occurs. In the event handler you replace the window's content, which is currently the loading screen, with the newly created home page.
It’s critical that an app with an extended initialization period show a loading page. Aside from providing the user feedback about the activation process, the process will be terminated if Window.Activate is not called within 15 seconds of the start of the activation process.
partial class GameHomePage : Page
{
    public GameHomePage()
    {
        InitializeComponent();

        // add a handler to be called when the home page has been loaded
        this.Loaded += ReaderHomePageLoaded;

        // load the minimal amount of image and sound data from disk necessary to create the home page.
    }

    void ReaderHomePageLoaded(object sender, RoutedEventArgs e)
    {
        // set the content of the window to the home page now that it's ready to be displayed.
        Window.Current.Content = this;
    }

    // Shown for demonstration purposes only.
    // This is typically autogenerated by Visual Studio.
    private void InitializeComponent()
    {
    }
}
    Partial Friend Class GameHomePage
    Inherits Page

    Public Sub New()
        InitializeComponent()

        ' add a handler to be called when the home page has been loaded
        AddHandler Me.Loaded, AddressOf ReaderHomePageLoaded

        ' load the minimal amount of image and sound data from disk necessary to create the home page.
    End Sub

    Private Sub ReaderHomePageLoaded(ByVal sender As Object, ByVal e As RoutedEventArgs)
        ' set the content of the window to the home page now that it's ready to be displayed.
        Window.Current.Content = Me
    End Sub

    ' Shown for demonstration purposes only.
    ' This is typically autogenerated by Visual Studio.
    Private Sub InitializeComponent()
    End Sub
End Class
For an example of using extended splash screens, see Splash screen sample.
Phase 3
Just because the app displayed the UI doesn't mean it is completely ready for use. In the case of our game, the UI is displayed with placeholders for features that require data from the internet. At this point the game downloads the additional data needed to make the app fully functional and progressively enables features as data is acquired.
Sometimes much of the content needed for activation can be packaged with the app. Such is the case with a simple game. This makes the activation process quite simple. But many programs (such as news readers and photo viewers) must pull information from the web to become functional. This data can be large and take a fair amount of time to download. How the app gets this data during the activation process can have a huge impact on the perceived performance of an app.
You could display a loading page, or worse, a splash screen, for minutes if an app tried to download an entire data set it needs for functionality in phase one or two of activation. This makes an app look like it’s hung or cause it to be terminated by the system. We recommend that an app download the minimal amount of data to show an interactive UI with placeholder elements in phase 2 and then progressively load data, which replaces the placeholder elements, in phase 3. For more info on dealing with data, see Optimize ListView and GridView.
How exactly an app reacts to each phase of startup is completely up to you, but providing the user as much feedback as possible (splash screen, loading screen, UI while data loads) makes the user feel as though an app, and the system as a whole, are fast.
Minimize managed assemblies in the startup path
Reusable code often comes in the form of modules (DLLs) included in a project. Loading these modules requires accessing the disk, and as you can imagine, the cost of doing so can add up. This has the greatest impact on cold startup, but it can have an impact on warm startup, too. In the case of C# and Visual Basic, the CLR tries to delay that cost as much as possible by loading assemblies on demand. That is, the CLR doesn’t load a module until an executed method references it. So, reference only assemblies that are necessary to the launch of your app in startup code so that the CLR doesn’t load unnecessary modules. If you have unused code paths in your startup path that have unnecessary references, you can move these code paths to other methods to avoid the unnecessary loads.
Another way to reduce module loads is to combine your app modules. Loading one large assembly typically takes less time than loading two small ones. This is not always possible, and you should combine modules only if it doesn't make a material difference to developer productivity or code reusability. You can use tools such as PerfView or the Windows Performance Analyzer (WPA) to find out what modules are loaded on startup.
Make smart web requests
You can dramatically improve the loading time of an app by packaging its contents locally, including XAML, images, and any other files important to the app. Disk operations are faster than network operations. If an app needs a particular file at initialization, you can reduce the overall startup time by loading it from disk instead of retrieving it from a remote server.
Journal and Cache Pages Efficiently
The Frame control provides navigation features. It offers navigation to a Page (Navigate method), navigation journaling (BackStack/ForwardStack properties, GoForward/GoBack method), Page caching (Page.NavigationCacheMode), and serialization support (GetNavigationState method).
The performance to be aware of with Frame is primarily around the journaling and page caching.
Frame journaling. When you navigate to a page with Frame.Navigate(), a PageStackEntry for the current page is added to Frame.BackStack collection. PageStackEntry is relatively small, but there’s no built-in limit to the size of the BackStack collection. Potentially, a user could navigate in a loop and grow this collection indefinitely.
The PageStackEntry also includes the parameter that was passed to the Frame.Navigate() method. It’s recommended that that parameter be a primitive serializable type (such as an int or string), in order to allow the Frame.GetNavigationState() method to work. But that parameter could potentially reference an object that accounts for more significant amounts of working set or other resources, making each entry in the BackStack that much more expensive. For example, you could potentially use a StorageFile as a parameter, and consequently the BackStack is keeping an indefinite number of files open.
Therefore it’s recommended to keep the navigation parameters small, and to limit the size of the BackStack. The BackStack is a standard vector (IList in C#, Platform::Vector in C++/CX), and so can be trimmed simply by removing entries.
Page caching. By default, when you navigate to a page with the Frame.Navigate method, a new instance of the page is instantiated. Similarly, if you then navigate back to the previous page with Frame.GoBack, a new instance of the previous page is allocated.
Frame, though, offers an optional page cache that can avoid these instantiations. To get a page put into the cache, use the Page.NavigationCacheMode property. Setting that mode to Required will force the page to be cached, setting it to Enabled will allow it to be cached. By default the cache size is 10 pages, but this can be overridden with the Frame.CacheSize property. All Required pages will be cached, and if there are fewer than CacheSize Required pages, Enabled pages can be cached as well.
Page caching can help performance by avoiding instantiations, and therefore improving navigation performance. Page caching can hurt performance by over-caching and therefore impacting working set.
Therefore it’s recommended to use page caching as appropriate for your application. For example, say you have an app that shows a list of items in a Frame, and when you tap on an item, it navigates the frame to a detail page for that item. The list page should probably be set to cache. If the detail page is the same for all items, it should probably be cached as well. But if the detail page is more heterogeneous, it might be better to leave caching off.
Feedback
Coming soon: Throughout 2024 we will be phasing out GitHub Issues as the feedback mechanism for content and replacing it with a new feedback system. For more information see: https://aka.ms/ContentUserFeedback.
Submit and view feedback for