Opacity Masks Overview
This topic describes how to use bitmaps and brushes to define opacity masks. It contains the following sections.
- Prerequisites
- What Is an Opacity Mask?
- Use a Bitmap as an Opacity Mask with the FillOpacityMask Method
- Use a Brush as an Opacity Mask with the FillGeometry Method
- Apply an Opacity Mask to a Layer
- Related topics
Prerequisites
This overview assumes that you are familiar with basic Direct2D drawing operations, as described in the Create a simple Direct2D application walkthrough. You should also be familiar with the different types of brushes, as described in the Brushes Overview.
What Is an Opacity Mask?
An opacity mask is a mask, described by a brush or bitmap, that is applied to another object to make that object partially or completely transparent. An opacity mask uses alpha channel information to specify how the source pixels of the object are blended into the final destination target. The transparent portions of the mask indicate the areas where the underlying image is hidden, whereas the opaque portions of the mask indicate where the masked object is visible.
There are several ways to apply an opacity mask:
- Use the ID2D1RenderTarget::FillOpacityMask method. The FillOpacityMask method paints a rectangular region of a render target and then applies an opacity mask, defined by a bitmap. Use this method when your opacity mask is a bitmap and you want to fill a rectangular region.
- Use the ID2D1RenderTarget::FillGeometry method. The FillGeometry method paints the interior of geometry with the specified ID2D1BitmapBrush, then applies an opacity mask, defined by a brush. Use this method when you want to apply an opacity mask to a geometry or you want to use a brush as an opacity mask.
- Use an ID2D1Layer to apply an opacity mask. Use this approach when you want to apply an opacity mask to a group of drawing content, not just a single shape or image. For details, see the Layers Overview.
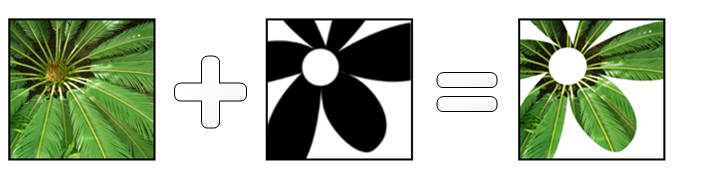
Use a Bitmap as an Opacity Mask with the FillOpacityMask Method
The FillOpacityMask method paints a rectangular region of a render target and then applies an opacity mask, defined by an ID2D1Bitmap. Use this method when you have a bitmap that you want to use as an opacity mask for a rectangular region.
The following diagram shows an effect of applying the opacity mask (an ID2D1Bitmap with an image of a flower) to an ID2D1BitmapBrush with an image of a fern plant. The resulting image is a bitmap of a plant clipped to the flower shape.
The following code examples shows how this is accomplished.
The first example loads the following bitmap, m_pBitmapMask, for use as a bitmap mask. The following illustration shows the output that is produced. Note that, although the opaque portion of the bitmap appears black, the color information in the bitmap has no effect on the opacity mask; only the opacity information of each pixel in the bitmap is used. The fully opaque pixels in this bitmap have been colored black for illustrative purposes only.

In this example, the ID2D1Bitmap is loaded by a helper method, LoadResourceBitmap, defined elsewhere in the sample.
            if (SUCCEEDED(hr))
            {
                hr = LoadResourceBitmap(
                    m_pRenderTarget,
                    m_pWICFactory,
                    L"BitmapMask",
                    L"Image",
                    &m_pBitmapMask
                    );
            }
The next example defines the brush, m_pFernBitmapBrush, to which the opacity mask is applied. This example uses an ID2D1BitmapBrush that contains an image of a fern, but you could use an ID2D1SolidColorBrush, ID2D1LinearGradientBrush, or ID2D1RadialGradientBrush instead. The following illustration shows the output that is produced.

            if (SUCCEEDED(hr))
            {
                D2D1_BITMAP_BRUSH_PROPERTIES propertiesXClampYClamp =
                    D2D1::BitmapBrushProperties(
                    D2D1_EXTEND_MODE_CLAMP,
                    D2D1_EXTEND_MODE_CLAMP,
                    D2D1_BITMAP_INTERPOLATION_MODE_NEAREST_NEIGHBOR
                    );
                hr = m_pRenderTarget->CreateBitmapBrush(
                    m_pFernBitmap,
                    propertiesXClampYClamp,
                    &m_pFernBitmapBrush
                    );


            }
Now that opacity mask and the brush are defined, you can use the FillOpacityMask method in your application's rendering method. When you call the FillOpacityMask method, you must specify the type of opacity mask you are using: D2D1_OPACITY_MASK_CONTENT_GRAPHICS, D2D1_OPACITY_MASK_CONTENT_TEXT_NATURAL, and D2D1_OPACITY_MASK_CONTENT_TEXT_GDI_COMPATIBLE. For the meanings of these three types, see D2D1_OPACITY_MASK_CONTENT.
Note
Starting with Windows 8, the D2D1_OPACITY_MASK_CONTENT is not required. See the ID2D1DeviceContext::FillOpacityMask method, which has no D2D1_OPACITY_MASK_CONTENT parameter.
The next example sets the render target's antialiasing mode to D2D1_ANTIALIAS_MODE_ALIASED so that the opacity mask will work properly. It then calls the FillOpacityMask method and passes it the opacity mask (m_pBitmapMask), the brush to which the opacity mask is applied (m_pFernBitmapBrush), the type of content inside the opacity mask (D2D1_OPACITY_MASK_CONTENT_GRAPHICS), and the area to paint. The following illustration shows the output that is produced.

        D2D1_RECT_F rcBrushRect = D2D1::RectF(5, 5, 155, 155);


        // D2D1_ANTIALIAS_MODE_ALIASED must be set for FillOpacityMask to function properly
        m_pRenderTarget->SetAntialiasMode(D2D1_ANTIALIAS_MODE_ALIASED);
        m_pRenderTarget->FillOpacityMask(
            m_pBitmapMask,
            m_pFernBitmapBrush,
            D2D1_OPACITY_MASK_CONTENT_GRAPHICS,
            &rcBrushRect
            );
        m_pRenderTarget->SetAntialiasMode(D2D1_ANTIALIAS_MODE_PER_PRIMITIVE);
Code has been omitted from this example.
Use a Brush as an Opacity Mask with the FillGeometry Method
The preceding section described how to use an ID2D1Bitmap as an opacity mask. Direct2D also provides the ID2D1RenderTarget::FillGeometry method, which enables you to optionally specify brush as an opacity mask when you fill an ID2D1Geometry. This enables you to create opacity masks from gradients (using ID2D1LinearGradientBrush or ID2D1RadialGradientBrush) and bitmaps (using ID2D1Bitmap).
The FillGeometry method takes three parameters:
- The first parameter, an ID2D1Geometry, defines the shape to paint.
- The second parameter, an ID2D1Brush, specifies the brush used to paint the geometry. This parameter must be an ID2D1BitmapBrush that has its x- and y-extend modes set to D2D1_EXTEND_MODE_CLAMP.
- The third parameter, an ID2D1Brush, specifies a brush to use as the opacity mask. This brush may be an ID2D1LinearGradientBrush, ID2D1RadialGradientBrush, or an ID2D1BitmapBrush. (Technically, you may use an ID2D1SolidColorBrush, but using a solid color brush as an opacity mask doesn't produce interesting results.)
The following sections describe how to use ID2D1LinearGradientBrush and ID2D1RadialGradientBrush objects as opacity masks.
Use an Linear Gradient Brush as an Opacity Mask
The following diagram shows the effect of applying a linear gradient brush to a rectangle that is filled with a bitmap of flowers.

The steps that follow describe how to re-create this effect.
Define the content to be masked. The following example creates an ID2D1BitmapBrush, m_pLinearFadeFlowersBitmap. The extend mode x- and y- for m_pLinearFadeFlowersBitmap are set to D2D1_EXTEND_MODE_CLAMP so that it can be used with an opacity mask by the FillGeometry method.
if (SUCCEEDED(hr))
{
    // Create the bitmap to be used by the bitmap brush.
    hr = LoadResourceBitmap(
        m_pRenderTarget,
        m_pWICFactory,
        L"LinearFadeFlowers",
        L"Image",
        &m_pLinearFadeFlowersBitmap
        );
}

if (SUCCEEDED(hr))
    {
        D2D1_BITMAP_BRUSH_PROPERTIES propertiesXClampYClamp =
            D2D1::BitmapBrushProperties(
            D2D1_EXTEND_MODE_CLAMP,
            D2D1_EXTEND_MODE_CLAMP,
            D2D1_BITMAP_INTERPOLATION_MODE_NEAREST_NEIGHBOR
            );
C++ if (SUCCEEDED(hr)) { hr = m_pRenderTarget->CreateBitmapBrush( m_pLinearFadeFlowersBitmap, propertiesXClampYClamp, &m_pLinearFadeFlowersBitmapBrush ); }C++ }Define the opacity mask. The next code example creates a diagonal linear gradient brush (m_pLinearGradientBrush) that fades from fully opaque black at position 0 to completely transparent white at position 1.
                if (SUCCEEDED(hr))
                {
                    ID2D1GradientStopCollection *pGradientStops = NULL;

                    static const D2D1_GRADIENT_STOP gradientStops[] =
                    {
                        {   0.f,  D2D1::ColorF(D2D1::ColorF::Black, 1.0f)  },
                        {   1.f,  D2D1::ColorF(D2D1::ColorF::White, 0.0f)  },
                    };

                    hr = m_pRenderTarget->CreateGradientStopCollection(
                        gradientStops,
                        2,
                        &pGradientStops);


                    if (SUCCEEDED(hr))
                    {
                        hr = m_pRenderTarget->CreateLinearGradientBrush(
                            D2D1::LinearGradientBrushProperties(
                                D2D1::Point2F(0, 0),
                                D2D1::Point2F(150, 150)),
                            pGradientStops,
                            &m_pLinearGradientBrush);
                    }


                pGradientStops->Release();
                }
- Use the FillGeometry method. The final example uses the FillGeometry method to the content brush to fill a ID2D1RectangleGeometry (m_pRectGeo) with an ID2D1BitmapBrush (m_pLinearFadeFlowersBitmap) and applies an opacity mask (m_pLinearGradientBrush).
            m_pRenderTarget->FillGeometry(
                m_pRectGeo,
                m_pLinearFadeFlowersBitmapBrush,
                m_pLinearGradientBrush
                );
Code has been omitted from this example.
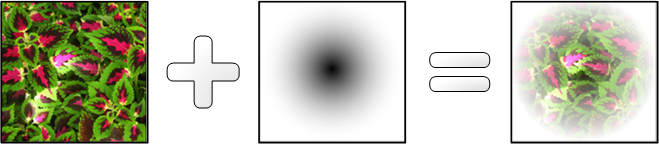
Use a Radial Gradient Brush as an Opacity Mask
The following diagram shows the visual effect of applying a radial gradient brush to a rectangle that is filled with a bitmap of foliage.
The first example creates an ID2D1BitmapBrush, m_pRadialFadeFlowersBitmapBrush. So that it can be used with an opacity mask by the FillGeometry method, the extend mode x- and y- for m_pRadialFadeFlowersBitmapBrush are set to D2D1_EXTEND_MODE_CLAMP.
            if (SUCCEEDED(hr))
            {
                // Create the bitmap to be used by the bitmap brush.
                hr = LoadResourceBitmap(
                    m_pRenderTarget,
                    m_pWICFactory,
                    L"RadialFadeFlowers",
                    L"Image",
                    &m_pRadialFadeFlowersBitmap
                    );
            }


            if (SUCCEEDED(hr))
            {
                D2D1_BITMAP_BRUSH_PROPERTIES propertiesXClampYClamp =
                    D2D1::BitmapBrushProperties(
                    D2D1_EXTEND_MODE_CLAMP,
                    D2D1_EXTEND_MODE_CLAMP,
                    D2D1_BITMAP_INTERPOLATION_MODE_NEAREST_NEIGHBOR
                    );
| C++ |
|---|
|
| C++ |
|---|
|
The next example defines the radial gradient brush that will be used as the opacity mask.
            if (SUCCEEDED(hr))
            {
                ID2D1GradientStopCollection *pGradientStops = NULL;

                static const D2D1_GRADIENT_STOP gradientStops[] =
                {
                    {   0.f,  D2D1::ColorF(D2D1::ColorF::Black, 1.0f)  },
                    {   1.f,  D2D1::ColorF(D2D1::ColorF::White, 0.0f)  },
                };

                hr = m_pRenderTarget->CreateGradientStopCollection(
                    gradientStops,
                    2,
                    &pGradientStops);


                if (SUCCEEDED(hr))
                {
                    hr = m_pRenderTarget->CreateRadialGradientBrush(
                        D2D1::RadialGradientBrushProperties(
                            D2D1::Point2F(75, 75),
                            D2D1::Point2F(0, 0),
                            75,
                            75),
                        pGradientStops,
                        &m_pRadialGradientBrush);
                }
                pGradientStops->Release();
            }
The final code example uses the ID2D1BitmapBrush (m_pRadialFadeFlowersBitmapBrush) and the opacity mask (m_pRadialGradientBrush) to fill an ID2D1RectangleGeometry (m_pRectGeo).
        m_pRenderTarget->FillGeometry(
            m_pRectGeo,
            m_pRadialFadeFlowersBitmapBrush,
            m_pRadialGradientBrush
            );
Code has been omitted from this example.
Apply an Opacity Mask to a Layer
When you call PushLayer to push an ID2D1Layer onto an render target, you can use the D2D1_LAYER_PARAMETERS structure to apply a brush as an opacity mask. The following code example uses an ID2D1RadialGradientBrush as an opacity mask.
HRESULT DemoApp::RenderWithLayerWithOpacityMask(ID2D1RenderTarget *pRT)
{

    HRESULT hr = S_OK;

    // Create a layer.
    ID2D1Layer *pLayer = NULL;
    hr = pRT->CreateLayer(NULL, &pLayer);

    if (SUCCEEDED(hr))
    {
        pRT->SetTransform(D2D1::Matrix3x2F::Translation(300, 250));

        // Push the layer with the content bounds.
        pRT->PushLayer(
            D2D1::LayerParameters(
                D2D1::InfiniteRect(),
                NULL,
                D2D1_ANTIALIAS_MODE_PER_PRIMITIVE,
                D2D1::IdentityMatrix(),
                1.0,
                m_pRadialGradientBrush,
                D2D1_LAYER_OPTIONS_NONE),
            pLayer
            );

        pRT->DrawBitmap(m_pBambooBitmap, D2D1::RectF(0, 0, 190, 127));

        pRT->FillRectangle(
            D2D1::RectF(25.f, 25.f, 50.f, 50.f),
            m_pSolidColorBrush
            );
        pRT->FillRectangle(
            D2D1::RectF(50.f, 50.f, 75.f, 75.f),
            m_pSolidColorBrush
            );
        pRT->FillRectangle(
            D2D1::RectF(75.f, 75.f, 100.f, 100.f),
            m_pSolidColorBrush
            );

        pRT->PopLayer();
    }
    SafeRelease(&pLayer);

    return hr;

}
For more information about using layers, see the Layers Overview.
Related topics