Note
Access to this page requires authorization. You can try signing in or changing directories.
Access to this page requires authorization. You can try changing directories.
How to get started developing apps for Android 9 Pie using Xamarin.Android.
Android 9 Pie is now available from Google. A number of new features and APIs are being made available in this release, and many of them are necessary to take advantage of new hardware capabilities in the latest Android devices.
![]()
This article is structured to help you get started in developing Xamarin.Android apps for Android Pie. It explains how to install the necessary updates, configure the SDK, and prepare an emulator or device for testing. It also provides an outline of the new features in Android Pie and provides example source code that illustrates how to use some of the key Android Pie features.
Xamarin.Android 9.0 provides support for Android Pie. For more information about Xamarin.Android support for Android Pie, see the Android P Developer Preview 3 release notes.
Requirements
The following list is required to use Android Pie features in Xamarin-based apps:
Visual Studio – Visual Studio 2019 is recommended. If you are using Visual Studio 2017, on Windows update to Visual Studio 2017 version 15.8 or later. On macOS, update to Visual Studio 2017 for Mac version 7.6 or later.
Xamarin.Android – Xamarin.Android 9.0.0.17 or later must be installed with Visual Studio (Xamarin.Android is automatically installed as part of the Mobile development with .NET workload).
Java Developer Kit – Xamarin Android 9.0 development requires JDK 8 (or you can try the preview of Microsoft's distribution of the OpenJDK). JDK8 is automatically installed as part of the Mobile development with .NET workload.
Android SDK – Android SDK API 28 or later must be installed via the Android SDK Manager.
Getting started
To get started developing Android Pie apps with Xamarin.Android, you must download and install the latest tools and SDK packages before you can create your first Android Pie project:
Visual Studio 2019 is recommended. If you are using Visual Studio 2017, update to Visual Studio 2017 version 15.8 or later. If you are using Visual Studio for Mac, update to Visual Studio 2017 for Mac version 7.6 or later.
Install Android Pie (API 28) packages and tools via the SDK Manager.
Create a new Xamarin.Android project that targets Android 9.0.
Configure an emulator or device for testing Android Pie apps.
Each of these steps is explained in the following sections:
Update Visual Studio
Visual Studio 2019 is recommended for building Android Pie apps using Xamarin.
If you are using Visual Studio 2017, update to Visual Studio 2017 version 15.8 or later (for instructions, see Update Visual Studio 2017 to the most recent release). On macOS, update to Visual Studio 2017 for Mac 7.6 or later (for instructions, see Setup and Install Visual Studio for Mac).
Install the Android SDK
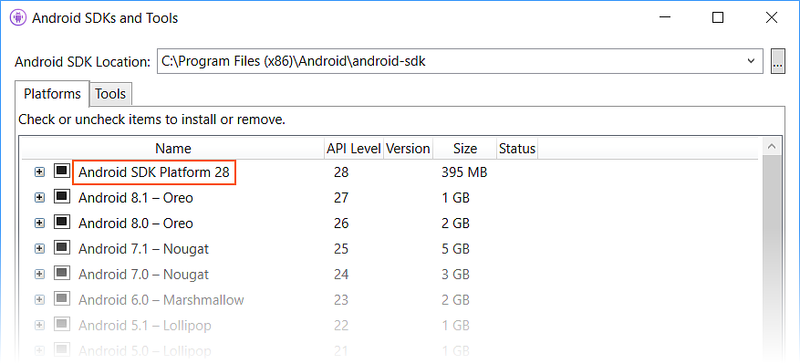
To create a project with Xamarin.Android 9.0, you must first use the Android SDK Manager to install the SDK platform for Android Pie (API level 28) or later.
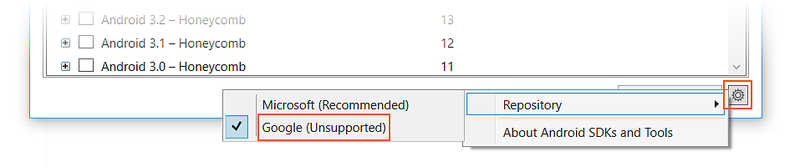
Start the SDK Manager. In Visual Studio, click Tools > Android > Android SDK Manager. In Visual Studio for Mac, click Tools > SDK Manager.
In the lower right-hand corner, click the gear icon and select Repository > Google (Unsupported):
Install the Android Pie SDK packages, which are listed as Android SDK Platform 28 in the Platforms tab (for more information about using the SDK Manager, see Android SDK Setup):
If you are using an emulator, create a virtual device that supports API Level 28. For more information about creating virtual devices, see Managing Virtual Devices with the Android Device Manager.


Start a Xamarin.Android project
Create a new Xamarin.Android project. If you are new to Android development with Xamarin, see Hello, Android to learn about creating Xamarin.Android projects.
When you create an Android project, you must configure the version settings to target Android 9.0 or later. For example, to target your project for Android Pie, you must configure the target Android API level of your project to Android 9.0 (API 28). It is recommended that you also set your Target Framework level to API 28 or later. For more about configuring Android API levels, see Understanding Android API Levels.
Configure a device or emulator
If you are using a physical device such as a Nexus or a Pixel, you can update your device to Android Pie by following the instructions in Factory Images for Nexus and Pixel Devices.
If you are using an emulator, create a virtual device for API level 28 and select an x86-based image. For information about using the Android Device Manager to create and manage virtual devices, see Managing Virtual Devices with the Android Device Manager. For information about using the Android emulator for testing and debugging, see Debugging on the Android Emulator.
New features
Android Pie introduces a variety of new features. Some of these new features are intended to leverage new hardware capabilities offered by the latest Android devices, while others are designed to further enhance the Android user experience:
Display Cutout Support – Provides APIs to find the location and shape of the cutout at the top of the screen on newer Android devices.
Notification Enhancements – Notification messages can now display images, and a new
Personclass is used to simplify conversation participants.Indoor Positioning – Platform support for the WiFi Round-Trip-Time protocol, which makes it possible for apps to use WiFi devices for navigation in indoor settings.
Multi-Camera Support – Offers the capability to access streams simultaneously from multiple physical cameras (such as dual-front and dual-back cameras).
The following sections highlight these features and provide brief code examples to help you get started using them in your app.
Display cutout support
Many newer Android devices with edge-to-edge screens have a Display Cutout (or "notch") at the top of the display for camera and speaker. The following screenshot provides an emulator example of a cutout:

To manage how your app window displays its content on devices with a display cutout, Android Pie has added a new LayoutInDisplayCutoutMode window layout attribute. This attribute can be set to one of the following values:
LayoutInDisplayCutoutModeNever – The window is never allowed to overlap with the cutout area.
LayoutInDisplayCutoutModeShortEdges – The window is allowed to extend into the cutout area but only on the short edges of the screen.
LayoutInDisplayCutoutModeDefault – The window is allowed to extend into the cutout area if the cutout is contained within a system bar.
For example, to prevent the app window from overlapping with the cutout area, set the layout cutout mode to never:
Window.Attributes.LayoutInDisplayCutoutMode =
    Android.Views.LayoutInDisplayCutoutMode.Never;
The following examples provide examples of these cutout modes. The
first screenshot on the left is of the app in non-fullscreen mode. In
the center screenshot, the app goes full-screen with
LayoutInDisplayCutoutMode set to
LayoutInDisplayCutoutModeShortEdges. Notice that the app's white
background extends into the display cutout area:

In the final screenshot (above on the right),
LayoutInDisplayCutoutMode is set to
LayoutInDisplayCutoutModeShortNever before it goes to full-screen.
Notice that the app's white background is not allowed to extend into
the display cutout area.
If you need more detailed information about the cutout area on the
device, you can use the new
DisplayCutout
class. DisplayCutout represents the area of the display that cannot
be used to display content. You can use this information to retrieve
the location and shape of the cutout so that your app does not attempt
to display content in this non-functional area.
For more information about the new cutout features in Android P, see Display cutout support.
Notifications enhancements
Android Pie introduces the following enhancements to improve the messaging experience:
Notification channels (introduced in Android Oreo) now supports blocking of channel groups.
The notification system has three new Do-Not-Disturb categories (prioritizing alarms, system sounds, and media sources). In addition, there are seven new Do-Not-Disturb modes that can be used to suppress visual interruptions (such as badges, notification lights, status bar appearances, and launching of full-screen activities).
A new Person class has been added to represent the sender of a message. Use of this class helps to optimize the rendering of each notification by identifying people involved in a conversation (including their avatars and URIs).
Notifications can now display images.
The following example illustrates how to use the new APIs to generate a notification that contains an image. In the following screenshots, a text notification is posted and is followed by a notification with an embedded image. When the notifications are expanded (as seen on the right), the text of the first notification is displayed and the image embedded in the second notification is enlarged:

The following example illustrates how to include an image in an Android
Pie notification, and it demonstrates usage of the new Person class:
Create a
Personobject that represents the sender. For example, the sender's name and icon are included infromPerson:Icon senderIcon = Icon.CreateWithResource(this, Resource.Drawable.sender_icon); Person fromPerson = new Person.Builder() .SetIcon(senderIcon) .SetName("Mark Sender") .Build();Create a
Notification.MessagingStyle.Messagethat contains the image to send, passing the image to the new Notification.MessagingStyle.Message.SetData method. For example:Uri imageUri = Uri.Parse("android.resource://com.xamarin.pminidemo/drawable/example_image"); Notification.MessagingStyle.Message message = new Notification.MessagingStyle .Message("Here's a picture of where I'm currently standing", 0, fromPerson) .SetData("image/", imageUri);Add the message to a
Notification.MessagingStyleobject. For example:Notification.MessagingStyle style = new Notification.MessagingStyle(fromPerson) .AddMessage(message);Plug this style into the notification builder. For example:
builder = new Notification.Builder(this, MY_CHANNEL)
    .SetContentTitle("Tour of the Colosseum")
    .SetContentText("I'm standing right here!")
    .SetSmallIcon(Resource.Mipmap.ic_notification)
    .SetStyle(style)
    .SetChannelId(MY_CHANNEL);
Publish the notification. For example:
const int notificationId = 1000;
notificationManager.Notify(notificationId, builder.Build());
For more information about creating notifications, see Local Notifications.
Indoor positioning
Android Pie provides support for IEEE 802.11mc (also known as WiFi Round-Trip-Time or WiFi RTT), which makes it possible for apps to detect the distance to one or more Wi-Fi access points. Using this information, it is possible for your app to take advantage of indoor positioning with an accuracy of one to two meters. On Android devices that provide hardware support for IEEE 801.11mc, your app can offer navigation features such as location-based control of smart appliances or turn-by-turn instructions through a store:

The new WifiRttManager class and several helper classes provides the means for measuring distance to Wi-Fi devices. For more information about the indoor positioning APIs introduced in Android P, see Android.Net.Wifi.Rtt.
Multi-Camera support
Many newer Android devices have dual-front and/or dual-back cameras that are useful for such features as stereo vision, enhanced visual effects, and improved zoom capability. Android P introduces a new Multi-Camera API that makes it possible for your app to use a logical camera (or logical multi-camera) that is backed by two or more physical cameras. To determine if the device supports a logical multi camera, you can look at the capabilities of each camera on the device to see if it supports RequestAvailableCapabilitiesLogicalMultiCamera.
Android Pie also includes a new SessionConfiguration class that can be used to help reduce delays during initial capture and eliminate the need to start and start the camera stream.
For more information about Multi-Camera support in Android P, see Multi-camera support and camera updates.
Other features
In addition, Android Pie supports several other new features:
The new AnimatedImageDrawable class, which can be used for drawing and displaying animated images.
A new ImageDecoder class that replaces
BitmapFactory.ImageDecodercan be used to decode anAnimatedImageDrawable.Support for HDR (High Dynamic Range) video and HEIF (High Efficiency Image File Format) images.
The JobScheduler has been enhanced to more intelligently handle network-related jobs. The new GetNetwork method of the JobParameters class returns the best network for performing any network requests for a given job.
For more information about the latest Android Pie features, see Android 9 features and APIs.
Behavior changes
When the Target Android Version is set to API level 28, there are several platform changes that can affect your app's behavior even if you are not implementing the new features described above. The following list is a brief summary of these changes:
Apps must now request foreground permission before using foreground services.
If your app has more than one process, it cannot share a single WebView data directory across processes.
Directly accessing another app's data directory by path is no longer allowed.
For more information about behavior changes for apps targeting Android P, see Behavior Changes.
Sample code
AndroidPMiniDemo
is a Xamarin.Android sample app for Android Pie that demonstrates how to
set display cutout modes, how to use the new Person class, and how to
send a notification that includes an image.
Summary
This article introduced Android Pie and explained how to install and configure the latest tools and packages for Xamarin.Android development with Android Pie. It provided an overview of the key features available in Android Pie, with example source code for several of these features. It included links to API documentation and Android Developer topics to help you get started in creating apps for Android Pie. It also highlighted the most important Android Pie behavior changes that could impact existing apps.