Note
Access to this page requires authorization. You can try signing in or changing directories.
Access to this page requires authorization. You can try changing directories.
In partnership with Adform, Microsoft has created this guide to help Monetize publishers communicate with their buyers about accessing and targeting Monetize’ publisher inventory using Adform as their DSP. This information has been created in collaboration with and approved by the Adform team.
Note
The platforms can and will change regularly. We will do our best to update this guide as needed.
We recommend that if buyers are having issues, or if they need help using the Adform platform, their first point of contact should be the Adform team.
Terminology mapping
In some cases, Adform and Microsoft (Monetize) use different terminology, as shown in the following table.
| Adform | Xandr |
|---|---|
| Agency Seat ID or Advertiser Seat ID | Buyer Seat ID |
| Tracked Ads | Impressions |
| Publisher | Seller member |
| Inventory Source | See Inventory source section. |
Inventory source
Most publishers are accessible by targeting the main inventory source “Xandr – Monetize SSP (AppNexus)”. Below is the list of Monetize sellers that are displayed as separate inventory sources.
| Inventory Source Name |
|---|
| 33Across |
| Admixer |
| Baltic Adexchange |
| CPX Interactive |
| Canadian Programmatic Marketplace |
| Dailymotion |
| FigaroMedias |
| Hi-Media |
| IDG Tech Network |
| IPadex |
| InteractiveMedia CCSP GmbH |
| Intermarkets |
| L'Agora |
| MediaSquare Full Transparent |
| MediaSquare Semi Blind |
| Microsoft Ad Exchange |
| NRC Media |
| Netsprint: Premium Native & Video |
| NextDayMedia (AppNexus) |
| Orange Ad Market |
| Premio – Websystem |
| Prime Real Time BV |
| PubStream Advertising |
| Rossel |
| Schibsted Classified Media |
| Schibsted Media Group |
| Schibsted Media Group Norway |
| Schibsted Media Group Sweden (9943) |
| Semilo |
| Seznam.cz |
| Stailamedia |
| The Moneytizer |
| Viber |
| Webedia Exchange |
| Zodiak Active |
| bRealTime Select |
The above list will help buyers check the Xandr publisher they are trying to deliver on and what inventory source it is included under. For example, if a buyer wants to deliver on Seznam and Microsoft on the open exchange, they should ensure that Seznam.cz and Microsoft Ad Exchange inventory sources are targeted in their Line item.
For deal inventory source targeting, please refer to the Targeting deals section.
Note
All inventory sources are enabled by default. Buyers need to ensure they are targeting those inventory sources to access all open auction inventory available.
Targeting Xandr inventory on Adform
In the Inventory tab, you can manage your inventory sources, deals, domains, and apps by including or excluding them from your targeting list, as well as setting bid multipliers and bid prices in order to achieve the best campaign performance results.
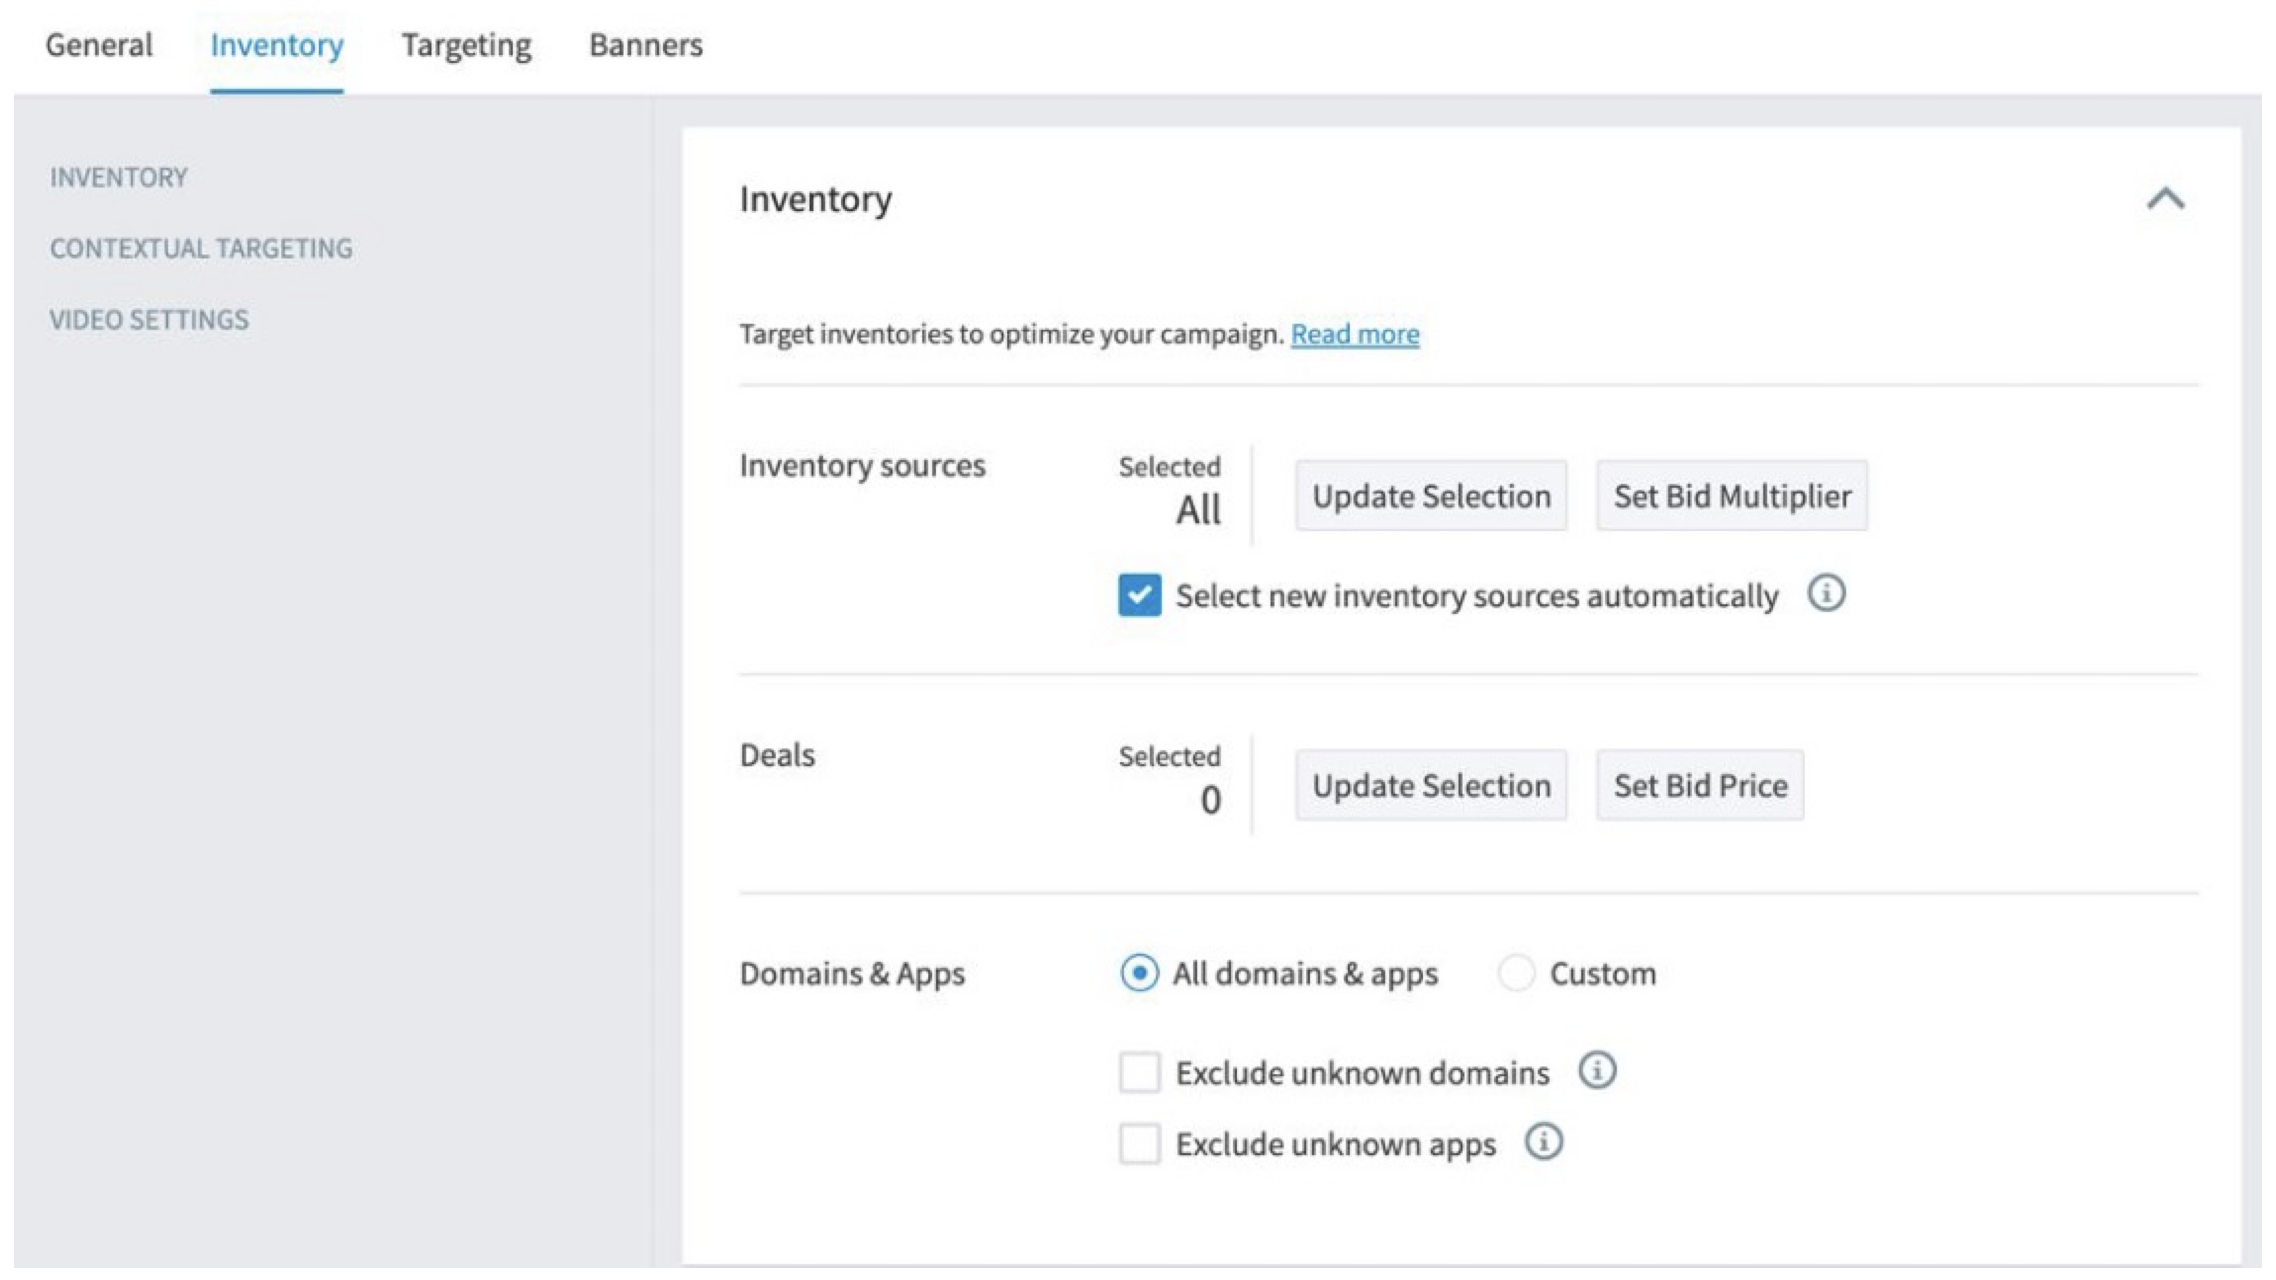
In the Inventory sources section, you can see the count of all the inventory sources that are selected for your Line item. By default, all inventory sources are selected. You can edit the list of inventory sources by clicking on the Update Selection button.
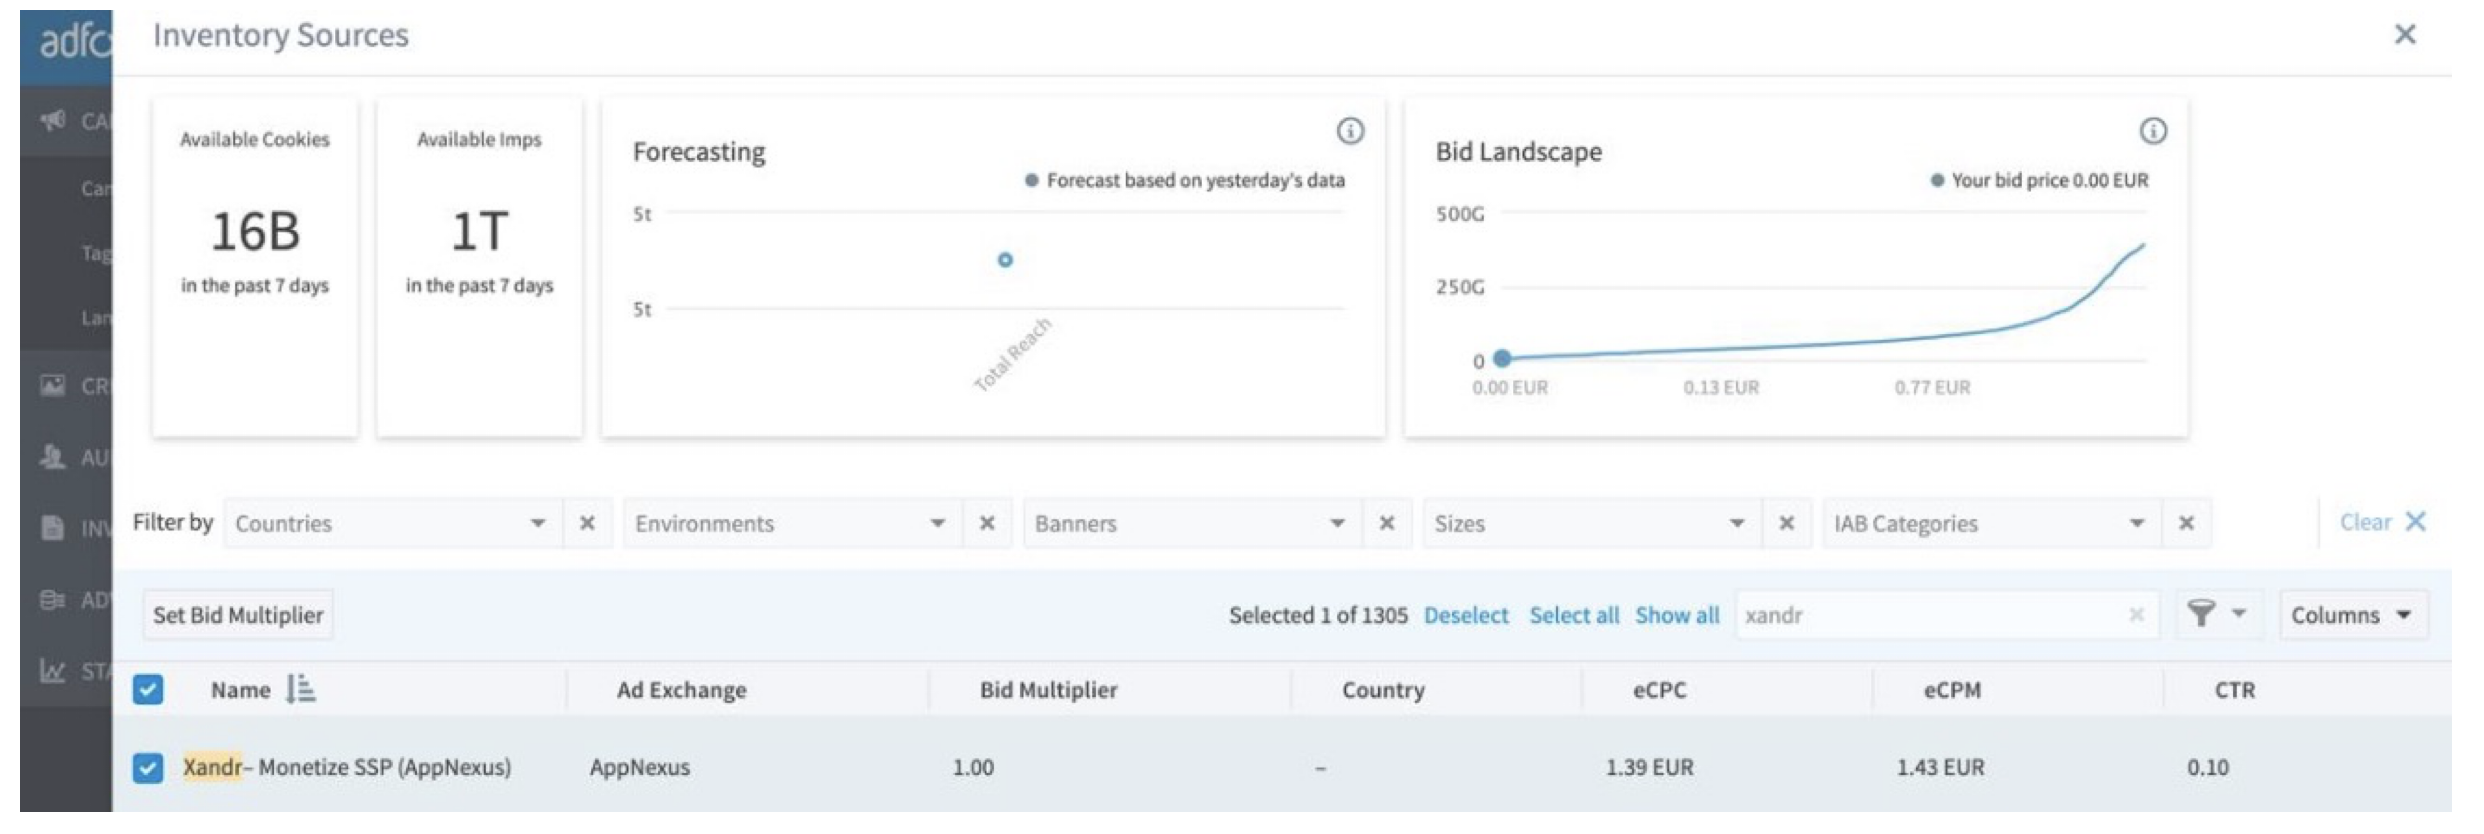
Once you click on this button, a side panel with the Inventory Marketplace opens, where you can see the list of all the available inventory sources. In this list, the main inventory source “Xandr – Monetize SSP (AppNexus)” will be displayed.
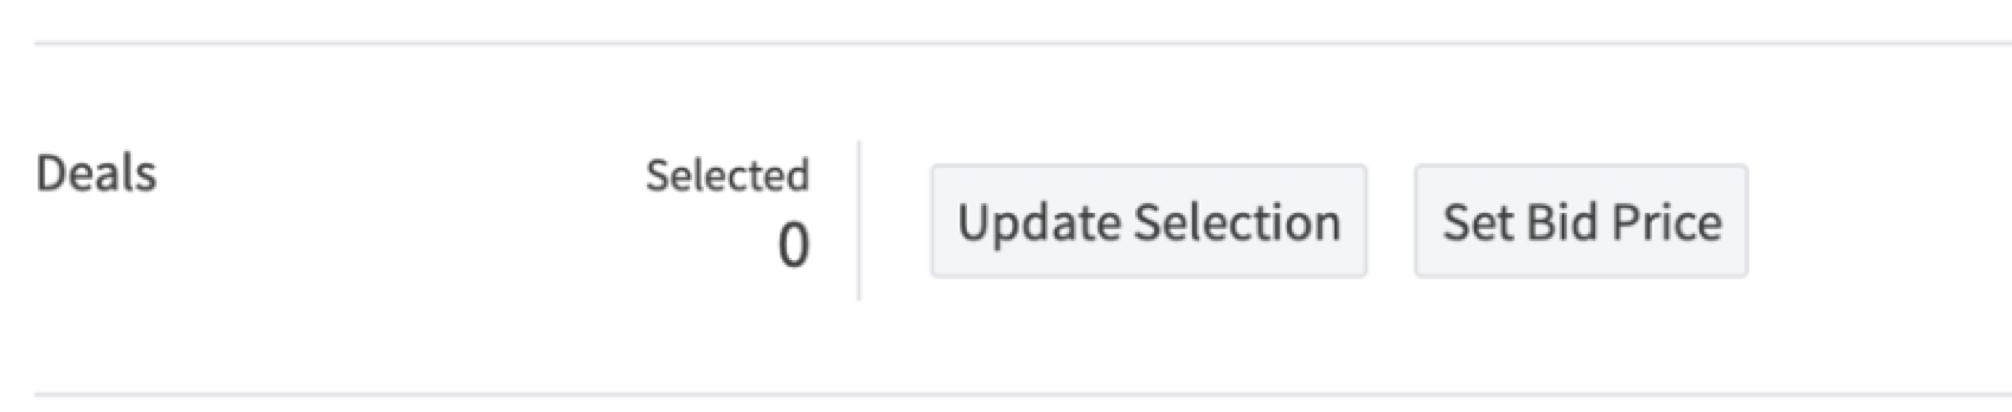
Targeting deals
In the Deals section, you can see the count of all the deals selected for your Line item. You can edit the list of deals by clicking on the Update Selection button.
The following deal types will be automatically synchronised within the buyer account once they have been created by the seller:
- Single-buyer deals: deals will be synced to the selected seat.
- Multi-buyer deals: deals will be synced to the selected seats.
- Buyer Specific Curated deals: deals will be synced to the selected seats.
If Automatic sync fails, automated deal types can be created manually.
Deal sync (automated deal creation)
Buyer specific deals generated by sellers/publishers through Microsoft Monetize (regardless of inventory source) or Microsoft Curate will be available in your Adform DSP account automatically through Deal Sync. This applies to Preferred, PG and Private deals. Please see Automated Deal Sync for more details. Bidder level deals created through Microsoft Monetize or Microsoft Curate will need to be set up manually. Please see Manually Created Deals for more details
Targeting deal syncs
- The publisher sets up the deal in Microsoft Monetize.
- The publisher assigns the deal to the Adform seat.
- The publisher sends you the deal name and ID.
- Adform automatically imports all the deals.
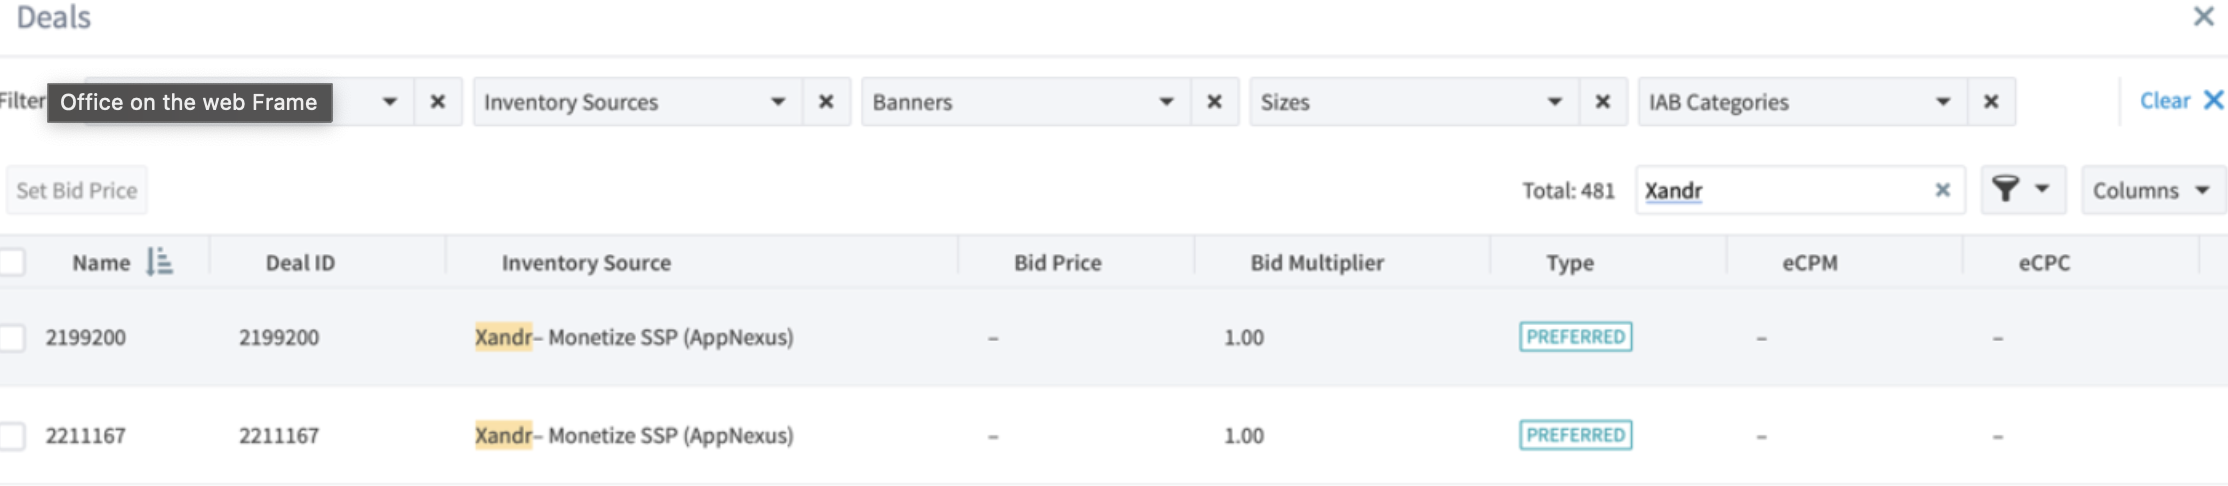
- Search the Deal list to find the deal ID that the publisher has provided to you.
- Approve the deal.
- Add the deal to your programmatic Line item.
You won't be able to select the deal in your programmatic Line item unless it has an "Approved” status. If you are unable to find the deals, reach out to Adform support.
Manually created deals
Bidder level deals need to be created manually. These deals are public and accessible to everyone. So, any client can set the deal up manually and add it to the line item.
Creating a deal manually
Click Inventory > Deals.
At the top of the Deals list, click Create.
In the Create Deal panel, enter a relevant Name for this deal.
The name can include up to 255 characters including spaces.
In the Deal ID box, insert the deal ID provided by the publisher.
The deal ID can be up to 100 characters.
Important
- You can’t change the deal ID once you save the deal.
- Deal IDs are always unique across all SSPs and exchanges.
Specify an Inventory Source in the list.
You can start typing to see relevant sources. If you type Xandr, the list shows all inventory sources related to Xandr.
To specify a single advertiser that can access the deal, click on Select and then choose the advertiser. By default, Adform selects All.
In the Pricing section, specify the Type of deal: Private or Preferred.
Note
The type of the deal is agreed upon with the publisher.
In the Price field, enter the agreed floor price. This is for your information only.
Click Create.
After you create the deal, Adform shows it in the Deals list as an accepted deal.
Important
- The only information you can change once you create a deal is the deal’s name.
- You can’t delete a deal after you've created it, but you can reject it in the Deals list.
Targeting manually created deals
Once you create the deal, you can add it to your programmatic Line item targeting setup.
On the deal section page, click on the Update Selection button. A side panel with the Marketplace opens, where you can see the list of all available deals.

Select the deals you want to add to your programmatic Line item.
Once all deals have been selected, click on the “Apply Changes” button to save.
Important
The Xandr Monetize Inventory Source limitation for deal sync is aimed to be resolved in 2024.
Programmatic Guaranteed (PG) Line items
There are three ways to initiate the setup of a new programmatic guaranteed line item in a campaigns list:
- Next to the order's name, click > Create programmatic guaranteed line item.
- Next to the campaign's name, click > Create programmatic guaranteed line item. If the campaign has more than one order, in the side panel, select a parent order for the new line item. Then click Create.
- In the toolbar, click Create > Programmatic guaranteed line item. In the side panel, select a parent advertiser, campaign, and order for the new line item. Then click Create.
- Line item budget needs to be large enough to buy all the agreed impressions.
To create a programmatic guaranteed line item, define these general settings:
- In the Line Item Details section, enter the name of your line item. Develop a convention for your Line item names to keep them organized and recognizable in the list.
- Select the Status of the Line item. To start bidding with this Line item, select Active; to stop bidding, select Paused. We recommend to select Paused while creating the Line item. Only select Active after you have defined all the Line item settings.
- In the Schedule section, click the Line item schedule link.
- In the side panel, select the dates in the calendar.
- In the date list below the calendar, to modify the time for each day, edit the fields in the Time range column
- Click Apply
- In the Programmatic Budget Flights section, select the Budget type. Programmatic guaranteed Line items can have one of the two types:
- Monetary Budget: The delivery of this Line item is capped by monetary limitations.
- Impressions: The delivery of this Line item is defined by the number of impressions that should be reached. To lock the programmatic guaranteed line item budget and ensure effective delivery, the campaign, order, and Line item must have matching budget types, and budget goals set to Total.
- Enter a Start date and End date for the budget flight.
- Enter the Budget for the budget flight. To ensure that the programmatic guaranteed Line item delivers as agreed in the deal, the following settings are set by default and can't be edited:
- Parent Budget and Pacing is turned off.
- Pacing is set to ASAP.
- Goal is set to Total.
- To add multiple budget flights, click Add Flight and repeat the steps 8-9.
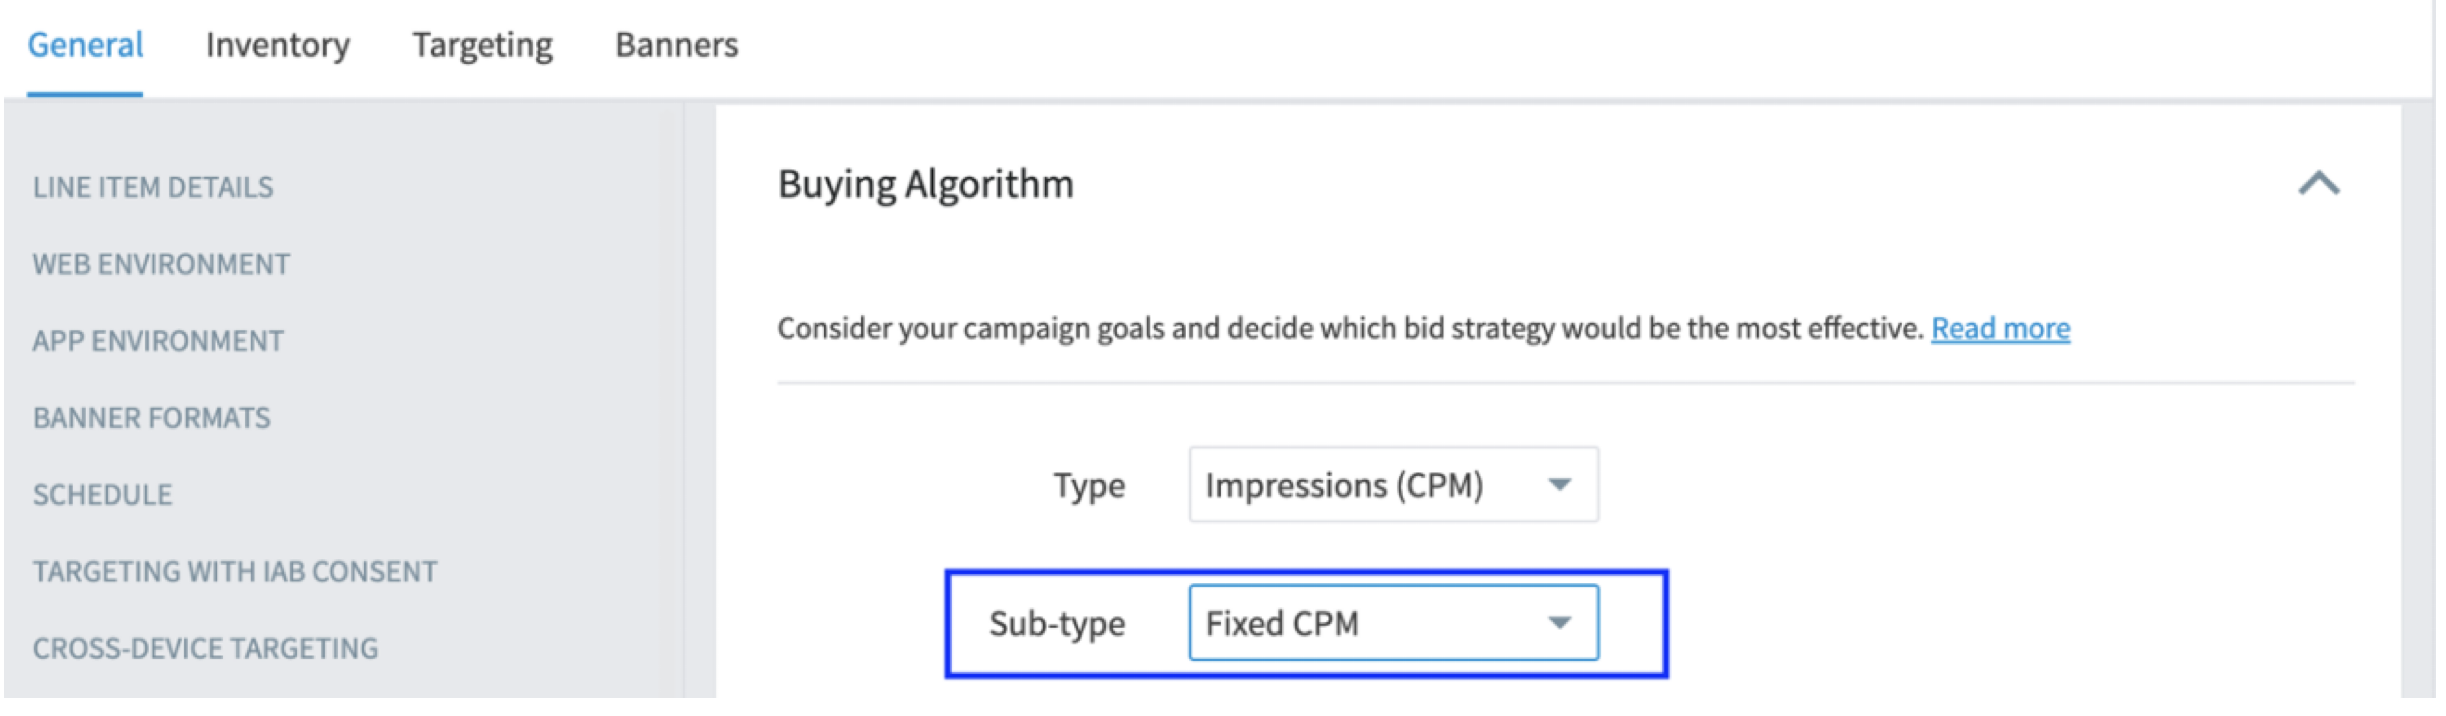
- In the Buying Strategy section, enter the Max CPM. Make sure MAX CPM is higher the programmatic guaranteed deal price including all the fees. To ensure effective programmatic guaranteed Line item delivery, by default, programmatic guaranteed Line item has the Branding strategy and the Bid Flat (fixed CPM) and they can't be edited.
- Activate the Line item only after the tags are approved. See Approval status of RTB tags for more information.
Set up inventory targeting
In the Inventory tab, manage the deals that your programmatic guaranteed line items target. Typically, only one deal is assigned to a programmatic guaranteed line item, but it's also possible to assign multiple deals based on your needs. To target a deal, first, you need to either set it up manually or enable automatic deal import.
To target a programmatic guaranteed deal:
- Click Update Selection.

- In the Deals side panel, select the Xandr deal that you agreed on with the publisher. (All programmatic guaranteed deals have the Preferred type assigned.) You can search for the specific deal using its deal ID.
- You can only select a deal if it has an Approved status. Make sure you don't select open exchanges and target only deals of interest.
- If you want to set a specific bid price for the deal, click Set Bid Price. Alternatively, you can also edit the bid price in the Inventory tab, after you apply the changes in the Deals side panel. The price set for the deal in the line item inventory settings overrides the price and the algorithm selected in general settings.
- In the Bid Price side panel, enter the bid price agreed with the publisher.
- In the Bid Price side panel, click Apply Changes.
- In the Deals side panel, click Apply Changes.
Note
- Create tags for approval at least 48 hours before the campaign start date.
- Tags should include all banner sizes that the deal was negotiated for.
Note
For requests regarding PG campaigns, please reach out to Adform support
Check approval status of RTB tags
All created RTB tags for creatives are sent to inventory sources for approval. Whether you just created a new RTB tag or want to troubleshoot already created tags, you can check RTB Approval Status from the right-side panel in the Tags Overview page. A creative gets submitted for Xandr’s approval when it gets assigned to a Line item that is actively targeting Xandr inventory.
To check the RTB tag approval status in Adform Platform:
- Click Campaigns > Tags in the left sidebar.
- Select the tags to check their approval status.
- Review the information in the five tag status categories in the RTB Approval Status widget on the right side of the page:
- Rejected: The tag doesn't comply with the inventory source's requirements and can't be used in bidding. Remove the banner associated with this tag or resend it for approval.
- Approved: The inventory source has approved the tag.
- In Progress: Adform has sent the tag to the inventory source and is awaiting approval.
- Not Supported: The ad type or the tag isn't supported by the inventory source.
- Not Sent: This is the initial status of the tag before sending it for approval. You can view the percentage and number of inventories that have assigned this status to your tags.
- Click the
 button to expand each status category and view the list of inventories that assigned this status.
Note
- Using third-party ads extends the tag approval process, as tags must undergo additional auditing to ensure no malicious content is served. This process can take up to 24 hours. Since some exchanges may take up to 48 hours to approve tags, assign banners to corresponding line items few days before the campaign starts.
- It is highly recommended to assign the creatives to corresponding Line items a few days prior to campaign start.
Resend tags for approval
To resend your tags to the publisher for approval after making adjustments, follow these steps:
- Go to the Tags page and select the tags you want to resend.
- Click
 button.
 - Choose one of the following options:
- Send to all inventory sources: Resends your tags to all publishers, regardless of their approval status.
- Send to inventory sources that returned the following status: Resends your tags to publishers that rejected the tag or are still in progress of approving it.
- Click Send.
Note
Contact Adform support if your tag is approved but statistics aren't collected.
FAQ(s) and troubleshooting
FAQ(s)
What should I consider when using complex banners? If you are running your campaigns in an open auction and your tag is not working, it might be due to using a complex banner. Banners such as expanding, floating, or 3D banners typically require a separate agreement with the publisher. To resolve this, set up an individual deal with the publisher instead of bidding in an open auction. By creating a deal, you can agree on specific placements that support your banners, ensuring that your banner will be displayed properly.
Why Aren't My Banner Changes Being Applied? Once you make changes to a banner and save it, you must republish it to apply those changes. Depending on the type of banner you are creating, to publish the banner, click the Submit or
button.Why Were Banners Removed From My Line Item? Third-party and HTML ads are automatically removed from inactive line items that haven't been scheduled to run for the past three days (72 hours). This is done because these ad types use more resources and can slow down the platform. To get them running again, reassign the ads to your line items and create new tags.
Troubleshooting
If an Adform buyer has issues serving on Xandr inventory, we recommend that they:
- Reach out to Adform support as the first step. Please include deal ID, campaign ID, line item IDs, and creative IDs where available and relevant.
- If they cannot resolve the issue using Adform, Adform will open a ticket with Xandr platform support.
- Sellers can reach out to Microsoft Advertising Customer Support Portal or to their Xandr account manager.
Buyer identification using Buyer Seat ID
- Adform supports Xandr's Buyer Seat ID feature. Member breakouts and virtual seats are no longer used for each Adform buyer.
- Deals should be set up using Adform Agency or Advertiser Seat IDs. Buyers should confirm their buyer seat ID when requesting a deal from a publisher. If buyers are not aware of their seat id, please contact Adform support.
- If a seller is unable to find the seat ID shared by the buyer in the SSP, submit a request to Microsoft Advertising Customer Support Portal for the buyer seat ID to be added.
Adform and TCF compliance
Adform only supports TCF 2.0 traffic. Non-TCF 2.0 traffic will be treated as no consent given. Adform is still able to bid on non-TCF 2.0 traffic but only with non-personalised ads.