Note
Access to this page requires authorization. You can try signing in or changing directories.
Access to this page requires authorization. You can try changing directories.
This page describes a typical Bonsai custom model process overview and provides code examples.
Note
The Closed Beta process requires using the API. Closed Beta clients are expected to have completed our API Onboarding Process before getting started.
Step 1: Identify your requirements
You will write your custom model as a decision tree, where branches of the tree express conditions that lead to specific outputs (bid prices in the case of a Bid Price Model and bid multipliers in the case of a Bid Modifier Model). The conditions are written in our Bonsai language and based on a set of Bonsai Features and feature values. Before writing your tree:
- Take a close look at the Bonsai Features that are available.
- Sketch how you want to use tree features to determine outputs.
- Be sure to take advantage of reporting data in identifying the right features and values. For more information, see Log Level Data Feeds and "Standard Reporting" in documentation.
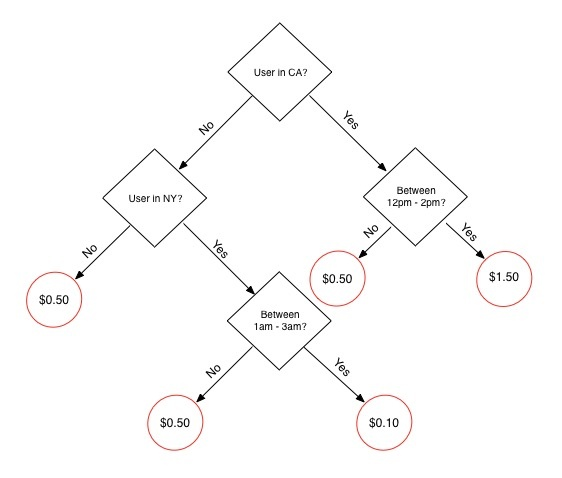
Example: Decision tree for bid pricing
Note
Use custom models to determine how to price impressions, not how to target them. For targeting impressions, you should continue to use the Profile Service for targeting via the API.
Step 2: Create your decision tree
Once you know the features and steps you want to follow to price or modify bids for a campaign, write them as a decision tree in our Bonsai Language. Use the examples on that page as well as the simple example below to jumpstart your understanding of how to write your tree.
Note
Use tabs for indentation, not spaces.
In Bonsai, indentation is used to group expressions (similar to Python). Be sure to use tabs to indicate line indentation. Spaces are not currently supported.
Example: Bonsai tree for bid pricing
Note
In the code example below, lines beginning with # are comments to help you understand the logic of this tree.
# This tree determines a bid price as follows:
# 1. If the user is in California, and the hour is between 12pm and 14pm there, bid $1.50.
# 2. If the user is in New York, and the hour is between 1am and 3am there, bid $0.10.
# 3. Otherwise, bid $0.50.

if every region = "US:CA", user_hour range (12,14):
        1.5
elif every region = "US:NY", user_hour range (1,3):
        0.1
else:
        0.5
Step 3: Encode your decision tree
Base64-encode your decision tree. Base64 is an encoding algorithm that allows you to transform binary digits into an alphabet which consists of Latin letters, digits, plus, and slash symbols. There are several web-based convertors that can encode your content into Base64.
Example: Base64-encoded
IyBUaGlzIHRyZWUgZGV0ZXJtaW5lcyBhIGJpZCBwcmljZSBhcyBmb2xsb3dzOgojIDEuIElmIHRoZSB1c2VyIGlzIGluIENhbGlmb3JuaWEsIGFuZCB0aGUgaG91ciBpcyBiZXR3ZWVuIDEycG0gYW5kIDE0cG0gdGhlcmUsIGJpZCAkMS41MC4KIyAyLiBJZiB0aGUgdXNlciBpcyBpbiBOZXcgWW9yaywgYW5kIHRoZSBob3VyIGlzIGJldHdlZW4gMWFtIGFuZCAzYW0gdGhlcmUsIGJpZCAkMC4xMC4KIyAzLiBPdGhlcndpc2UsIGJpZCAkMC41MC4KCmlmIGV2ZXJ5IHJlZ2lvbiA9ICJVUzpDQSIsIHVzZXJfaG91ciByYW5nZSAoMTIsMTQpOgoJMS41CmVsaWYgZXZlcnkgcmVnaW9uID0gIlVTOk5ZIiwgdXNlcl9ob3VyIHJhbmdlICgxLDMpOgoJMC4xCmVsc2U6CgkwLjU=
Step 4: Check your decision tree for errors
Use the Custom Model Parser Service to check the validity of your decision tree.
- In the JSON request, put your base64-encoded tree in the
model_textfield as a string. - If there are errors, use the
errorfield in the response to help you identify and resolve Bonsai syntax or feature errors. For guidance, see Error Messages. - If there are no errors, the
sizefield in the response shows you the size of your tree in Lisp (the format we use to store trees). Make sure thesizeis less than 3MB, or 3,145,728 bytes.
Note
If the tree is larger than 3MB, you will not be able to add the tree.
Example: JSON file containing your base64-encoded tree
$ cat check_tree.json

{
    "custom-model-parser": {
                "model_text": "IyBUaGlzIHRyZWUgZGV0ZXJtaW5lcyBhIGJpZCBwcmljZSBhcyBmb2xsb3dzOgojIDEuIElmIHRoZSB1c2VyIGlzIGluIENhbGlmb3JuaWEsIGFuZCB0aGUgaG91ciBpcyBiZXR3ZWVuIDEycG0gYW5kIDE0cG0gdGhlcmUsIGJpZCAkMS41MC4KIyAyLiBJZiB0aGUgdXNlciBpcyBpbiBOZXcgWW9yaywgYW5kIHRoZSBob3VyIGlzIGJldHdlZW4gMWFtIGFuZCAzYW0gdGhlcmUsIGJpZCAkMC4xMC4KIyAzLiBPdGhlcndpc2UsIGJpZCAkMC41MC4KCmlmIGV2ZXJ5IHJlZ2lvbiA9ICJVUzpDQSIsIHVzZXJfaG91ciByYW5nZSAoMTIsMTQpOgoJMS41CmVsaWYgZXZlcnkgcmVnaW9uID0gIlVTOk5ZIiwgdXNlcl9ob3VyIHJhbmdlICgxLDMpOgoJMC4xCmVsc2U6CgkwLjU="
    }
}
Example: POST to the custom-model-parser service
$ curl -b cookies -c cookies -X POST -d @check_tree.json 'https://api.appnexus.com/custom-model-parser'
{
    "response": {
        "service": "custom-model-parser",
        "method": "post",
        "custom-model-parser": {
            "model_text": "IyBUaGlzIHRyZWUgZGV0ZXJtaW5lcyBhIGJpZCBwcmljZSBhcyBmb2xsb3dzOgojIDEuIElmIHRoZSB1c2VyIGlzIGluIENhbGlmb3JuaWEsIGFuZCB...",
            "size": 111
        },
        "dbg_info": {
            ...
        }
    }
}
Step 5: Add your decision tree as a custom model
Once you've confirmed that your tree is valid, use the Custom Model Service to upload your encoded decision tree. Be sure to:
- Set the correct custom model type in the
model_outputfield:- For a Bid Price model, use
"bid". - For a Bid Modifier model, use
"bid_modifier".
- For a Bid Price model, use
- Put your base64-encoded tree in the
model_textfield as a string. - Provide a unique
name. This is required and will make it easier to select the correct model in. - Provide the
advertiser_idto which the custom model belongs. You will be able to use the model only in campaigns under this advertiser.
Example: JSON file defining your custom model
$ cat custom_model.json

{
    "custom_model": {
        "name": "Bid by Region/Hour of Day",
        "member_id": 958,
        "advertiser_id": 39776,
        "custom_model_structure": "decision_tree",
        "model_output": "bid",
                "model_text": "aWYgZXZlcnkgZGV2aWNlX3R5cGUgPSAiT3RoZXJzIChpbmNsdWRpbmcgUEMpIiwgdXNlcl9ob3VyIHJhbmdlICg5LDE4KToKCTEuNQplbGlmIGV2ZXJ5IGRldmljZV90eXBlIGluICgiVGFibGV0IiwgIlBob25lIiksIHVzZXJfaG91ciBpbiAoNSw2LDcsOCwxOSwyMCwyMSwyMik6CgkyCmVsc2U6CgkwLjU="
    }
}
Example: POST to custom-model service
$ curl -b cookies -c cookies -X POST -d @custom_model.json 'https://api.appnexus.com/custom-model'

{
    "response": {
        "status": "OK",
        "count": 1,
        "id": "329",
        "start_element": 0,
        "num_elements": 100,
        "custom_model": {
            "id": 329,
            "name": "Bid by Region/Hour of Day",
            "member_id": 958,
            "advertiser_id": 39776,
            "custom_model_structure": "decision_tree",
            "model_output": "bid",
            "model_text": "aWYgZXZlcnkgcmVnaW9uID0gIlVTOkNBIiwgdXNlcl9ob3VyIHJhbmdlICgxMiwxNCk6CgkxLjUKZWxpZiBldmVyeSByZWdpb24gPSAiVVM6TlkiLCB1c2VyX2hvdXIgcmFuZ2UgKDEsMyk6CgkwLjEKZWxzZToKCTAuNQ=",
            "original_text": "if every region = \"US:CA\", user_hour range (12,14):
 1.5
elif every region = \"US:NY\", user_hour range (1,3):
 0.1
else:
 0.5",
            "active": true,
            "last_modified": "2015-09-22 20:52:53"
        },
        "dbg_info": {
            "instance": "64.bm-hbapi.prod.nym2",
            "s1ave_hit": true,
            "db": "10.3.129.206",
            "awesomesauce_cache_used": false,
            "count_cache_used": false,
            "warnings": [
            ],
            "time": 39.799213409424,
            "start_microtime": 1438028779.7596,
            "version": "1.15.572",
            "s1ave_lag": 0,
            "member_last_modified_age": 21425,
            "output_term": "custom_model"
        }
    }
}
Step 6: Assign your custom model to a campaign
Bid price model
Use the Campaign Service to assign your custom model to a campaign. Be sure to:
Set
cpm_bid_typeto"custom_model".Provide the
idof your custom model in thebid_modelobject.Set
inventory_typeto"real_time".JSON file defining your campaign
$ cat campaign.json

{
    "campaign": {
        "name": "Custom Model Campaign - Bid by Region/Hour of Day",
        "cpm_bid_type": "custom_model",
        "bid_model": {
                        "id": 329
                },
        "line_item_id": 34287,
                "inventory_type": "real_time"
    }
}
Bid modifier model
Use the Campaign Service to assign your custom model to a campaign. Be sure to:
Set
cpm_bid_typeto an optimization-based buying strategy ("predicted"or"margin") and any corresponding required fields.- In the JSON below, for example, we set
cpm_bid_typeto"predicted"andcpc_click_goalto1.00to optimize CPM bids to a predicted $1.00 CPC goal.
- In the JSON below, for example, we set
In the
bid_modifier_modelobject, provide theidof the custom model that will modify the campaign's CPM bids.Set
inventory_typeto"real_time".JSON file defining your campaign
$ cat campaign.json
{
    "campaign": {
        "name": "Custom Model Campaign - Modify Bid Based on Region/Hour of Day",
        "cpm_bid_type": “predicted”,
        “cpc_goal”: 1.00,
        "bid_modifier_model": {
            "id": 148
        },
        "line_item_id": 34287,
        "inventory_type": "real_time"
    }
}