Note
Access to this page requires authorization. You can try signing in or changing directories.
Access to this page requires authorization. You can try changing directories.
Follow these instructions to modify an ad created in Adobe Edge such that it works seamlessly with the Xandr HTML5 Library. This is required to properly track clicks.
Banner ads
Prerequisites
You will require a text editor to complete the procedure below. If you do not have one, we recommend Sublime Text.
Step 1: Locate the correct files to edit
Before you begin, locate the folder containing the ad created in Adobe Edge. If the ad is located in a .zip file, you must unzip the file to reveal a folder containing its various assets.
Then, locate the following files:
index.html- a file with the extension
.jsat the root level of the ad folder, for example,300x250edge.jsoredgeActions.js
These files are where you will make all of the necessary changes in the steps below.
Step 2: Add the Xandr HTML5 Library
Ensure that the actual Xandr HTML5 Library is linked to inside index.html.
Link the library inside the <head>tag in the index.html file, by adding the following <script> tag:
<script type="text/javascript" src="https://acdn..com/html5-lib/1.3.0/-html5-lib.min.js"></script>
Tip
Use https to ensure the creative can serve on secure inventory.
Step 3: Add click event
For this step, you make all your changes to the .js file.
Without existing click event
You may see an Adobe Edge JavaScript function that handles events with no existing click events. It will look similar to:
//Edge symbol: 'stage'
(function(symbolName){
  Symbol.bindTriggerAction(compId,symbolName,"Default Timeline",16750,function(sym,e){
    sym.play(0);
  });
//Edge binding end
})("stage");
In order to support the click event using the APPNEXUS.click() function, you must add the following function:
Symbol.bindElementAction(compId,symbolName,"${Stage}","click",function(sym,e){
        APPNEXUS.click();
});
Once the click event has been added, you will have a function that looks similar to:
//Edge symbol: 'stage'
(function(symbolName){
  Symbol.bindTriggerAction(compId,symbolName,"Default Timeline",16750,function(sym,e){
    sym.play(0);
  });
  Symbol.bindElementAction(compId,symbolName,"${Stage}","click",function(sym,e){
    APPNEXUS.click();
  });
//Edge binding end
})("stage");
With existing click event
You may see an Adobe Edge JavaScript function that handles events with an existing click event. It will look similar to:
//Edge symbol: 'stage'
(function(symbolName){
 Symbol.bindElementAction(compId, symbolName, "${Stage}", "click", function(sym, e) {
        window.open("https://xandr.com");
 });
//Edge binding end
})("stage");
In order to support the click event using the APPNEXUS.click() function, you must replace the hard-coded URL, https://xandr.com to add the function APPNEXUS.getClickTag().
Once you have replaced the hard-coded URL, you will have a function that looks like this:
//Edge symbol: 'stage'
(function(symbolName){
 Symbol.bindElementAction(compId, symbolName, "${Stage}", "click", function(sym, e) {
        window.open(APPNEXUS.getClickTag());
 });
//Edge binding end
})("stage");
Step 4. Save changes
Save the changes.
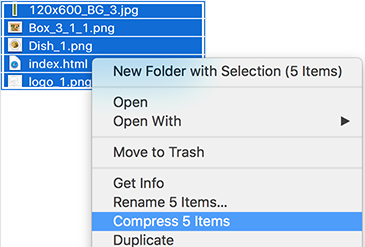
Step 5. Re-zip creative contents
Select all of the contents within the folder created when you unzipped the file. Compress the contents into a new .zip file.
You are now ready to upload your HTML5 creatives onto the Xandr platform.
IAB validator (optional)
If you would like to verify how this creative measures up to IAB guidelines, you can do so using the HTML5 Ad Validator tool.