Note
Access to this page requires authorization. You can try signing in or changing directories.
Access to this page requires authorization. You can try changing directories.
The following steps and code snippets illustrate how you can dynamically update the consent state based on user interactions using JavaScript functions and event listeners such as onclick triggers.
Note that these are not the only ways to achieve this, and your specific setup may require a different approach.
Example 1: Control Universal Pixel Fires with Google Tag Manager’s consent requirement
Important
This approach may prevent Universal pixel from measuring events in the absence of consent. Universal pixel can be loaded on pages with the applicable consent settings to avoid the use of personal data without consent.
See Example 3 for more details.
If you use a consent management platform (CMP) that supports Google’s Consent Mode feature, you may choose to fire Microsoft’s Universal pixel only when a user has granted consent for specific purposes.
Add consent signal to UP tag
Go to Tags > New.
Select Tag Configuration.
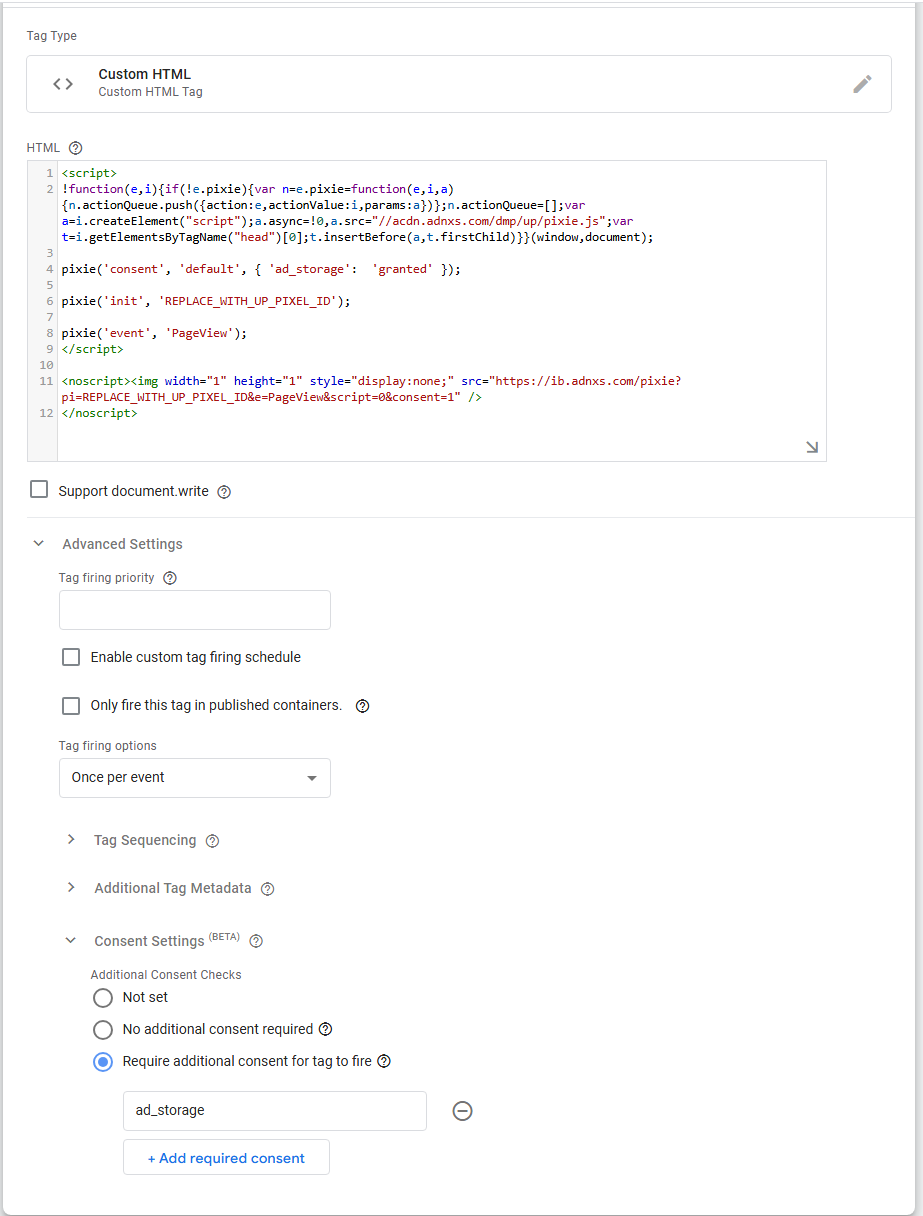
Select Custom HTML.
Copy and paste the following JavaScript code, replacing
REPLACE_WITH_UP_PIXEL_IDwith your Tag ID:<script> !function(e,i){if(!e.pixie){var n=e.pixie=function(e,i,a){n.actionQueue.push({action:e,actionValue:i,params:a})};n.actionQueue=[];var a=i.createElement("script");a.async=!0,a.src="//acdn.adnxs.com/dmp/up/pixie.js";var t=i.getElementsByTagName("head")[0];t.insertBefore(a,t.firstChild)}}(window,document); pixie('consent', 'default', { 'ad_storage': 'granted' }); pixie('init', 'REPLACE_WITH_UP_PIXEL_ID'); pixie('event', 'PageView'); </script> <noscript><img width="1" height="1" style="display:none;" src="https://ib.adnxs.com/pixie?pi=REPLACE_WITH_UP_PIXEL_ID&e=PageView&script=0&consent=1" /></noscript>Select Triggering and choose All pages.
Save the template.
Edit Universal Event Tracker consent settings
- Go to Tags in GTM and select the tag you created.
- Choose Tag Configuration and edit the existing tag.
- Expand Advanced Settings.
- Expand the Consent Settings section.
- Select Require additional consent for tag to fire.
- Select the necessary purposes, such as
ad_storage. - Save your changes.
Note
This setting ensures that Universal pixel only measures events when users grant consent for ad_storage via your CMP provider.
Test and Debug
- Preview Mode in GTM: Use GTM’s preview mode to test triggers and tags.
- Check the browser console: Open the browser console to verify that consent updates are being pushed correctly.
By following these steps, you can dynamically update consent settings based on user interactions, ensuring compliance and a user-friendly experience.
Example 2: Update Consent Modes using Triggers for button clicks
Create User Interaction Triggers in GTM
You need to create triggers in GTM that fire when users interact with your consent banner (e.g., click "Yes" or "No").
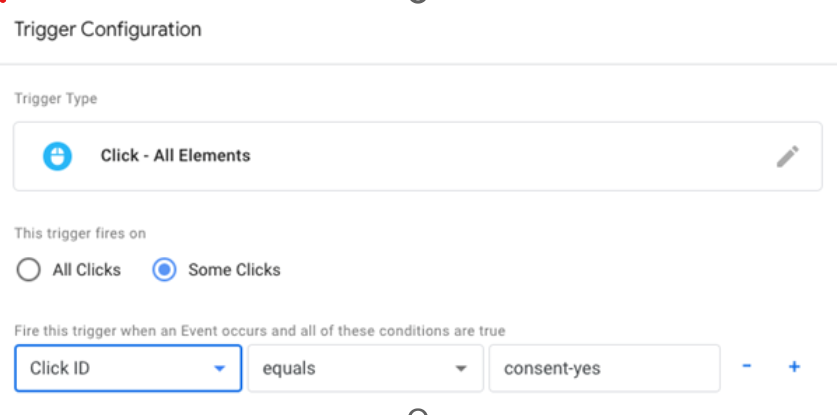
Click trigger for "Yes"
- Go to Triggers in GTM and create a new trigger.
- Select Click - All Elements.
- Choose Some Clicks.
- Select Choose Built-In Variable and select Click ID.
- Define the condition using the consent prompt button ID.
- Name the trigger (e.g.,
Consent Granted Click).
Click trigger for "No"
Repeat the steps above for the No button, naming it Consent Denied Click.
Example consent banner HTML
<div id="consent-banner">
  <p>We use cookies to improve your experience. Do you accept?</p>
  <button id="consent-yes">Yes</button>
  <button id="consent-no">No</button>
</div>
Example Consent-Granted Trigger
Create custom HTML tags for consent updates
Custom HTML tag for granted consent
Go to Tags > New.
Choose Custom HTML Tag.
Add the following script:
<script>
pixie ('consent', 'update', { 'ad_storage': 'granted' });
</script>
Set the Triggering to
Consent Granted Click.Save and publish the tag.
Custom HTML tag for denied consent
Repeat the steps above but use the following script:
<script>
pixie ('consent', 'update', { 'ad_storage': 'denied' });
</script>
Set the Triggering to
Consent Denied Click.Save and publish the tag.
Implement the consent banner
Ensure your consent banner HTML includes buttons with IDs or classes that can be used to identify elements for the GTM triggers.
Example 3: Update consent modes using custom events
Send custom events on user choices to GTM's data layer
If your page already listens to user privacy choices and controls JavaScript, you can use custom events sent to GTM’s data layer as custom event triggers in your GTM workspace.
Example consent banner HTML
<div id="consent-banner">
  <p>We use cookies to improve your experience. Do you accept?</p>
  <button id="consent-yes">Yes</button>
  <button id="consent-no">No</button>
</div>
If your consent banner matches the example above, you can send a custom GTM event to GTM’s data layer as follows:
Using jQuery:
$('#consent-yes').click(function() {
    dataLayer.push({'event': 'consent_granted'});
});
Using JavaScript:
document.getElementById('consent-yes').addEventListener('click', function() {
    dataLayer.push({'event': 'consent_granted'});
});
Create User Interaction Triggers in GTM
To track user interactions with your consent banner, create triggers in GTM that fire when users click Yes or No.
Create a click trigger for "Yes"
- In GTM, go to Triggers and create a new trigger.
- Select Custom Event.
- Enter a descriptive event name.
- Select Some Custom Events.
- Set Event as the variable type.
- Choose a condition operator and enter the data layer event name from your custom JavaScript function.
- Name the trigger (for example, Consent Granted Click).
Create a click trigger for "No"
Repeat the steps above for the No button (or its equivalent) and name the trigger (for example, Consent Denied Click).
Create Custom HTML Tags for consent updates
Create two Custom HTML tags in GTM to update the consent state based on user interaction.
Custom HTML tag for granted consent
In GTM, go to Tags and create a new tag.
Select Custom HTML Tag.
Add the following script:
<script>
pixie('consent', 'update', { 'ad_storage': 'granted' });
- Set the Triggering to the "Consent Granted Click" trigger you created earlier.
- Save and publish the tag.
Custom HTML Tag for Denied Consent
<script>
pixie ('consent', 'update', { 'ad_storage': 'denied' });
</script>
Follow the same steps as in Example 2 to create custom HTML tags for Consent Granted Click and Consent Denied Click.
By implementing these methods, you can ensure compliance with user consent preferences dynamically through GTM.