Note
Access to this page requires authorization. You can try signing in or changing directories.
Access to this page requires authorization. You can try changing directories.
A Network Profile is a collection of ad quality settings that is created by a network administrator. These rules are applied to every impression across all publishers associated with a network.
There is no need to create a Network Profile, they are created automatically for each member.
Restrictions set in a Network Profile will apply to all publishers, even if those publishers have their own custom profiles. In other words, publisher-level settings can only be more strict than the Network Profile, never less. For more information about publisher templates, see Create a Publisher Template.
Step 1. Update your network profile
Depending on your menu options, click Ad Quality from either the Network menu or the Inventory menu.
Click to expand the attribute section you want to update (Buyers, Brands, Categories, Technical Attributes, Languages, Frequency Caps). Within each section you'll see a list corresponding to that attribute. (For example, under the Buyers section you'll see a list of buyers.) You can scroll through the list, search for a particular attribute, or filter for a specific set of attributes.
Once you find the attribute you want to update, you can set eligibility on that attribute (see Step 2). You can also set the default for all attributes within a section.
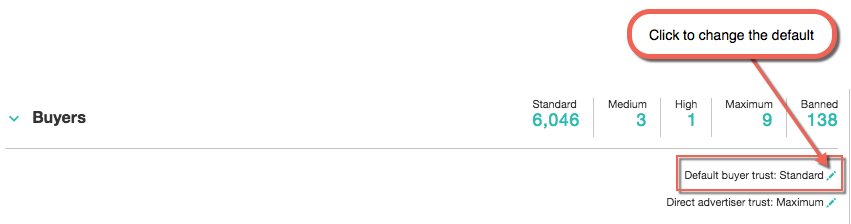
To set the default, click the default option in the upper right corner of the section. For example, to set the default for buyer trust, click the pencil icon next to Default buyer trust in the top right corner of the Buyers section:
Step 2. Determine which creatives are eligible to serve on your inventory
You can determine which creatives will be eligible to serve on your inventory based on one or more of the following attributes:
- Bidders
- Buyers
- Brands
- Categories
- Technical Attributes
- Languages
- Ad Servers
- Frequency Caps
Bidders
You can manage bidders and individual bidder seats that serve on your inventory by defining trust level settings here. Choose from the trust level given in the table below:
| Trust Level | Description |
|---|---|
| Banned | Ban all creatives from this buyer. |
| High | Bypass ad quality standards, require platform audit. |
| Maximum | Bypass ad quality standards, do not require platform audit. |
| Medium | Apply ad quality standards, trust buyer self-classification. |
| Standard | Apply ad quality standards, require platform audit. |
The bidders and their seats are mapped to the existing buyer IDs, and all trust settings are inherited by both. Updating trust settings to either one of the sections (Buyers or Bidders) will update trust settings for the same bidder or seat in both sections.
Note
Updating the trust level for Bidders will apply the same trust level to all Seats. However, Bidder trust can be overridden by updating Seat-level trust settings from Use Bidder to another trust level.
The default trust setting for Bidders is inherited from the Buyers section and any adjustments to the trust settings should be made in the Buyer’s section. To know more about Buyer Seat IDs, see: Understanding Buyer Seat IDs
Buyers
Click in the Buyers section to expand that section. The buyer trust levels and their descriptions are as follows:
| Trust Level | Description |
|---|---|
| Banned | Ban all creatives from this buyer. |
| High | Bypass ad quality standards, require platform audit. |
| Maximum | Bypass ad quality standards, do not require platform audit. |
| Medium | Apply ad quality standards, trust buyer self-classification. |
| Standard | Apply ad quality standards, require platform audit. |
You can also choose the Use Default option. To set the default, click the pencil icon next to Default buyer trust or Direct advertiser trust in the top right corner of the Buyers section.
Brands
There may be creatives associated with certain brands that you would prefer don't serve on your inventory. You can define those settings here. Choose from the following:
- Eligible: The creative will serve.
- Banned: The creative will not serve.
- Use Default: Reuse the default settings. (You can modify the default by clicking the pencil icon next to Default brand eligibility in the top right corner of the section.)
Note
If a brand is marked as Eligible, creatives associated with this brand will serve even if the brand's category is Banned. For example, if you mark the brand "1 and 1 Internet (17310)" as Eligible it will serve even if you ban its overall category, "Telecommunications (27)".
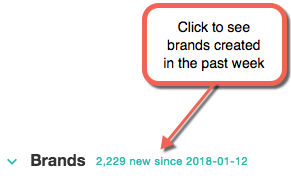
To find specific brands to modify you can do a search for brands matching a specific pattern (such as all brands containing "media" in the name) or you can bulk search, entering the names of each brand you want to modify. You can also filter on whether a brand is currently marked as eligible or banned. If you want to see only brands that were added after a certain date, click in the Created after date box and select a date. To see all brands created in the past seven days, click nnn new since yyyy-mm-dd next to the Brands section heading.
Categories
Depending upon the category the creative falls into, you may choose to mark it as one of the following:
- Eligible: The creative will serve.
- Banned: The creative will not serve.
- Default: Reuse the default settings. (You can modify the default by clicking the pencil icon next to Default category eligibility in the top right corner of the section.)
Warning
Sell-side content category targeting limitations
Content categories must be set at both the placement group and placement level in order for sell-side targeting of content categories to work consistently. This affects yield management and ad quality settings. This limitation applies only to content categories (both custom and universal), not to other inventory attributes.
Technical attributes
You may allow or disallow certain creatives based upon technical attributes such as whether the creative is an expandable, or whether it plays audio. Choose from:
- Eligible: The creative will serve.
- Banned: The creative will not serve.
- Default: Reuse the default settings. (You can modify the default by clicking the pencil icon next to Default technical attribute eligibility in the top right corner of the section.)
Languages
Your inventory may interest users who speak certain languages; you can choose to allow creatives using those languages here. You may also exclude creatives based on language. Choose from:
- Eligible: The creative will serve.
- Banned: The creative will not serve.
- Default: Reuse the default settings. (You can modify the default by clicking the pencil icon next to Default language eligibility in the top right corner of the section.)
Ad Servers
Note
This option is available only to some Publisher Adserver customers.
You can choose to serve only those creatives that are hosted on a specific set of ad server domains. All ad servers are eligible by default, but you can change the default by clicking the pencil icon next to Default ad server eligibility in the top right corner of the section.
Choose from the following settings:
- Eligible: The creative will serve.
- Banned: The creative will not serve.
- Default: Reuse the default settings. (You can modify the default by clicking the pencil icon next to Default language eligibility in the top right corner of the section.)
See Ad Server Settings for information on using the Ad Server screen to create collections of eligible or banned ad servers.
Step 3. Apply frequency caps to attributes
You can apply per-user frequency caps to particular creatives based on one or both of the following attributes:
- Sensitive Categories: The creative may belong to a sensitive category such as "Dating" or "Politics".
- Technical Attributes: The creative may have undesirable technical attributes, such as whether it plays audio.
By default frequency caps are turned off, in which case you'll see No limit per user in the upper right corner of the section. To change this, click No limit per user. (If frequency caps have already been set, this area will show the frequency, such as 2 imps per day, rather than No limit per user.) This will expand an area where you can set the frequency caps for the attributes and categories to which they're applied.
For more information on frequency caps, see Frequency and Recency Caps.