Note
Access to this page requires authorization. You can try signing in or changing directories.
Access to this page requires authorization. You can try changing directories.
This article describes how to deploy and configure Azure virtual machines (VMs), install the cluster framework, and install a high-availability (HA) SAP NetWeaver system with a simple mount structure. You can implement the presented architecture by using one of the Azure native Network File System (NFS) services selectable above.
This article describes a high-availability configuration for ASCS with a simple mount structure. To deploy the SAP application layer, you need shared directories like /sapmnt/SID, /usr/sap/SID, and /usr/sap/trans, which are highly available.
You still need a Pacemaker cluster to help protect single-point-of-failure components like SAP Central Services (SCS) and ASCS.
Compared to the classic Pacemaker cluster configuration, with the simple mount deployment, the cluster doesn't manage the file systems.
This article doesn't cover the database layer.
The example configurations and installation commands use the following instance numbers and server names.
| Instance name | Instance number |
|---|---|
| ASCS | 00 |
| Enqueue Replication Server (ERS) | 01 |
| Primary Application Server (PAS) | 02 |
| Additional Application Server (AAS) | 03 |
| SAP system identifier | NW1 |
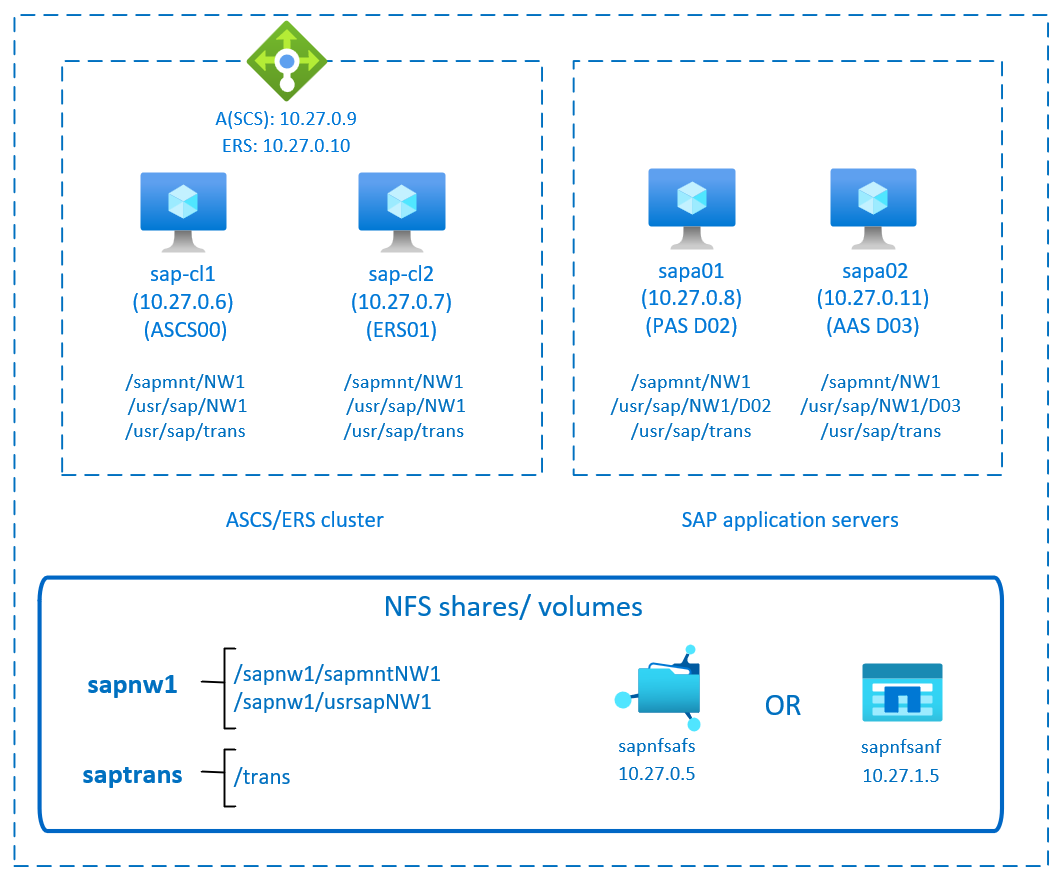
This diagram shows a typical SAP NetWeaver HA architecture with a simple mount. The `sapmnt` and `saptrans` file systems are deployed on Azure native NFS, NFS shares on Azure Files, or NFS volumes on Azure NetApp Files. A Pacemaker cluster protects the SAP central services. The clustered VMs are behind an Azure load balancer. The Pacemaker cluster doesn't manage the file systems, in contrast to the classic Pacemaker configuration.
Important
The cluster configuration with simple mount is supported on RHEL 9.x and later releases for SAP.
Prerequisites
The following guides contain all the required information to configure a NetWeaver HA system:
- Red Hat Documentation
- SAP Documentation for RHEL
- SAP documentation for SAP on Azure
- SAP Note 1928533, which has:
- A list of Azure Virtual Machine sizes that are supported for the deployment of SAP software
- Important capacity information for Azure Virtual Machine sizes
- Supported SAP software, operating systems (OSs), and combinations
- The required SAP kernel version for Windows and Linux on Microsoft Azure
- SAP Note 2015553, which lists prerequisites for SAP-supported SAP software deployments in Azure.
- SAP Note 2178632, which has detailed information about all monitoring metrics reported for SAP in Azure
- SAP Note 2191498, which has the required SAP Host Agent version for Linux in Azure
- SAP Note 2243692, which has information about SAP licensing on Linux in Azure
- SAP Note 1999351, which has more troubleshooting information for the Azure Enhanced Monitoring Extension for SAP
- SAP Note 1928533, which has:
- Azure Services documentation
- NetApp NFS documentation
- Microsoft SAP on Azure documentation
Prepare the infrastructure
The resource agent for SAP Instance is included in RHEL for SAP. An image for which is available in Azure Marketplace. You can use the image to deploy new VMs.
Deploy Linux VMs manually via Azure portal
This document assumes that you previously deployed a resource group, Azure Virtual Network, and subnet for your cluster.
Deploy VMs for SAP ASCS, ERS, and Application servers. Choose a suitable version of RHEL that is supported for your SAP system. You can deploy VMs in any one of the availability options - virtual machine scale set, availability zone, or availability set.
Configure Azure Load Balancer
During virtual machine (VM) configuration, you can create or select an existing internal load balancer (ILB) in the networking section. Follow the steps outlined to configure a standard load balancer for the high-availability setup of an SAP system. You need a combination of a front end IP, health probe, and load balancing rule for each service you're hosting in your cluster.
Use the following reference when configuring your ILB:
- Frontend IP Configuration: Create one IP for each service you're hosting in your cluster. It must be on the same virtual network & subnet as your VMs.
- Backend Pool: Create one backend pool for your cluster and add your VMs to it.
- Health Probes: Create one health probe for each service in your cluster, use the following options:
- Protocol: TCP
- Port: 625## (where ## is the service's instance number)
- Interval: 5
- Probe Threshold: 2
- Load Balancing Rules: Create one per service in your cluster.
- Protocol: TCP
- Frontend IP: Select the corresponding IP for your service
- Backend Pool: Select your backend pool
- High Availability Ports: Use this option
- Health Probe: Select the corresponding health probe for your service
- Session Persistence: None
- Idle Timeout (minutes): 30
- Enable TCP Reset: No
- Enable Floating IP: Yes
Follow the Create load balancer guide to set up a standard load balancer for a high availability SAP system using the Azure portal.
Note
The health probe configuration property ProbeThreshold can't be specified in the Portal. So to control the number of successful or failed consecutive probes, set the property "probeThreshold" to 2 by using either the Azure CLI or PowerShell commands.
Note
When VMs without public IP addresses are added to the back-end pool of an internal Standard Azure Load Balancer, they lack outbound internet connectivity. Further configuration is needed to enable routing to public endpoints. For details on how to achieve outbound connectivity, see Public endpoint connectivity for virtual machines using Azure Standard Load Balancer in SAP high-availability scenarios.
Important
Don't enable TCP time stamps on Azure VMs placed behind Azure Load Balancer. Enabling TCP timestamps causes the health probes to fail. Set the net.ipv4.tcp_timestamps parameter to 0. For details, see Load Balancer health probes.
Deploy NFS on Azure Files
NFS on Azure Files runs on top of Azure Files premium storage. Before you set up NFS on Azure Files, see How to create an NFS share.
There are two options for redundancy within an Azure region:
- Locally redundant storage (LRS) offers local, in-zone synchronous data replication.
- Zone-redundant storage (ZRS) replicates your data synchronously across three availability zones in the region.
Check if your selected Azure region offers Premium Azure Files with your required redundancy. Review the availability of Azure Files by Azure region for Premium Files Storage. If your scenario benefits from ZRS, verify that premium file shares with ZRS are supported in your Azure region.
We recommend that you access your Azure storage account through an Azure private endpoint. Be sure to deploy the Azure Files storage account endpoint, and the VMs where you need to mount the NFS shares, in the same Azure virtual network or in a peered Azure virtual network.
- Deploy an Azure Files storage account named sapnfsafs. This example uses ZRS. If you're not familiar with the process, see Create a storage account for the Azure portal.
- On the Basics tab, use these settings:
- For Storage account name, enter sapnfsafs.
- For Performance, select Premium.
- For Premium account type, select FileStorage.
- For Replication, select Zone redundancy (ZRS).
- Select Next.
- On the Advanced tab, clear Require secure transfer for REST API. If you don't clear this option, you can't mount the NFS share to your VM (the mount operation times out).
- Select Next.
- In the Networking section, configure these settings:
- Under Networking connectivity, for Connectivity method, select Private endpoint.
- Under Private endpoint, select Add private endpoint.
- On the Create private endpoint pane, select your subscription, resource group, and location. Then make the following selections:
- For Name, enter sapnfsafs_pe.
- For Storage sub-resource, select file.
- Under Networking, for Virtual network, select the virtual network and subnet to use. Again, you can use either the virtual network where your SAP VMs are or a peered virtual network.
- Under Private DNS integration, accept the default option of Yes for Integrate with private DNS zone. Be sure to select your private DNS zone.
- Select OK.
- On the Networking tab again, select Next.
- On the Data protection tab, keep all the default settings.
- Select Review + create to validate your configuration.
- Wait for the validation to finish. Fix any issues before continuing.
- On the Review + create tab, select Create.
Next, deploy the NFS shares in the storage account that you created. In this example, there are two NFS shares, sapnw1 and saptrans.
- Sign in to the Azure portal.
- Select or search for Storage accounts.
- On the Storage accounts page, select sapnfsafs.
- On the resource menu for sapnfsafs, select File shares under Data storage.
- On the File shares page, select File share, and then:
- For Name, enter
**sapnw1**,**saptrans**. - Select an appropriate share size. Consider the size of the data stored on the share, I/O per second (IOPS), and throughput requirements. For more information, see Azure file share targets.
- Select NFS as the protocol.
- Select No root Squash. Otherwise, when you mount the shares on your VMs, you can't see the file owner or group.
- For Name, enter
Note
Azure Files NFS supports Encryption in Transit (EiT). If you would like to use EiT, read Azure Files NFS Encryption in Transit for SAP on Azure Systems to learn how to configure and deploy.
Important considerations for NFS on Azure Files shares
When you plan your deployment with NFS on Azure Files, consider the following important points:
- The minimum share size is 100 GiB. You pay for only the capacity of the provisioned shares.
- Size your NFS shares not only based on capacity requirements, but also on IOPS and throughput requirements. For details, see Azure file share targets.
- Test the workload to validate your sizing and ensure that it meets your performance targets. To learn how to troubleshoot performance issues with NFS on Azure Files, consult Troubleshoot Azure file share performance.
- For SAP J2EE systems, placing
/usr/sap/<SID>/J<nr>on NFS on Azure Files isn't supported. - If your SAP system has a heavy load of batch jobs, you might have millions of job logs. If the SAP batch job logs are stored in the file system, pay special attention to the sizing of the
sapmntshare. As of SAP_BASIS 7.52, the default behavior for the batch job logs is to be stored in the database. For details, see Job sign in the database. - Deploy a separate
sapmntshare for each SAP system. - Don't use the
sapmntshare for any other activity, such as interfaces. - Don't use the
saptransshare for any other activity, such as interfaces. - Avoid consolidating the shares for too many SAP systems in a single storage account. There are also scalability and performance targets for storage accounts. Be careful to not exceed the limits for the storage account, too.
- In general, don't consolidate the shares for more than five SAP systems in a single storage account. This guideline helps you avoid exceeding the storage account limits and simplifies performance analysis.
- In general, avoid mixing shares like
sapmntfor nonproduction and production SAP systems in the same storage account. - Ensure your Linux Kernel is above v5.12.5 to avoid the bug mentioned in NFS client improvements.
- Use a private endpoint. In the unlikely event of a zonal failure, your NFS sessions automatically redirect to a healthy zone. You don't have to remount the NFS shares on your VMs.
- If you're deploying your VMs across availability zones, use a storage account with ZRS in the Azure regions that supports ZRS.
- Azure Files doesn't currently support automatic cross-region replication for disaster recovery scenarios.
The SAP file systems that don't need to be mounted via NFS can also be deployed on Azure disk storage. In this example, you can deploy /usr/sap/NW1/D02 and /usr/sap/NW1/D03 on Azure disk storage.
Deploy Azure NetApp Files
Azure NetApp Files is a native, first-party, high-performance file storage service that provides volumes as a service. Here we're using it to host our NFS SAP shares.
Check that the Azure NetApp Files service is available in your Azure region of choice.
Create the NetApp account in the selected Azure region.
Create a capacity pool for Azure NetApp Files.
The SAP NetWeaver architecture presented in this article uses a single Azure NetApp Files capacity pool, Premium SKU. We recommend Azure NetApp Files Premium SKU for SAP NetWeaver application workloads on Azure.
Create an NFS volume for Azure NetApp Files. Deploy the volumes in the designated Azure NetApp Files subnet. The IP addresses of the Azure NetApp volumes are assigned automatically.
Keep in mind that the Azure NetApp Files resources and the Azure VMs must be in the same Azure virtual network or in peered Azure virtual networks. This example uses two Azure NetApp Files volumes:
sapnw1andtrans. The file paths that are mounted to the corresponding mount points are:- Volume
sapnw1(nfs://10.27.1.5/sapnw1/sapmntNW1) - Volume
sapnw1(nfs://10.27.1.5/sapnw1/usrsapNW1) - Volume
trans(nfs://10.27.1.5/trans)
- Volume
Important considerations for NFS on Azure NetApp Files
When you're considering Azure NetApp Files for the SAP NetWeaver high-availability architecture, be aware of the following important considerations:
- The minimum capacity pool is 4 tebibytes (TiB). You can increase the size of the capacity pool in 1-TiB increments.
- The minimum volume is 100 GiB.
- Azure NetApp Files, and all virtual machines where Azure NetApp Files volumes are mounted, must be in the same Azure virtual network. If they're not in the same virtual network, they must be in peered virtual networks in the same region. Azure NetApp Files access over virtual network peering in the same region is supported. Azure NetApp Files access over global peering isn't yet supported.
- The selected virtual network must have a delegated subnet to Azure NetApp Files.
- The throughput and performance characteristics of an Azure NetApp Files volume is a function of the volume quota and service level, as documented in Service level for Azure NetApp Files. When you're sizing the Azure NetApp Files volumes for SAP, make sure that the resulting throughput meets the application's requirements.
- Azure NetApp Files offers an export policy. You can control the allowed clients and the access type (for example, read/write or read-only).
- Azure NetApp Files isn't zone aware yet. Currently, Azure NetApp Files isn't deployed in all availability zones in an Azure region. Be aware of the potential latency implications in some Azure regions.
- Azure NetApp Files volumes can be deployed as NFSv3 or NFSv4.1 volumes. Both protocols are supported for the SAP application layer (ASCS/ERS, SAP application servers).
The SAP file systems that don't need to be mounted via NFS can also be deployed on Azure disk storage. In this example, you can deploy /usr/sap/NW1/D02 and /usr/sap/NW1/D03 on Azure disk storage.
Prepare Pacemaker cluster nodes for SAP installation
The next step is to prepare the nodes for installation. Begin by following the steps in Set up Pacemaker on Red Hat Enterprise Linux in Azure, then continue.
Note
The following items are prefixed with:
- [A]: Applicable to all nodes.
- [1]: Applicable to only node 1.
- [2]: Applicable to only node 2.
[A] Install the latest version of the SAP Cluster Connector and the SAP Resource Agents.
sudo dnf install -y sap-cluster-connector resource-agents-sapImportant
You need to have
resource-agents-sap-4.15.1or a later version for Simple Mount. Older versions don't provide the mandatorySAPStartSrvresource agent.
[A] Configure host name resolution. You can either use a DNS server or modify
/etc/hostson all nodes. This example shows how to use the/etc/hostsfile.Update the entries to match your IPs and Hostnames.
sudo vi /etc/hosts
[...]
# IP address of cluster node 1
10.27.0.6    sap-cl1
# IP address of cluster node 2
10.27.0.7    sap-cl2
# IP address of the load balancer's front-end configuration for SAP NetWeaver ASCS
10.27.0.9    sapascs
# IP address of the load balancer's front-end configuration for SAP NetWeaver ERS
10.27.0.10   sapers
# Add Any Additional Hostnames/IPs as needed for the Database and/or Additional Application Servers
10.27.0.8    sapa01
10.27.0.11   sapa02
10.27.0.3    sapdb1
10.27.0.4    sapdb2
10.27.0.5    sapdb
[A] Configure TCP KeepAlive Settings
To ensure communication channels between nodes aren't dropped, configure the following keepalive settings on both nodes. More information can be found in SAP Note 1410736
# Check Current Settings:
sudo sysctl -a --pattern net.ipv4.tcp_keepalive

net.ipv4.tcp_keepalive_intvl = 75
net.ipv4.tcp_keepalive_probes = 9
net.ipv4.tcp_keepalive_time = 7200

# Set the values:
sudo vi /etc/sysctl.d/sap.conf

net.ipv4.tcp_keepalive_intvl=75
net.ipv4.tcp_keepalive_probes=9
net.ipv4.tcp_keepalive_time=300

# Apply the changes.
sudo sysctl --system
[1] Configure Pacemaker Resource Defaults
# Check Values
sudo pcs resource defaults
Meta Attrs: build-resource-defaults
  migration-threshold=3
  resource-stickiness=1

# Set Values if Required
sudo pcs resource defaults update resource-stickiness=1 migration-threshold=3
[A] Configure the SWAP file. Follow Create a SWAP partition for an Azure Linux VM to configure a SWAP space for each VM.
[A] Add firewall rules
Note
RHEL comes with a local firewall enabled by default. These commands are provided as an example. Reference SAP Port Numbers for your specific system ports.
# ASCS Probe Port
sudo firewall-cmd --add-port=62500/tcp --permanent
# ASCS SAP Ports
sudo firewall-cmd --add-port={3200,3600,3900,8100,50013,50014,50016}/tcp --permanent

# ERS Probe Port
sudo firewall-cmd --add-port=62501/tcp --permanent
# ERS SAP Ports
sudo firewall-cmd --add-port={3201,3301,50113,50114,50116}/tcp --permanent

# Apply Changes
sudo firewall-cmd --reload
Prepare and mount SAP shares
[1] Create the SAP Sub Directories on the NFS Share
# Temporarily mount the volume.
sudo mkdir -p /saptmp
sudo mount -t nfs sapnfsafs.file.core.windows.net:/sapnfsafs/sapnw1 /saptmp -o noresvport,nfsvers=4.1,sec=sys

# Create the SAP sub directories.
cd /saptmp
sudo mkdir -p sapmntNW1
sudo mkdir -p usrsapNW1

# Unmount the volume and delete the temporary directory.
cd ..
sudo umount /saptmp
sudo rmdir /saptmp
[A] Create the mount point directories
sudo mkdir -p /sapmnt/NW1
sudo mkdir -p /usr/sap/NW1
sudo mkdir -p /usr/sap/trans

sudo chattr +i /sapmnt/NW1
sudo chattr +i /usr/sap/NW1
sudo chattr +i /usr/sap/trans
[A] Mount the NFS Shares
sudo vi /etc/fstab
[...]
sapnfsafs.file.core.windows.net:/sapnfsafs/sapnw1/sapmntNW1 /sapmnt/NW1 nfs noresvport,nfsvers=4.1,sec=sys,hard  0  0
sapnfsafs.file.core.windows.net:/sapnfsafs/sapnw1/usrsapNW1 /usr/sap/NW1 nfs noresvport,nfsvers=4.1,sec=sys,hard  0  0
sapnfsafs.file.core.windows.net:/saptrans /usr/sap/trans nfs noresvport,nfsvers=4.1,sec=sys,hard  0  0

# Mount the file systems.
sudo mount -a
Note
For Encryption-in-Transit (EiT) enabled File systems, use
aznfsas filesystem type in the mount command syntax. Read Azure Files NFS Encryption in Transit for SAP on Azure Systems, to learn how to enable EiT and mounting the file systems.
[A] Disable ID Mapping
Edit the NFS domain setting. Make sure that the domain is configured as the default Azure NetApp Files domain,
defaultv4iddomain.com. Also verify that the mapping is set tonobody.sudo vi /etc/idmapd.conf [General] Verbosity = 0 Pipefs-Directory = /var/lib/nfs/rpc_pipefs Domain = defaultv4iddomain.com [...] [Mapping] Nobody-User = nobody Nobody-Group = nobody [...]Verify
nfs4_disable_idmapping. It should be set toY.To create the directory structure where
nfs4_disable_idmappingis located, run themountcommand. You're unable to manually create the directory under/sys/modulesbecause access is reserved for the kernel and drivers.# Check nfs4_disable_idmapping. cat /sys/module/nfs/parameters/nfs4_disable_idmapping # If you need to set nfs4_disable_idmapping to Y: sudo mkdir /mnt/tmp sudo mount 10.27.1.5:/sapnw1 /mnt/tmp sudo umount /mnt/tmp echo "Y" | sudo tee /sys/module/nfs/parameters/nfs4_disable_idmapping # Make the configuration permanent. echo "options nfs nfs4_disable_idmapping=Y" | sudo tee -a /etc/modprobe.d/nfs.conf
[1] Temporarily mount the Azure NetApp Files volume on one of the VMs and create the SAP directories (file paths).
# Temporarily mount the volume.
sudo mkdir -p /saptmp
sudo mount -t nfs -o rw,hard,rsize=65536,wsize=65536,nfsvers=4.1,sec=sys,tcp 10.27.1.5:/sapnw1 /saptmp

# Create the SAP directories.
cd /saptmp
sudo mkdir -p sapmntNW1
sudo mkdir -p usrsapNW1

# Unmount the volume and delete the temporary directory.
cd ..
sudo umount /saptmp
sudo rmdir /saptmp
[A] Create the shared directories.
sudo mkdir -p /sapmnt/NW1
sudo mkdir -p /usr/sap/NW1
sudo mkdir -p /usr/sap/trans

sudo chattr +i /sapmnt/NW1
sudo chattr +i /usr/sap/NW1
sudo chattr +i /usr/sap/trans
[A] Mount the file systems.
sudo vi /etc/fstab
[...]
10.27.1.5:/sapnw1/sapmntNW1 /sapmnt/NW1 nfs nfsvers=4.1,sec=sys,hard 0 0
10.27.1.5:/sapnw1/usrsapNW1 /usr/sap/NW1 nfs nfsvers=4.1,sec=sys,hard 0 0
10.27.1.5:/saptrans /usr/sap/trans nfs nfsvers=4.1,sec=sys,hard 0 0

# Mount the file systems.
sudo mount -a
Install SAP NetWeaver ASCS and ERS
[1] Create a virtual IP resource and health probe for the ASCS instance.
Important
We recommend using the
azure-lbresource agent, which is part of the resource-agents-cloud package.sudo pcs node standby sap-cl2 sudo pcs resource create vip_NW1_ASCS IPaddr2 ip=10.27.0.9 sudo pcs resource create nc_NW1_ASCS azure-lb port=62500 sudo pcs resource group add g-NW1_ASCS vip_NW1_ASCS nc_NW1_ASCS # Verify Cluster Status is OK and all resources are started. # As long as the resources in g-NW1_ASCS are on sap-cl1 then you're good. sudo pcs status Cluster name: sap-cl Cluster Summary: * Stack: corosync (Pacemaker is running) * Current DC: sap-cl1 (version 3.0.0-5.1.el10_0-8818a21) - partition with quorum * Last updated: Tue May 19 22:15:08 2026 on sap-cl1 * Last change: Tue Apr 21 23:11:34 2026 by root via root on sap-cl1 * 2 nodes configured * 3 resource instances configured Node List: * Node sap-cl2: standby * Online: [ sap-cl1 ] Full List of Resources: * sbd (stonith:fence_sbd): Started sap-cl1 * Resource Group: g-NW1_ASCS: * vip_NW1_ASCS (ocf:heartbeat:IPaddr2): Started sap-cl1 * nc_NW1_ASCS (ocf:heartbeat:azure-lb): Started sap-cl1 Daemon Status: corosync: active/disabled pacemaker: active/disabled pcsd: active/enabled sbd: active/enabled[1] Install SAP NetWeaver ASCS as root on the first node.
Use a virtual host name that maps to the IP address of the load balancer's front-end configuration for ASCS (for example,
sapascs,10.27.0.9) and the instance number that you used for the probe of the load balancer (for example,00).You can use the
sapinstparameterSAPINST_REMOTE_ACCESS_USERto allow a nonroot user to connect tosapinst. You can use theSAPINST_USE_HOSTNAMEparameter to install SAP by using a virtual host name.<swpm>/sapinst SAPINST_REMOTE_ACCESS_USER=sapadmin SAPINST_USE_HOSTNAME=<virtual_hostname>[1] Create a virtual IP resource and health probe for the ERS instance.
sudo pcs node unstandby sap-cl2
sudo pcs node standby sap-cl1

sudo pcs resource create vip_NW1_ERS IPaddr2 ip=10.27.0.10
sudo pcs resource create nc_NW1_ERS azure-lb port=62501
sudo pcs resource group add g-NW1_ERS vip_NW1_ERS nc_NW1_ERS

# Verify Cluster Status is OK and all resources are started.
# As long as the resources in g-NW1_ERS are on sap-cl2 then you're good.
sudo pcs status

Cluster name: sap-cl
Cluster Summary:
  * Stack: corosync (Pacemaker is running)
  * Current DC: sap-cl2 (version 3.0.0-5.1.el10_0-8818a21) - partition with quorum
  * Last updated: Tue May 19 22:15:08 2026 on sap-cl2
  * Last change:  Tue Apr 21 23:11:34 2026 by root via root on sap-cl2
  * 2 nodes configured
  * 5 resource instances configured

Node List:
  * Node sap-cl1: standby
  * Online: [ sap-cl2 ]

Full List of Resources:
  * sbd (stonith:fence_sbd):     Started sap-cl2
  * Resource Group: g-NW1_ASCS:
    * vip_NW1_ASCS      (ocf:heartbeat:IPaddr2):         Started sap-cl2
    * nc_NW1_ASCS       (ocf:heartbeat:azure-lb):        Started sap-cl2
  * Resource Group: g-NW1_ERS:
    * vip_NW1_ERS       (ocf:heartbeat:IPaddr2):         Started sap-cl2
    * nc_NW1_ERS        (ocf:heartbeat:azure-lb):        Started sap-cl2

Daemon Status:
  corosync: active/disabled
  pacemaker: active/disabled
  pcsd: active/enabled
  sbd: active/enabled
[2] Install SAP NetWeaver ERS as root on the second node.
Use a virtual host name that maps to the IP address of the load balancer's front-end configuration for ERS (for example,
sapers,10.27.0.10) and the instance number that you used for the probe of the load balancer (for example,01).You can use the
SAPINST_REMOTE_ACCESS_USERparameter to allow a nonroot user to connect tosapinst. You can use theSAPINST_USE_HOSTNAMEparameter to install SAP by using a virtual host name.<swpm>/sapinst SAPINST_REMOTE_ACCESS_USER=sapadmin SAPINST_USE_HOSTNAME=<virtual_hostname>Note
Use SWPM SP 20 PL 05 or later. Earlier versions don't set the permissions correctly, and they cause the installation to fail.
Configure SAP to run in the cluster
[1] Adapt the instance profiles for running in a cluster.
The ASCS and ERS profiles might contain
Restart_Programconfigurations for certain instance services by default. Change these entries toStart_Programto prevent SAP from automatically restarting the enqueue replication process, because the cluster manages it.- ASCS Profile (Enqueue Server)
sudo vi /sapmnt/NW1/profile/NW1_ASCS00_nw1ascs [...] #----------------------------------------------------------------------- # Start SAP enqueue server #----------------------------------------------------------------------- _ENQ = enq.sap$(SAPSYSTEMNAME)_$(INSTANCE_NAME) Execute_04 = local rm -f $(_ENQ) Execute_05 = local ln -s -f $(DIR_EXECUTABLE)/enq_server$(FT_EXE) $(_ENQ) Start_Program_01 = local $(_ENQ) pf=$(_PF) [...] - ERS Profile (Enqueue Replicator)
sudo vi /sapmnt/NW1/profile/NW1_ERS01_nw1ers
[...]
#-----------------------------------------------------------------------
# Start enqueue replicator
#-----------------------------------------------------------------------
_ENQR = enqr.sap$(SAPSYSTEMNAME)_$(INSTANCE_NAME)
Execute_02 = local rm -f $(_ENQR)
Execute_03 = local ln -s -f $(DIR_EXECUTABLE)/enq_replicator$(FT_EXE) $(_ENQR)
Start_Program_00 = local $(_ENQR) pf=$(_PF)
[...]
- ASCS Profile (Enqueue Server)
Add cluster libraries to the profiles of all instances managed by the cluster
Note
In this example, you add only the ASCS and ERS instances to the cluster. However, if you include a Primary Application Server (PAS) in your cluster, add this section to that profile as well.
sudo vi /sapmnt/NW1/profile/NW1_<instanceProfile>_nw1<instance>
[...]
#-----------------------------------------------------------------------
# SAP Cluster Config
#-----------------------------------------------------------------------
service/halib = $(DIR_EXECUTABLE)/saphascriptco.so
service/halib_cluster_connector = /usr/bin/sap_cluster_connector
[...]
Remove
Autostartfrom any instances in the cluster, as the cluster manages them.ENSA1 only: Add the Keepalive parameter to the ERS profile.
sudo vi /sapmnt/NW1/profile/NW1_ERS01_nw1ers
[...]
enque/encni/set_so_keepalive = TRUE
[...]
[A] Add the
sidadmaccount to thehaclientgroup to allow it to run cluster commands.sudo usermod -a -G haclient nw1adm[A] Register ASCS and ERS services on both nodes. This step adds or updates the entries in the
/usr/sap/sapservicesfile so that both services are listed.sudo LD_LIBRARY_PATH=/usr/sap/NW1/ASCS00/exe /usr/sap/NW1/ASCS00/exe/sapstartsrv pf=/usr/sap/NW1/SYS/profile/NW1_ASCS00_nw1ascs -reg sudo LD_LIBRARY_PATH=/usr/sap/NW1/ERS01/exe /usr/sap/NW1/ERS01/exe/sapstartsrv pf=/usr/sap/NW1/SYS/profile/NW1_ERS01_nw1ers -reg[A] Ensure all SAP services are stopped and disabled on both nodes. The cluster manages them.
# Run as sidadm
sudo su - nw1adm
sapcontrol -nr 00 -function Stop
sapcontrol -nr 00 -function StopService

sapcontrol -nr 01 -function Stop
sapcontrol -nr 01 -function StopService
#Log off of sidadm
exit

sudo systemctl disable SAPNW1_00
sudo systemctl disable SAPNW1_01
[A] Prevent SAP services from restarting outside of the cluster.
sudo mkdir /etc/systemd/system/SAPNW1_00.service.d
sudo vi /etc/systemd/system/SAPNW1_00.service.d/HA.conf
[Service]
Restart=no

sudo mkdir /etc/systemd/system/SAPNW1_01.service.d
sudo vi /etc/systemd/system/SAPNW1_01.service.d/HA.conf
[Service]
Restart=no

sudo systemctl daemon-reload
[A] Enable
sappingandsappongservices. Thesappingagent runs beforesapinitto hide the/usr/sap/sapservicesfile. Thesappongagent runs aftersapinitto unhide thesapservicesfile during VM boot.SAPStartSrvisn't started automatically for an SAP instance at boot time, because the Pacemaker cluster manages it.sudo systemctl enable sapping sudo systemctl enable sappong[1] Create SAP services in the cluster.
- Put the cluster into maintenance mode.
sudo pcs property set maintenance-mode=true - Create the ASCS and ERS services.
# ASCS Resources
sudo pcs resource create rsc_SAPStartSrv_NW1_ASCS00 ocf:heartbeat:SAPStartSrv InstanceName="NW1_ASCS00_nw1ascs" --group g-NW1_ASCS op monitor interval=0 timeout=20 enabled=0
sudo pcs resource create rsc_SAPInstance_NW1_ASCS00 ocf:heartbeat:SAPInstance InstanceName="NW1_ASCS00_nw1ascs" MINIMAL_PROBE=true meta resource-stickiness=5000 priority=100 --group g-NW1_ASCS op monitor interval=20 on-fail=restart timeout=60

# ERS Resources
sudo pcs resource create rsc_SAPStartSrv_NW1_ERS01 ocf:heartbeat:SAPStartSrv InstanceName="NW1_ERS01_nw1ers" --group g-NW1_ERS op monitor interval=0 timeout=20 enabled=0
sudo pcs resource create rsc_SAPInstance_NW1_ERS01 ocf:heartbeat:SAPInstance InstanceName="NW1_ERS01_nw1ers" MINIMAL_PROBE=true IS_ERS=true --group g-NW1_ERS op monitor interval=20 on-fail=restart timeout=60 op start interval=0 timeout=600 op stop interval=0 timeout=600
# ASCS Resources sudo pcs resource create rsc_SAPStartSrv_NW1_ASCS00 ocf:heartbeat:SAPStartSrv InstanceName="NW1_ASCS00_nw1ascs" --group g-NW1_ASCS op monitor interval=0 timeout=20 enabled=0 # NFSv4.1 sudo pcs resource create rsc_SAPInstance_NW1_ASCS00 ocf:heartbeat:SAPInstance InstanceName="NW1_ASCS00_nw1ascs" MINIMAL_PROBE=true meta resource-stickiness=5000 priority=100 --group g-NW1_ASCS op monitor interval=20 on-fail=restart timeout=120 # NFSv3 sudo pcs resource create rsc_SAPInstance_NW1_ASCS00 ocf:heartbeat:SAPInstance InstanceName="NW1_ASCS00_nw1ascs" MINIMAL_PROBE=true meta resource-stickiness=5000 priority=100 --group g-NW1_ASCS op monitor interval=20 on-fail=restart timeout=60 # ERS Resources sudo pcs resource create rsc_SAPStartSrv_NW1_ERS01 ocf:heartbeat:SAPStartSrv InstanceName="NW1_ERS01_nw1ers" --group g-NW1_ERS op monitor interval=0 timeout=20 enabled=0 # NFSv4.1 sudo pcs resource create rsc_SAPInstance_NW1_ERS01 ocf:heartbeat:SAPInstance InstanceName="NW1_ERS01_nw1ers" MINIMAL_PROBE=true IS_ERS=true --group g-NW1_ERS op monitor interval=20 on-fail=restart timeout=120 op start interval=0 timeout=600 op stop interval=0 timeout=600 # NFSv3 sudo pcs resource create rsc_SAPInstance_NW1_ERS01 ocf:heartbeat:SAPInstance InstanceName="NW1_ERS01_nw1ers" MINIMAL_PROBE=true IS_ERS=true --group g-NW1_ERS op monitor interval=20 on-fail=restart timeout=60 op start interval=0 timeout=600 op stop interval=0 timeout=600 - Configure properties and constraints for the cluster.
sudo pcs property set priority-fencing-delay=15 sudo pcs resource meta g-NW1_ASCS resource-stickiness=3000 sudo pcs constraint colocation add g-NW1_ERS with g-NW1_ASCS -5000 id=col_sap_NW1_no_both sudo pcs constraint order start g-NW1_ASCS then stop g-NW1_ERS symmetrical=false kind=Optional id=ord_sap_NW1_first_start_ascs - ENSA1 only: Configure additional constraint.
- Enable the nodes and take the cluster out of maintenance mode.
sudo pcs node unstandby sap-cl1
sudo pcs property set maintenance-mode=false
- Put the cluster into maintenance mode.
Verify cluster setup. Your cluster should have a similar status.
sudo pcs status

Cluster name: sap-cl
Cluster Summary:
  * Stack: corosync (Pacemaker is running)
  * Current DC: sap-cl1 (version 2.1.9-1.2.el9_6-49aab9983) - partition with quorum
  * Last updated: Tue Jun  2 23:46:27 2026 on sap-cl1
  * Last change:  Tue May 26 18:30:18 2026 by root via root on sap-cl1
  * 2 nodes configured
  * 9 resource instances configured

Node List:
  * Online: [ sap-cl1 sap-cl2 ]

Full List of Resources:
  * sbd (stonith:fence_sbd):     Started sap-cl1
  * Resource Group: g-NW1_ASCS:
    * vip_NW1_ASCS      (ocf:heartbeat:IPaddr2):         Started sap-cl1
    * nc_NW1_ASCS       (ocf:heartbeat:azure-lb):        Started sap-cl1
    * rsc_SAPStartSrv_NW1_ASCS00        (ocf:heartbeat:SAPStartSrv):     Started sap-cl1
    * rsc_SAPInstance_NW1_ASCS00        (ocf:heartbeat:SAPInstance):     Started sap-cl1
  * Resource Group: g-NW1_ERS:
    * vip_NW1_ERS       (ocf:heartbeat:IPaddr2):         Started sap-cl2
    * nc_NW1_ERS        (ocf:heartbeat:azure-lb):        Started sap-cl2
    * rsc_SAPStartSrv_NW1_ERS01 (ocf:heartbeat:SAPStartSrv):     Started sap-cl2
    * rsc_SAPInstance_NW1_ERS01 (ocf:heartbeat:SAPInstance):     Started sap-cl2

Daemon Status:
  corosync: active/disabled
  pacemaker: active/disabled
  pcsd: active/enabled
  sbd: active/enabled
Note
You can extend a SAP ASCS/ERS cluster from a 2-node to a 3-node cluster with a third node as a spare for failover of ASCS or ERS services.
- A 3-node cluster setup can only be used with Enqueue Replication Server 2 (ENSA2).
- Don't use the cluster property
priority-fencing-delayin a 3-node cluster.
Install SAP Database and Application Server
Some databases require you to execute the database installation on an application server. Prepare an application server, then trigger the Database installation, and finally install the Application Server.
The following common steps assume that you install the application server on a server that's different from the ASCS and HANA servers:
Configure host name resolution.
You can either use a DNS server or modify
/etc/hostson all nodes. This example shows how to use the/etc/hostsfile.Update the entries to match your IPs and Hostnames.
sudo vi /etc/hosts
[...]
# IP address of cluster node 1
10.27.0.6    sap-cl1
# IP address of cluster node 2
10.27.0.7    sap-cl2
# IP address of the load balancer's front-end configuration for SAP NetWeaver ASCS
10.27.0.9    sapascs
# IP address of the load balancer's front-end configuration for SAP NetWeaver ERS
10.27.0.10   sapers
# Add Any Additional Hostnames/IPs as needed for the Database and/or Additional Application Servers
10.27.0.8    sapa01
10.27.0.11   sapa02
10.27.0.3    sapdb1
10.27.0.4    sapdb2
10.27.0.5    sapdb
Configure the SWAP file. Follow Create a SWAP partition for an Azure Linux VM to configure a SWAP space for each VM.
Configure SAP Directories
- Create the Mount Points
sudo mkdir -p /sapmnt/NW1 sudo mkdir -p /usr/sap/trans sudo chattr +i /sapmnt/NW1 sudo chattr +i /usr/sap/trans - Mount the File Systems
echo "sapnfsafs.file.core.windows.net:/sapnfsafs/sapnw1/sapmntNW1 /sapmnt/NW1  nfs noresvport,vers=4,minorversion=1,sec=sys  0  0" >> /etc/fstab
echo "sapnfsafs.file.core.windows.net:/sapnfsafs/saptrans /usr/sap/trans  nfs noresvport,vers=4,minorversion=1,sec=sys  0  0" >> /etc/fstab

# Mount the file systems.
mount -a
# If you're using NFSv3: echo "10.27.1.5:/sapnw1/sapmntNW1 /sapmnt/NW1 nfs nfsvers=3,hard 0 0" >> /etc/fstab echo "10.27.1.5:/saptrans /usr/sap/trans nfs nfsvers=3, hard 0 0" >> /etc/fstab # If you're using NFSv4.1: echo "10.27.1.5:/sapnw1/sapmntNW1 /sapmnt/NW1 nfs nfsvers=4.1,sec=sys,hard 0 0" >> /etc/fstab echo "10.27.1.5:/saptrans /usr/sap/trans nfs nfsvers=4.1,sec=sys,hard 0 0" >> /etc/fstab # Mount the file systems. mount -a
- Create the Mount Points
Install Database from Application Server
In this example, SAP NetWeaver is installed on SAP HANA. You can use any supported database for this installation. For more information on how to install SAP HANA in Azure, see High availability of SAP HANA on Azure virtual machines. For a list of supported databases, see SAP Note 1928533.
Install the SAP NetWeaver database instance as root by using a virtual host name that maps to the IP address of the load balancer's front-end configuration for the database. You can use the
SAPINST_REMOTE_ACCESS_USERparameter to allow a nonroot user to connect tosapinst.sudo <swpm>/sapinst SAPINST_REMOTE_ACCESS_USER=sapadminInstall SAP NetWeaver on Application Server
Install SAP You can use the
SAPINST_REMOTE_ACCESS_USERparameter to allow a nonroot user to connect tosapinst.sudo <swpm>/sapinst SAPINST_REMOTE_ACCESS_USER=sapadminUpdate hdbuserstore to point to the database cluster name List the entries
#Run as SIDADM
su - nw1adm

hdbuserstore list
DATA FILE       : /home/nw1adm/.hdb/sapa01/SSFS_HDB.DAT
KEY FILE        : /home/nw1adm/.hdb/sapa01/SSFS_HDB.KEY

KEY DEFAULT
  ENV : 10.27.0.3:30313
  USER: SAPABAP1
  DATABASE: NW1
In this example, the IP address of the default entry points to the VM, not the load balancer. Change the entry to point to the virtual host name of the load balancer. Be sure to use the same port and database name. For example, use
30313andNW1in the sample output.hdbuserstore SET DEFAULT sapdb:30313@NW1 SAPABAP1 <password of ABAP schema>
Test your cluster setup
Thoroughly test your Pacemaker cluster. Run the typical failover tests.
Next steps
- HA for SAP NetWeaver on Azure VMs on RHEL for SAP with HA and Update Services multi-SID guide
- SAP workload configurations with Azure availability zones
- Azure Virtual Machines planning and implementation for SAP
- Azure Virtual Machines deployment for SAP
- Azure Virtual Machines DBMS deployment for SAP
- High Availability of SAP HANA on Azure VMs