Note
Access to this page requires authorization. You can try signing in or changing directories.
Access to this page requires authorization. You can try changing directories.
This article describes how to configure SAP HANA System Replication in scale-up deployment, when the HANA file systems are mounted via NFS, by using Azure NetApp Files. In the example configurations and installation commands, instance number 03 and HANA System ID HN1 are used. SAP HANA System Replication consists of one primary node and at least one secondary node.
When steps in this document are marked with the following prefixes, the meaning is as follows:
- [A]: The step applies to all nodes
- [1]: The step applies to node1 only
- [2]: The step applies to node2 only
Prerequisites
Read the following SAP Notes and papers first:
- SAP Note 1928533, which has:
- The list of Azure virtual machine (VM) sizes that are supported for the deployment of SAP software.
- Important capacity information for Azure VM sizes.
- The supported SAP software and operating system (OS) and database combinations.
- The required SAP kernel version for Windows and Linux on Microsoft Azure.
- SAP Note 2015553 lists prerequisites for SAP-supported SAP software deployments in Azure.
- SAP Note 405827 lists recommended file systems for HANA environments.
- SAP Note 2002167 has recommended OS settings for Red Hat Enterprise Linux.
- SAP Note 2009879 has SAP HANA Guidelines for Red Hat Enterprise Linux.
- SAP Note 3108302 has SAP HANA Guidelines for Red Hat Enterprise Linux 9.x.
- SAP Note 2178632 has detailed information about all monitoring metrics reported for SAP in Azure.
- SAP Note 2191498 has the required SAP Host Agent version for Linux in Azure.
- SAP Note 2243692 has information about SAP licensing on Linux in Azure.
- SAP Note 1999351 has more troubleshooting information for the Azure Enhanced Monitoring Extension for SAP.
- SAP Community Wiki has all required SAP Notes for Linux.
- Azure Virtual Machines planning and implementation for SAP on Linux
- Azure Virtual Machines deployment for SAP on Linux
- Azure Virtual Machines DBMS deployment for SAP on Linux
- SAP HANA system replication in Pacemaker cluster
- RHEL HA documentation:
- Configuring and managing high availability clusters.
- Support Policies for RHEL High Availability Clusters - Management of SAP HANA in a Cluster
- Classic: Automating SAP HANA Scale-Up System Replication using the RHEL HA Add-on
- New Generation - angi: Deploying SAP HANA Scale-Up System Replication with angi resource agent
- Configure SAP HANA System Replication in Scale-Up in a Pacemaker cluster when the HANA file systems are on NFS shares
- Azure-specific RHEL documentation:
- NFS v4.1 volumes on Azure NetApp Files for SAP HANA
Overview
Traditionally in a scale-up environment, all file systems for SAP HANA are mounted from local storage. Setting up high availability (HA) of SAP HANA System Replication on Red Hat Enterprise Linux is published in Set up SAP HANA System Replication on RHEL.
To achieve SAP HANA HA of a scale-up system on Azure NetApp Files NFS shares, we need some more resource configuration in the cluster, in order for HANA resources to recover, when one node loses access to the NFS shares on Azure NetApp Files. The cluster manages the NFS mounts, allowing it to monitor the health of the resources. The dependencies between the file system mounts and the SAP HANA resources are enforced.
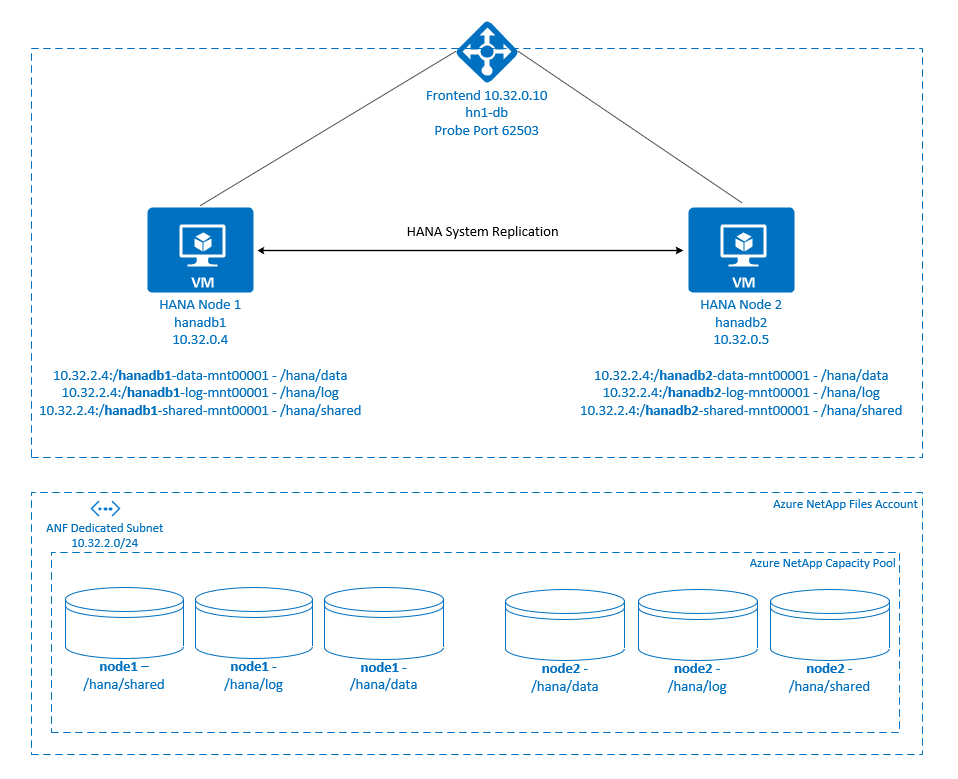
SAP HANA file systems are mounted on NFS shares by using Azure NetApp Files on each node. File systems /hana/data, /hana/log, and /hana/shared are unique to each node.
Mounted on node1 (hanadb1):
- 10.32.2.4:/hanadb1-data-mnt00001 on /hana/data
- 10.32.2.4:/hanadb1-log-mnt00001 on /hana/log
- 10.32.2.4:/hanadb1-shared-mnt00001 on /hana/shared
Mounted on node2 (hanadb2):
- 10.32.2.4:/hanadb2-data-mnt00001 on /hana/data
- 10.32.2.4:/hanadb2-log-mnt00001 on /hana/log
- 10.32.2.4:/hanadb2-shared-mnt00001 on /hana/shared
Note
File systems /hana/shared, /hana/data, and /hana/log aren't shared between the two nodes. Each cluster node has its own separate file systems.
The SAP HANA System Replication configuration uses a dedicated virtual hostname and virtual IP addresses. On Azure, a load balancer is required to use a virtual IP address. The configuration shown here has a load balancer with:
- Front-end IP address: 10.32.0.10 for hn1-db
- Probe port: 62503
Set up the Azure NetApp Files infrastructure
Before you proceed with the setup for Azure NetApp Files infrastructure, familiarize yourself with the Azure NetApp Files documentation.
Azure NetApp Files is available in several Azure regions. Check to see whether your selected Azure region offers Azure NetApp Files.
For information about the availability of Azure NetApp Files by Azure region, see Azure NetApp Files availability by Azure region.
Important considerations
As you're creating your Azure NetApp Files volumes for SAP HANA scale-up systems, be aware of the important considerations documented in NFS v4.1 volumes on Azure NetApp Files for SAP HANA.
Sizing of HANA database on Azure NetApp Files
The throughput of an Azure NetApp Files volume is a function of the volume size and service level, as documented in Service level for Azure NetApp Files.
While you're designing the infrastructure for SAP HANA on Azure with Azure NetApp Files, be aware of the recommendations in NFS v4.1 volumes on Azure NetApp Files for SAP HANA.
The configuration in this article is presented with simple Azure NetApp Files volumes.
Important
For production systems, where performance is a key, we recommend that you evaluate and consider using Azure NetApp Files application volume group for SAP HANA.
Deploy Azure NetApp Files resources
The following instructions assume that you already deployed your Azure virtual network. You must deploy the Azure NetApp Files resources and VMs, where the Azure NetApp Files resources are mounted, in the same Azure virtual network or in peered Azure virtual networks.
Create a NetApp account in your selected Azure region by following the instructions in Create a NetApp account.
Set up an Azure NetApp Files capacity pool by following the instructions in Set up an Azure NetApp Files capacity pool.
The HANA architecture shown in this article uses a single Azure NetApp Files capacity pool at the Ultra service level. For HANA workloads on Azure, we recommend using Azure NetApp Files Ultra or Premium service Level.
Delegate a subnet to Azure NetApp Files, as described in the instructions in Delegate a subnet to Azure NetApp Files.
Deploy Azure NetApp Files volumes by following the instructions in Create an NFS volume for Azure NetApp Files.
As you're deploying the volumes, be sure to select the NFSv4.1 version. Deploy the volumes in the designated Azure NetApp Files subnet. The IP addresses of the Azure NetApp volumes are assigned automatically.
Keep in mind that the Azure NetApp Files resources and the Azure VMs must be in the same Azure virtual network or in peered Azure virtual networks. For example,
hanadb1-data-mnt00001andhanadb1-log-mnt00001are the volume names andnfs://10.32.2.4/hanadb1-data-mnt00001andnfs://10.32.2.4/hanadb1-log-mnt00001are the file paths for the Azure NetApp Files volumes.On hanadb1:
- Volume hanadb1-data-mnt00001 (nfs://10.32.2.4:/hanadb1-data-mnt00001)
- Volume hanadb1-log-mnt00001 (nfs://10.32.2.4:/hanadb1-log-mnt00001)
- Volume hanadb1-shared-mnt00001 (nfs://10.32.2.4:/hanadb1-shared-mnt00001)
On hanadb2:
- Volume hanadb2-data-mnt00001 (nfs://10.32.2.4:/hanadb2-data-mnt00001)
- Volume hanadb2-log-mnt00001 (nfs://10.32.2.4:/hanadb2-log-mnt00001)
- Volume hanadb2-shared-mnt00001 (nfs://10.32.2.4:/hanadb2-shared-mnt00001)
Note
All commands to mount /hana/shared in this article are presented for NFSv4.1 /hana/shared volumes.
If you deployed the /hana/shared volumes as NFSv3 volumes, don't forget to adjust the mount commands for /hana/shared for NFSv3.
Prepare the infrastructure
Azure Marketplace contains images qualified for SAP HANA with the High Availability add-on, which you can use to deploy new VMs by using various versions of Red Hat.
Deploy Linux VMs manually via the Azure portal
This document assumes that you deployed a resource group, an Azure virtual network, and a subnet.
Deploy VMs for SAP HANA. Choose a suitable RHEL image supported for the HANA system. You can deploy a VM in any one of the availability options: virtual machine scale set, availability zone, or availability set.
Important
Make sure that the OS you select is SAP certified for SAP HANA on the specific VM types that you plan to use in your deployment. You can look up SAP HANA-certified VM types and their OS releases in SAP HANA Certified IaaS Platforms. Make sure that you look at the details of the VM type to get the complete list of SAP HANA-supported OS releases for the specific VM type.
Configure Azure load balancer
During VM configuration, you can create or select an existing load balancer in the networking section. To set up a standard load balancer for a high availability setup of the HANA database, follow the steps in the following sections.
Follow the steps in Create load balancer to set up a standard load balancer for a high-availability SAP system by using the Azure portal. During the setup of the load balancer, consider the following points:
- Frontend IP Configuration: Create a front-end IP. Select the same virtual network and subnet name as your database virtual machines.
- Backend Pool: Create a back-end pool and add database VMs.
- Inbound rules: Create a load-balancing rule. Follow the same steps for both load-balancing rules.
- Frontend IP address: Select a front-end IP.
- Backend pool: Select a back-end pool.
- High-availability ports: Select this option.
- Protocol: Select TCP.
- Health Probe: Create a health probe with the following details:
- Protocol: Select TCP.
- Port: For example, 625<instance-no.>.
- Interval: Enter 5.
- Probe Threshold: Enter 2.
- Idle timeout (minutes): Enter 30.
- Enable Floating IP: Select this option.
Note
The health probe configuration property numberOfProbes, otherwise known as Unhealthy threshold in the portal, isn't respected. To control the number of successful or failed consecutive probes, set the property probeThreshold to 2. It's currently not possible to set this property by using the Azure portal, so use either the Azure CLI or the PowerShell command.
For more information about the required ports for SAP HANA, read the chapter Connections to Tenant Databases in the SAP HANA Tenant Databases guide or SAP Note 2388694.
Note
When VMs without public IP addresses are placed in the back-end pool of an internal (no public IP address) instance of Standard Azure Load Balancer, there's no outbound internet connectivity, unless more configuration is performed to allow routing to public endpoints. For more information on how to achieve outbound connectivity, see Public endpoint connectivity for virtual machines using Standard Azure Load Balancer in SAP high-availability scenarios.
Important
Don't enable TCP timestamps on Azure VMs placed behind Azure Load Balancer. Enabling TCP timestamps could cause the health probes to fail. Set the parameter net.ipv4.tcp_timestamps to 0. For more information, see Load Balancer health probes and SAP Note 2382421.
Mount the Azure NetApp Files volume
[A] Create mount points for the HANA database volumes.
sudo mkdir -p /hana/data
sudo mkdir -p /hana/log
sudo mkdir -p /hana/shared
[A] Verify the NFS domain setting. Make sure that the domain is configured as the default Azure NetApp Files domain, that is, defaultv4iddomain.com, and the mapping is set to nobody.
sudo cat /etc/idmapd.confExample output:
[General]
Domain = defaultv4iddomain.com
[Mapping]
Nobody-User = nobody
Nobody-Group = nobody
Important
Make sure to set the NFS domain in
/etc/idmapd.confon the VM to match the default domain configuration on Azure NetApp Files: defaultv4iddomain.com. If there's a mismatch between the domain configuration on the NFS client (that is, the VM) and the NFS server (that is, the Azure NetApp Files configuration), then the permissions for files on Azure NetApp Files volumes that are mounted on the VMs display asnobody.[1] Mount the node-specific volumes on node1 (hanadb1).
sudo mount -o rw,nfsvers=4.1,hard,timeo=600,rsize=262144,wsize=262144,noatime,lock,_netdev,sec=sys 10.32.2.4:/hanadb1-shared-mnt00001 /hana/shared
sudo mount -o rw,nfsvers=4.1,hard,timeo=600,rsize=262144,wsize=262144,noatime,lock,_netdev,sec=sys 10.32.2.4:/hanadb1-log-mnt00001 /hana/log
sudo mount -o rw,nfsvers=4.1,hard,timeo=600,rsize=262144,wsize=262144,noatime,lock,_netdev,sec=sys 10.32.2.4:/hanadb1-data-mnt00001 /hana/data
[2] Mount the node-specific volumes on node2 (hanadb2).
sudo mount -o rw,nfsvers=4.1,hard,timeo=600,rsize=262144,wsize=262144,noatime,lock,_netdev,sec=sys 10.32.2.4:/hanadb2-shared-mnt00001 /hana/shared
sudo mount -o rw,nfsvers=4.1,hard,timeo=600,rsize=262144,wsize=262144,noatime,lock,_netdev,sec=sys 10.32.2.4:/hanadb2-log-mnt00001 /hana/log
sudo mount -o rw,nfsvers=4.1,hard,timeo=600,rsize=262144,wsize=262144,noatime,lock,_netdev,sec=sys 10.32.2.4:/hanadb2-data-mnt00001 /hana/data
[A] Verify that all HANA volumes are mounted with NFS protocol version NFSv4.
sudo nfsstat -mVerify that the flag
versis set to 4.1. Example from hanadb1:/hana/log from 10.32.2.4:/hanadb1-log-mnt00001 Flags: rw,noatime,vers=4.1,rsize=262144,wsize=262144,namlen=255,hard,proto=tcp,timeo=600,retrans=2,sec=sys,clientaddr=10.32.0.4,local_lock=none,addr=10.32.2.4 /hana/data from 10.32.2.4:/hanadb1-data-mnt00001 Flags: rw,noatime,vers=4.1,rsize=262144,wsize=262144,namlen=255,hard,proto=tcp,timeo=600,retrans=2,sec=sys,clientaddr=10.32.0.4,local_lock=none,addr=10.32.2.4 /hana/shared from 10.32.2.4:/hanadb1-shared-mnt00001 Flags: rw,noatime,vers=4.1,rsize=262144,wsize=262144,namlen=255,hard,proto=tcp,timeo=600,retrans=2,sec=sys,clientaddr=10.32.0.4,local_lock=none,addr=10.32.2.4[A] Verify nfs4_disable_idmapping. It should be set to Y. To create the directory structure where nfs4_disable_idmapping is located, run the mount command. You can't manually create the directory under
/sys/modulesbecause access is reserved for the kernel and drivers.Check
nfs4_disable_idmapping.sudo cat /sys/module/nfs/parameters/nfs4_disable_idmappingIf you need to set
nfs4_disable_idmappingto:sudo echo "Y" > /sys/module/nfs/parameters/nfs4_disable_idmappingMake the configuration permanent.
sudo echo "options nfs nfs4_disable_idmapping=Y" >> /etc/modprobe.d/nfs.confFor more information on how to change the
nfs_disable_idmappingparameter, see the Red Hat Knowledge Base.
SAP HANA installation
[A] Set up hostname resolution for all hosts.
You can either use a DNS server or modify the
/etc/hostsfile on all nodes. This example shows you how to use the/etc/hostsfile. Replace the IP address and the hostname in the following commands:sudo vi /etc/hostsInsert the following lines in the
/etc/hostsfile. Change the IP address and hostname to match your environment.10.32.0.4 hanadb1 10.32.0.5 hanadb2[A] Prepare the OS for running SAP HANA on Azure NetApp with NFS, as described in SAP Note 3024346 - Linux Kernel Settings for NetApp NFS. Create configuration file
/etc/sysctl.d/91-NetApp-HANA.conffor the NetApp configuration settings.sudo vi /etc/sysctl.d/91-NetApp-HANA.confAdd the following entries in the configuration file.
net.core.rmem_max = 16777216
net.core.wmem_max = 16777216
net.ipv4.tcp_rmem = 4096 131072 16777216
net.ipv4.tcp_wmem = 4096 16384 16777216
net.core.netdev_max_backlog = 300000
net.ipv4.tcp_slow_start_after_idle=0
net.ipv4.tcp_no_metrics_save = 1
net.ipv4.tcp_moderate_rcvbuf = 1
net.ipv4.tcp_window_scaling = 1
net.ipv4.tcp_sack = 1
[A] Create the configuration file
/etc/sysctl.d/ms-az.confwith more optimization settings.sudo vi /etc/sysctl.d/ms-az.confAdd the following entries in the configuration file.
net.ipv6.conf.all.disable_ipv6 = 1
net.ipv4.tcp_max_syn_backlog = 16348
net.ipv4.conf.all.rp_filter = 0
sunrpc.tcp_slot_table_entries = 128
vm.swappiness=10
Tip
Avoid setting
net.ipv4.ip_local_port_rangeandnet.ipv4.ip_local_reserved_portsexplicitly in thesysctlconfiguration files to allow the SAP Host Agent to manage the port ranges. For more information, see SAP Note 2382421.[A] Adjust the
sunrpcsettings, as recommended in SAP Note 3024346 - Linux Kernel Settings for NetApp NFS.sudo vi /etc/modprobe.d/sunrpc.confInsert the following line:
options sunrpc tcp_max_slot_table_entries=128[A] Perform RHEL OS configuration for HANA.
Configure the OS as described in the following SAP Notes based on your RHEL version:
[A] Install SAP HANA, following SAP's documentation.
[A] Configure a firewall.
Create the firewall rule for the Azure Load Balancer probe port.
sudo firewall-cmd --zone=public --add-port=62503/tcp
sudo firewall-cmd --zone=public --add-port=62503/tcp –permanent
Configure SAP HANA System Replication
Follow the steps in Set up SAP HANA System Replication to configure SAP HANA System Replication.
Cluster configuration
This section describes the steps required for a cluster to operate seamlessly when SAP HANA is installed on NFS shares by using Azure NetApp Files.
Create a Pacemaker cluster
Follow the steps in Set up Pacemaker on Red Hat Enterprise Linux to create a basic Pacemaker cluster for this HANA server.
Important
By using the systemd-based SAP Startup Framework, systemd manages the SAP HANA instance. The minimum required Red Hat Enterprise Linux (RHEL) version is RHEL 8 for SAP. As outlined in SAP Note 3189534, any new installations of SAP HANA SPS07 revision 70 or later, or updates to HANA systems to HANA 2.0 SPS07 revision 70 or later, automatically register the SAP Startup framework with systemd.
When using HA solutions to manage SAP HANA system replication in combination with systemd-enabled SAP HANA instances (refer to SAP Note 3189534), additional steps are necessary to ensure that the HA cluster can manage the SAP instance without systemd interference. So, for SAP HANA system integrated with systemd, additional steps outlined in Red Hat KBA 7029705 must be followed on all cluster nodes.
Implement SAP HANA system replication hooks
Red Hat provides two generations of resource agents for configuring a HANA system replication HA cluster on RHEL. Because the configuration procedures differ, this document splits them into separate tabs based on the resource agent generation:
- Classic Tab: Covers the classic generation of resource agents, provided in the "resource-agents-sap-hana" (scale-up) package.
- New Generation Tab: Covers the new generation of resource agents, provided in "sap-hana-ha" package. In upstream, this generation is referred to as "SAPHanaSR-angi".
Note
For new generation setup, the sap-hana-ha package is available from RHEL 9.4 and later.
The classic and new generation packages are mutually exclusive. You can configure only one package on your system at a time. Configure the SAPHanaSR/HanaSR and ChkSrv Python hook. Follow the steps in Implement the Python system replication hook SAPHanaSR/HanaSR and ChkSrv, and use the corresponding tab for your specific configuration.
Manage file system
For SAP HANA scale-up on Azure NetApp Files NFS shares, Red Hat takes different approaches depending on the software package. With the new generation resource agent package, you define the mount in /etc/fstab instead, and the SAPHanaFilesystem resource agent monitors the filesystem and detects issues before SAPHanaController does. In contrast, the classic resource agent package uses Pacemaker filesystem cluster resources to manage NFS shares.
Follow the appropriate step in the following section, depending on whether you're configuring HANA Scale-Up on Azure NetApp Files with new generation or classic resource agents.
Each cluster node has its own HANA NFS file systems /hana/shared, /hana/data, and /hana/log. Make sure you insert the correct entries of the volumes in each node.
[A] Stop SAP HANA on both replication sites. Run as <sap-sid>adm.
sapcontrol -nr 03 -function StopSystem[A] Unmount all HANA filesystems on both VMs, since it was mounted temporarily for installation. Before unmounting, stop any processes or sessions that are still using it.
umount /hana/shared[1] Mount the node specific volumes on node1 (hanadb1).
sudo vi /etc/fstab
# Add the following entry
10.32.2.4:/hanadb1-shared-mnt00001 /hana/shared  nfs rw,nfsvers=4.1,hard,timeo=600,rsize=262144,wsize=262144,noatime,lock,_netdev,sec=sys  0  0
10.32.2.4:/hanadb1-log-mnt00001 /hana/log  nfs rw,nfsvers=4.1,hard,timeo=600,rsize=262144,wsize=262144,noatime,lock,_netdev,sec=sys  0  0
10.32.2.4:/hanadb1-data-mnt00001 /hana/data  nfs rw,nfsvers=4.1,hard,timeo=600,rsize=262144,wsize=262144,noatime,lock,_netdev,sec=sys  0  0
# Mount all volumes
sudo mount -a
[2] Mount the node specific volumes on node2 (hanadb2).
sudo vi /etc/fstab
# Add the following entries
10.32.2.4:/hanadb2-shared-mnt00001 /hana/shared  nfs rw,nfsvers=4.1,hard,timeo=600,rsize=262144,wsize=262144,noatime,lock,_netdev,sec=sys  0  0
10.32.2.4:/hanadb2-log-mnt00001 /hana/log  nfs rw,nfsvers=4.1,hard,timeo=600,rsize=262144,wsize=262144,noatime,lock,_netdev,sec=sys  0  0
10.32.2.4:/hanadb2-data-mnt00001 /hana/data  nfs rw,nfsvers=4.1,hard,timeo=600,rsize=262144,wsize=262144,noatime,lock,_netdev,sec=sys  0  0
# Mount the volume
sudo mount -a
[A] Start SAP HANA on both replication sites. Run as <sap-sid>adm.
sapcontrol -nr 03 -function StartSystem
Configure SAP HANA cluster resources
Follow the appropriate tab in Create SAP HANA cluster resources to create the SAP HANA resources in the cluster.
After creating the SAP HANA resources, perform the additional steps. Select the appropriate tabs based on your configuration.
The new generation package introduces a new resource agent,
SAPHanaFilesystem, which monitors read and write access to the/hana/shared/SIDpath. The filesystem is mounted statically at the OS level, with each host configured through/etc/fstab. NeitherSAPHanaFilesystemnor Pacemaker is responsible for mounting this filesystem for HANA.[1] For SAP HANA scale-up on Azure NetApp Files NFS shared, configure
SAPHanaFileSystemresource agent.sudo pcs resource create rsc_SAPHanaFilesystem_HN1_HDB03 \ ocf:heartbeat:SAPHanaFilesystem \ SID=HN1 \ InstanceNumber=03 \ ON_FAIL_ACTION="fence" \ op start interval=0 timeout=10 \ op stop interval=0 timeout=20 \ op monitor interval=120 timeout=120 \ clone cln_SAPHanaFilesystem_HN1_HDB03 \ meta clone-node-max=1 interleave=true --future
Check the status of the cluster and all the resources.
Note
This article contains references to a term that Microsoft no longer uses. When the term is removed from the software, we'll remove it from this article.
sudo pcs statusExample output:
Node List:
* Online: [ hanadb1 hanadb2 ]

Full List of Resources:
* rsc_hdb_azr_agt        (stonith:fence_azure_arm):       Started hanadb1
* Clone Set: cln_SAPHanaTopology_HN1_HDB03 [rsc_SAPHanaTopology_HN1_HDB03]:
    * Started: [ hanadb1 hanadb2 ]
* Clone Set: cln_SAPHanaController_HN1_HDB03 [rsc_SAPHanaController_HN1_HDB03] (promotable):
    * Promoted: [ hanadb1 ]
    * Unpromoted: [ hanadb2 ]
* Clone Set: cln_SAPHanaFilesystem_HN1_HDB03 [rsc_SAPHanaFilesystem_HN1_HDB03]:
    * Started: [ hanadb1 hanadb2 ]
* Resource Group: g_ip_HN1_03:
    * nc_HN1_03         (ocf:heartbeat:azure-lb):        Started hanadb1
    * vip_HN1_03        (ocf:heartbeat:IPaddr2):         Started hanadb2
Configure HANA active/read-enabled system replication in Pacemaker cluster
With SAP HANA 2.0 SPS 01, SAP supports active and read-enabled setups for SAP HANA System Replication. In these setups, you can use the secondary systems of SAP HANA System Replication actively for workloads that require a lot of reading. To support this setup in a cluster, you need a second virtual IP address. This IP address gives clients access to the secondary read-enabled SAP HANA database.
To ensure that the secondary replication site can still be accessed after a takeover has occurred, the cluster needs to move the virtual IP address around with the secondary of the SAPHana resource.
The extra configuration, which is required to manage HANA active/read-enabled System Replication in a Red Hat HA cluster with a second virtual IP, is described in Configure HANA Active/Read-Enabled System Replication in Pacemaker cluster.
Before you proceed further, make sure you've fully configured Red Hat High Availability Cluster managing SAP HANA database as described in the preceding sections of the documentation.
Test the cluster setup
This section describes how you can test your setup.
Before you start a test, make sure that Pacemaker doesn't have any failed action (via pcs status), there are no unexpected location constraints (for example, leftovers of a migration test), and that HANA system replication is in sync state, for example, with
systemReplicationStatus:sudo su - hn1adm -c "python /usr/sap/HN1/HDB03/exe/python_support/systemReplicationStatus.py"Verify the cluster configuration for a failure scenario when a node loses access to the NFS share (
/hana/shared).The SAP HANA resource agents depend on binaries stored on
/hana/sharedto perform operations during failover. File system/hana/sharedis mounted over NFS in the presented scenario.It's difficult to simulate a failure where one of the servers loses access to the NFS share. As a test, you can remount the file system as read-only. This approach validates that the cluster can fail over, if access to
/hana/sharedis lost on the active node.Expected result: When you make
/hana/shareda read-only file system, the read/write operations on the file system fail, resulting in the failover. The same result is expected when your HANA node loses access to the NFS shares.Check the resource state before starting the test:
sudo pcs statusYou can place
/hana/sharedin read-only mode on the active cluster node by using this command:sudo mount -o ro 10.32.2.4:/hanadb1-shared-mnt00001 /hana/sharedhanadbwill either reboot or power off based on the action set onstonith(pcs property show stonith-action). Once the server (hanadb1) is down, the HANA resource moves tohanadb2. You can check the status of the cluster fromhanadb2.sudo pcs statusWe recommend that you thoroughly test the SAP HANA cluster configuration by also performing the tests described in Set up SAP HANA System Replication on RHEL.