Note
Access to this page requires authorization. You can try signing in or changing directories.
Access to this page requires authorization. You can try changing directories.
An agent configuration experience allows users to set up and reconfigure their agents' settings directly within the channel or group chat scope post-installation. This enhances the agent’s operational efficiency from the start. Agent configuration experience eliminates the need for repeated user interventions that previously hampered the timely benefits of apps, affecting user experience.
With the agent configuration experience, you can ensure the agent's ongoing relevance and value as users can:
- Tailor the agent to their specific workflows and preferences during installation.
- Reconfigure settings to adapt to changing requirements post installation.
For example, an agent that tracks and shares news topics or monitors GitHub repositories can initially be set up to match user workflows. Later, it can be easily reconfigured to respond to new topics or repositories directly from the group chat, streamlining content management and interaction without leaving the Teams environment. This flexible configuration experience significantly enhances user experience and productivity by integrating agents seamlessly into daily operations.
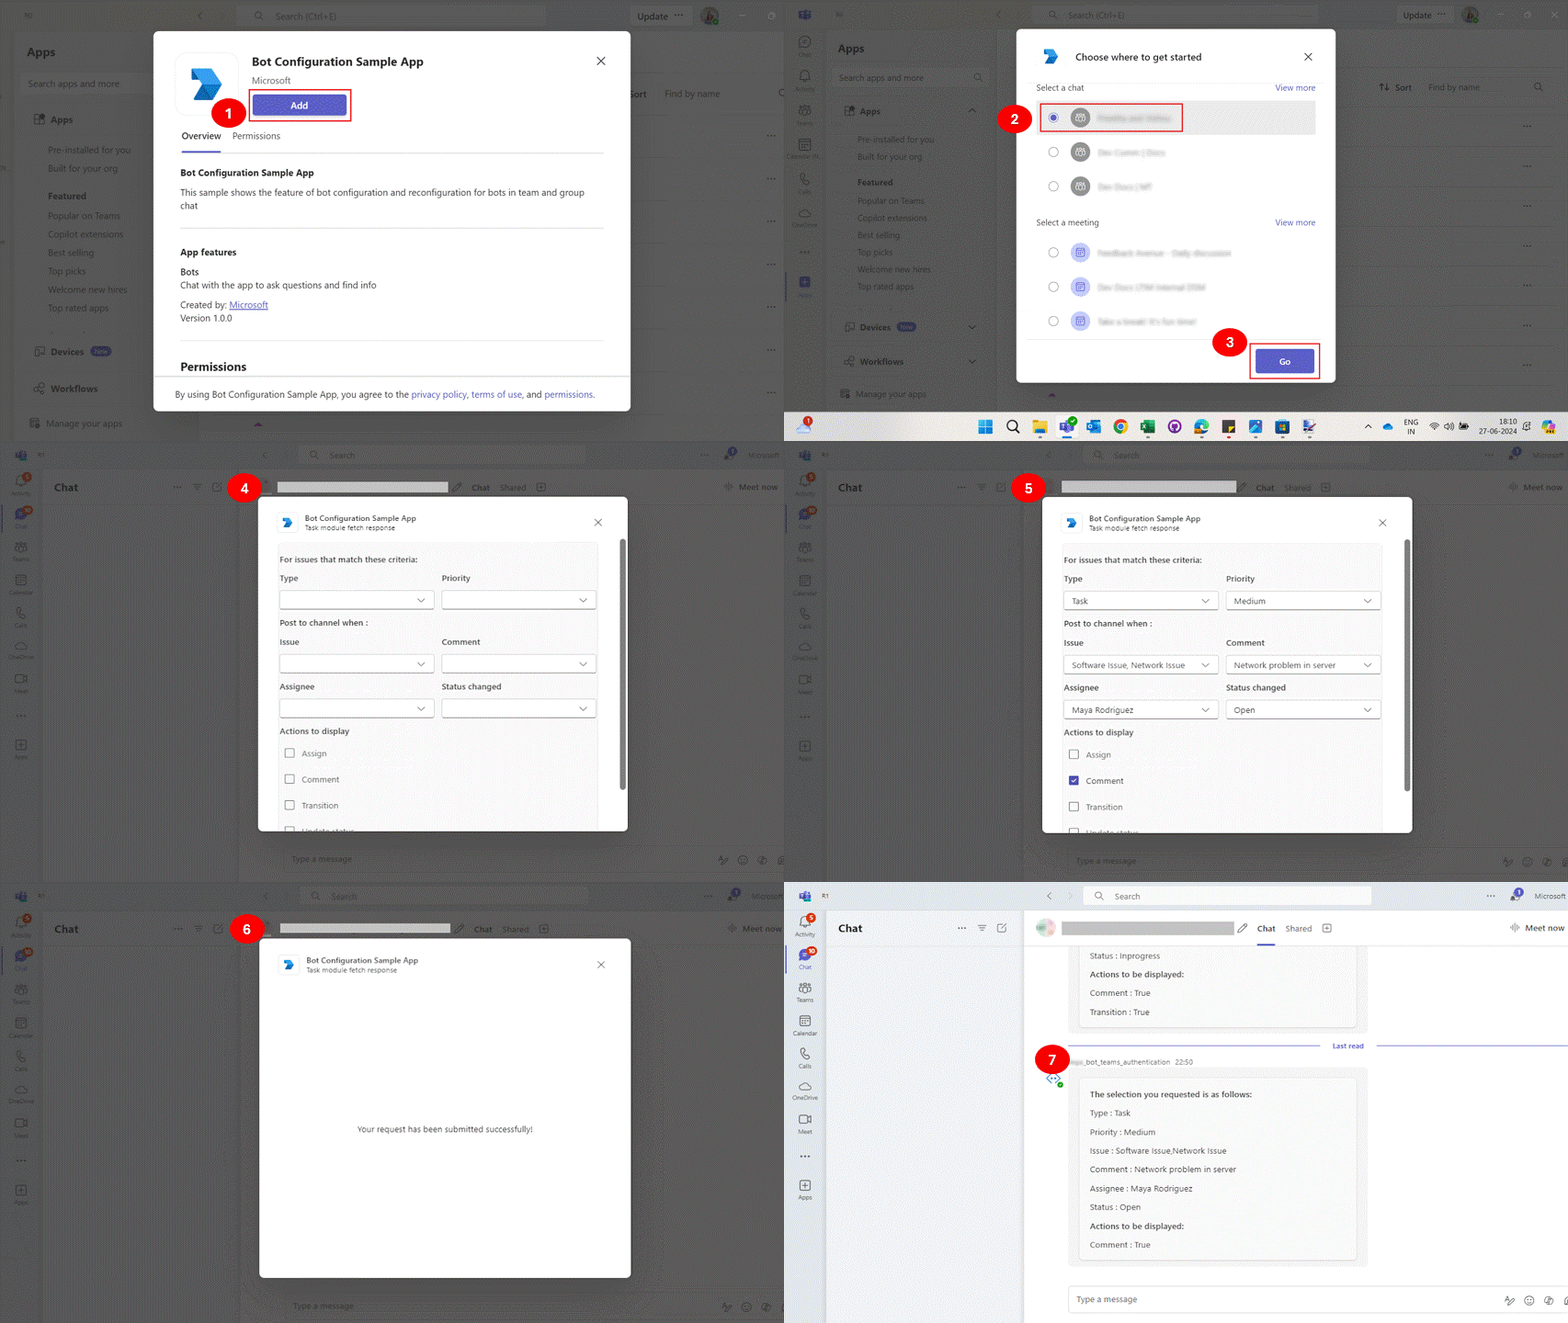
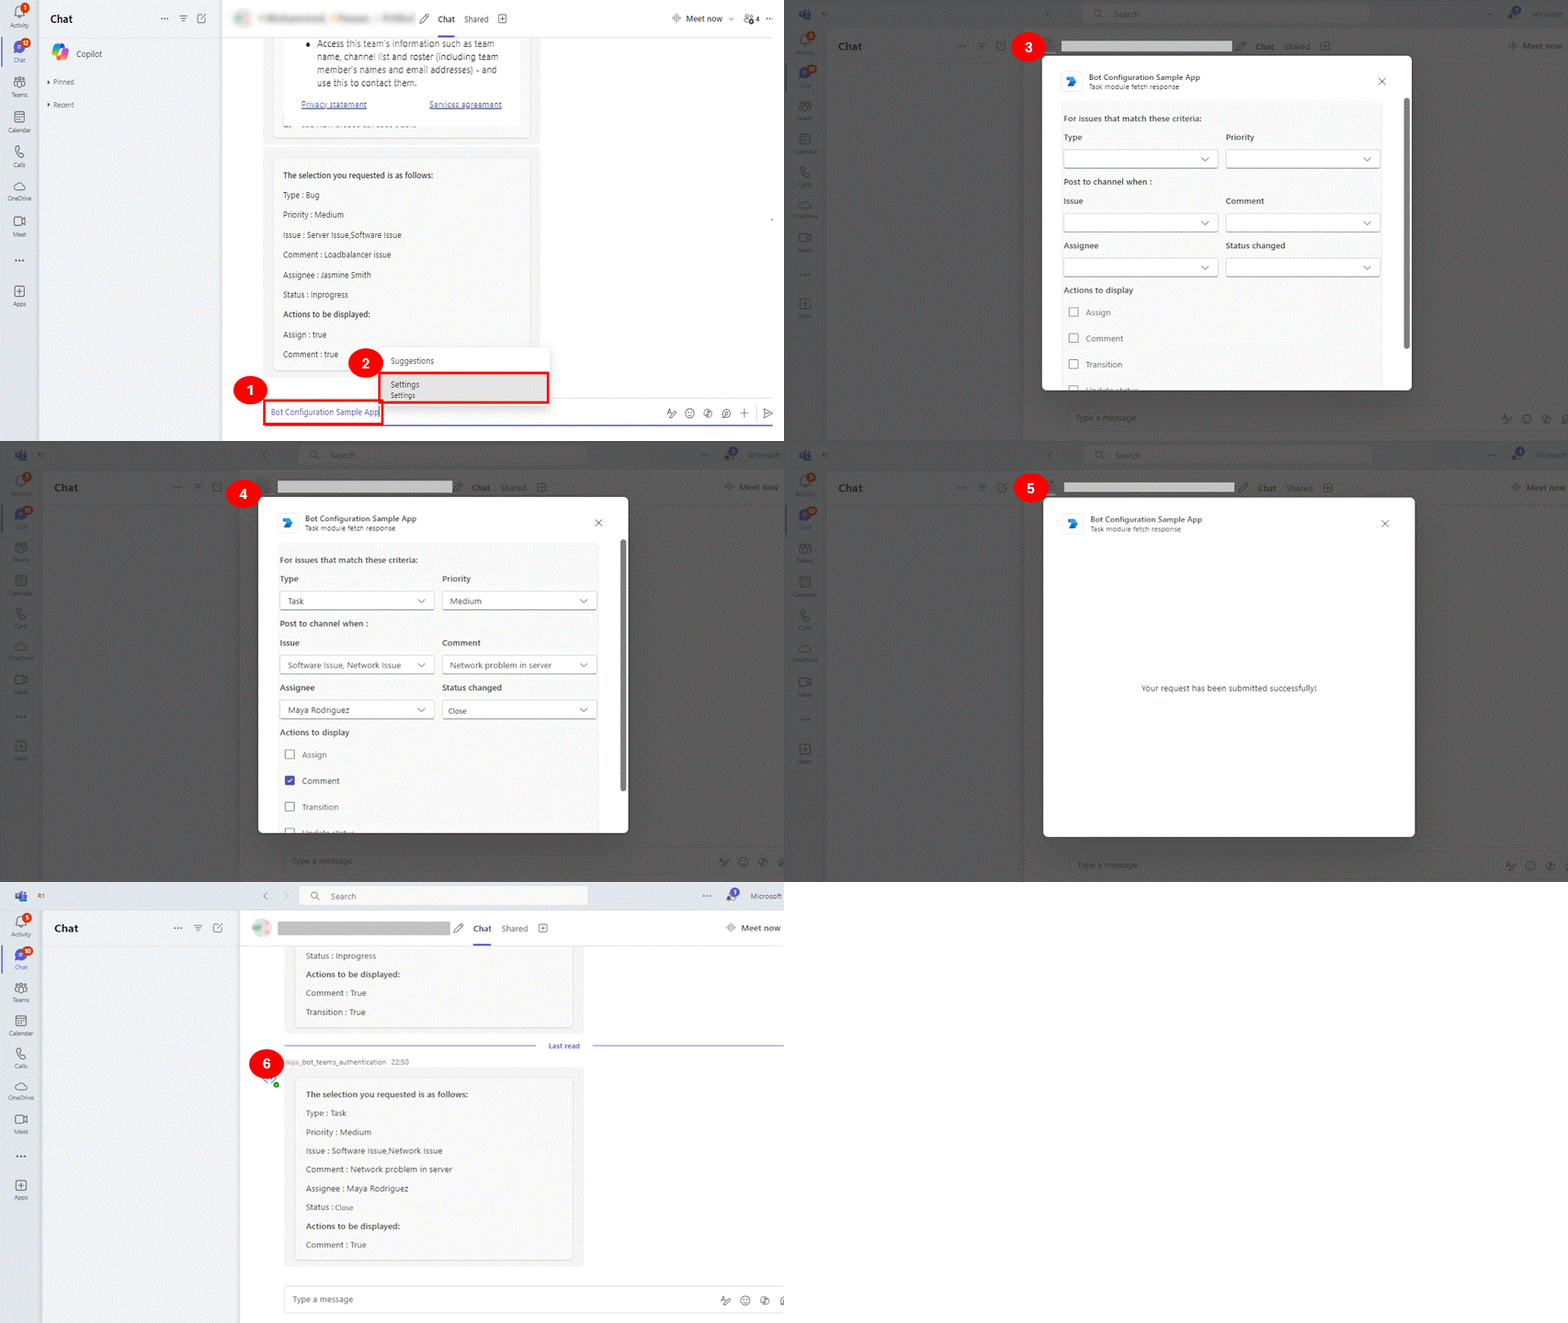
Here's an example, where a user adds the agent to a group chat and then configures it to align with their specific requirements. The user then reconfigures the agent to change the status.
Configure
Reconfigure
To configure agent as the default landing capability for an app that supports bot and tab capabilities, see configure default landing capability.
Build agent configuration experience
Note
Agent configuration experience is supported only in channel or group chat.
When you build the agent configuration experience, you must ensure that the user must be able to configure an agent on first installation and reconfigure it at any time.
To build the agent configuration experience, follow these steps:
Update app manifest
In the app manifest (previously called Teams app manifest) file, update the fetchTask property under the bots.configuration object as follows:
"bots": [
    {
      "botId": "${{AAD_APP_CLIENT_ID}}",
     "needsChannelSelector": false,
      "scopes": [
        "personal",
        "team",
        "groupChat"
      ],
      "configuration":{
        "groupChat":{
          "fetchTask": true
        },
        "team":{
          "fetchTask": true
        }
      },
      "isNotificationOnly": false
    }
  ],
For more information, see app manifest schema.
Configure your agent
When a user installs the agent in channel or group chat, the fetchTask property in the app manifest file initiates either config.fetch or config.submit.
If you set the fetchTask property in the app manifest to:
false: The agent doesn't fetch a dialog or an Adaptive Card. Instead, the agent must provide a static dialog or card that is used when the agent is invoked. For more information, see dialogs.
true: The agent initiates either
config.fetchorconfig.submitas defined. When the agent is invoked, you can return an Adaptive Card or a dialog depending on the context provided in channelData and userdata.
The following table lists the response type associated with the invoke requests:
| Invoke request | Response type |
|---|---|
config.fetch |
Type: "continue" or Type = "auth" |
config.submit |
Type: "continue" or Type: "message" |
type: "continue":type: "continue"is used to define a continuation of a dialog or Adaptive Card within an agent configuration. When the type is set tocontinue, it indicates that the agent is expecting further interaction from the user to continue with the configuration process.When the user submits the configuration, the
config.submitinvoke is triggered. It reads the user's input and returns a different Adaptive Card. You can also update the agent configuration to return a dialog.
app.OnConfigFetch(async (context) =>
{
 var card = new AdaptiveCard
 {
     Body = new List<CardElement>
     {
         new TextBlock("Configure your agent")
         {
             Weight = TextWeight.Bolder
         }
     },
     Actions = new List<Action>
     {
         new SubmitAction
         {
             Title = "Submit"
         }
     }
 };
 var taskInfo = new TaskInfo
 {
     Title = "test card",
     Width = new Union<int, Size>(600),
     Height = new Union<int, Size>(500),
     Card = new Attachment
     {
         ContentType = new ContentType("application/vnd.microsoft.card.adaptive"),
         Content = card
     }
 };
 return new ConfigTaskResponse(
     new ContinueTask(taskInfo)
 );
});
type: "auth": You can also request the user to authenticate as a response toconfig.fetchrequest. Thetype: "auth"configuration prompts the user to sign in through a specified URL, which must be linked to a valid authentication page that can be opened in a browser. Authentication is essential for scenarios where the agent requires the user to be authenticated. It ensures that the user’s identity is verified, maintaining security, and personalized experiences within the agent’s functionality.Note
For
type: "auth"only third party authentication is supported. Single sign-on (SSO) isn't supported. For more information on third party authentication, see add authentication.
app.OnConfigFetch(async (context) =>
{
 return new ConfigAuthResponse(
     new ConfigAuth
     {
         SuggestedActions = new SuggestedActions
         {
             Actions = new List<CardAction>
             {
                 new CardAction
                 {
                     Type = "openUrl",
                     Value = "https://example.com/auth",
                     Title = "Sign in to this app"
                 }
             }
         }
     }
 );
});
type="message": When the type is set to message, it indicates that the agent is sending a simple message back to the user, indicating the end of the interaction or providing information without requiring further input.
app.OnConfigSubmit(async (context) =>
{
 return new ConfigTaskResponse(
     new MessageTask("You have chosen to finish setting up agent")
 );
});
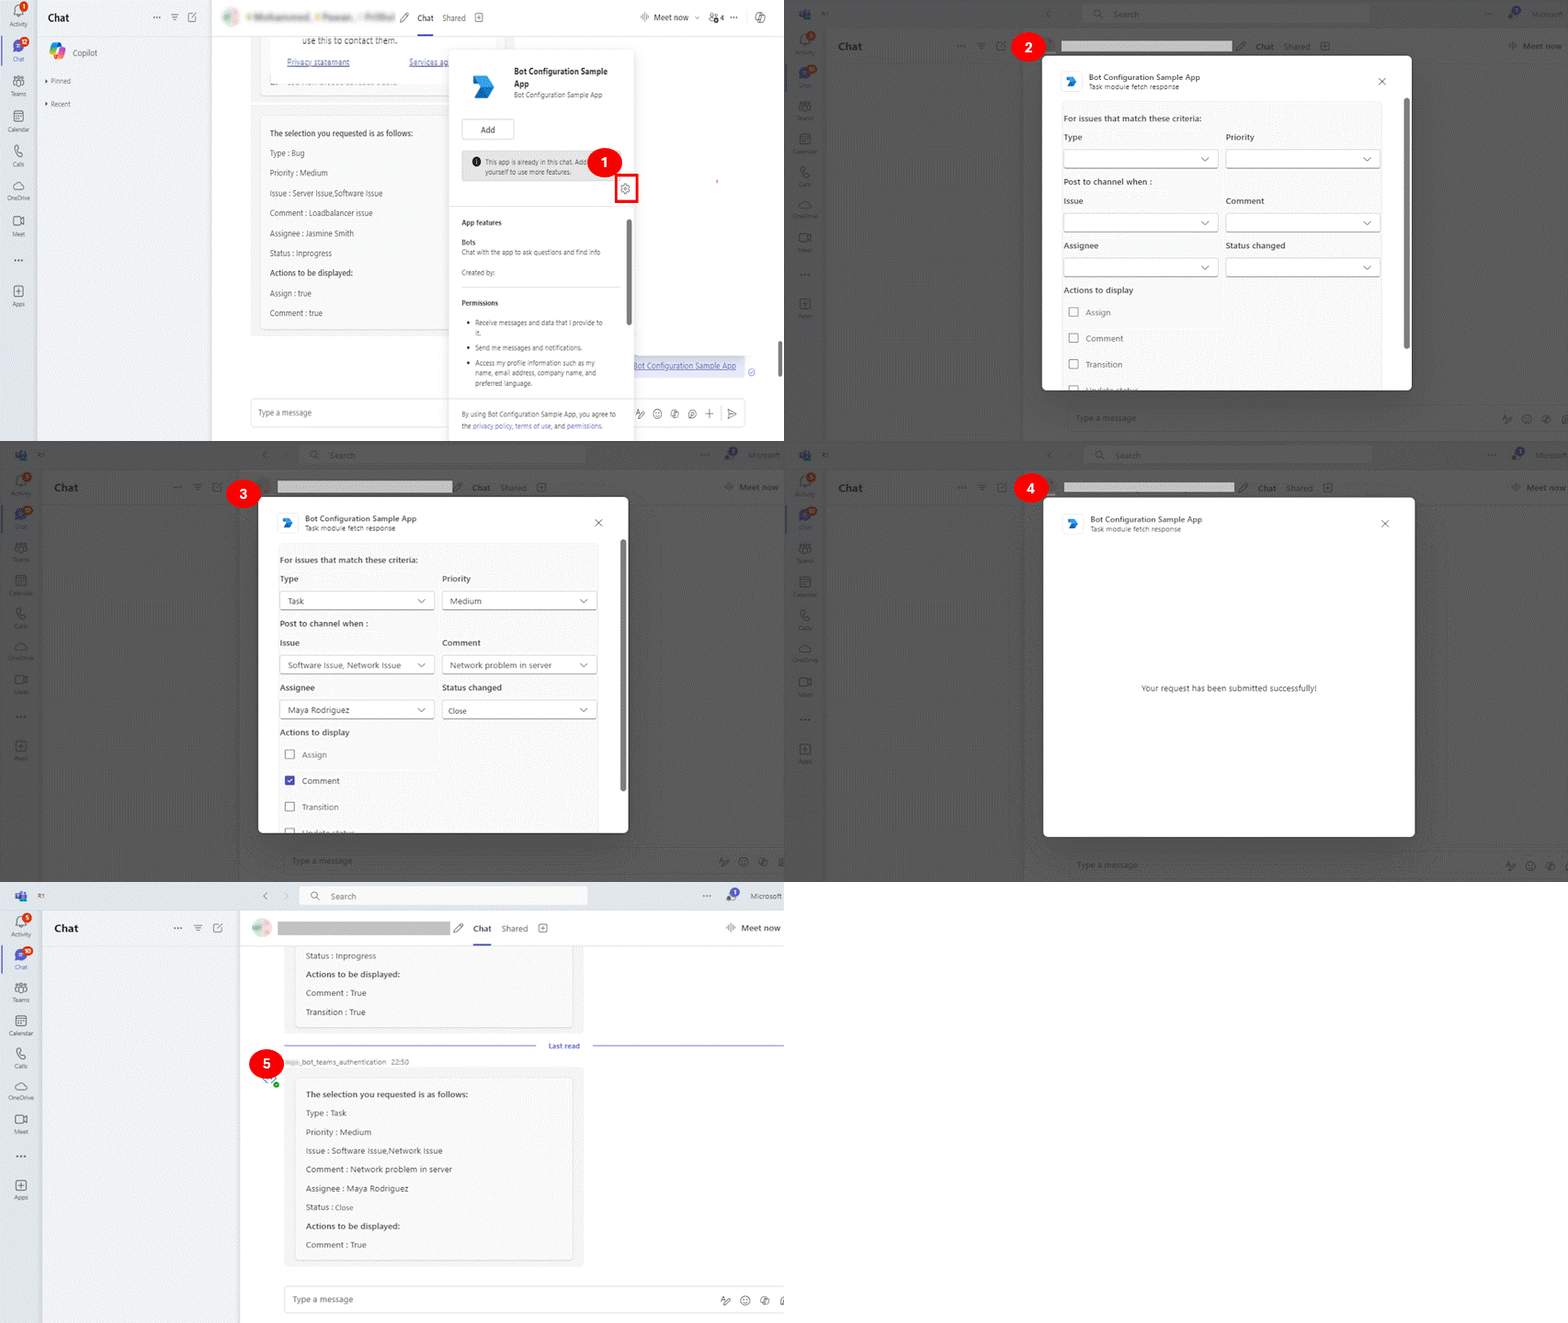
When a user reconfigures the agent, the fetchTask property in the app manifest file initiates config.fetch in the agent logic. The user can reconfigure the agent settings post-installation in two ways:
@mention the agent in the message compose area. Select the Settings option that appears above the message compose area. A dialog appears, update, or changes the agent's configuration settings in the dialog.
Hover over the agent, the agent profile card appears. To update or change the agent's configuration settings, select the settings icon in the agent profile card.
Best practices
If you want to have an individual channel-level configuration of your agent, ensure that you track the configuration as per the channel. Configuration data isn't stored and the invoke payload includes the sufficient channelData.
Provide a clear and user-friendly dialog that prompts the user to enter the required information for the agent to operate properly, such as a URL, an area path, or a dashboard link.
Avoid sending multiple notifications or requests for configuration after the installation, as it might confuse the users.
Code sample
| Sample name | Description | .NET | Node.js | Manifest |
|---|---|---|---|---|
| Agent configuration app | This sample demonstrates an agent for configuring and reconfiguring Adaptive Cards in teams and group chats. | View | View | View |
| Agent configuration app with auth | This Teams agent enables configuration and reconfiguration with dynamic search capabilities on Adaptive Cards. | View | View | View |
See also
Collaborate with us on GitHub
The source for this content can be found on GitHub, where you can also create and review issues and pull requests. For more information, see our contributor guide.
Platform Docs