Note
Access to this page requires authorization. You can try signing in or changing directories.
Access to this page requires authorization. You can try changing directories.
This article shows you how to enable autoscale for an Azure Event Grid namespace. Autoscale requires only three configuration properties: an enable flag and the minimum and maximum throughput unit (TU) limits. Event Grid manages all scaling logic internally.
You can enable autoscale by using the Azure portal, an Azure Resource Manager template, the REST API, or Azure CLI.
Prerequisites
- An Azure subscription. If you don't have one, create a free account.
- An Event Grid namespace in the Standard tier.
Important
Autoscale isn't available in the Basic tier.
Enable autoscale - Azure portal
Sign in to the Azure portal.
In the search bar, type Event Grid Namespaces and select it from the results.
Select your namespace from the list.
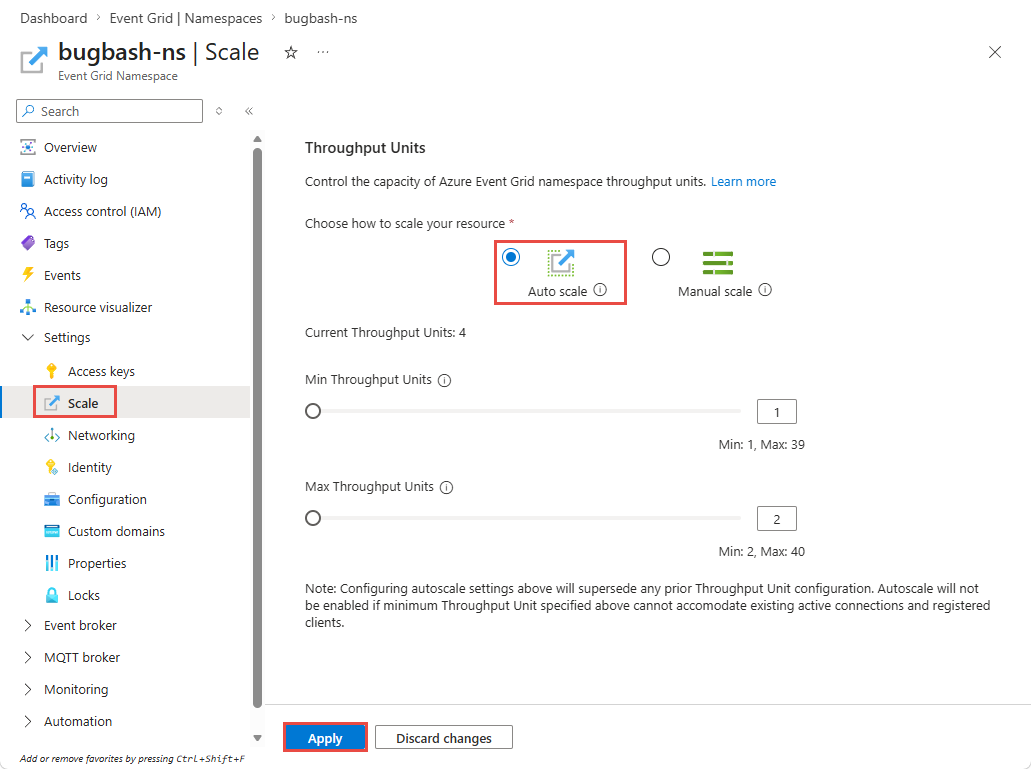
Under Settings, select Scale.
Select Autoscale.
Set the Minimum throughput units value. This value is the lowest number of TUs the namespace can scale down to.
Set the Maximum throughput units value. This value is the highest number of TUs the namespace can scale up to. The maximum supported value is 40.
Select Apply.
Review the summary of changes and select Confirm to apply the new autoscale settings.
Note
After you apply the changes, Autoscale takes effect almost immediately. The namespace evaluates utilization continuously and adjusts TUs as needed.
Enable autoscale - ARM template
Use the following Azure Resource Manager template to create or update an Event Grid namespace with autoscale enabled.
{
  "$schema": "https://schema.management.azure.com/schemas/2019-04-01/deploymentTemplate.json#",
  "contentVersion": "1.0.0.0",
  "parameters": {
    "namespaceName": {
      "type": "string",
      "metadata": { "description": "Name of the Event Grid namespace." }
    },
    "location": {
      "type": "string",
      "defaultValue": "[resourceGroup().location]",
      "metadata": { "description": "Azure region for the namespace." }
    },
    "minThroughputUnits": {
      "type": "int",
      "defaultValue": 1,
      "minValue": 1,
      "maxValue": 40,
      "metadata": { "description": "Minimum number of throughput units." }
    },
    "maxThroughputUnits": {
      "type": "int",
      "defaultValue": 10,
      "minValue": 1,
      "maxValue": 40,
      "metadata": { "description": "Maximum number of throughput units." }
    },
    "enableAutoscale": {
      "type": "bool",
      "defaultValue": true,
      "metadata": { "description": "Set to true to enable autoscale." }
    }
  },
  "resources": [
    {
      "type": "Microsoft.EventGrid/namespaces",
      "apiVersion": "2025-11-15-preview",
      "name": "[parameters('namespaceName')]",
      "location": "[parameters('location')]",
      "sku": {
        "name": "Standard",
        "capacity": "[parameters('minThroughputUnits')]"
      },
      "properties": {
        "autoScaleConfiguration": {
          "enableAutoScale": "[parameters('enableAutoscale')]",
          "minimumThroughputUnits": "[parameters('minThroughputUnits')]",
          "maximumThroughputUnits": "[parameters('maxThroughputUnits')]"
        }
      }
    }
  ]
}
Deploy the template by using Azure CLI:
az deployment group create \
    --resource-group <resource-group-name> \
    --template-file autoscale-namespace.json \
    --parameters namespaceName=<namespace-name> \
                 minThroughputUnits=2 maxThroughputUnits=10
Enable autoscale - REST API
You can enable autoscale when creating or updating an Event Grid namespace by using the REST API.
Create or update a namespace with autoscale enabled (PUT)
PUT https://management.azure.com/subscriptions/{subscriptionId}/resourceGroups/{resourceGroupName}/providers/Microsoft.EventGrid/namespaces/{namespaceName}?api-version=2025-11-15-preview
Request body:
{
  "location": "eastus",
  "sku": {
    "name": "Standard",
    "capacity": 1
  },
  "properties": {
    "autoScaleConfiguration": {
      "enableAutoScale": true,
      "minimumThroughputUnits": 2,
      "maximumThroughputUnits": 8
    }
  }
}
Update autoscale on an existing namespace (PATCH)
PATCH https://management.azure.com/subscriptions/{subscriptionId}/resourceGroups/{resourceGroupName}/providers/Microsoft.EventGrid/namespaces/{namespaceName}?api-version=2025-11-15-preview
Request body:
{
  "properties": {
    "autoScaleConfiguration": {
      "enableAutoScale": true,
      "minimumThroughputUnits": 1,
      "maximumThroughputUnits": 10
    }
  }
}
Enable autoscale - Azure CLI
Use Azure CLI to enable autoscale on an existing namespace. Replace placeholder values with your own.
To configure autoscale using Azure CLI, set three properties on the namespace:
| Property | Description |
|---|---|
enableAutoScale |
Set to true to enable autoscale. |
minimumThroughputUnits |
The minimum number of TUs the namespace can scale down to. Must be at least 1. |
maximumThroughputUnits |
The maximum number of TUs the namespace can scale up to. Maximum supported value is 40. |
az resource update \
    --resource-group <resource-group-name> \
    --name <namespace-name> \
    --resource-type "Microsoft.EventGrid/namespaces" \
    --api-version 2025-11-15-preview \
    --set properties.autoScaleConfiguration.enableAutoScale=true \
         properties.autoScaleConfiguration.minimumThroughputUnits=2 \
         properties.autoScaleConfiguration.maximumThroughputUnits=8
Verify Autoscale configuration
After enabling Autoscale, verify the configuration by retrieving the namespace details.
REST API
GET https://management.azure.com/subscriptions/{subscriptionId}/resourceGroups/{resourceGroupName}/providers/Microsoft.EventGrid/namespaces/{namespaceName}?api-version=2025-11-15-preview
The response body includes the autoScaleConfiguration section:
{
  "id": "/subscriptions/12345678-.../providers/Microsoft.EventGrid/namespaces/my-namespace",
  "name": "my-namespace",
  "type": "Microsoft.EventGrid/namespaces",
  "location": "eastus",
  "sku": {
    "name": "Standard",
    "capacity": 1
  },
  "properties": {
    "provisioningState": "Succeeded",
    "autoScaleConfiguration": {
      "enableAutoScale": true,
      "minimumThroughputUnits": 1,
      "maximumThroughputUnits": 10
    },
    "topicsConfiguration": {
      "inputSchema": "CloudEventSchemaV1_0"
    },
    "topicSpacesConfiguration": {
      "state": "Enabled",
      "maximumSessionExpiryInHours": 1,
      "maximumClientSessionsPerAuthenticationName": 1
    },
    "publicNetworkAccess": "Enabled",
    "isZoneRedundant": false,
    "minimumTlsVersionAllowed": "1.2"
  },
  "systemData": {
    "createdBy": "user@contoso.com",
    "createdByType": "User",
    "createdAt": "2026-01-15T10:30:00.0000000Z",
    "lastModifiedBy": "user@contoso.com",
    "lastModifiedByType": "User",
    "lastModifiedAt": "2026-01-15T11:45:00.0000000Z"
  }
}
Azure CLI
az resource show \
    --resource-group <resource-group-name> \
    --name <namespace-name> \
    --resource-type "Microsoft.EventGrid/namespaces" \
    --api-version 2025-11-15-preview \
    --query "properties.autoScaleConfiguration"
Expected output:
{
  "enableAutoScale": true,
  "minimumThroughputUnits": 2,
  "maximumThroughputUnits": 8
}
Disable autoscale
This section shows how to disable autoscale for an Event Grid namespace by using Azure portal, CLI, and REST API. The namespace keeps its current TU allocation and stops scaling automatically.
Azure portal
Follow these steps to disable autoscale by using the Azure portal:
Go to your Event Grid namespace in the Azure portal.
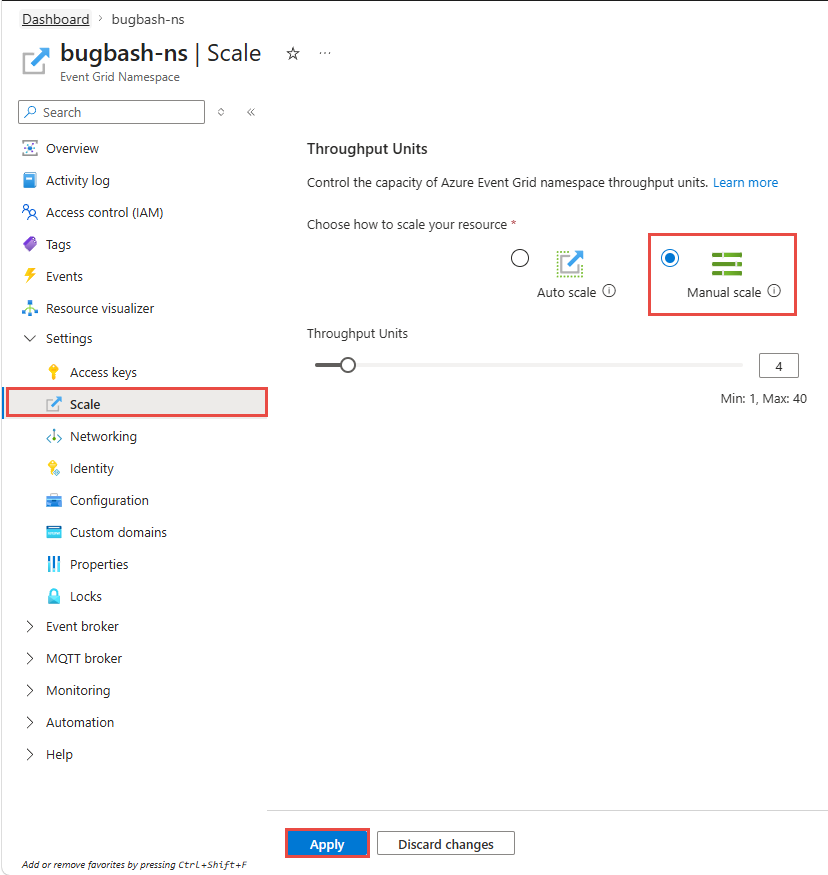
Under Settings, select Scale.
Select Manual scale to disable autoscale.
Select Apply to save your changes.
REST API
When using the REST API, set enableAutoScale to false under properties.
PATCH https://management.azure.com/subscriptions/{subscriptionId}/resourceGroups/{resourceGroupName}/providers/Microsoft.EventGrid/namespaces/{namespaceName}?api-version=2025-11-15-preview
Request body:
{
  "properties": {
    "autoScaleConfiguration": {
      "enableAutoScale": false
    }
  }
}
Azure CLI
az resource update \
    --resource-group <resource-group-name> \
    --name <namespace-name> \
    --resource-type "Microsoft.EventGrid/namespaces" \
    --api-version 2025-11-15-preview \
    --set properties.autoScaleConfiguration.enableAutoScale=false
Best practices
- Set the minimum TU count to handle your baseline load. Autoscale needs time to detect utilization changes and provision more capacity. A minimum value that covers normal traffic avoids throttling during the initial ramp-up.
- Don't set the maximum TU count higher than what your budget allows. Every TU allocated incurs cost. Set the maximum to the highest capacity you're willing to pay for during peak periods.
- Account for the cooldown period during traffic spikes. After a scale-up, there's a dynamic cooldown period before the next scale operation. If your workload ramps from idle to peak within seconds, set a minimum TU count that can absorb the initial burst.
- Review per-TU capacity limits for all categories. Autoscale evaluates all categories (event ingress, event egress, MQTT publish, MQTT clients) together. If your workload is dominated by one category (for example, MQTT connections), your TU requirements might be driven primarily by that category.