Note
Access to this page requires authorization. You can try signing in or changing directories.
Access to this page requires authorization. You can try changing directories.
Create a Salesforce connection in Catalog Explorer to store authentication credentials for Lakeflow Connect ingestion. Any user with the USE CONNECTION privilege on the connection can then create Salesforce ingestion pipelines without needing direct access to the credentials.
Alternatively, admin users can create a connection and a pipeline at the same time in the data ingestion UI. See Create an ingestion pipeline.
For privilege requirements, see Connect to managed ingestion sources.
Prerequisites
Salesforce applies usage restrictions to connected apps. The permissions in the following table are required for a successful first-time authentication. If you lack these permissions, Salesforce blocks the connection and requires an admin to install the Databricks connected app.
| Condition | Required permission |
|---|---|
| API Access Control is enabled. | Customize Application and either Modify All Data or Manage Connected Apps |
| API Access Control is not enabled. | Approve Uninstalled Connected Apps |
For background, see Prepare for Connected App Usage Restrictions Change in the Salesforce documentation.
Create a connection
Salesforce connections support two authentication types. Choose the one that fits your organization:
- OAuth (user-to-machine): You sign in to Salesforce interactively to grant Azure Databricks access. See OAuth authentication.
- Mutual TLS (mTLS): Azure Databricks and Salesforce exchange and verify client certificates to establish two-way trust, combined with the OAuth client credentials flow. Choose this for API-only users or when your organization requires mTLS. See Mutual TLS (mTLS) authentication.
OAuth authentication
In the Azure Databricks workspace, click Catalog > External locations > Connections > Create connection.
On the Connection basics page of the Set up connection wizard, specify a unique Connection name.
In the Connection type drop-down menu, select Salesforce.
(Optional) Add a comment.
Click Next.
If you're ingesting from a Salesforce sandbox account, set Is sandbox to
true.Click Sign in with Salesforce.
You're redirected to Salesforce.
If you're ingesting from a Salesforce sandbox, click Use Custom Domain, provide the sandbox URL, and then click Continue.
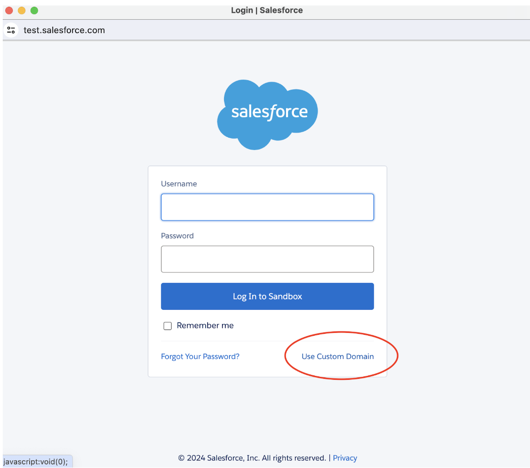
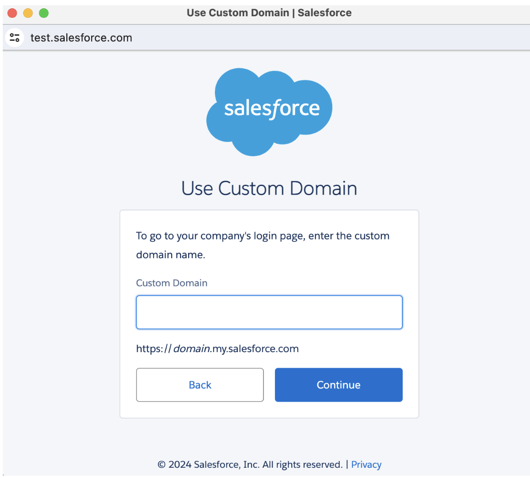
Enter your Salesforce credentials and click Log in. Databricks recommends logging in as a Salesforce user that's dedicated to Databricks ingestion.
Important
For security purposes, only authenticate if you clicked an OAuth 2.0 link in the Azure Databricks UI.
After returning to the ingestion wizard, click Create connection.
Mutual TLS (mTLS) authentication
Important
This feature is in Beta. Workspace admins can control access to this feature from the Previews page. See Manage Azure Databricks previews.
With mutual TLS, both Azure Databricks and Salesforce exchange and verify certificates, so each system confirms the other's identity before exchanging any data. Set up the certificate and connected app in Salesforce, then create the connection in Azure Databricks.
Salesforce setup
Ensure that mutual authentication is enabled for your Salesforce account. See Enable mutual authentication in the Salesforce documentation.
Generate and upload a certificate authority (CA)-signed certificate in Salesforce:
- From Setup, in the Quick Find box, enter
Certificate and Key Management, and then select Certificate and Key Management. - Select Create CA-Signed Certificate and enter the details to generate the certificate signing request (CSR).
- Send the CSR to a CA that Salesforce recognizes. For the list of trusted CAs, see the Salesforce CA list.
- Get the private key that corresponds to the certificate. You use this key in the Azure Databricks setup.
For detailed steps, see Upload a signed certificate in the Salesforce documentation.
- From Setup, in the Quick Find box, enter
Verify that the signed certificate bundle contains the root and intermediate certificates, and that the certificate metadata lists a public CA as the issuer.
Combine the client, intermediate, and root certificates into a single file, in the order Leaf (client), intermediate, then root. Separate each certificate with
BEGIN CERTIFICATEandEND CERTIFICATEblocks.Save the private key in a separate file in PEM (
.pem) format.Create a connected app and configure it for the OAuth client credentials flow. Assign the client credentials flow to the user for whom you enabled the mutual authentication profile. For detailed steps, see Configure a connected app for the client credentials flow in the Salesforce documentation.
Note the consumer key and consumer secret for the connected app. You use these as the client ID and client secret in the Azure Databricks setup.
Azure Databricks setup
In the Azure Databricks workspace, click Catalog > External data > Connections > Create connection.
On the Connection basics page of the Set up connection wizard, specify a unique Connection name.
In the Connection type drop-down menu, select Salesforce.
In the Auth type drop-down menu, select Mutual TLS.
(Optional) Enter a comment.
Click Next.
Enter the following connection details:
Field Description Client ID The consumer key from your Salesforce connected app. Client Secret The consumer secret from your Salesforce connected app. Instance URL The domain URL for your Salesforce account, for example https://DomainName.my.salesforce.com. The URL must use HTTPS and end insalesforce.com.Client Private Key The private key in PEM format that corresponds to the certificate you uploaded to Salesforce. Client Certificate The certificate chain in PEM format. Enter the same certificate chain that you uploaded to Salesforce. Click Create connection.