Note
Access to this page requires authorization. You can try signing in or changing directories.
Access to this page requires authorization. You can try changing directories.
As an administrator, you can install and enable LinkedIn Sales Navigator for your organization.
Important
Dynamics 365 Sales (on-premises) doesn't support LinkedIn Sales Navigator.
Review prerequisites
Review the following prerequisites to install and enable LinkedIn Sales Navigator:
You have a System Administrator security role in Dynamics 365.
You can integrate LinkedIn Sales Navigator with Dynamics 365 Customer Engagement apps only and can't integrate it with a Microsoft Dataverse organization.
You have a Microsoft Relationship Sales subscription for Dynamics 365. Microsoft Relationship Sales (MRS) solution includes Dynamics Sales Enterprise and LinkedIn Sales Navigator Advanced license.
or
If you don't have MRS Solution or MRS Solution plus for LinkedIn Sales Navigator license, you need to sign up your team for LinkedIn Sales Navigator Advanced or LinkedIn Sales Navigator Advanced Plus license.Note
We recommend having a Microsoft Relationship Sales solution Plus license that includes Dynamics 365 Sales Enterprise and LinkedIn Sales Navigator Advanced Plus license. To learn more, see the Dynamics 365 Sales section from the Microsoft Dynamics 365 Licensing Guide.
Tip
If you see a "LinkedIn Sales Navigator subscription not found" message after installation, verify that a proper LinkedIn Sales Navigator license is assigned to you. A Microsoft Relationship Sales subscription alone doesn't automatically provision LinkedIn licenses—both the Dynamics 365 and LinkedIn license components must be active.
You need to enable JavaScript in your browser.
You have to disable your pop-up blocker for the Dynamics 365 domain.
Install LinkedIn Sales Navigator
To install the app, go to the Install LinkedIn Sales Navigator for Dynamics 365 pane. You can access this pane in three ways:
App Settings
Sign in to your Sales Hub app.
In the site map, at the lower-left, select the Change area icon
 , and then select App Settings.
Under General Settings, select LinkedIn integration and then select Enable LinkedIn integration.
Advanced Settings
- In the sales app, go to Settings > Advanced Settings.
- On the Business Management page, select LinkedIn Sales Navigator.
- On the LinkedIn integration page, select Enable LinkedIn integration.
Marketplace page
Go to the LinkedIn Sales Navigator for Dynamics 365 Marketplace page, and then select Get it now.
You're navigated to the Power Platform admin center page.
On the Install LinkedIn Sales Navigator for Dynamics 365 pane, choose your environment.
Select the check boxes for Microsoft and Dynamics 365 legal terms and privacy statements, and then select Install.
The installation might take a few minutes to complete.
(Optional) To check the installation status, go to Environments > your environment > Dynamics 365 apps and verify that the status of Dynamics 365 Sales LinkedIn Integration solution is Installed.
(Optional) Validate the installation to help ensure that the installation is successful. For more information, see Validate the installation.
Validate the installation
In the sales app, go to Settings > Advanced Settings.

Go to Customization > Solutions.
Verify that the following solutions are installed in your organization.
- LinkedInSalesNavigatorControlsForUnifiedClient
- msdyn_LinkedInSalesNavigatorAnchor

Note
If the LinkedInSalesNavigatorControlsForUnifiedClient solution isn't available in the list, follow the steps described in the LinkedInSalesNavigatorControlsForUnifiedClient solution is not available in the organization to configure LinkedIn Sales Navigator section.
After the installation finishes, enable LinkedIn Sales Navigator.
Enable LinkedIn Sales Navigator
When you enable this feature, the Sales Navigator controls appear on Account, Contact, Lead, and Opportunity pages by default. You can also customize other forms and entities to show Sales Navigator controls.
Use one of the following methods to go to the LinkedIn integration page:
App Settings
Sign in to your Sales Hub app and go to App Settings.
Under General Settings, select LinkedIn integration.
Advanced Settings
In the sales app, go to Settings > Advanced Settings.
On the Business Management page, select LinkedIn Sales Navigator.
On the LinkedIn integration page, toggle the following options to enable:
- Sales navigator integration: Allows you to see LinkedIn Sales Navigator controls on Account, Contact, Lead, and Opportunity forms.
- Daily profile picture updates: Allows you to see the latest profile pictures of your contacts that are updated in LinkedIn.
- Personal and employment changes: Allows you to see personal and employment changes of your contacts that are updated in LinkedIn.
- Hide employment notification: Allows you to hide the employment notification of your contacts that are updated in LinkedIn when sellers select Ignore Update on the Verify Contact Details pane.

Select Save.
After you enable the LinkedIn Sales Navigator solution, enable CRM sync and activity writeback.
Enable CRM sync and activity writeback
When you enable CRM sync and activity writeback, Sales Navigator matches the Accounts, Leads, and Contacts in Dynamics 365 Sales. The sync also allows you to see the data created in LinkedIn Sales Navigator from Dynamics 365 Sales, including InMails and Messages.
To enable CRM sync and activity writeback, follow the process described in CRM Sync & Activity Writeback for Dynamics 365.
Existing orgs that got updated with April 19 features
In the April 19 release, Microsoft introduced changes to how the Sales Navigator controls are enabled. Here are a few things to consider if you don't plan to enable the integration:
Three solutions related to the LinkedIn integration appear in the All Solutions view in Settings > Customization > Solutions. Although these solutions are preinstalled, the functionality and data transfer between the two systems is disabled unless you enable LinkedIn Sales Navigator. Additionally, you need to explicitly enable CRM Sync on LinkedIn Sales Navigator Admin Settings page.

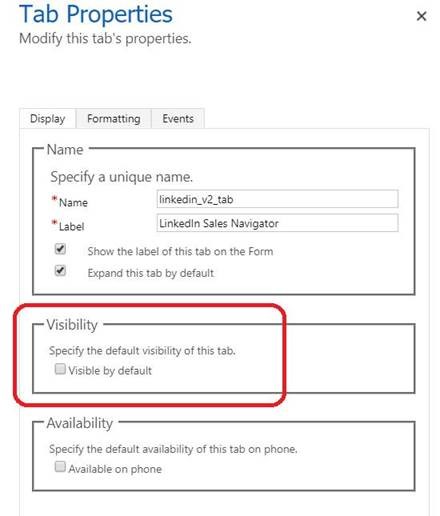
System customizers see the new LinkedIn controls in Account, Contact, Lead, and Opportunity form editors. However, the visibility for these controls is turned off by default and users can't see them on forms unless the feature is enabled by a system administrator. Customizers can remove these controls from pages as they'd remove any control that they consider too distracting.
While using Advanced Find, users see the new entities introduced by these solutions (InMails, Messages, and Smart Links) even if the integration isn't enabled. This behavior is intended; users can ignore these entities if they aren't actively using LinkedIn Sales Navigator.
Troubleshoot common issues
If you encounter issues during or after installation, use the following guidance to resolve them.
Integration shows as inactive
If the LinkedIn Sales Navigator integration status shows Inactive after you complete all installation and enablement steps:
- Go to Advanced settings > Customizations > Solutions and verify that LinkedInSalesNavigatorControlsForUnifiedClient, LinkedIn, and msdyn_LinkedInSalesNavigatorAnchor solutions show status as Installed.
- Go to the LinkedIn Sales Navigator Admin Settings page and verify that CRM Sync is enabled.
- Verify that the LinkedIn Sales Navigator license is active and assigned to users who need the integration.
LinkedIn Sales Navigator tab is missing
If you don't see the LinkedIn Sales Navigator tab on Account, Contact, Lead, or Opportunity records:
- Verify that the Sales navigator integration toggle is turned on in the LinkedIn integration settings.
- Go to Advanced settings > Customizations > Solutions and verify that the version for the msdyn_LinkedInSalesNavigatorAnchor solution is 3.0.1.1060 or later.
- If any relevant controls were removed, add them back using the form editor. For more information, see Customize forms to show Sales Navigator controls.
Installation is stuck or fails
If the installation remains stuck on Install Requested or fails:
- In the Power Platform admin center, select Environments > your environment > Dynamics 365 apps and verify the installation status for any errors.
- Verify that you have a System Administrator security role and that the environment is a Dynamics 365 Customer Engagement environment (not a standalone Dataverse environment).
- If the installation fails due to existing solution dependencies, try uninstalling and reinstalling the LinkedIn solutions. For more information, see Remove LinkedIn Sales Navigator from Dynamics 365.
Related information
Overview for LinkedIn Sales Navigator solutions
Customize forms to show Sales Navigator controls
Work with Sales Navigator controls on forms
See profile pictures