Edit insight cards
Editing the cards allows you to do the following tasks based on the card:
- Turn cards on or off
- Assign to or remove roles from a card
- Set priority of a card
- Edit flow of a card
- View card usage metrics
License and role requirements
| Requirement type | You must have |
|---|---|
| License | Dynamics 365 Sales Premium More information: Dynamics 365 Sales pricing |
| Security roles | System Administrator More information: Predefined security roles for Sales |
Turn cards on or off
Different users have different needs in using the cards, and you don’t want to show the card for some users at this point in time. Similarly, you don’t want to show certain cards in your organization or you might not need them to be displayed at this time. You can turn the cards on or off depending on the need to show them to specific user roles in the user's Personal settings section.
When you turn off a card, the assistant feature disables the card for the security roles you've assigned the card to. However, the assistant feature doesn't disable other properties that are associated with the card. For the card that you generated using Microsoft Power Automate, you can disable the card but you can't delete the flow. Even after you disable the card, the flow remains active because other custom insight cards might use the flow.
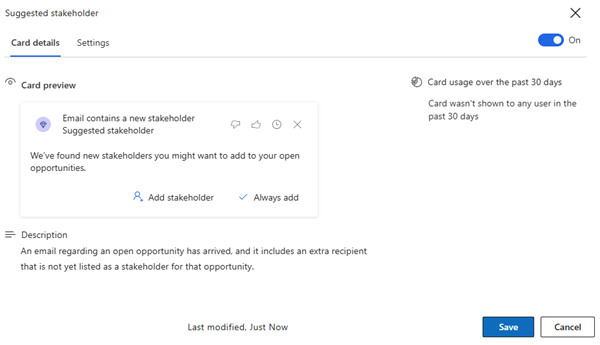
Go to the Assistant Studio home page and open a card from the list that you want to turn on or off. Select the On/Off toggle as required. In this example, we turned on the Suggested stakeholder card.
To turn off or on multiple cards, select the cards that you want to turn on or off. Select Turn on cards or Turn off cards as per your requirement.
Turn cards on or off for a security role
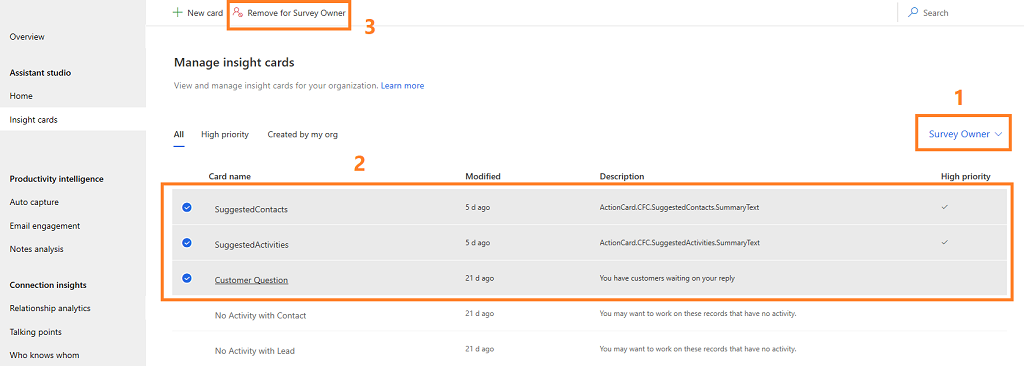
If you want to turn off cards for a particular security role, go to the Insight cards page (Insight cards tab) under Assistant studio and filter the cards based on the role. Choose the cards that you want to turn off for the selected role and select Remove for role name. The cards will not show for the role that you have selected.
In this example, we have filtered the cards with the security role Survey Owner and chosen the cards SuggestedContacts, SuggestedActivities, and Customer Question. Select Remove for Survey Owner and the cards are turned off only for the Survey Owner role.
Assign roles to or remove roles from a card
When you create a card, you can specify the security roles to whom you want the card to display. By default, the cards are assigned to all the security roles in your organization. You can edit the card to assign or remove the security roles to the card.
Note
The security roles you see in the cards are defined in the Microsoft Power Platform admin center. To learn more on security roles, see Security roles and privileges.
Go to the Insight cards page (Insight cards tab) under Assistant studio and select the card for which you want to add the security roles. In this example, we've selected the Close date coming soon card.
Go to the Settings tab. You can see that by default the card is assigned to all the security roles.
Under the Show by security role section, select the Add a security role search box. A list of security roles that are available in your organization is displayed.
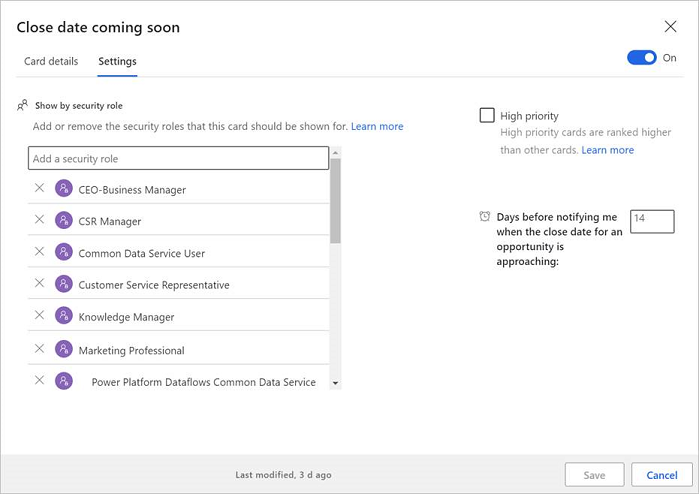
In this example, we have added the Marketing Manager security role to the Close date coming soon card.
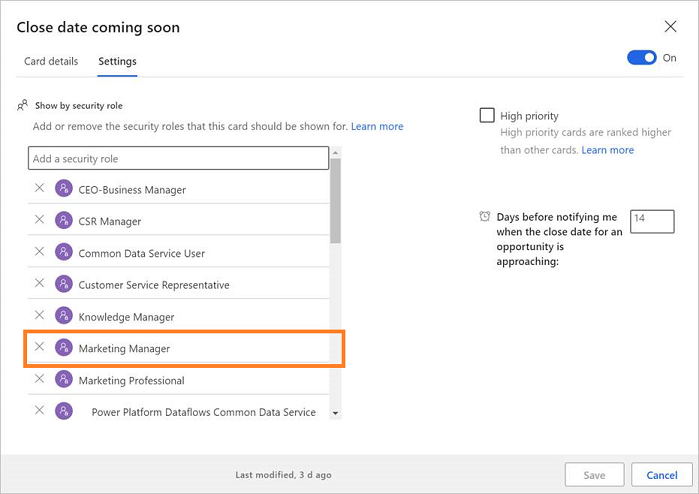
Save the card.
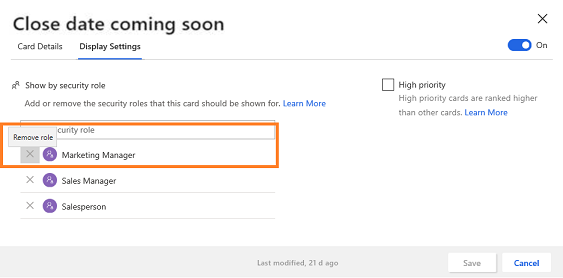
To remove security roles, select the role to remove. In this example, we're removing the Marketing Manager security role from the Close date coming soon card.
Set priority for a card
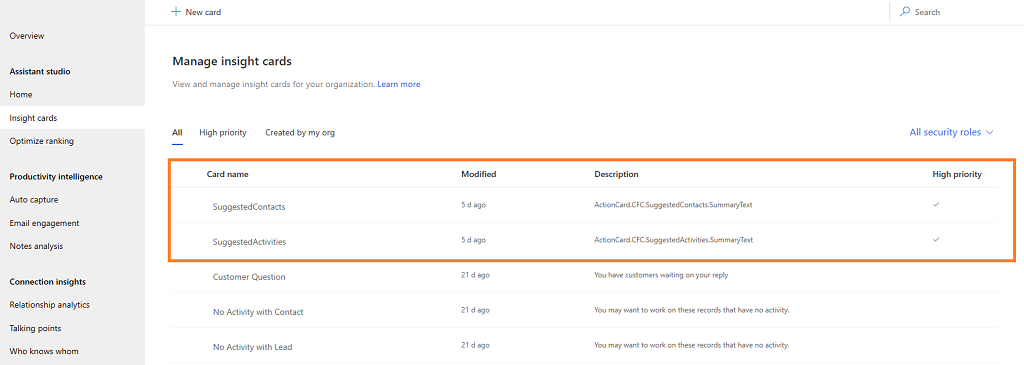
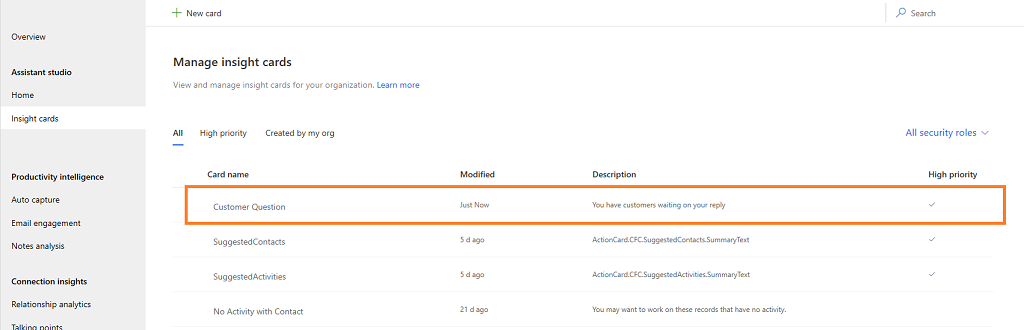
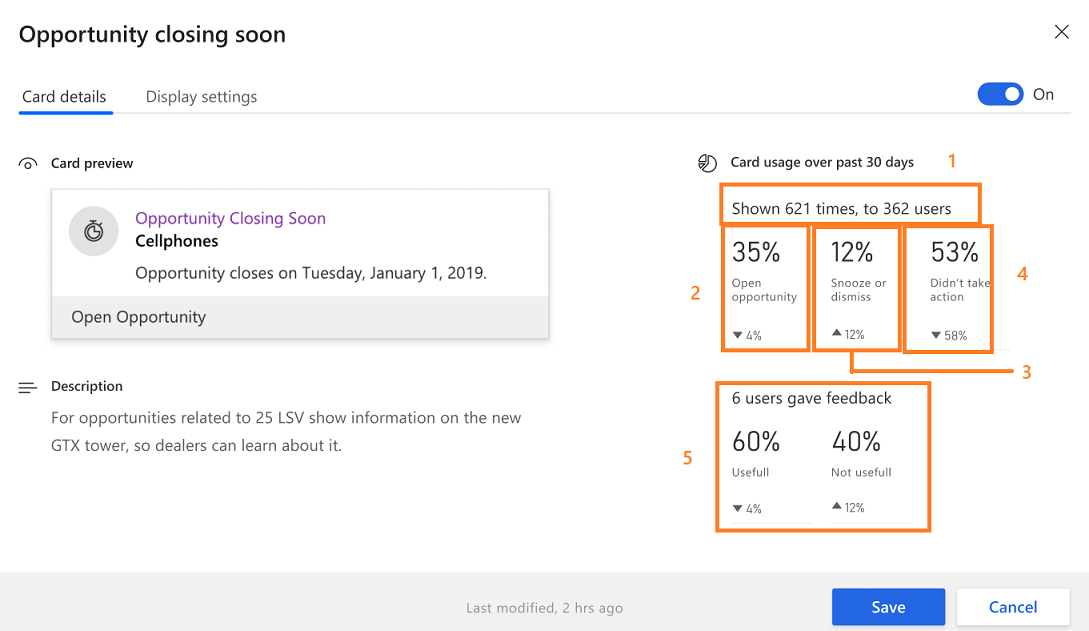
You can prioritize the cards that display in your organization. When you set a card as a priority, the card is displayed to the user at the top. When you open the Assistant studio page, the list of cards that are defined for your organization is displayed. A check mark corresponding to the card in the High priority column specifies that the card is set as priority. Also, select the High priority tab to view the high priority cards.
In this example, the SuggestedContacts and SuggestedActivities cards are set as high priority. These cards will be promoted above other cards and displayed on top of the others.
To set card priority:
Go to the Assistant studio page and open the card that you want to set as a priority.
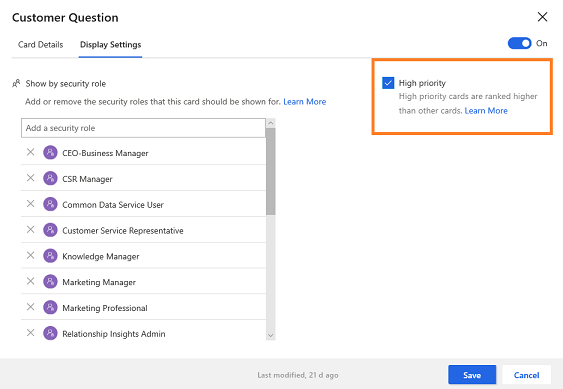
Go to the Settings tab and select High priority. In this example, we're selecting and prioritizing the Customer Question card.
Save and close the card.
The Customer Question card is set as priority and you can verify that the High priority column corresponding to the card is updated with a check.
To know how to optimize ranking of cards, see Optimize ranking of insight cards.
Edit flow of a card
You can always edit the flow of the card when there is a business need to update it. You can add or update conditions and steps, and update the properties of a condition.
Note
The Edit card logic in Microsoft Power Automate option appears only for the cards that are created in Microsoft Power Automate. You can see a flow icon corresponding to the name of the cards that are created using Power Automate.
In Assistant studio home page, select the card for which you want to change the flow. In this example, we have selected the No update in opportunity card.
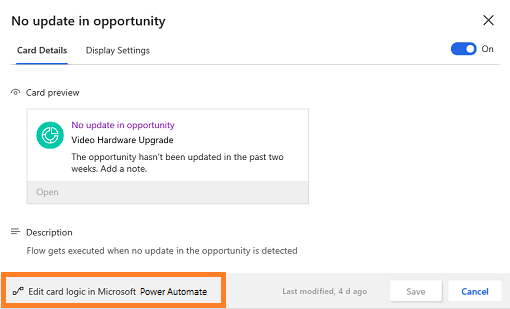
Select Edit card logic in Microsoft Power Automate and the flow opens in a tab to edit.

Edit the flow as required and select Save. The flow of the card is updated.
To learn more about editing the flow, see Add an action and Add a condition.
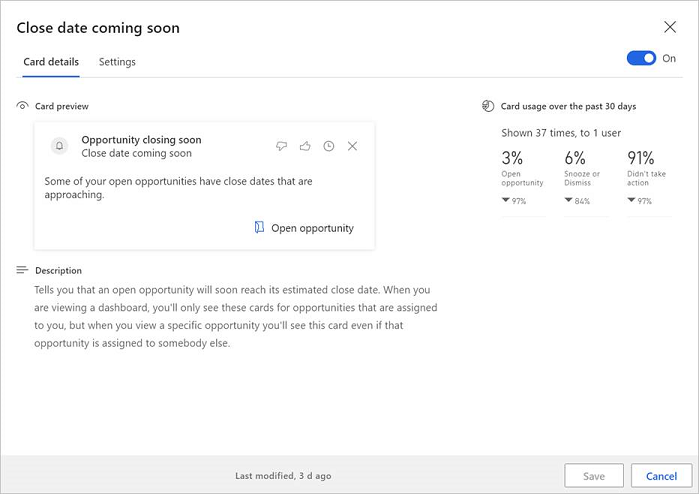
View card usage metrics
Each insight card that is available in Assistant shows usage metrics based on the views and actions that users perform. These metrics help to get real-time data on how the card is used. Also, you can analyze what updates are necessary for the card, if it is underused.
The metric values are for the last 30 days and calculated as follows:
Percentage value = (Number of actions performed * 100) / Number of views
For example, when a card is displayed for 10 users and only four users have performed an action, the value displayed is 40%.
Also, at the bottom of each metric, a trend value is displayed for the last 30 days from the current date. For example, the metric value was 30% in the last 30 days and 40% on the current date, so the trend value displays a 10% increase in usage.
Note
The metric values are refreshed every 24 hours.
The following metrics are available on the card.
| Number | Metrics | Description |
|---|---|---|
| 1 | Header | Specifies the number of times the card has been displayed to the number of users. For example, if a card is displayed 621 times to 362 users, then the header shows Shown 621 times, to 362 users. |
| 2 | Action | Displays in percentage value the number of times the users performed actions on the card. |
| 3 | Snooze or dismiss | Displays in percentage value that users have performed snooze and dismiss actions on the card. |
| 4 | No action | Displays in percentage value that users didn't perform actions on the card. |
| 5 | Feedback | Displays in percentage value the number of times the users liked and disliked the card. Also, a header displays the total number of users who gave the feedback. |
Can't find the options in your app?
There are three possibilities:
- You don't have the necessary license or role.
- Your administrator hasn't turned on the feature.
- Your organization is using a custom app. Check with your administrator for exact steps. The steps described in this article are specific to the out-of-the-box Sales Hub and Sales Professional apps.
See also
Configure and manage insight cards for the premium assistant
Create custom insight cards
Optimize ranking of insight cards
Feedback
Coming soon: Throughout 2024 we will be phasing out GitHub Issues as the feedback mechanism for content and replacing it with a new feedback system. For more information see: https://aka.ms/ContentUserFeedback.
Submit and view feedback for