Note
Access to this page requires authorization. You can try signing in or changing directories.
Access to this page requires authorization. You can try changing directories.
Note
Community interest groups have now moved from Yammer to Microsoft Viva Engage. To join a Viva Engage community and take part in the latest discussions, fill out the Request access to Finance and Operations Viva Engage Community form and choose the community you want to join.
This article describes how to configure product filters and filter codes to categorize inventory items in a warehouse. You can also use filters to specify which customers can order a particular item and which items can be purchased from a particular vendor.
By setting up and using product filters, you can automatically organize inventory items in a warehouse and combine filtered items into filter groups. Use filters to put items into categories for handling, purchasing, and selling processes. You might want to group items together or separate them from each other when the way that you handle them is based on weight or handling restrictions. You can also specify which customers or vendors an item can be purchased from or sold to.
Prerequisites
The following table shows the prerequisites that must be in place before you start.
| Prerequisite | Instructions |
|---|---|
| Before you start to configure products on the Released product details page, turn on warehouse processing for the product's storage dimension group. | Go to Product information management > Setup > Dimension and variant groups > Storage dimension groups, and select or create a storage dimension group where the Use warehouse management processes option is set to Yes. |
| If you use customer filters and/or vendor filters, enable their use in Warehouse management parameters. | Go to Warehouse management > Setup > Warehouse management parameters. On the Product filters tab, set the Enable customer filters and/or Enable vendor filters options to Yes. |
Set up product filters
Product filters provide up to 10 Filter title characteristics, which are enumeration (enum) values. You can select these enum values when you create a product filter. The enum values Code 1 through Code 10 are system-defined and represent a specific characteristic or attribute of an item. For example, Code 1 might represent items that have a hazardous material classification. Code 2 might represent items that only vendors can purchase. Product filters then define the specific Filter code value that is associated with a Filter title value.
Go to Warehouse management > Setup > Product filters > Product filters.
On the Action Pane, select New to add a product filter to the grid.
In the Filter title field, select a value.
In the Filter code field, enter a value.

In the Description field, enter a name for the code. For example, Code 2 might represent vendors. You can then create a product filter for a specific vendor or group of vendors. To learn more, see the Setup vendor filter codes section later in this article.

Set up product filter groups
Use filter groups to organize filter codes. This capability is helpful when a group is used in a query in a location directive and you want to search for the group instead of a series of codes. Each filter group is associated with an item group.
Important
Not all product filter groups are available for filter codes that are higher than Code 4 (that is, Code 5 through Code 10). For example, for released products, although all the product filter codes are added, the grouping of filter codes isn't updated. This behavior might be updated in later releases.
To set up filter groups, follow these steps:
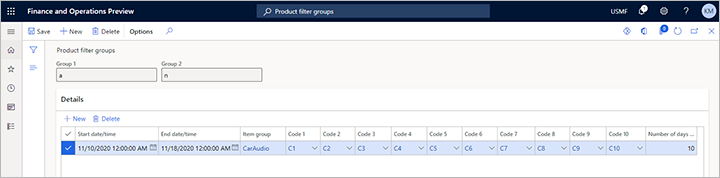
Go to Warehouse management > Setup > Product filters > Product filter groups.
On the Action Pane, select New.
In the Group 1 and Group 2 fields, enter the names that you can use to categorize items.
On the Details FastTab, select New to add a line.
In the Start date/time and End date/time fields, enter start and end dates for the filter group.
In the Item group field, select the item group that the product filter should apply to.
In the Code 1 through Code 10 fields, select the filter codes to include in the group, as required.
Note
If you receive an error message when you close the page, a code setup might be missing. On the Item groups page, you can make the codes mandatory for an item group by selecting the Assign filter code 1 for item group, Assign filter code 2 for item group, and so on, check boxes.
Set up filter codes on item groups
When you set up filter codes on an item group, you specify the codes required for products attached to that item group.
To set up filter codes on item groups, follow these steps:
Go to Inventory management > Setup > Inventory > Item groups.
On the Action Pane, select New to create an item group.
In the Item group field, enter a name.
In the Name field, enter a description.
On the Warehouse FastTab, in the Filter required section, select the check boxes for the filter codes that you must specify for products associated with the item group.
To update a released product, open its Released product details page, and then, on the Action Pane, select Edit. The filters that are associated with codes then become available on the Warehouse FastTab.
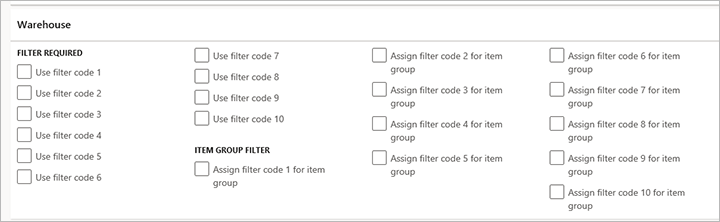
In the Item group filter section, select the check boxes for the filters that must match for the filter group to be the default filter group for an item.
For example, if you select the Use filter code 1 and Use filter code 2 check boxes, both filter code 1 and filter code 2 of the item must match the setup of the filter group for the item group before you can select the filter group. When you create a new item, the selected filter group is the default filter group in the Group 1 and Group 2 fields on the Warehouse FastTab of the Released product details page.
Important
You can enable product filter codes only for items that use warehouse management processes (WMS).
Specify filter codes for released products
Follow these steps to specify filter codes for released products. For example, use filter codes to group hazardous products that specific vendors purchase.
Go to Product information management > Products > Released products.
On the Action Pane, select New to create a product.
In the New released product dialog box, enter the data required to create the base of a new product, and then select OK.
Product filter codes aren't enabled unless the item group attached to the product is configured for filter codes.
On the Warehouse FastTab, in the Product filter codes section, select filter codes for the Code 1 through Code 10 fields, as required, to specify filter codes for the product.
Set up generally available items
You can make specific inventory items available only for customers, only for vendors, or for both customers and vendors.
Note
Customer and vendor filters don't apply to any item set up as generally available.
To set up generally available items, follow these steps:
Go to Warehouse management > Setup > Product filters > Generally available products.
On the Action Pane, select New to create a record.
In the Customer or vendor field, select Customer, Vendor, or All to make the items available for customers, vendors, or both.
In the Start date/time field, enter the date and time when the item becomes available.
In the Item group field, select an item group.
In the Code 1 through Code 10 fields, select the filter codes to limit the items that are generally available.
When you select an item group, you set that group of items as generally available. By selecting filter codes in these fields, you limit the items that are available.
Set up customer product filters
Use this optional procedure to specify items that customers can access, in addition to the items available through the filter setup on the Generally available items page. You can set up multiple filters for a single customer.
To set up customer filter codes, follow these steps:
- Go to Sales and marketing > Customers > All customers.
- Select a customer.
- On the Action Pane, on the Customer tab, in the Set up group, select Product filters.
- On the Product filter codes page, on the Action Pane, select New.
- In the Start date/time and End date/time fields, enter start and end dates for the selected item group.
- In the Item group field, select an item group.
- In the Code 1 through Code 10 fields, select the filter codes to use as criteria to limit the items that are available for customers in the selected item group. You must make a selection for every filter code set up for the item group.
Set up vendor product filters
Use this optional procedure to specify items that a vendor can access, in addition to the items made available through the filter setup on the Generally available items page. You can set up multiple filters for a single vendor.
To set up vendor filter codes, follow these steps:
- Go to Procurement and sourcing > Vendors > All vendors.
- Select a vendor.
- On the Action Pane, on the Vendor tab, in the Set up group, select Product filters.
- On the Filter codes page, on the Action Pane, select New.
- In the Start date/time and End date/time fields, enter start and end dates for the selected item group.
- In the Item group field, select an item group.
- In the Code 1 through Code 10 fields, select the filter codes to use as criteria to limit the items that are available for vendors in the selected item group. You must make a selection for every filter code set up for the item group.
Note
The setup of vendor product filters applies to released products where warehouse management processes (WMS) are enabled for the associated storage dimension group. The filter codes determine whether the system allows users to purchase a given item from a given vendor when they create purchase order lines. Microsoft Dynamics 365 Supply Chain Management has two methods for handling vendor approval. If one or more released products exist where the Approved vendor check method field is set to Warning only or Not allowed, both vendor approval methods can be enabled for those items. This situation might cause issues when users create purchase order lines.
Related information
- WMS Filter codes (blog post)