Note
Access to this page requires authorization. You can try signing in or changing directories.
Access to this page requires authorization. You can try changing directories.
This article provides an overview of the scanning and ingestion features in Microsoft Purview Data Map. These features connect your Microsoft Purview account to your sources to populate Data Map and Unified Catalog so you can begin exploring and managing your data through Microsoft Purview.
- Scanning captures metadata from data sources and brings it to Microsoft Purview.
- Ingestion processes metadata and stores it in Unified Catalog from both:
- Data source scans - scanned metadata is added to Data Map.
- Lineage connections - transformation resources add metadata about their sources, outputs, and activities to Data Map.
Scanning
After you register data sources in your Microsoft Purview account, scan the data sources. The scanning process connects to the data source and captures technical metadata like names, file size, columns, and more. It also extracts schema for structured data sources, applies classifications on schemas, and applies sensitivity labels if your Data Map is connected to Microsoft Purview portal. You can trigger the scanning process to run immediately or schedule it to run periodically to keep your Microsoft Purview account up to date.
For each scan, you can customize the process so that you only scan the information you need, rather than the whole source.
Choose an authentication method for your scans
Microsoft Purview is secure by default. It doesn't store passwords or secrets directly, so you need to choose an authentication method for your sources. You can authenticate your Microsoft Purview account in several ways, but not all methods are supported for each data source.
- Managed Identity
- Service Principal
- SQL Authentication
- Windows Authentication
- Role ARN
- Delegated Authentication
- Consumer Key
- Account Key or Basic Authentication
Whenever possible, use a Managed Identity because it eliminates the need for storing and managing credentials for individual data sources. This method can greatly reduce the time you and your team spend setting up and troubleshooting authentication for scans. When you enable a managed identity for your Microsoft Purview account, an identity is created in Microsoft Entra ID (Entra ID) and is tied to the lifecycle of your account.
Scope your scan
When scanning a source, you can scan the entire data source or choose only specific entities (folders or tables) to scan. The available options depend on the source you're scanning. You can define these options for both one-time and scheduled scans.
For example, when creating and running a scan for an Azure SQL Database, you can choose which tables to scan, or select the entire database.
For each entity (folder or table), three selection states exist: fully selected, partially selected, and not selected. In the following example, if you select Department 1 on the folder hierarchy, Department 1 is considered as fully selected. The parent entities for Department 1, which are Company and example, are considered as partially selected, since the other entities under the same parent (for example, Department 2) aren't selected. Different icons are used on the UI for entities with different selection states.
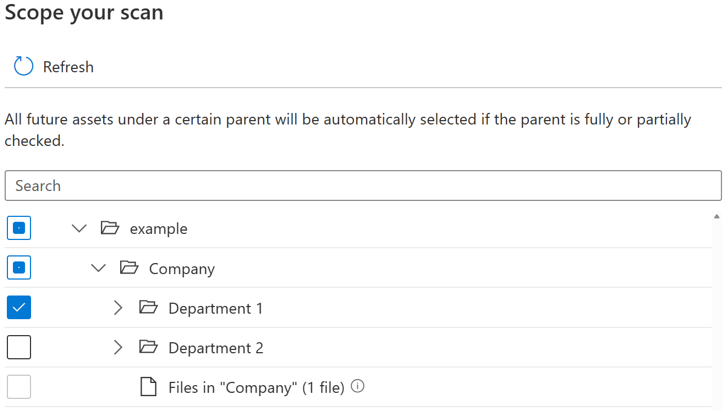
After you run the scan, it's likely that new assets will be added in the source system. By default, future assets under a certain parent are automatically selected if the parent is fully or partially selected when you run the scan again. In the preceding example, after you select Department 1 and run the scan, any new assets under folder Department 1 or under Company and example are included when you run the scan again.
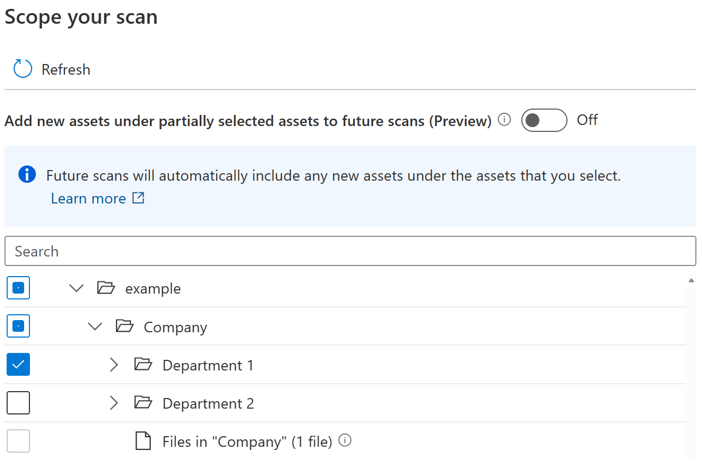
A toggle button, as seen in the image below, allows users to control the automatic inclusion for new assets under partially selected parent. By default, the toggle is turned off and the automatic inclusion behavior for a partially selected parent is disabled. With the toggle turned off, any new assets under partially selected parents like Company and example aren't included when you run the scan again; only new assets under Department 1 are included in future scan.
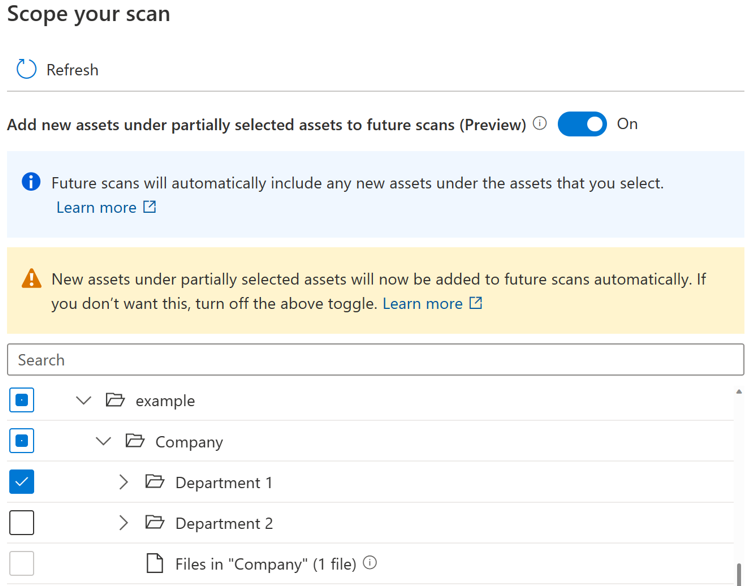
If the toggle is turned on, the new assets under a parent are automatically selected if the parent is fully or partially selected when you run the scan again. The inclusion behavior is the same as before the toggle is introduced.
Note
- The availability of the toggle button depends on the data source type. Currently it's available in public preview for sources including Azure Blob Storage, Azure Data Lake Storage Gen 1, Azure Data Lake Storage Gen 2, Azure Files, and Azure Dedicated SQL pool (formerly SQL DW).
- For any scans created or scheduled before the toggle is introduced, the toggle state is set as On and can't be changed. For any scans created or scheduled after the toggle is introduced, the toggle state can't be changed after the scan is saved. You need to create a new scan to change the toggle state.
- When the toggle is turned off, for sources of storage type like Azure Data Lake Storage Gen 2, it can take up to four hours before the browse by source type experience becomes fully available after your scan job is completed.
Known limitations
When the toggle is turned off:
- The file entities under a partially selected parent aren't scanned.
- If all existing entities under a parent are explicitly selected, the parent is considered fully selected, and any new assets under the parent are included when you run the scan again.
Customize scan level
In Data Map terminology, three different levels of scanning exist based on the metadata scope and functionalities:
- L1 scan: Extracts basic information and metadata like file name, size, and fully qualified name
- L2 scan: Extracts schema for structured file types and database tables
- L3 scan: Extracts schema where applicable and subjects the sampled file to the system and custom classification rules
When you set up a new scan or edit an existing scan, you can customize the scan level for scanning data sources that support the scan level configuration.
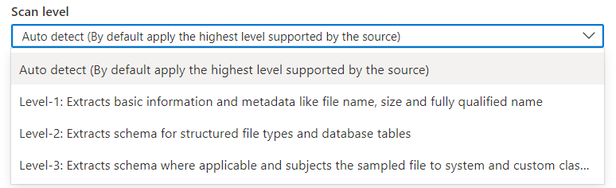
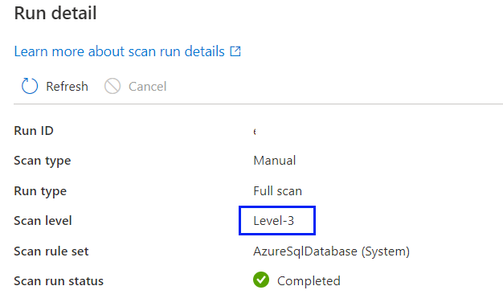
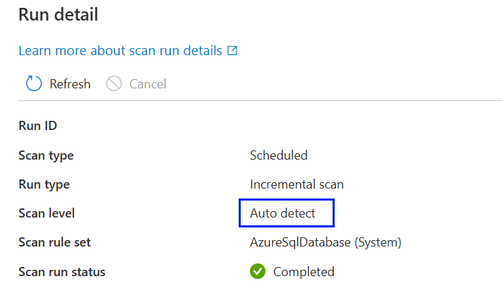
By default, the "Auto detect" will be selected, which means Microsoft Purview applies the highest scan level available for this data source. Take Azure SQL Database as an example, the "Auto detect" will be resolved as “Level-3” when the scan is executed as the data source has already supported classification in Microsoft Purview. The scan level in the scan run detail shows the actual level applied.
For all scan runs in the scan history that completed before customizing scan level as a new feature, the scan level is set and displayed as Auto detect.
When a higher scan level becomes available for a data source, the saved or scheduled scans that have scan level set to Auto detect automatically apply the new scan level. For example, if classification as a new feature is enabled for a given data source, all existing scans on this data source automatically apply classification.
The scan level setting shows in the scan monitoring interface for each scan run.
If you select Level-1, scanning returns only basic technical metadata like asset name, asset size, modified timestamp, and more, based on the existing metadata availability of a specific data source. For SQL Database, the process creates asset entities like tables in Data Map but doesn't extract the table schema. (Note: users can still see the table schema via live view if they have necessary permissions in the source system).
If you select Level-2, scanning returns table schemas and basic technical metadata, but it doesn't perform data sampling and classification. For Azure SQL Database, table asset entities capture the table schema without classification information.
If you select Level-3, scanning performs the data sampling and classification. This is a standard configuration for Azure SQL Database scanning before scan level as a new feature is introduced.
If you set a scheduled scan to a lower scan level and later modify it to a higher scan level, the next scan run automatically performs a full scan and updates all existing data assets from the data source with metadata introduced by a higher scan level setting. For example, when you change a scheduled scan set with Level-2 on an Azure SQL Database to Level-3, the next scan run is a full scan and updates all existing Azure SQL Database table and view assets with classification information. All scans thereafter resume as incremental scans set with Level-3.
If you set a scheduled scan to a higher scan level and later modify it to a lower scan level, the next scan run continues to perform an incremental scan and all new data assets from the data source only have metadata introduced by a lower scan level setting. For example, when you change a scheduled scan set with Level-3 on an Azure SQL Database to Level-2, the next scan run is an incremental scan and all new Azure SQL Database table and view assets added in Data Map have no classification information. All existing data assets still keep the classification information generated from the previous scan set with Level-3.
Note
- Customizing scan level is currently available for the following data sources: Azure SQL Database, Azure SQL Managed Instance, Azure Cosmos DB for NoSQL, Azure Database for PostgreSQL, Azure Database for MySQL, Azure Data Lake Storage Gen2, Azure Blob Storage, Azure Files, Azure Synapse Analytics, Azure Dedicated SQL pool (formerly SQL DW), Azure Data Explorer, Dataverse, Azure Multiple (Azure Subscription), Azure Multiple (Azure Resource Group), Snowflake, Azure Databricks Unity Catalog
- Currently the feature is only available on Azure integration runtime and Managed Virtual Network integration runtime v2.
Scan rule set
A scan rule set determines the kinds of information a scan looks for when it's running against one of your sources. Available rules depend on the kind of source you're scanning, but include things like the file types you should scan, and the kinds of classifications you need.
Many data source types already have system scan rule sets, but you can also create your own scan rule sets to tailor your scans to your organization.
Schedule your scan
Microsoft Purview gives you a choice of scanning daily, weekly, or monthly at a specific time you choose. Learn more about the supported schedule options. Daily or weekly scans might be appropriate for data sources with structures that are actively under development or frequently change. Monthly scanning is more appropriate for data sources that change infrequently. Work with the administrator of the source you want to scan to identify a time when compute demands on the source are low.
How scans detect deleted assets
A Microsoft Purview catalog is only aware of the state of a data store when it runs a scan. For the catalog to know if a file, table, or container is deleted, it compares the last scan output against the current scan output. For example, suppose that the last time you scanned an Azure Data Lake Storage Gen2 account, it included a folder named folder1. When the same account is scanned again, folder1 is missing. Therefore, the catalog assumes the folder is deleted.
Tip
Because of how deleted files are detected, you might need multiple successful scans to detect and resolve deleted assets. If Unified Catalog isn't registering deletions for a scoped scan, try multiple full scans to resolve the issue.
Detecting deleted files
The logic for detecting missing files works for multiple scans by the same user and by different users. For example, suppose a user runs a one-time scan on a Data Lake Storage Gen2 data store on folders A, B, and C. Later, a different user in the same account runs a different one-time scan on folders C, D, and E of the same data store. Because folder C was scanned twice, the catalog checks it for possible deletions. Folders A, B, D, and E, however, were scanned only once, and the catalog doesn't check them for deleted assets.
To keep deleted files out of your catalog, it's important to run regular scans. The scan interval is important, because the catalog can't detect deleted assets until another scan is run. So, if you run scans once a month on a particular store, the catalog can't detect any deleted data assets in that store until you run the next scan a month later.
When you enumerate large data stores like Data Lake Storage Gen2, there are multiple ways (including enumeration errors and dropped events) to miss information. A particular scan might miss that a file was created or deleted. So, unless the catalog is certain a file is deleted, it doesn't delete it from the catalog. This strategy means there can be errors when a file that doesn't exist in the scanned data store still exists in the catalog. In some cases, a data store might need to be scanned two or three times before it catches certain deleted assets.
Note
- Assets that are marked for deletion are deleted after a successful scan. Deleted assets might continue to be visible in your catalog for some time before they're processed and removed.
- Deletion detection is supported only for these sources within Microsoft Purview: Azure Synapse Analytics workspaces, Azure Arc-enabled SQL Server, Azure Blob Storage, Azure Files, Azure Cosmos DB, Azure Data explorer, Azure Database for MySQL, Azure Database for PostgreSQL, Azure Dedicated SQL pool, Azure Machine Learning, Azure SQL Database, and Azure SQL Managed instance. For these sources, when an asset is deleted from the data source, subsequent scans will automatically remove the corresponding metadata and lineage in Microsoft Purview.
Ingestion
Ingestion is the process that populates Data Map with metadata gathered through its various processes.
Ingestion from scans
The scanning process identifies technical metadata or classifications and sends them to ingestion. Ingestion analyzes the input from the scan, applies resource set patterns, populates available lineage information, and then automatically loads Data Map. You can discover or curate assets and schemas only after ingestion is complete. If your scan completes but you don't see your assets in the Data Map or catalog, you need to wait for the ingestion process to finish.
Ingestion from lineage connections
You can connect resources like Azure Data Factory and Azure Synapse to Microsoft Purview to bring data source and lineage information into Data Map. For example, when a copy pipeline runs in an Azure Data Factory that you connected to Microsoft Purview, the service ingests metadata about the input sources, the activity, and the output sources. The information is added to Data Map.
If you add a data source to Data Map through a scan, the lineage information about the activity is added to the existing source. If you haven't yet added the data source to Data Map, the lineage ingestion process adds it to the root collection with its lineage information.
For more information about the available lineage connections, see the lineage user guide.
Next steps
For more information, or for specific instructions for scanning sources, follow the links below.