Enable code coverage in Visual Studio
For some reason, every time that I want to enable code coverage for a library that I’m unit testing, I found hard to remember how to enable this fabulous feature.
Here are the steps (that work for me):
- Double click the [Local].testsettings file in the Solutions Items folder in the Solution Explorer window.
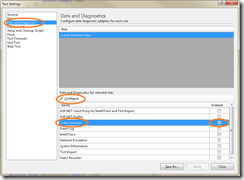
- In the "Test Settings" dialog, choose the "Data and Diagnostics" item.
- In the list of roles, select "Code Coverage" [Figure 1] and immediately click the '"Configure" button.
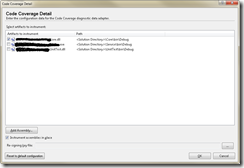
- In the "Code Coverage Detail" [Figure 2] dialog select the assemblies to instrument for code coverage.
- Run your test scenario and in the "Test Tools" toolbar, click the icon "Code Coverage Results".
- Done.
Figure 1.
Figure 2.
Comments
Anonymous
February 16, 2010
Enable code coverage in Visual Studio is very useful for me.Anonymous
February 19, 2012
I couldn't see the Data and Diagnostics option after double clicking the test settings file... Could you provide some help Thanks in advance RupeshAnonymous
May 24, 2012
@aractnido thanks for the nice summary, short and useful! @rupesh not all versions of Visual Studion include this feature. I had to get the Ultimate Edition to use the code coverage featureAnonymous
May 24, 2012
Thanks for circling everything. That didn't even look like a button, so my eyes never went there! I'm getting coverage info now!

