Hands-free configuration of your VM in Microsoft Azure
We have recently announced several updates on Microsoft Azure to facilitate the management of your Virtual Machines. One of them is the work done to have a better integration with Chef and Puppet. Microsoft has worked with the editors of those two well-know devops tools to integrate them of our IaaS platform.
With those tools, you have several options:
- Deploy a supported Linux distribution and use Chef to manage this virtual machine (also called node)
- Deploy a Windows virtual machine with the Chef agent installed
- Use knife to deploy Virtual Machines in Azure
- Integrate in a recipe the configuration of Azure resources
In this post, I'll explain how to use Chef to apply a specific configuration to a Windows machine in Azure using a configuration file. This is done with the three following steps:
- Create the cookbook (the file that defines what should be applied on the VM)
- Create the VM in Azure and indicate to that VM how to get it's configuration
- Monitor the deployment
In this example, let's deploy a Windows VM running Apache. You can use similar a approach to deploy any roles and features or third party applications on you VM.
The Azure Configuration
Chef works with a client running on the machine that needs to be configured (a Node) and a Run List either on a Chef Enterprise server or hosted. On Linux, Chef uses SSH to connect to the node and deploy the client. With Windows you can use WinRM to perform the same operation however, the integration of Chef with Microsoft Azure facilitates this process.
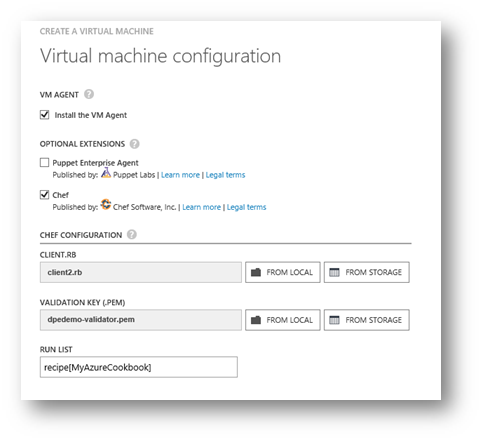
In Azure, Chef appears as an extension of the virtual machines. To deploy the client, you only need to select the check boxes as follows.

Before we can actually deploy a VM using that approach, we need to take some preparation steps.
The configuration file
Chef uses configuration files, called cookbooks, to apply settings on the system. Here are the steps that we need to perform to create the configuration file that will install Apache, configure it and open the proper Firewall port on the system:
You need to have knife installed on your machine. Go to https://getchef.com to install it on your machine and define your local repository.
Add to your repository the "windows" cookbook that has been developed by OpsCode.
This cookbook that is freely available will facilitate the next steps. Here is where you can access the repository: https://github.com/opscode-cookbooks/windows.
Create your own cookbook
Knife cookbook create MyAzureCookbook

Modify the cookbook that you have just created
Open the MyAzureCookbook\recipes\default.rb file to indicate the steps that needs to be done to configure the system.
This is how the file will look like (be careful, it is case sensitive):
# This line will install Apache2 from the current source on internet
windows_package 'apache2' do
source 'https://apache.osuosl.org//httpd/binaries/win32/httpd-2.0.65-win32-x86-openssl-0.9.8y.msi'
action :install
end# Copy the configuration file for apache in the right location
cookbook_file 'C:/Program Files (x86)/Apache Group/Apache2/conf/httpd.conf' do
source 'httpd.conf'
end# Install Apache as a service on Windows using the command line
windows_batch "ApacheAsService" do
code <<-EOH
"C:\\Program Files (x86)\\Apache Group\\Apache2\\bin\\Apache.exe" -k install
EOH
end# Create the file from a template that will be home page of our site
template "C:/Program Files (x86)/Apache Group/Apache2/htdocs/index.html" do
source "index.html.erb"
end# Enable Port 80 on the Firewall of the VM
powershell_script "FWPort80" do
code <<-EOH
New-NetFirewallRule -DisplayName "Allow Apache" -Direction Inbound -Program "C:\\Program Files (x86)\\Apache Group\\Apache2\\bin\\Apache.exe"
EOH
end# Ensure that the apache service is started
service "Apache2" do
action :start
endYou also need to create two files:
MyAzureCookbook\templates\default\index.html.erb
<html>
<body>
<h1> Welcome to My Demo </h1>
<h2> Hello, <%= node["fqdn"]%> !</h2>
<P>
This server has <%= node["kernel"]["cs_info"]["total_physical_memory"].to_i / 1048576 %> MB of memory.
</P>
</body>
</html>MyAzureCookbook\files\default\httpd.conf
Copy the default httpd.conf file and modify or verify the following lines:
ServerRoot "c:/Program Files (x86)/Apache Group/Apache2"
ServerAdmin test@demo.com
ServerName AzureVM1:80Finally you need to modify the file \MyAzureCookbook\metadata.rb and add at the end
depends 'windows'
Upload all the cookbooks to the server.
knife cookbook upload MyAzureCookbook
knife cookbook upload windows
If your cookbook has a syntax error, it will be detected at that time.
How to deploy a Windows VM
In the previous steps we have prepared our configuration files, now let's walk through the deployment itself.
From the Azure management portal start to create a new VM from the Gallery and select a Windows 2012 R2 image.
Define the properties of the VM. In this sample, we'll use "AzureVM1" for the name of the VM and "azureuser" for the administrator.

The VM can be associated with an existing cloud service or a new one. Either cases, make sure you add HTTP (port 80) on the endpoints so that the requests can reach the server.

In the last configuration step, you now need to provide two files:
Client.RB: The client.rb file is more or less the configuration file of the chef client. It has the URL of the server to use to download the recipes, the name of the node that will be used in Chef, the location of the cache of the Chef client.
In the following example, the machine will be represented in Chef with the name of "AzureVM1" and it will be attached to the organization called "dpedemo". The name of the node does not need to be identical to the name of the VM. However, doing so makes it easier from a management point of view.
log_level :info
log_location STDOUTchef_server_url https://api.opscode.com/organizations/dpedemo
validation_client_name "dpedemo-validator"
client_key "c:/chef/client.pem"
validation_key "c:/chef/validation.pem"file_cache_path "c:/chef/cache"
file_backup_path "c:/chef/backup"
cache_options ({:path => "c:/chef/cache/checksums", :skip_expires => true})node_name "AzureVM1"
Validation Key (.PEM): This file is the validator file that you get from your Chef server or your Chef hosted tenant when you download the starter kit for your organization. In my example, I'll use the file called "dpedemo-validator.pem". Your file sill look like "<your_organization>-validator.pem"

The Run List is the list of recipe that will be used to configure the VM by the Chef client. In this example, we use only one run list but you can add several in the order in which they should be applied.
Note: You can store you configuration file and your validation keys in a storage account to facilitate the deployment and not rely on the host that you are using to deploy the Node.
Monitoring the deployment
During the deployment of the above VM, you will see the following stages of the VM:
The VM is being created and the resources provisioned:


Once the VM has been deployed, the process goes to deploying the extensions. This is when the Chef client is being deployed.

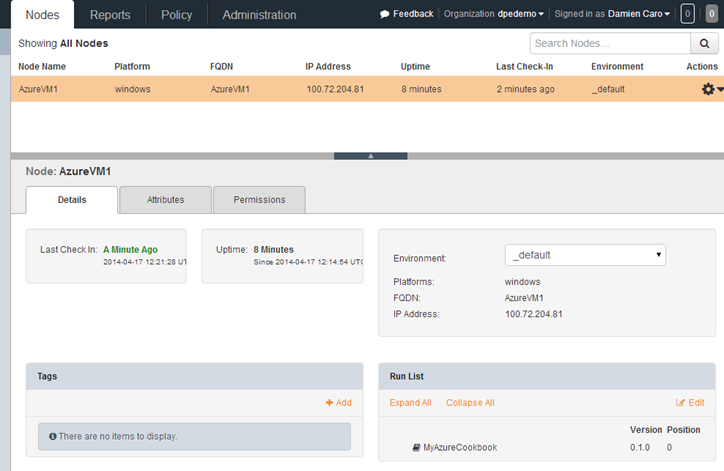
The Chef client registers the node and you can see it appearing in the Chef administration tool. The Cookbook that we have specified in the run list on the Azure portal is reported in the run list on the Chef administration tool.

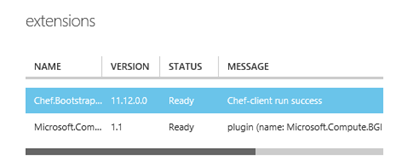
On the Azure portal, in the dashboard of the VM you can verify that the Chef client has correctly executed the recipe by looking at the extension status.

Finally, let's try to access the cloud service.

Conclusion
There are other options to deploy a desired configuration to a Windows Virtual Machine which we will cover in additional posts. However, if you have already invested in Chef from Opscode and already developed several recipe and cookbooks, this is a way to leverage your investments while doing devops on Windows Azure.
Additional resources
To learn more about the various technologies that we have covered in this post, you can visit the following sites.
Windows Azure:
- General information on Azure: https://azure.microsoft.com/
- Deploy Azure Virtual machine : https://azure.microsoft.com/en-us/documentation/services/virtual-machines/
- Managing the Windows firewall with powershell : https://technet.microsoft.com/en-us/library/jj554908.aspx
Chef / Opscode:
- Screen casts on Chef : https://learnchef.opscode.com/screencasts/fundi-webinar-week-1/
- Creating your first cookbook : https://learnchef.opscode.com/create-your-first-cookbook/
- Creating Windows cookbooks : https://blog.postmarkapp.com/post/74863816767/using-chef-on-windows-is-easier-than-you-think
MSOpenTechnologies:
- https://msopentech.com/
- Using chef to manager azure resources : https://msopentech.com/blog/2014/03/31/using-chef-to-manage-azure-resources/
- List of content on Chef project : https://msopentech.com/opentech-projects/chef/
Comments
- Anonymous
May 02, 2014
Hey IT operations professionals, what do you think? All Hype? What's your CIO thinking? Is she already