Creating a Multi-Site Cross Region fully meshed VNET to VNET to On-Premises connection
Azure's Multi-Site VNETs allow you to create a fully meshed network architecture that provides great flexibility. I can connect VNETs within region and even across regions. I can also include my on-premises site within the multi-site topology! Very cool!
Another nice gem is that all VNET to VNET traffic flows internally within Microsoft's data centers, so traffic does not traverse the internet.
In this blog I will show you how to configure a multi-site VNET to VNET topology which also includes an on-premises site in the mesh.
If you followed my previous blog here, I showed you how to configure a S2S VPN from an Azure VNET to an on-premises network using an RRAS server as an on-premises gateway.
If you have not read it, I highly advise that you do as I provided a detailed walk-through for creating VNETs and RRAS Demand Dial Interfaces which I will not step through again. I also leverage the S2S VPN connection established in my previous blog as the basis for this scenario.
Setup Overview
The process of creating a Multi-Site VNET mesh is no different to creating multiple S2S VPNs. In fact we will need to establish VPN tunnels between all networks to create the fully meshed topology. My target architecture is as follows:

We are going to complete this exercise in two phases. The first phase will connect vNet1 to vNet2. The second phase will connect vNet2 to our Local On-Premises gateway. Why two phases? This will help demonstrate the connectivity differences between non meshed and meshed topology.
OK, let's get started!
Quick recap of VNET1 to Local On-Premises S2S VPN setup
In my previous blog here, I had established a S2S VPN from Azure vNet1 to my Local On-Premises RRAS gateway. We will use this as our starting point. As such we have an established connection from vNet1 to my Local on-premises network.

We are now here:

Defining our Local Networks
Planning your network is important, and in my case I will have three networks which require three separate non overlapping address spaces. I have defined my network as follows:
Network Name |
Address Space |
Location |
Local |
192.168.0.0/24 |
On Premises |
vNet1 |
10.10.0.0/16 |
South East Asia |
vNet2 |
172.16.0.0/24 |
West US |
Defining these networks allows Azure to perform routing decisions. These networks are then associated with the Azure VPN gateways.
Let's define these networks in the Azure Portal. In the Networks view click on Local Networks.
I already have my Local On-Premises network defined from my previous blog.

We now need to create two additional networks, the first for VNET1 and the second for VNET2.
Click NEW located at the bottom left and select ADD LOCAL NETWORK.

The following screen should be familiar as we have added a local network before in my previous blog. We fill in the Name for the Local Network, VNET1 in our case. Now in the VPN Device IP Address field we enter the IP address of the vNet1 gateway. The IP address of the vNet1 gateway is already available as we had previously created a gateway for vNet1 to establish our S2S VPN to our On-Premises site.

On the next page we need to define the address space we will be using with VNET1. As per my address space table, we will define 10.10.0.0/16.

Now we need to define our VNET2 details. Repeat the wizard. This time we can leave the VPN Device IP Address blank as we have not created the gateway as yet. My address space for VNET2 is 172.16.0.0/24, so I will define this in the address space section. Once complete, our Local Networks will look like this:

Creating VNET2, our second virtual network
Now that we have defined our local networks, let's move on and create our second virtual network, vNet2.
As vNet1 has been created in Southeast Asia, I will create vNet2 in the West US data center to provide our cross region connectivity.
In the Azure Portal lets Custom Create a new Virtual Network and create our vNet2 in West US.

Let's click through the wizard. We leave DNS and VPN connectivity blank for now and click next to define the address space. Following my address space plan, I am defining 172.16.0.0/24 for vNet2.
Note: Because we are going to need a subnet for the VPN gateway, I am subdividing my address space and using only 128 of the 256 addresses (/25). This will leave room in the pool for the VPN gateway subnet.

Finish the wizard. You can now see my two VNETs. Each VNET is in a different region.

Establishing a connection between VNET2 and VNET1
We have already established a S2S VPN from vNet1 to my Local on premises network, so I am going to establish a VPN connection between vNet2 and vNet1. As we have done in my previous blog, under the vNet2 page click Configure and enable the site to site VPN by selecting Connect to the local network. For the Local Network select VNET1. Your gateway subnet will automatically be created. Once that is completed. Select SAVE at the bottom of the page.

Let us head back to the dashboard view for vNet2 and create a Dynamic Gateway.
Note: Multi-site connectivity is only supported with Dynamic Gateways.

After 15 minutes our dashboard will look like this:
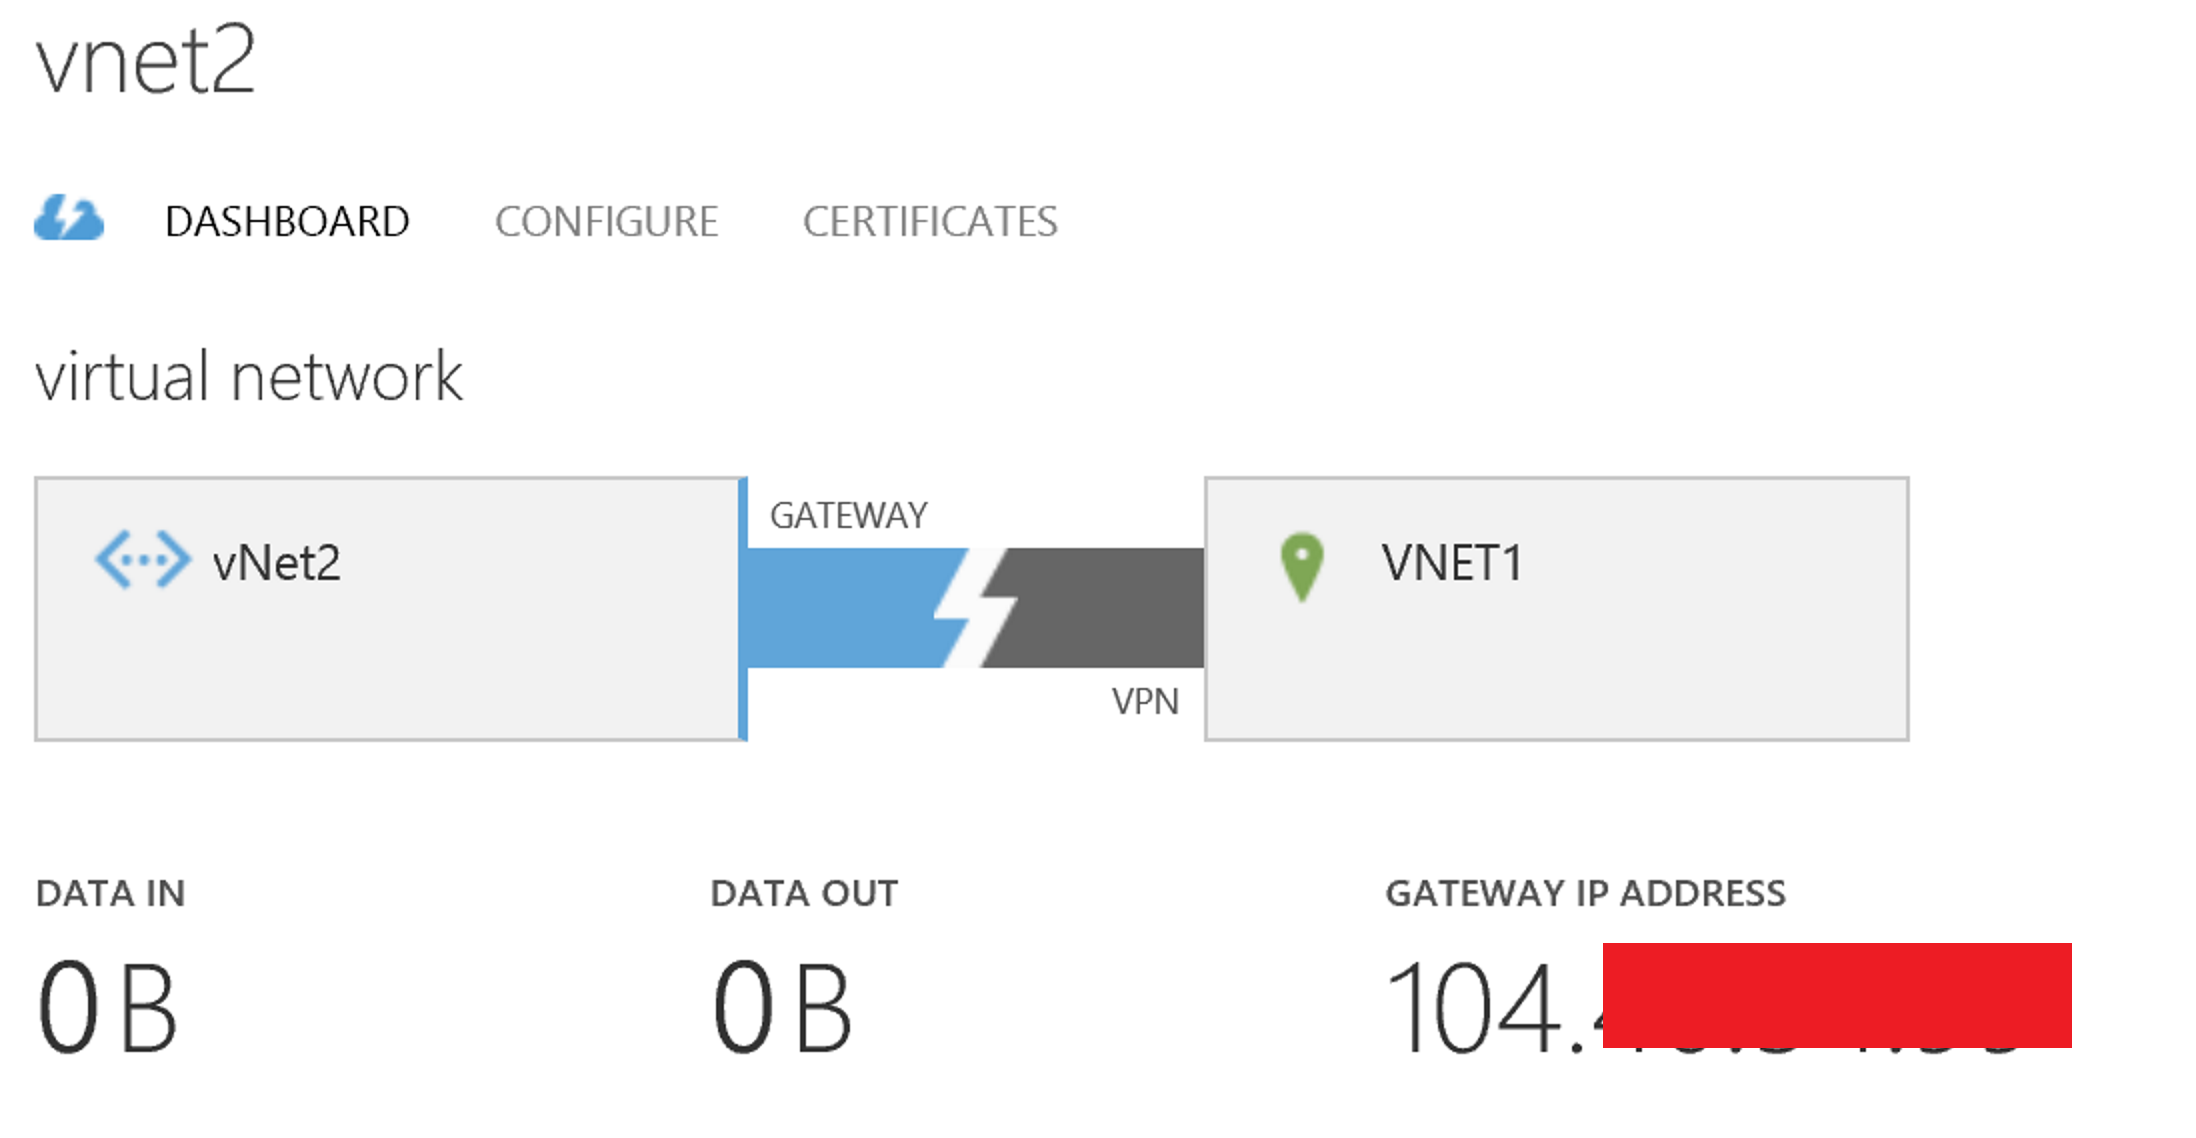
Take note of the Gateway IP Address.
Once the gateway is created there are three things we need to do.
1: First we need to update our local networks VNET2 entry and add the VPN Address we have now been assigned after creating the dynamic gateway. Head back to Local Networks. Click on VNET2 and select Edit at the bottom of the page and enter the VPN IP Address for VNET2. Once completed our local network will look like this:

2: Next we need to link vNet1 and vNet2 together. As vNet1 is already connected to our Local On-Premises gateway, we need to make the second connection by exporting the network configuration file and making the edits manually. Adding a second connection is not currently supported in the portal.
Let's export the network configuration file. On the Dashboard page Click the Export button at the bottom of the screen.

During the export process you will be asked to select a subscription. If you have one subscription this is straight forward, if you have multiple, select the subscription that is associated with the Virtual Networks we are working on. You will then be prompted to download the file NetworkConfig.xml.
Note: This configuration file contains all your Azure network configuration details. Please back up the file before you modify its contents.
In order to make our changes, we need to open the networkconfig.xml file with a text editor. I recommend Notepad++.
To simplify editing I recommend that you collapse the nodes so it looks like the following:

To connect VNET1 and VNET2 together we need to modify the xml file accordingly. Expand the VirtualNetworkSite that references VNET1 and look for the Gateway section.
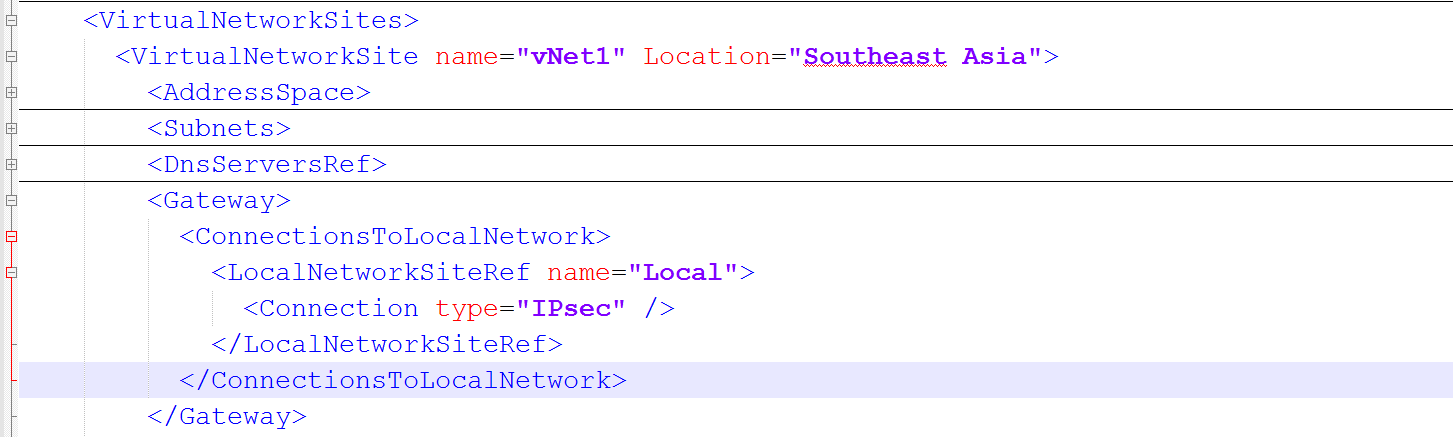
Note: You will see that under the <ConnectionsToLocalNetwork> node, we already have a reference to Local, as this was defined in the Azure Portal during the creation of our S2S VPN to our Local on-premises network from my previous blog.
We now add a reference for VNET2. Under the <ConnectionsToLocalNetwork> node we add the following lines:
<LocalNetworkSiteRef name="VNET2">
<Connection type="IPsec" />
</LocalNetworkSiteRef>
It should look like the following:

If we now examine the elements for the VirtualNetworkSite referencing VNET2, we will see that under the <ConnectionsToLocalNetwork> node, it already references VNET1 as we have already defined this in the Azure Portal during the creation of our S2S VPN to VNET1, as such we do not need to make any further modifications.

Once this is complete, we save the XML file and import the file back into Azure.
Under the vNet2 Dashboard page, we click NEW on the bottom left of the page and then, Import Configuration.

We will be prompted for the location of the networkconfig.xml file. Once we upload the file, we will be presented with the following screen:

Note: Azure has detected that the configurations of vNet1 and vNet2 need to be updated.
We finish the wizard and allow the Network configuration to update.

3: The final step is to exchange the gateway pre shared keys between VNET1 and VNET2. As VNET1 is now configured for multi-site connectivity we need to load an additional key which must be done through PowerShell. This is pretty straight forward.
For VNET1 we use the following:
Set-AzureVNetGatewayKey -VNetName VNet1 -LocalNetworkSiteName VNet2 -SharedKey sharedkey123
Now that we are in multi-site gateway mode, we will also need to reset the pre-shared key between VNET1 and our Local on-premises network.
Set-AzureVNetGatewayKey -VNetName VNet1 -LocalNetworkSiteName Local -SharedKey sharedkey123
For VNET2 we use the following:
Set-AzureVNetGatewayKey -VNetName VNet2 -LocalNetworkSiteName VNet1 -SharedKey sharedkey123
Note: The shared key can be anything, but they must match.
Our screen will look like this.

If we have done everything correctly, our dashboards will look as follows:
VNET1 Dashboard:
Note that our nice VPN graphic has now been replaced by a table to show multi-site connectivity.

VNET2 Dashboard:

We have now establish a multi-site VPN from VNET1 to the Local and VNET2 networks. Our connections now looks like this:

Testing connectivity between networks
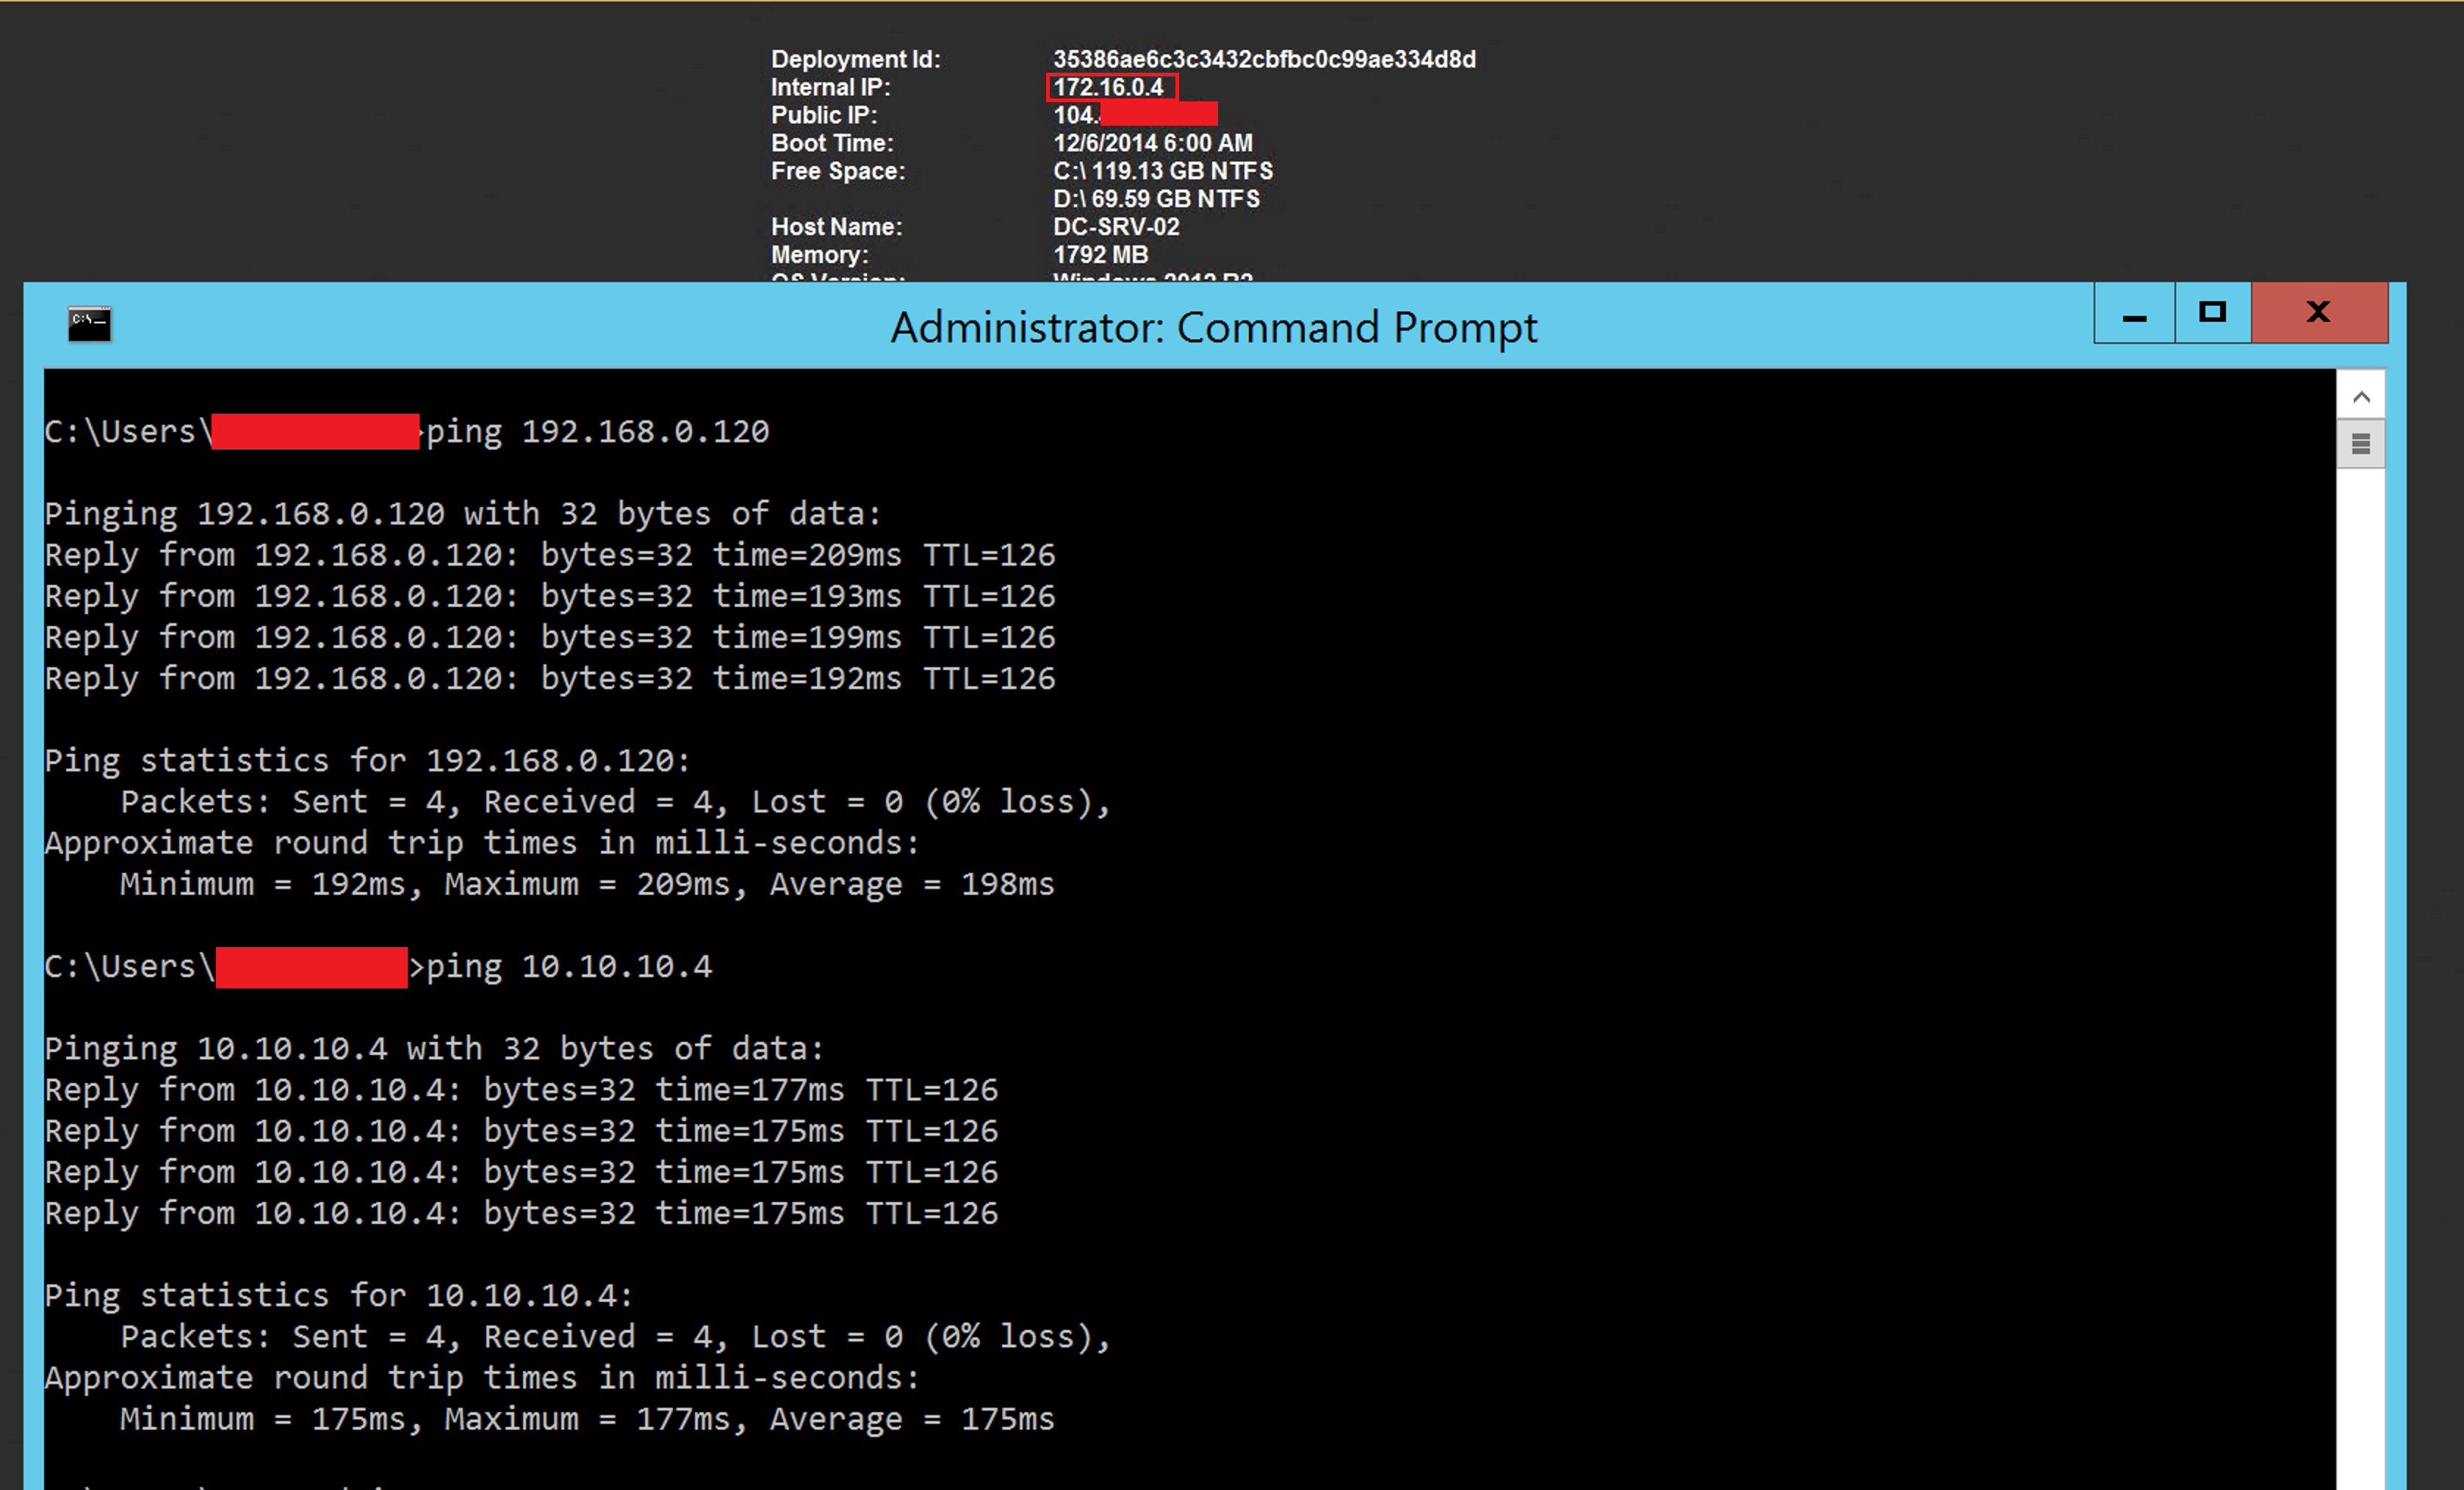
I have a VM in each VNET to test connectivity. I have allowed ICMP for our testing.
NOTE: You will see that we can ping between VNET1 and VNET2 and VNET1 and Local On-Premises, but VNET2 and Local On-Premises cannot communicate.
VNET1:
I can ping from VNET1 (10.10.x.x) to VNET2 (172.16.x.x). I can ping from VNET1 (10.10.x.x) to Local (192.168.x.x)

VNET2:
Can only ping to VNET1

On-Premises:
Can only ping to VNET1
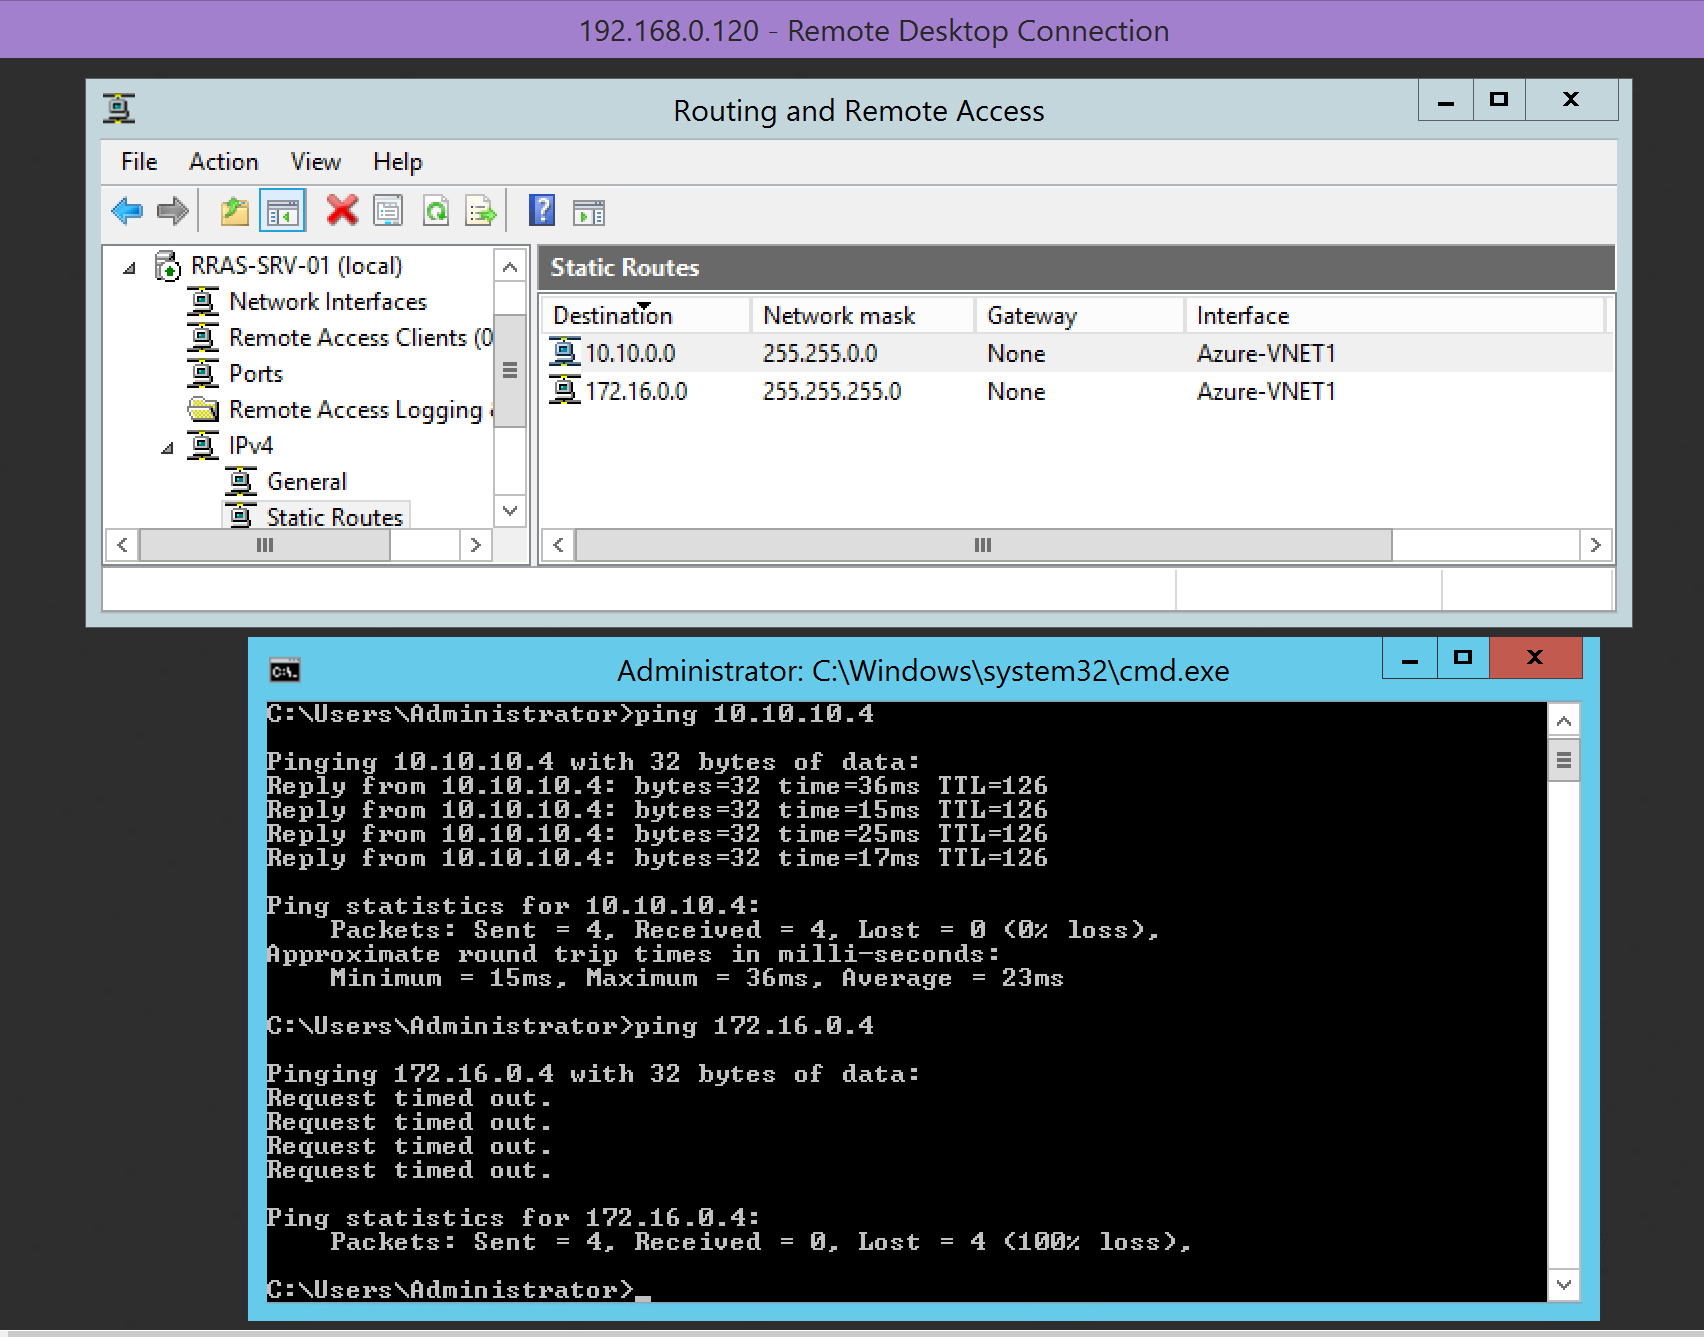
This demonstrates that VNET connectivity is limited to a single hope. In other words I cannot communicate from VNET2 to Local via VNET1 or from Local to VNET2 via VNET1. I must directly connect VNET2 to Local to have this connectivity.
Completing the fully meshed topology
To complete the full mesh topology we now need to connect VNET2 to our Local On-Premises network and we will do this by once again exporting the networkconfig.xml file and modifying the file as we did previously. This time I am modifying the vNet2 gateway section adding "Local" to the <ConnectionsToLocalNetwork> node as per below:

Once complete, save the file and import it into the Azure Portal as we did previously. We now need to set our pre-shared key between VNET2 and our Local on-premises VPN:
Set-AzureVNetGatewayKey -VNetName VNet2 -LocalNetworkSiteName Local -SharedKey sharedkey123
Once completed, our dashboard will update to show a multi-site connection for vNet2:

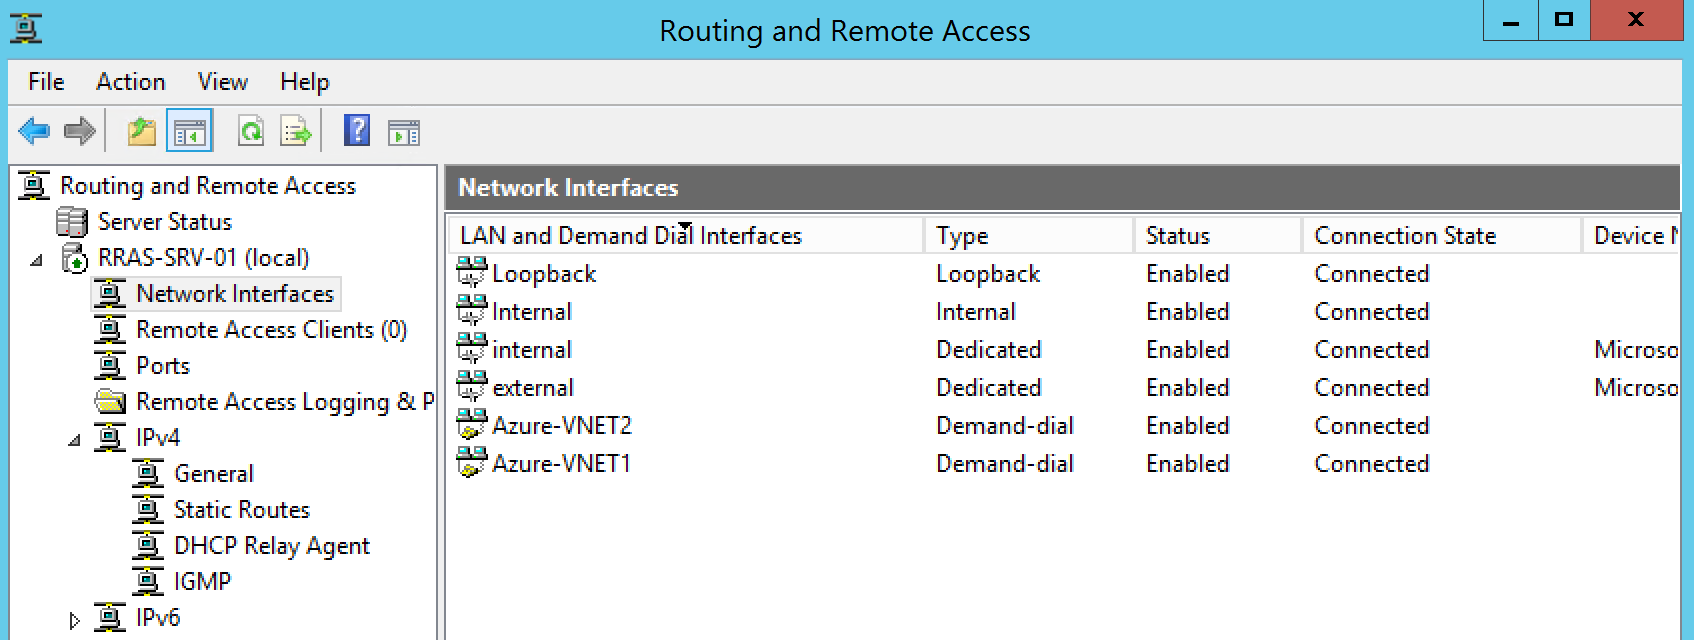
We are now fully meshed from the Azure side. To complete connectivity, I need to add another Demand Dial Interface on my on premises RRAS server to connect back to VNET2. Follow my previous article to walk through the creation of a demand dial interface on RRAS. The only difference in the RRAS Wizard will be to provide the Gateway IP Address of the VNET2 dynamic gateway and to also provide the pre-shared key we used when executing the PowerShell command Set-AzureVNetGatewayKey just above.
Also make sure your static routes are configured correctly:
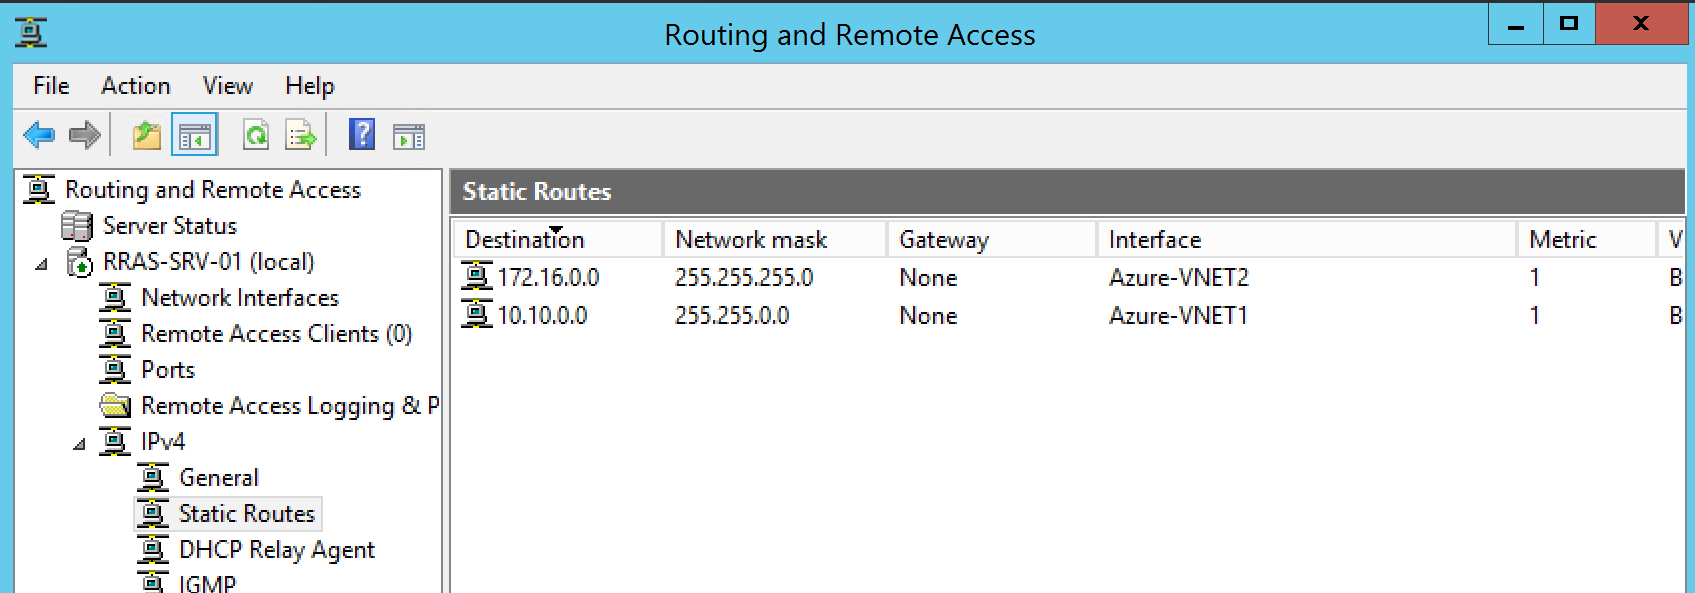
We verify connectivity back in the Azure Portal VNET2 Dashboard.

You can see that we are now connected to our Local network from vNet2.
Now that we have a meshed network, BAM! we can connect across all networks.
Local On-Premises:

VNET2:
Hope this has been helpful!