Developing Windows 8 Store Apps for SharePoint Online with SSO (Single Sign On)
A few folks have asked me if I could tweak the code from my previous post to enable SSO into SharePoint Online from a Windows Store App so here I am again with Parte Dos. This basically means users can use their corporate credentials or, even better, Windows integrated authentication (if they are connected to their corporate network) to access SPO content right from the Windows Store App. Office 365 has full support for SSO via ADFS (Active Directory Federation Services).
There are many advantages to SSO but the most important (always thinking about the customer) in my opinion are:
1) 1) Users don’t have to remember and enter multiple pairs of credentials to sign into different services/applications
2) 2) User’s don’t’ have to manage multiple credentials such as periodically updating passwords for security reasons
When you sign up for an O365 tenancy you can configure it for SSO as described here. If you are interested in a quick overview of how SSO works in O365 this is a good place to start. I also recommend looking over this excellent whitepaper that explains in detail SSO configuration as well as the mechanics behind the core SSO scenarios. This post assumes an SSO has been configured as outlined in the links above and an ADFS proxy has been deployed to allow users to connect from outside their corporate network.
Now before we proceed you should know the code referenced in this post was written solely for illustration purposes (it is by NO means production quality). Also, it is provided as is without warranty of any kind either expressed or implied. Ok, now that you have been warned let’s dive in.
I modified the code in the previous post so the Windows Store App can now authenticate the user in 3 different ways:
1) 1) Using integrated Windows authentication if the user is connected to the corporate network
2) 2) Using the user’s corporate credentials if the user is outside of the corporate network
3) 3) Using the user’s O365 credentials (from the previous post)
For 1 and 2 above this post assumes SSO has been configured properly so O365 can recognize the user as being part of a federated domain. Needless to say, all communications must happen over SSL for security reasons. Next we will walk through the code changes for 1 and 2. Most code changes are in SpoAuthUtility.cs. Now for those of you that know all this stuff already and can’t wait to get your hands dirty you can scroll down to the end of the post and download the sample code.
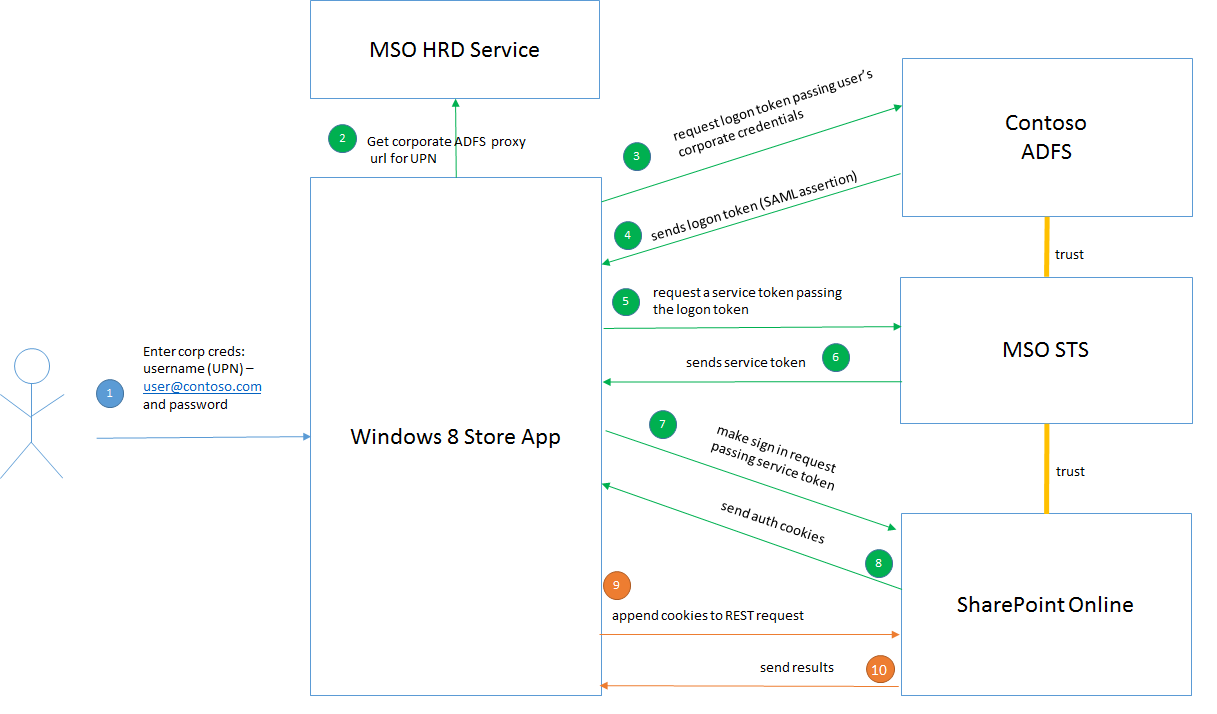
1. SSO via Integrated Windows Authentication

The diagram above shows at high level how the App achieves SSO using integrated Windows Authentication.
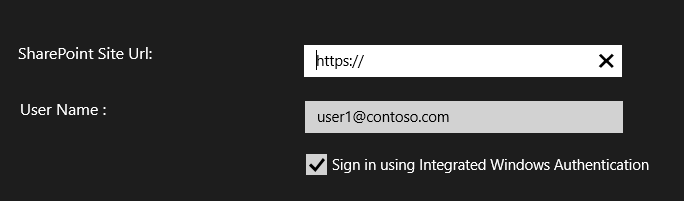
The first thing the App does is to ask the user for his UPN (User Principal Name). This is normally in the form of user1@contoso.com. The Windows Store App presents the UPN to the HRD (Home Realm Discovery) service to resolve the url of the corporate ADFS proxy to use for authentication. This step is not necessary if your app already knows the address of your corporate ADFS.
const string msoHrdUrl = "https://login.microsoftonline.com/GetUserRealm.srf";
private async Task<Uri> GetAdfsAuthUrl()
{
// make a post request with the user's login name to
// MSO HRD (Home Realm Discovery) service so it can find
// out the url of the federation service (corporate ADFS)
// responsible for authenticating the user
byte[] response = await HttpUtility.SendHttpRequest(
new Uri(msoHrdUrl),
HttpMethod.Post,
new MemoryStream(Encoding.UTF8.GetBytes(String.Format("handler=1&login={0}", this.username))), // pass in the login name in the body of the form
"application/x-www-form-urlencoded",
null);
StreamReader sr = newStreamReader(new MemoryStream(response));
Dictionary<String, IJsonValue> dict = new Dictionary<string, IJsonValue>();
HttpUtility.ParseJson(JsonObject.Parse(Encoding.UTF8.GetString(response, 0, response.Length)), dict);
// the corporate STS url is in the AuthURL element of the response body
Uri corpAdfsProxyUrl = dict.ContainsKey("AuthURL") ? new Uri(dict["AuthURL"].GetString()) : null;
return corpAdfsProxyUrl;
}
· The App then sends a security token request via HTTP GET to the corporate ADFS integrate authentication endpoint specifying 2 main things: the username and the realm which in this case is the O365 federation service. The url looks something like the following:
If the user is connected to the corporate network the service request will automatically get authenticated by the magic of Kerberos and we will get a signed SAML token back in the body of the response that asserts who the user is. The token will be in the form of a SAML assertion (refer to the WS-Trust standard for more details). This is our logon token.
HttpClientHandler handler = new HttpClientHandler();
handler.UseDefaultCredentials = true; // use the default credentials so Kerberos can take care of authenticating our request
byte[] stsresponse = await HttpUtility.SendHttpRequest(
this.adfsIntegratedAuthUrl,
HttpMethod.Get,
null,
"text/html; charset=utf-8",
handler);
// the security token response we got from ADFS is in the wresult input element
var wresult = from e in form.FirstOrDefault().Descendants()
where e.Name == XName.Get("input") &&
e.Attribute(XName.Get("name")) != null &&
e.Attribute(XName.Get("name")).Value == "wresult"
select e;
// the logon token is in the SAML assertion element
XDocument xDoc1 = XDocument.Parse(wresult.FirstOrDefault().Attribute(XName.Get("value")).Value, LoadOptions.PreserveWhitespace);
var assertion = from e in xDoc1.Descendants()
where e.Name == XName.Get("Assertion", saml)
select e;
The App now issues the security token request to the MSO STS. However, this time instead of appending the user’s O365 credentials to the SOAP message’s security header (as in the previous post) it appends the logon token we got from the corporate ADFS. MSO STS checks the validity of the token and if everything is happy it returns a service token which we can then use to sign into SPO and get the federated authentication cookies (just like in the previous post).
// generate the WS-Trust security token request SOAP message passing in the logon token we got from the corporate ADFS
// and the site we want access to
saml11RTBytes = Encoding.UTF8.GetBytes(ParameterizeSoapRequestTokenMsgWithAssertion(
this.spSiteUrl.ToString(),
logonToken,
msoStsUrl));
// make the post request to MSO STS with the WS-Trust payload
byte[] response = await HttpUtility.SendHttpRequest(
new Uri(msoStsUrl),
HttpMethod.Post,
new MemoryStream(saml11RTBytes),
"application/soap+xml; charset=utf-8",
null);
StreamReader sr = new StreamReader(new MemoryStream(response));
// the SAML security token is in the BinarySecurityToken element of the message body
XDocument xDoc = XDocument.Parse(sr.ReadToEnd());
var binaryST = from e in xDoc.Descendants()
where e.Name == XName.Get("BinarySecurityToken", wsse)
select e;
So as you notice the main difference from the previous code is we are now presenting the user’s logon token we got from the corporate ADFS to MSO STS as a proof/claim of who the user is. In this case, MSO STS is what is called a “relying party” in the claims/brokered authentication lingo and the corporate ADFS is what is called an “identity provider”. This basically means that MSO STS trusts the corporate ADFS has done its job authenticating the user and as long as the token signature is valid (hasn’t been tampered with) MSO STS will accept it as a proof of the user’s identity. Before all this code runs the trust relationship between MSO STS and the corporate ADFS should have been already established as outlined in the O365 SSO configuration references at the beginning of this post.
And that’s it for integrated Windows Authentication! Obviously, this is the preferred method as we never have to ask users for their credentials as long as they are logged into a machine joined to their domain and are connected to the corporate network.
2. SSO via user’s corporate credentials
Most steps happen the same way as in the integrated with auth approach except that in this case we ask users for their corporate credentials to get the logon token. This normally happens when users are not connected to the corporate network. This approach requires, as mentioned previously, an ADFS proxy service deployed following O365 SSO recommended guidelines.
The code assumes the ADFS proxy usernamemixed endpoint is available. The App asks for the user’s corpnet credentials and constructs a request security token message (following the WS-Trust standard). It sends the request to the usernamemixed endpoint and if the credentials are valid ADFS responds with the logon token. The logon token is then presented to MSO STS just as in the integrated win auth approach.
private async Task<string> GetAdfsSAMLTokenUsernamePassword()
{
// makes a seurity token request to the corporate ADFS proxy usernamemixed endpoint using
// the user's corporate credentials. The logon token is used to talk to MSO STS to get
// an O365 service token that can then be used to sign into SPO.
string samlAssertion = null;
// the corporate ADFS proxy endpoint that issues SAML seurity tokens given username/password credentials
string stsUsernameMixedUrl = String.Format("https://{0}/adfs/services/trust/2005/usernamemixed/", adfsAuthUrl.Host);
// generate the WS-Trust security token request SOAP message passing in the user's corporate credentials
// and the site we want access to. We send the token request to the corporate ADFS proxy usernamemixed endpoint.
byte[] requestBody = Encoding.UTF8.GetBytes(ParameterizeSoapRequestTokenMsgWithUsernamePassword(
"urn:federation:MicrosoftOnline", // we are requesting a logon token to talk to the Microsoft Federation Gateway
this.username,
this.password,
stsUsernameMixedUrl));
try
{
byte[] response = await HttpUtility.SendHttpRequest(
new Uri(stsUsernameMixedUrl),
HttpMethod.Post,
new MemoryStream(requestBody),
"application/soap+xml; charset=utf-8",
null);
// the logon token is in the SAML assertion element of the message body
XDocument xDoc = XDocument.Parse(Encoding.UTF8.GetString(response, 0, response.Length), LoadOptions.PreserveWhitespace);
var assertion = from e in xDoc.Descendants()
where e.Name == XName.Get("Assertion", saml)
select e;
And with that we have come to the end of this post. I hope you found it useful. Oh I almost forgot :)! You can download the sample code here.
Happy coding.
Legal Disclaimer:
Everything written in this blog represents my own views only and not those of my employer. Also, any code is provided “AS IS” without warranty of any kind either expressed or implied, including but not limited to the implied warranties of merchantability and/or fitness for a particular purpose.