Microsoft Bot Framework Part 4: Natural Language AI, LUIS
Welcome to the fourth post on using Microsoft Bot Framework!
- Microsoft Bot Framework Part 1: Getting Started
- Microsoft Bot Framework Part 2: Hello World
- Microsoft Bot Framework Part 3: Conversation
For the final installment of my 4-part blog series, there is a special guest I would like you to meet: LUIS! Language Understanding Intelligent Service (LUIS) is a service in Microsoft’s extensive "Cognitive Services" suite that adds conversational intelligence to your apps. LUIS also allows developers to create their own models, and creates HTTP endpoints that can be pinged to return simple JSON responses.
Smart bots provide an amazing opportunity to generate lively, adaptive interfaces in the channels where your users are talking. This post will show how to kickstart a Node.js bot from Simple to Smart by integrating LUIS and creating meaningful conversations.
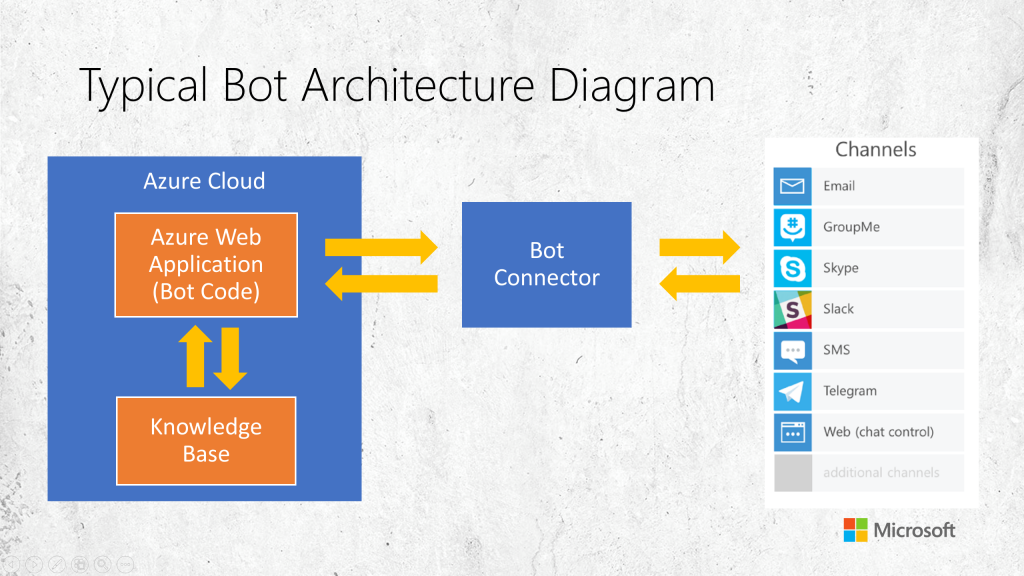
In the typical architecture of the inner-workings of a bot, I'd like to highlight the Bot Connector to platform channels. "Bot Connector" allows one bot to connect with many channels and endpoints, as explained in previous posts. Why restrict yourself to one platform when you can hit them all?
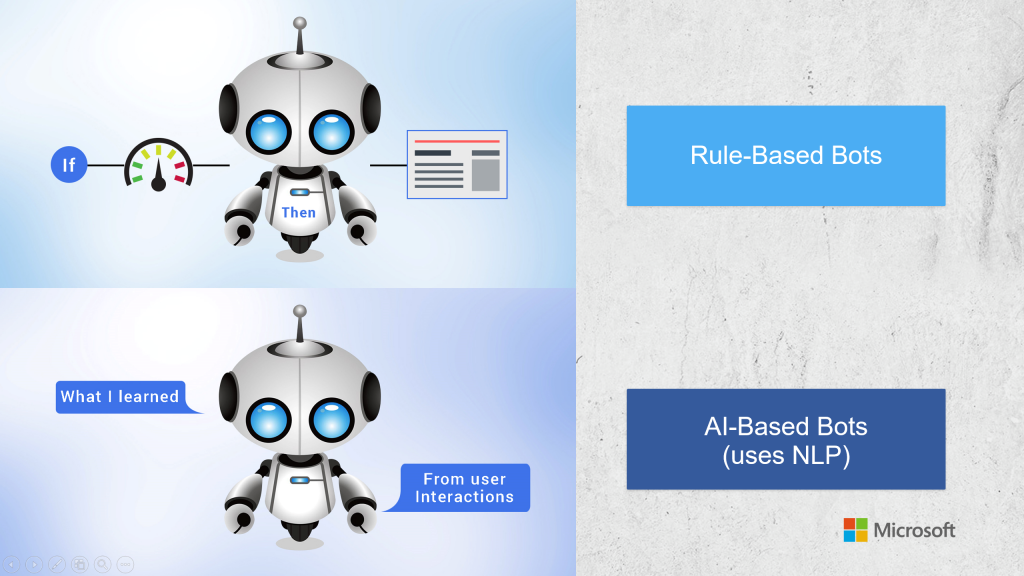
There are two ways that bots work under the hood. There are RULE-BASED BOTS, programed with conditions, in an "if this then that"? sort of way. My three previous blog posts explained these Simple bots. The other kind are ARTIFICIALLY INTELLIGENT BOTS, that primarily use Natural Language Processing to function.
Rule-based bots work by offering you multiple choice options. They do not understand language, and get stuck if you give an answer that is not part of their repository. These bots respond to commands that you are expecting the user to say - but only one explicit string of text. Then the bot goes in and parses the string that the user has given to try and look for the additional information. If the bot doesn't see it, you could program it to start prompting the user, but you have to put considerably more effort into crafting a smooth user experience.
AI-based bots are smarter than rule based bots because they understand the context and intent of user. The artificially intelligent bots in the market today use a subset of AI, called natural language processing (NLP). They get involved in the conversation and pick up keywords and phrases from the user's requirement. An AI-based bot would not get stuck if the user responded with "yeah" instead of "yes," unlike a rule-based bot. LUIS actually intercepts the user's request and converts it to comparable action for the bot.
The 3 most important aspects of the LUIS Framework are:
- Intents – Verbs: What actions do you want your bot to take?
- Entities – Nouns: What things are your bots taking action on?
- Utterances – Example messages from the user that link intents and entities.
You will create a new Language Model and train it with a bunch of example utterances - messages that a real user might actually say - and then you identify the entities and intents of those messages. You can train this through an easy-to-use graphical user interface online at https://luis.ai.
For today's example, we will start with the code created in my GitHub repo, WebChatPush . This simple bot creates a loop of numbered messages sent once every second. The user is required to type in the exact word "stop" to exit the loop. See it in action here.
In this article, we will alter the code to allow the user to say several different synonyms for "stop," or phrases and utterances that convey the same meaning. Most importantly, we will allow the user to type their request using normal language, then detect the intent of the user. We will do this by creating an application using LUIS, then interfacing that application with our existing Node.js bot that is programmed using the SDK of, and deployed in, the Microsoft Bot Framework.
Create a LUIS Application
The first step is to go to https://www.luis.ai/ and create an account on the home page with your Microsoft Account, and sign in. (The blog post "Using LUIS AI in Microsoft Bot Framework – Part 1" has more screenshots and up-to-date instructions for further reading.)
After completing the sign up and finishing other details, click on the "My Apps" link and select "New App" to create and register an application.
Give your app a name and set your culture as English (if you want your app to understand and speak English), provide a brief description, then click the "Create" button.
Now that your app is created, you can create your first intent. Head to the Dashboard of the app and select the "Create an intent" button.
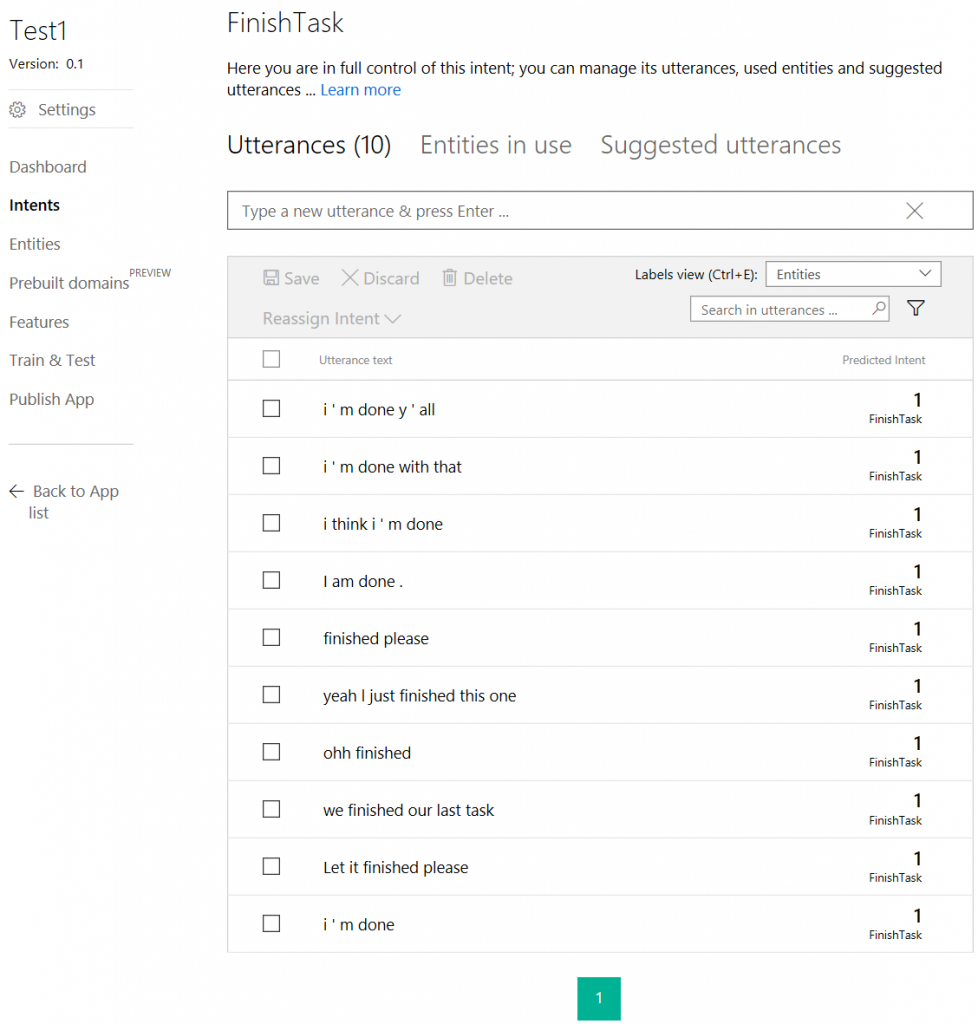
Here we will create "Stop" as our first intent. (You can name it "FinishTask," "ExitLoop," and so on.) Next, we define utterances that associate with our intent to stop the bot from continuing its loop.
Coming up with utterances can be fun! If you love thinking of different ways to say things, or observing how other people chat with your bot, then you can enter in dozens of utterances into your LUIS intent by hand. You can even ask friends, family, coworkers or acquaintances for help by telling them to visit your bot's URL and start talking to it, and seeing what they say.
For example, if we added the following statements to an intent called "Interest," they would all point to the "Interest" intent.
- I am interested to know about the product.
- I want to know about the product
- I would like to know about the product.
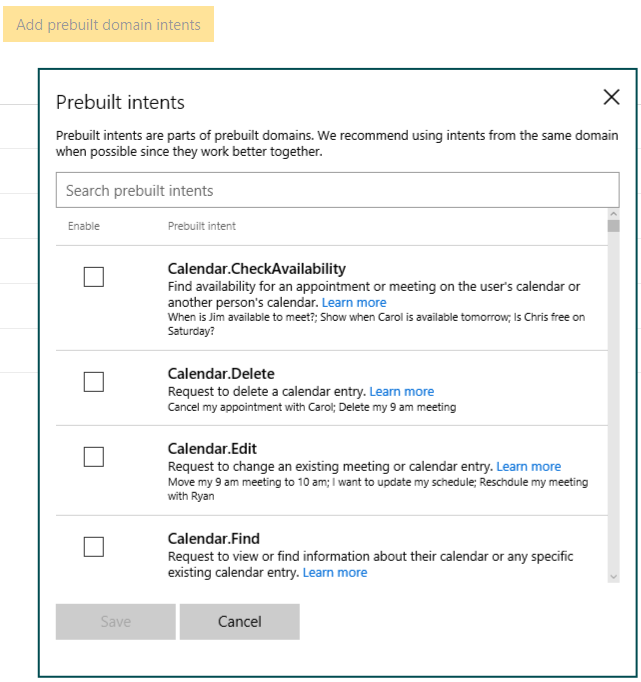
If you already have large databases full of data points that you do not want to enter by hand, or you want to do this part automatically, LUIS can help you skip entering your own utterances manually. There is a way you can choose prefabricated intents that come with their own lists of utterances: just click the "Add prebuilt domain intents" button.
Prebuilt domain intents come in handy when creating very common intents such as "Greetings" (Hi, Hello, Hey) and "Farewells" (Bye, Goodbye, See ya) that every user seems to say with a little different flair.
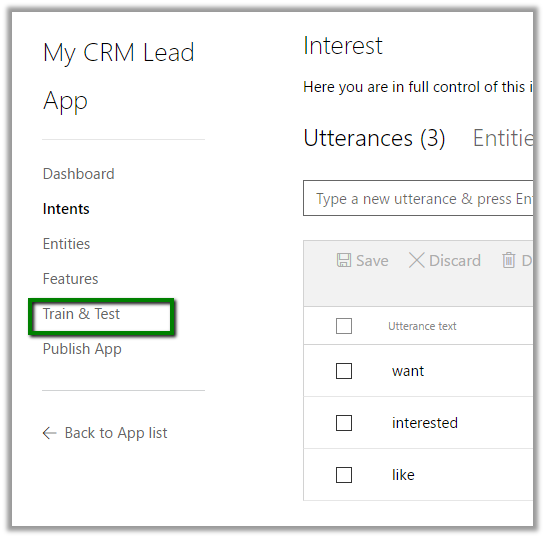
Once we are done specifying our intents, the next important step is to "Train and Test" the application.
Select Train and Test and click on "Train Application" button.
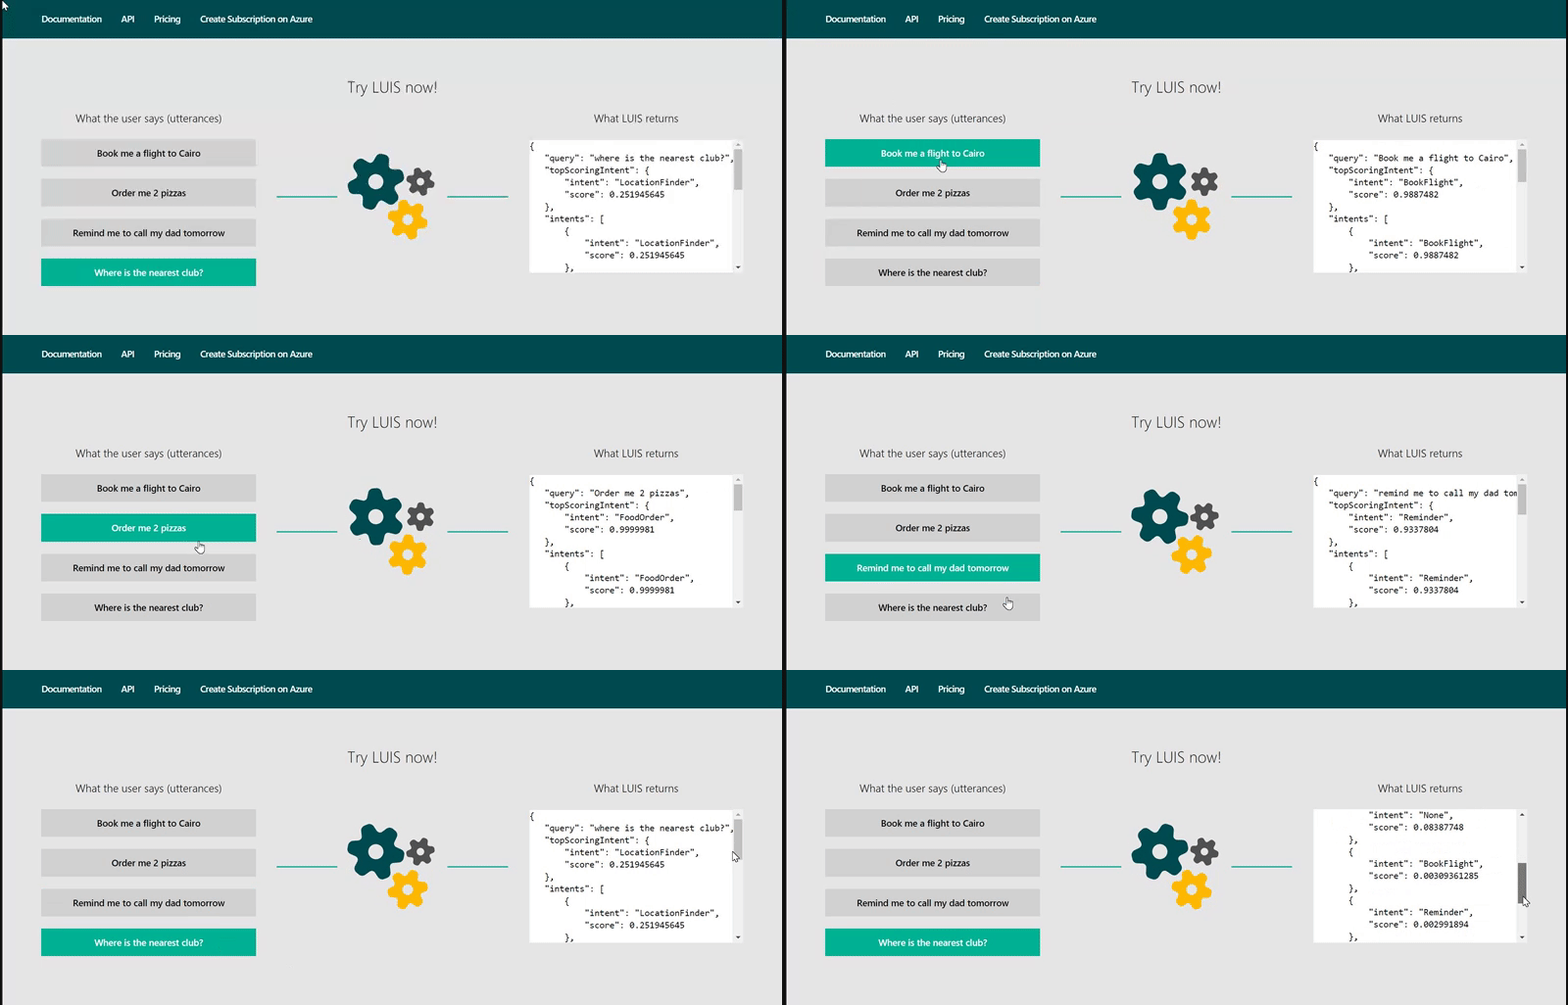
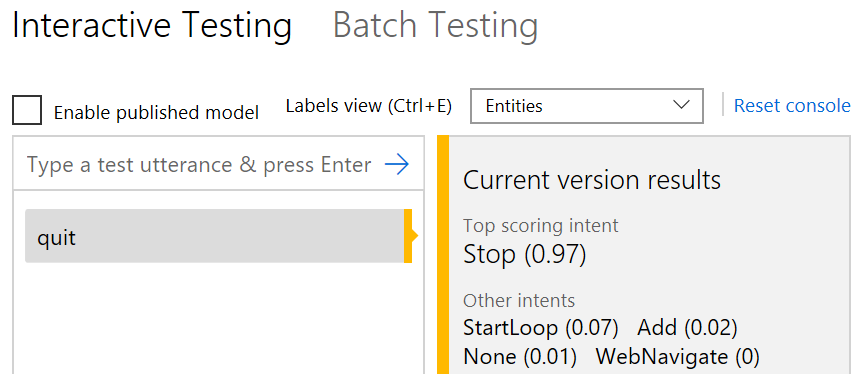
Once the training is completed, we can make use of LUIS's Interactive Testing interface to do some quick testing of our utterance and see the "confidence score".
The score represents a probability percentage of how "confident" LUIS is in its interpretation. If you type "quit" and see (0.97), that means LUIS is 97% confident that "quit" points to the "Stop" intent. (The numbers don't necessarily have to add up to 100.)
Adding entities next is actually optional. These are values that your bot can identify and gather, if you want your bot to perform operations based on their value. In our example, we don't need to create entities, because WebChatPush is just a simple Loop. This is atypical. Your bot will likely have more realistic functionality, so you may want to add entities such as "PeriodOfTime" to detect if the user entered a word describing an amount of days, like "week" or "month," but not actual dates, or an entity to detect if the user entered in numeric characters such as '1' or words such as 'one' or 'first'.
Once you are satisfied with testing and retraining your LUIS application, let us publish it. Once published, it will provide us with an endpoint URL.
We can append text to the query string "q=" in the endpoint URL to get the JSON result. Once you are done with all your configuration, training, and testing, train and publish the application once more to have all the changes reflected.
Implementing LUIS in Node.js
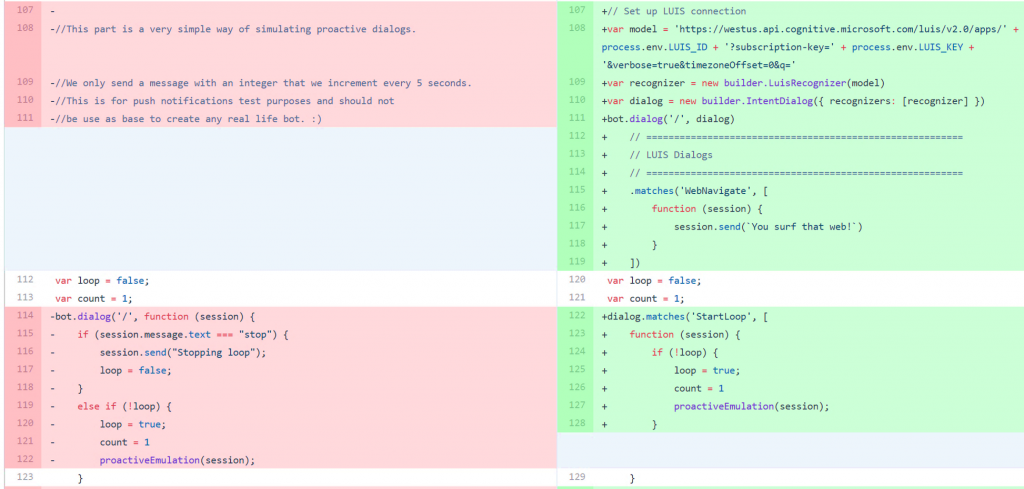
Comparing the code side-by-side of my WebChatBot with and without LUIS, one of the first changes in adding LUIS to the Node.js code is grabbing the URL for my LUIS model. (Note: We have to put that inside an environmental variable to keep it secret, because it does contain a key that could be used by anyone who sees the code. Please take precautions to treat that LUIS URL like you would any other secure token of information.)
On the line under "var model", we create a "var recognizer". With LUIS, what we do is send it a bit of information, let it figure out the intent, let it figure out those entities, which will then allow it to recognize what the user is trying to do. This LUIS recognizer is built into the framework. Then I pass in the model URL as a parameter inside the parentheses.
On the line below that, notice that when we start to build up a dialog object, rather than adding these into the bot individually, I create a full dialog object that fully encompasses all of the recognizers.
Feel free to see the source code and compare for yourself: https://github.com/SarahSexton/WebChatPush/compare/LUIS
Code Sample: app.js
 // Set up LUIS connection
var model = 'https://westus.api.cognitive.microsoft.com/luis/v2.0/apps/' + process.env.LUIS_ID + '?subscription-key=' + process.env.LUIS_KEY + '&verbose=true&timezoneOffset=0&q='
var recognizer = new builder.LuisRecognizer(model)
var dialog = new builder.IntentDialog({ recognizers: [recognizer] })
bot.dialog('/', dialog)
    // =========================================================
    // LUIS Dialogs
    // =========================================================
    .matches('WebNavigate', [
        function (session) {
            session.send(`You surf that web!`)
        }
    ])
var loop = false;
var count = 1;
dialog.matches('StartLoop', [
    function (session) {
        if (!loop) {
            loop = true;
            count = 1
            proactiveEmulation(session);
        }
    }
])
    .matches('Stop', [
        (session, response) => {
            session.send("Stopping loop.")
            loop = false;
        }
    ])
    .onDefault((session, results) => {
        session.send("Sorry, I did't understand that.")
        session.beginDialog('/', results)
    })

var proactiveEmulation = (session) => {
    if (loop) {
        session.send(`Hello, I am a web push notification! :) (${count++})
);
        setTimeout(() => proactiveEmulation(session), 5000);
    }
};
With this code, if the user types in "quit," or "cease," or "end," et cetera, the bot associates it to our "Stop" intent, since we trained our LUIS app for this. (Also, just for fun, if the user mentions anything related to "websites," the bot responds with the encouraging message, "You surf that web!") If the user types in something else entirely, or gibberish, the bot will associate it to the catch-all "None" intent prebuilt into LUIS, and it responds with, "Sorry, I didn't understand that."
Conclusion
In conclusion, Using Language Understanding Intelligent Service (LUIS) in your Microsoft Bot Framework application allows you to create chat bots that are easier for your end-users to interact with.
Check out Using LUIS AI in Microsoft Bot Framework – Part 2 to see how to implement LUIS into a C# bot in Visual Studio.
Microsoft employee Kevin Leung has some great slides on SlideShare.net explaining the process of LUIS intent and dialog flow, as well extensive steps on GitHub.
- https://www.slideshare.net/KevinLeung52/leveling-up-your-bot-with-language-intelligence
- https://github.com/KSLHacks/BotScheduleDemo
Demo video: Creating Bots in the Microsoft Bot Framework using Node.js Microsoft Virtual Academy
Documentation: docs.botframework.com https://luis.ai/home
I hope this helps you find success using Microsoft Cognitive Services to take your chat bot from simple to smart!
- Microsoft Bot Framework Part 1: Getting Started
- Microsoft Bot Framework Part 2: Hello World
- Microsoft Bot Framework Part 3:Â Conversation
Comments
- Anonymous
October 11, 2017
Thank you for sharing this info.I have some doubts on Bot Framework.Can you help me?- Anonymous
November 09, 2017
Hi Vikas, what is your question on Bot Framework?- Anonymous
November 26, 2017
How to train own model? I have already try it, but not completed.Can you tell me?
- Anonymous
- Anonymous
