BCS and FAST: Introduction and first steps
Introduction
SharePoint 2010 Business Connectivity Services (BCS) is, generally speaking, a way to both bring line-of-business data into SharePoint and allows changes to flow back from SharePoint to the line-of-business applications. For a good overview, check out the MSDN Magazine article Using Business Connectivity Services in SharePoint 2010
Here at the Search Guys, we're primarily concerned with the intersection of SharePoint and Search. This series of posts will look at how to use the BCS to feed content into SharePoint. Specifically a .NET Assembly that will use custom C# code to allow access to any 3rd party system. We're going to start small and then build, one feature at a time, and eventually cover:
- Development techniques for re-deployment and easy re-running of crawls
- Scaling full crawls by using batched requests
- Incremental updates
- Adding custom ACL information
- Indexing data via the StreamAccessor method
- Using the Secure Store service to retrieve connection information
- Miscellaneous tips, tricks and gotchas: logging to ULS, dealing with content types, specifying real urls and more.
Information on how to do all of the above can be found in TechNet, MSDN and blog posts out on the Internet, but I found it a challenge to sort through it all and put together a complete project. Some places I found
useful include here, here, here, here, here, and here.
Create a Project
So lets get started. I'm going to assume you have SharePoint 2010 and FAST Search for SharePoint installed and configured and that you have the Business Data Connectivity Service provisioned and started. I'm also going to assume a single server development instance for simplicity. The last thing is that you'll also need Visual Studio installed.
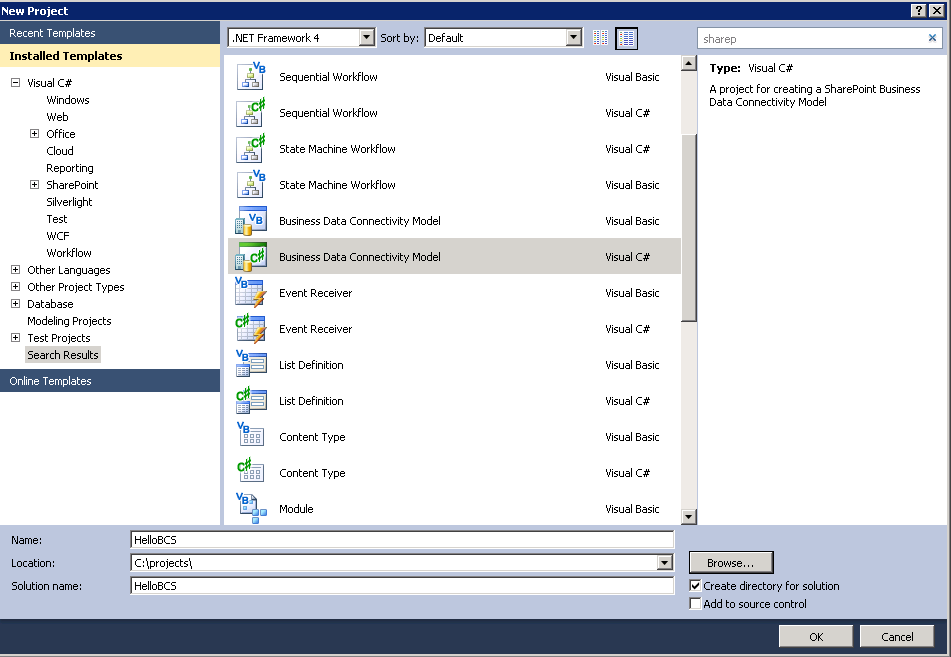
Create a new project, type "sharepoint" into the search box in the upper right and choose "Business Data Connectivity Model, Visual C#". I'm calling mine "HelloBCS"
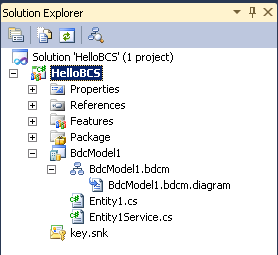
The next step will be to specify the local site to use for debugging. Use the Validate button to test that you've got it correct and then click Finish. At this point you'll be shown your Entity1 model in the SharePoint BDC Designer view and if you open up some folders in the Solution Explorer you should see:
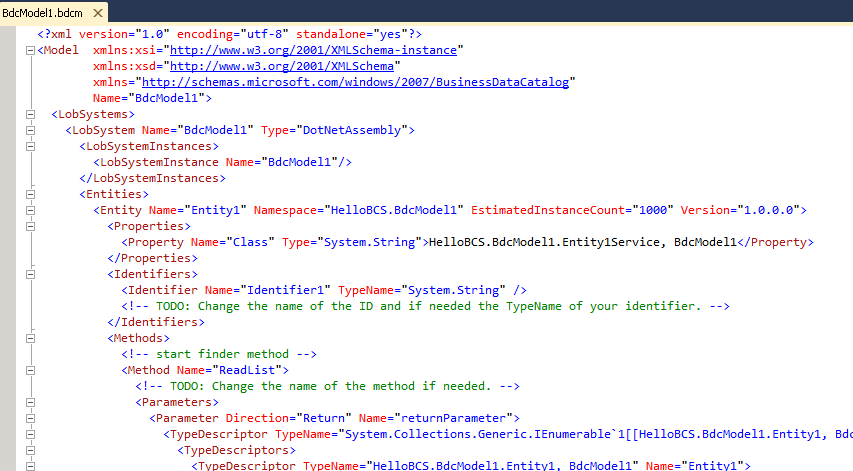
Here's my first tip and this may be a personal preference, but through trial and error I learned that the BdcModel1.bdcm file is just an XML file and I've found that working with it as XML has been much easier than trying to juggle between the BDC Designer, BDC Method Details editor, and the BDC Explorer. There are some nice things you can do with them, and I may be old fashioned, but I like to see the XML. First, close the BdcModel1.bdcm that was opened by default and then in the Solution Explorer, right-click on BdcModel1.bdcm, choose "Open with..." and then pick "XML (Text) Editor". You should see this:
The next thing I like to do is rename the BdcModel1 to something more project appropriate. For this project I'll use "HelloModel". What follows isn't exactly simple and I wonder if there isn't an easier way, but it works:
- In Solution Explorer,
- right click on the BdcModel1 folder and rename it to HelloModel.
- right click on BdcModel1 and rename it to HelloModel.bdcm - In the HelloModel.bdcm XML do a Quick Replace from "BdcModel1" to "HelloModel". Save the file.
- Open HelloModel.bdcm.diagram from Solution Explorer and do the same replace in that XML. Save the file and close it.
- Open Entity1.cs and Entity1Service.cs and do the same replace. Save both.
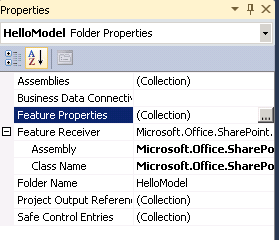
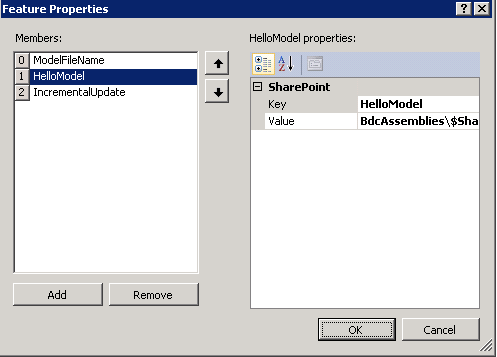
- The last step, and the trickiest is changing a property on the model folder that specifies where the assembly is stored:
Basic Search Customizations
In order for your BCS source to show up in the search content sources you need to set the ShowInSearchUI property on the LobSystemInstance. With HelloModel.bdcm opened as XML, find the HelloModel instance and replace it with the following:
  <LobSystemInstance Name="HelloModel">
 <Properties>
 <Property Name="ShowInSearchUI" Type="System.String"></Property>
 </Properties>
 </LobSystemInstance>
Note: It is the presence of the property is what is important, not the value.
Next we need to add some properties to the two MethodInstances. Scroll down to find the ReadList method with a MethodInstance @Type="Finder" and replace it with the following:
  <MethodInstance Type="Finder" ReturnParameterName="returnParameter" Default="true" Name="ReadList" DefaultDisplayName="Entity1 List">
 <Properties>
 <Property Name="RootFinder" Type="System.String"></Property>
     <Property Name="DisplayUriField" Type="System.String">url</Property>
 </Properties>
 </MethodInstance>
The RootFinder property indicates that this method should be used to find the full set of records and is called during a Full Crawl. The DisplayUriField property indicates the TypeDescriptor named "url" should be used as the Display Uri, which means that it will be the url of the documents instead of having them show up as bdc3://...
Now change the ReadItem Method's SpecificFinder MethodInstance to look:
  <MethodInstance Type="SpecificFinder" ReturnParameterName="returnParameter" Default="true" Name="ReadItem" DefaultDisplayName="Read Entity1">
 <Properties>
 <Property Name="DisplayUriField" Type="System.String">url</Property>
 </Properties>
 </MethodInstance>
As the name implies, the SpecificFinder method is used to retrieve a particular document by identifier.
Those paying attention will probably notice that our return TypeDescriptor doesn't yet contain a url. We'll fix that next.
Customizing the Entity
First, a word of caution. Changes to the bdcm TypeDescriptors are not synchronized with your C# types. You are responsible for making sure you keep them in line.
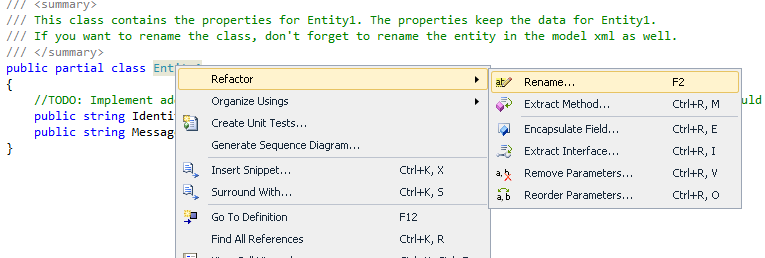
Open Entity1.cs, right click on class Entity1, select Refactor and then Rename:
Rename it to something that makes sense for your project. I'll rename it to Record. Rename the Entity1.cs file to Record.cs in the Solution Explorer.
Rename Entity1Service to Record service the same way.
In HelloModel.bdcm, do a string replace from "Entity1" to "Record".
Back in Record.cs, lets customize our property names. To start we'll Refactor->Rename Identifier1 to Url and Message to Title.
Back in RecordService.cs, replace line 38 where entity1.Url is assigned to be:
entity1.Url = https://localhost/0;
File menu, Save All. We're ready to deploy.
Initial Deployment
From the Solution Explorer, right click on HelloBCS project and choose Deploy. You will hopefully be rewarded with a "Deploy succeeded" message. If not you'll likely have not hooked up to the site correctly.
Open up Central Admin, go to Manage Service Applications and manage the Business Connectivity Service. You will see your Record ECT ready for use:
Select the Record and Set Object Permissions. Here you'll need to add the service account that is running OSearch14 service and give it all permissions. Make sure the Propagate permissions checkbox remains checked. Click OK.
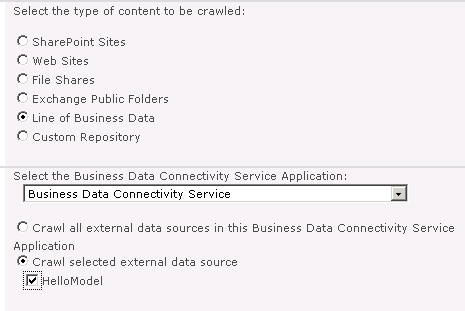
Go back to Manage Service Applications and manage your FAST Content SSA. Click Content Sources in the left side bar and then click "New Content Source". Give it a name ("HelloBCS" or whatever you want) and pick the Line of Business Data option for Content Source Type. If all has gone according to plan you'll see your HelloModel listed.
Click the box to start a full crawl and then click OK to create the source. Go get a coffee and come back in 2 minutes.
Click on Crawl Log in the left side bar and confirm that there are 3 successes for your source and no errors.
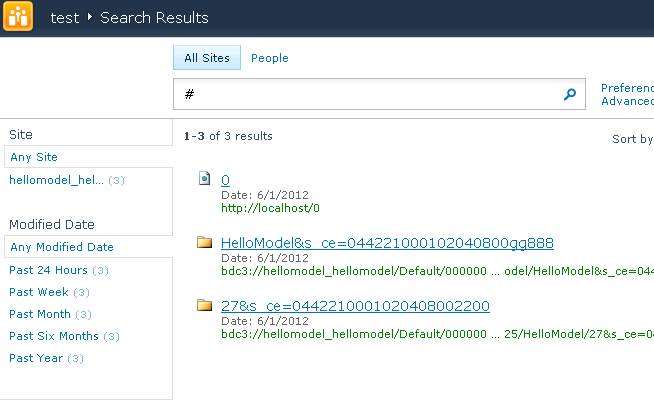
Go to your search center and do a # search for all documents. If this is your only content source you should see something like this:
Some things to note here:
We got 3 documents? The BCS will generate a record for every method call plus one for the crawl. In the above screen shot we have our actual document first followed by two bdc3:// urls that are pretty useless. The only thing that I've found to do with these is exclude them via a scope definition. I'll try to come back to that later.
Also you can see that our url was indeed used as the url for the document. What we didn't get was our title. This is because the Record.Title crawled property is not yet mapped to the Title managed property. I'll come back to that next time.
Also coming next week: Getting a development workflow set up to automate some of the tedious bits
Comments
Anonymous
January 01, 2003
Everything works perfectly fine. Only thing that is bothering me is, after I do some changes to my .net assembly and re-deploy, the changes are not getting reflected. The crawler is still crawling using the old .net assembly. What could be the issue please?Anonymous
January 01, 2003
Everything works perfectly fine. Only thing that is bothering me is, after I do some changes to my .net assembly and re-deploy, the changes are not getting reflected. The crawler is still crawling using the old .net assembly. What could be the issue please?Anonymous
August 06, 2012
Hi, I'm currently trying to build a solution that supports "Scaling full crawls by using batched requests", but i'm having some probelms, do you have any information on this ?Anonymous
March 15, 2013
Hi, As mentioned in the article, two additional records are shown up in the search results which are generated for each method call. Can you please explain how to exclude these useless urls? Thanks in advance!Anonymous
March 20, 2013
Hi Ansiya, You can create a scope rule and exclude the mentioned results.Anonymous
May 31, 2013
Thanks this simple and helpful for me.... just specific to display url it helped me a lot...but we need to make ensure that..url which is mentioned below should be same as Record class entity property i.e. Url or else it will cause problems. <Property Name="DisplayUriField" Type="System.String">Url</Property>Anonymous
July 18, 2014
Excellent Thanks a LotAnonymous
September 17, 2014
Getting below error message in Crawl Log.
Error while crawling LOB contents. ( The given dot notation 'url' refers to a node in Type Descriptor structure that does not exist. )
I changed 'url' to 'Url.'Anonymous
August 27, 2015
this custom bcs never picks the permission change on the file system during the incremental crawl
