Reporting on web tests using new web test API's added in VS 2008 SP1
This blog will show you how to use some of the new API’s added in VS 2008 sp1 to collect additional request and transaction timing data. Here is a post with more info on the new API's: New API's In this example, I am going to collect additional data for web tests, pages and transactions, then store it in a set of database tables. Then I’ll show you how you can use excel to report on this data. This will help people who have asked the question, “Is there any other way to report on web test data that is displayed in the web test playback UI?”
The First step will be to create the database tables and views. It does not have to be the same database that you collect load test data in, but it can be. Start up your favorite query editor and execute the following CREATE TABLE and CREATE VIEW statements. Here are the table definitions:
WebTest:
CREATE TABLE [dbo].[WebTest](
[TestId] [int] IDENTITY(1,1) NOT NULL,
[Name] [nvarchar](50) NOT NULL,
[ExecutionTime] [datetime] NULL,
CONSTRAINT [PK_WebTest] PRIMARY KEY CLUSTERED
(
[TestId] ASC
)
) ON [PRIMARY]
WebPage:
CREATE TABLE [dbo].[WebPage](
[TestId] [int] NOT NULL,
[ItemId] [int] IDENTITY(1,1) NOT NULL,
[Name] [nvarchar](255) NOT NULL,
[Outcome] [nvarchar](50) NOT NULL,
[Duration] [int] NOT NULL,
[Length] [int] NOT NULL,
CONSTRAINT [PK_WebPage] PRIMARY KEY CLUSTERED
(
[TestId] ASC,
[ItemId] ASC
)
) ON [PRIMARY]
WebTransaction:
CREATE TABLE [dbo].[WebTransaction](
[TestId] [int] NOT NULL,
[TransactionId] [int] IDENTITY(1,1) NOT NULL,
[Name] [nvarchar](255) NOT NULL,
[Duration] [int] NOT NULL,
CONSTRAINT [PK_WebTransaction] PRIMARY KEY CLUSTERED
(
[TestId] ASC,
[TransactionId] ASC
)
) ON [PRIMARY]
Now let’s create the database views:
WebTestView:
CREATE VIEW [dbo].[WebTestView]
AS
select a.TestId,
a.Name as "Web Test Name",
b.Name as URL,
Outcome,
Duration as "Duration (ms)" ,
Length as "Content Length"
FROM WebTest a
JOIN WebPage b
ON a.TestId = b.TestId
WebTestPageView:
CREATE VIEW [dbo].[WebTestPageView]
AS
select a.TestId,
a.ExecutionTime as "Execution Time",
a.Name as "Web Test Name",
b.Name as URL,
Outcome,
Duration as "Duration (ms)" ,
Length as "Content Length"
FROM WebTest a
JOIN WebPage b
ON a.TestId = b.TestId
WebTestTransactionView:
CREATE VIEW [dbo].[WebTestTransactionView]
AS
select a.TestId,
a.ExecutionTime as "Execution Time",
a.Name as "Web Test Name",
b.Name as "Transaction Name",
Duration as "Duration (ms)"
FROM WebTest a
JOIN WebTransaction b
ON a.TestId = b.TestId
As you can see from these tables, we are going to collect test, page and transaction timing information.
Here is the next set of steps:
1) Create a test project
2) Record a simple webtest that you want to collect additional timing information on.
3) We need to add some references to the project. Right click on the References folder and select Add Reference… Then select the System.Data dll from the .net tab.
4) Now we need to create a class which will help us log data to the tables we have created. Add a class files to your test project and call it SqlHelper.cs.
5) Now copy the following. This is very simple class which will log data to those tables.
using System;
using System.Globalization;
using System.Data.SqlClient;
namespace ApiDemo
{
class SqlHelper
{
static string s_connectionString;
public static void SetConnectionString(string connectionString)
{
s_connectionString = connectionString;
}
public static int CreateRun(string name)
{
string sql = string.Format("INSERT INTO WebTest (Name,ExecutionTime) Values ('{0}','{1}')", name, ToDbDateString(DateTime.Now));
using (SqlConnection connection = new SqlConnection(s_connectionString))
{
connection.Open();
using (SqlCommand sqlCommand = new SqlCommand(sql, connection))
{
sqlCommand.ExecuteNonQuery();
}
//NOW GET THE ID
sql = "SELECT MAX(TestId) FROM WebTest";
using (SqlCommand sqlCommand = new SqlCommand(sql, connection))
{
using (SqlDataReader dataReader = sqlCommand.ExecuteReader())
{
if (dataReader.Read())
{
return dataReader.GetInt32(0);
}
}
}
}
throw new Exception("Unable to create WebTest entry");
}
public static void LogPage(int id, string url,string outcome,double duration,long content)
{
string sql = string.Format("INSERT INTO WebPage (TestId,Name,Outcome,Duration,Length) Values ({0},'{1}','{2}',{3},{4})", id,url,outcome,duration,content);
using (SqlConnection connection = new SqlConnection(s_connectionString))
{
connection.Open();
using (SqlCommand sqlCommand = new SqlCommand(sql, connection))
{
sqlCommand.ExecuteNonQuery();
}
}
}
public static void LogTransaction(int id, string name, double duration)
{
string sql = string.Format("INSERT INTO WebTransaction (TestId,Name,Duration) Values ({0},'{1}',{2})", id, name,duration);
using (SqlConnection connection = new SqlConnection(s_connectionString))
{
connection.Open();
using (SqlCommand sqlCommand = new SqlCommand(sql, connection))
{
sqlCommand.ExecuteNonQuery();
}
}
}
private static string ToDbDateString(DateTime dateTime)
{
string dateString = dateTime.ToString("u", DateTimeFormatInfo.InvariantInfo);
dateString = dateString.Replace("Z", ".");
dateString += dateTime.Millisecond.ToString("d3", NumberFormatInfo.InvariantInfo);
return dateString;
}
}
}
6) Now that we have this class setup, we need a plugin which hooks the correct events and then calls this class. Add a new class files to your test project. Copy the following code into this class:
using Microsoft.VisualStudio.TestTools.WebTesting;
namespace ApiDemo
{
public class PluginExample : WebTestPlugin
{
public override void PreWebTest(object sender, PreWebTestEventArgs e)
{
if (e.WebTest.Context.ContainsKey("ConnectionString"))
{
SqlHelper.SetConnectionString(e.WebTest.Context["ConnectionString"].ToString());
}
else
{
SqlHelper.SetConnectionString("Data Source=\".\\SQLEXPRESS\";Initial Catalog=LoadTest;Integrated Security=True");
}
int id = SqlHelper.CreateRun(e.WebTest.Name);
e.WebTest.Context.Add("WebTestId", id);
}
public override void PrePage(object sender, PrePageEventArgs e)
{
if (e.WebTest.Context.ContainsKey("CurrentPage"))
{
e.WebTest.Context["CurrentPage"] = e.Request.Url;
}
else
{
e.WebTest.Context.Add("CurrentPage", e.Request.Url);
}
}
public override void PostPage(object sender, PostPageEventArgs e)
{
//get the web test id
int webTestId = int.Parse(e.WebTest.Context["WebTestId"].ToString());
SqlHelper.LogPage(webTestId, e.WebTest.Context["CurrentPage"].ToString(),
e.PageOutcome.ToString(),
e.PageStatistics.PageTime.TotalMilliseconds,
e.PageStatistics.TotalContentLength);
}
public override void PostTransaction(object sender, PostTransactionEventArgs e)
{
//get the web test id
int webTestId = int.Parse(e.WebTest.Context["WebTestId"].ToString());
SqlHelper.LogTransaction(webTestId, e.TransactionName, e.Duration.TotalMilliseconds);
}
}
}
Let’s go through what the above plugin does. It hooks 4 events. The PreWebTest, PrePage, PostPage,and PostTransaction.
a) PreWebTest – This event handler will set the connection string for the database. It defaults to the local sqlexpress database but you can override with a context parameter. This event also creates a row in the WebTest table by calling SqlHelper.CreateRun().
b) PrePage –This is a new API. This event is setting the current processing page in the context.
c) Post Page – This is a new API. The difference between this and post request, is that this fires after dependent requests have been fetched for a page. This handler will log information to the WebPage table in the database.
d) PostTransaction – This is a new API. This handler will log information to the WebTransaction table in the database.
7) Now we can add this to a web test. Open the web test you created in step 2. Right click on the root node and select Add Web Test Plugin. Select the plugin that we created.
8) Play back the web test. After it plays back the first time, click the Edit Run Settings button on the playback UI. Change the test to execute 5 times. Play test again. Now we should have 6 executions of the test stored in the database.
Now we have the extra data stored, but how can you view the data. One way is to use Excel. I am going to show you how to use excel to create a List and pivot table.
First let’s create a list:
1) Launch Excel.
2) Click on the Data ribbon.
3) Click the dropdown button for “From Other Sources” button and select From SQL Server.
a. Fill out info for the database
b. Select the Load Test database
c. Select WebTestPageView
d. Click Next and then click finish
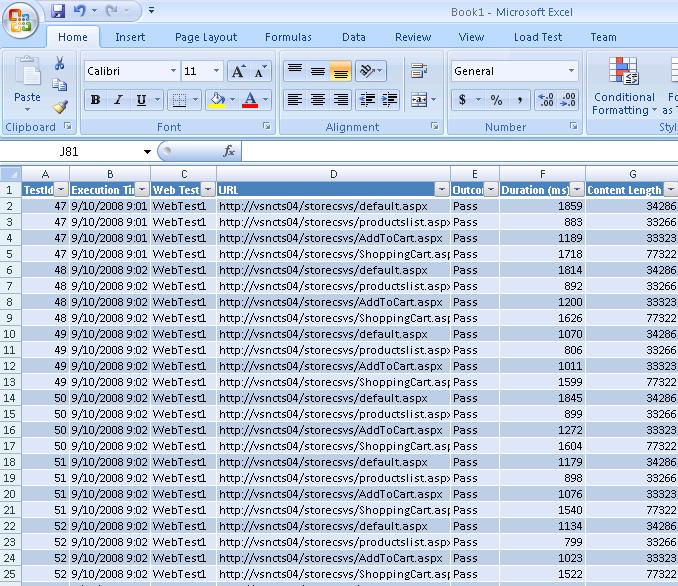
4) This will create a table which will look like the following:
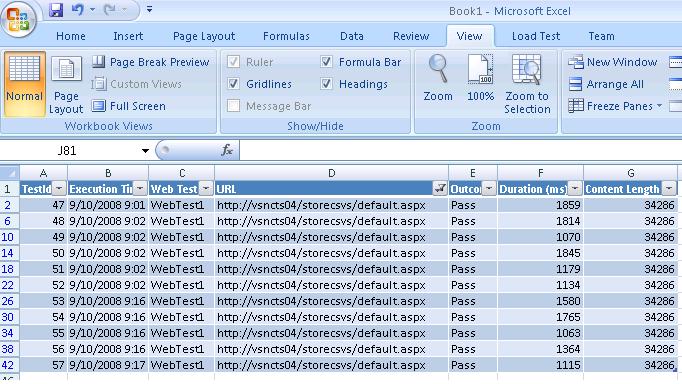
5) What is nice about having it in a list is that you can use the nicely built in filtering and sorting functions. For example, click on the URL drop down and select just one page. I am going to select just the default page. Now my screen looks like the following. This is a quick way to compare the timings for the same page across different executions of the webtest.
Now let’s create a Pivot table:
1) Launch Excel
2) Click on the Insert Ribbon
3) Click the pivot table button. This will launch a wizard
4) Select the Use an external data source radio button
5) Click Choose Connection
6) We are going to connect to the transaction view. If your test does not have transactions, then connect to the page or test view.
7) In the existing connections dialog that appears, click the Browse for more button
8) Click the new source button on the Select Data Source dialog
9) In the Data Connection Wizard, select “Microsoft SQL Server”, then click next.
10) Enter your sql server name and click next.
11) Change the database to loadtest
12) Select the WebTestTransactionView in the table list.
13) Click next and then finish.
14) You should be back in the Create Pivot table wizard now. Just click OK.
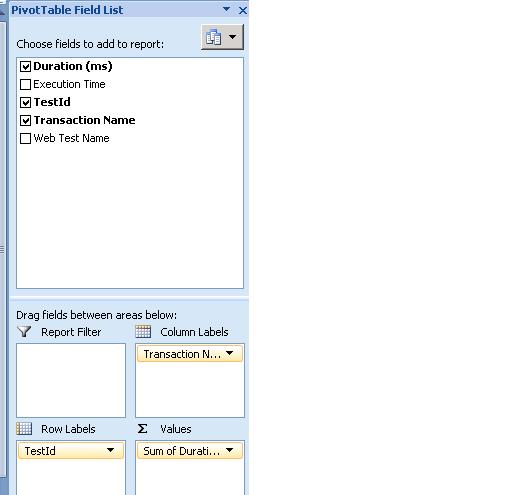
15) This will create your pivot table. Let’s add the correct columns to correct spots.
a. Add the duration column to the Values section
b. Add the TestId to the Row label
c. Add the Transaction Name to Column Label
Your pivot table field List should look like the following:
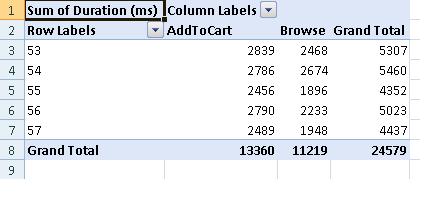
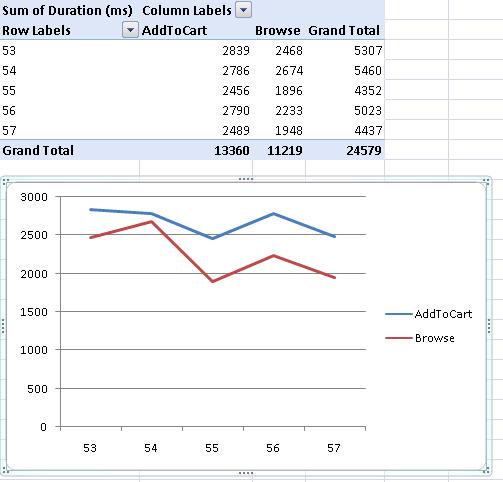
The pivot table will look like this:
16) The pivot table gives you a break down for each of the transactions in your web test. For my test I have 2 transactions: AddToCart and Browse. There are also many filtering options available. For example, you could add Web Test Name column to the Report Filter section and then have table only display certain tests.
17) Another nice thing about pivot tables is how easy it is to create a chart.
18) Click on the pivot table and then click on the Insert ribbon.
19) Click on the Line Button and select the first option.
20) This will create a chart that graphs the times for these 2 transactions from run to run. This gives a nice visual of how the timings for your tests, pages, transactions compare from run to run.
There are a few easy steps to get this demo setup. Hopefully you see how the new api’s plus excel make it really easy to do some additional reporting on web tests. One thing you should watch out for is that you probably want to disable the plugin when executing the test in a load test. The load test already collects this data.
Comments
- Anonymous
September 10, 2008
This blog post will make use of the some of the new web test API's added in VS 2008 SP1. The post will
