Nota
El acceso a esta página requiere autorización. Puede intentar iniciar sesión o cambiar directorios.
El acceso a esta página requiere autorización. Puede intentar cambiar los directorios.
Agregue una línea de código mlflow.<library>.autolog() para realizar un seguimiento automático de la aplicación de IA generativa. El seguimiento automático funciona con más de 20 bibliotecas y marcos compatibles de fábrica.
Prerrequisitos
Databricks recomienda MLflow 3 para las funcionalidades de seguimiento de GenAI más recientes.
Ejecute lo siguiente en un notebook de Databricks para instalar el paquete mlflow y el paquete de integración que desea usar. En este ejemplo se usa OpenAI:
MLflow 3
- mlflow[databricks]>=3.1: Funcionalidad de MLflow principal con características de GenAI y conectividad de Databricks.
- openai>=1.0.0: solo es necesario ejecutar el ejemplo de seguimiento automático básico en esta página (si usa otros proveedores llm, instale sus respectivos SDK en su lugar).
- Bibliotecas adicionales: instale bibliotecas específicas para las integraciones que desea usar.
Instale los requisitos básicos:
%pip install --upgrade "mlflow[databricks]>=3.1" openai>=1.0.0
# Also install libraries you want to trace (langchain, anthropic, etc.)

dbutils.library.restartPython()
MLflow 2.x
- mlflow[databricks]>=2.15.0,3.0.0<: Funcionalidad de MLflow principal con conectividad de Databricks.
- openai>=1.0.0: solo es necesario ejecutar el ejemplo de seguimiento automático básico en esta página (si usa otros proveedores llm, instale sus respectivos SDK en su lugar).
- Bibliotecas adicionales: instale bibliotecas específicas para las integraciones que desea usar.
Instale los requisitos básicos:
%pip install --upgrade "mlflow[databricks]>=2.15.0,<3.0.0" openai>=1.0.0
# Also install libraries you want to trace (langchain, anthropic, etc.)

dbutils.library.restartPython()
Configuración de credenciales
Notebook de Databricks
En un cuaderno de Databricks, establezca las claves de API de LLM necesarias:
import os
os.environ["OPENAI_API_KEY"] = "your-api-key"

# Add other provider keys as needed
# os.environ["ANTHROPIC_API_KEY"] = "your-api-key"
# os.environ["MISTRAL_API_KEY"] = "your-api-key"
Entorno externo
Si está en un entorno externo, establezca las credenciales de Databricks y las claves de API de LLM:
export DATABRICKS_HOST="https://your-workspace.cloud.databricks.com"
export DATABRICKS_TOKEN="your-databricks-token"


# Add other provider keys as needed
#export OPENAI_API_KEY="your-openai-api-key"
# export ANTHROPIC_API_KEY="your-anthropic-api-key"
# export MISTRAL_API_KEY="your-mistral-api-key"
Ejemplo de seguimiento automático
Aquí se muestra cómo habilitar el seguimiento automático para agentes de OpenAI que se conectan a las API de modelo de Databricks Foundation.
import mlflow
import os
from openai import OpenAI

# Databricks Foundation Model APIs use Databricks authentication.

mlflow.set_tracking_uri("databricks")
mlflow.set_experiment("/Shared/databricks-sdk-autolog-example")

# Enable auto-tracing for OpenAI (which will trace Databricks Foundation Model API calls)
mlflow.openai.autolog()

# Create OpenAI client configured for Databricks
client = OpenAI(
    api_key=os.environ.get("DATABRICKS_TOKEN"),
    base_url=f"{os.environ.get('DATABRICKS_HOST')}/serving-endpoints"
)

# Query Llama 4 Maverick using OpenAI client
response = client.chat.completions.create(
    model="databricks-llama-4-maverick",
    messages=[
        {"role": "system", "content": "You are a helpful assistant."},
        {"role": "user", "content": "What are the key features of MLflow Tracing?"}
    ],
    max_tokens=150,
    temperature=0.7
)

print(response.choices[0].message.content)
# Your calls to Databricks Foundation Model APIs are automatically traced!
Guía completa de integración de Databricks
Otras integraciones populares
MLflow realiza automáticamente un seguimiento de más de 20 frameworks compatibles. Estos son los más populares:
OpenAI
Aquí se muestra cómo habilitar el seguimiento automático para OpenAI:
import mlflow
from openai import OpenAI

# Enable automatic tracing
mlflow.openai.autolog()

# Set up tracking
mlflow.set_tracking_uri("databricks")
mlflow.set_experiment("/Shared/tracing-demo")

# Use OpenAI as normal - traces happen automatically
client = OpenAI()
response = client.chat.completions.create(
    model="gpt-4o-mini",
    messages=[{"role": "user", "content": "What is MLflow Tracing?"}],
    max_tokens=100
)

print(response.choices[0].message.content)
# All OpenAI calls are now traced.
Consulte la guía de integración completa de OpenAI.
LangChain
import mlflow
import os

from langchain.prompts import PromptTemplate
from langchain_core.output_parsers import StrOutputParser
from langchain_openai import ChatOpenAI

# Enabling autolog for LangChain will enable trace logging.
mlflow.langchain.autolog()

# Set up MLflow tracking on Databricks
mlflow.set_tracking_uri("databricks")
mlflow.set_experiment("/Shared/langchain-tracing-demo")

llm = ChatOpenAI(model="gpt-4o-mini", temperature=0.7, max_tokens=1000)

prompt_template = PromptTemplate.from_template(
    "Answer the question as if you are {person}, fully embodying their style, wit, personality, and habits of speech. "
    "Emulate their quirks and mannerisms to the best of your ability, embracing their traits—even if they aren't entirely "
    "constructive or inoffensive. The question is: {question}"
)

chain = prompt_template | llm | StrOutputParser()

# Let's test another call
chain.invoke(
    {
        "person": "Linus Torvalds",
        "question": "Can I just set everyone's access to sudo to make things easier?",
    }
)
Guía completa de integración de LangChain
LangGraph
from typing import Literal

import mlflow

from langchain_core.messages import AIMessage, ToolCall
from langchain_core.outputs import ChatGeneration, ChatResult
from langchain_core.tools import tool
from langchain_openai import ChatOpenAI
from langgraph.prebuilt import create_react_agent

# Enabling tracing for LangGraph (LangChain)
mlflow.langchain.autolog()

# Set up MLflow tracking on Databricks
mlflow.set_tracking_uri("databricks")
mlflow.set_experiment("/Shared/langgraph-tracing-demo")

@tool
def get_weather(city: Literal["nyc", "sf"]):
    """Use this to get weather information."""
    if city == "nyc":
        return "It might be cloudy in nyc"
    elif city == "sf":
        return "It's always sunny in sf"

llm = ChatOpenAI(model="gpt-4o-mini")
tools = [get_weather]
graph = create_react_agent(llm, tools)

# Invoke the graph
result = graph.invoke(
    {"messages": [{"role": "user", "content": "what is the weather in sf?"}]}
)
Guía completa de integración de LangGraph
Anthropic
import anthropic
import mlflow
import os

# Enable auto-tracing for Anthropic
mlflow.anthropic.autolog()

# Set up MLflow tracking on Databricks
mlflow.set_tracking_uri("databricks")
mlflow.set_experiment("/Shared/anthropic-tracing-demo")

# Configure your API key.
client = anthropic.Anthropic(api_key=os.environ["ANTHROPIC_API_KEY"])

# Use the create method to create new message.
message = client.messages.create(
    model="claude-3-5-sonnet-20241022",
    max_tokens=1024,
    messages=[
        {"role": "user", "content": "Hello, Claude"},
    ],
)
Guía completa de integración antrópica
DSPy
import dspy
import mlflow

# Enabling tracing for DSPy
mlflow.dspy.autolog()

# Set up MLflow tracking on Databricks
mlflow.set_tracking_uri("databricks")
mlflow.set_experiment("/Shared/dspy-tracing-demo")

# Define a simple ChainOfThought model and run it
lm = dspy.LM("openai/gpt-4o-mini")
dspy.configure(lm=lm)

# Define a simple summarizer model and run it
class SummarizeSignature(dspy.Signature):
    """Given a passage, generate a summary."""

    passage: str = dspy.InputField(desc="a passage to summarize")
    summary: str = dspy.OutputField(desc="a one-line summary of the passage")

class Summarize(dspy.Module):
    def __init__(self):
        self.summarize = dspy.ChainOfThought(SummarizeSignature)

    def forward(self, passage: str):
        return self.summarize(passage=passage)

summarizer = Summarize()
summarizer(
    passage=(
        "MLflow Tracing is a feature that enhances LLM observability in your Generative AI (GenAI) applications "
        "by capturing detailed information about the execution of your application's services. Tracing provides "
        "a way to record the inputs, outputs, and metadata associated with each intermediate step of a request, "
        "enabling you to easily pinpoint the source of bugs and unexpected behaviors."
    )
)
Guía completa de integración de DSPy
Bedrock
import boto3
import mlflow

# Enable auto-tracing for Amazon Bedrock
mlflow.bedrock.autolog()

# Set up MLflow tracking on Databricks
mlflow.set_tracking_uri("databricks")
mlflow.set_experiment("/Shared/bedrock-tracing-demo")

# Create a boto3 client for invoking the Bedrock API
bedrock = boto3.client(
    service_name="bedrock-runtime",
    region_name="<REPLACE_WITH_YOUR_AWS_REGION>",
)

# MLflow will log a trace for Bedrock API call
response = bedrock.converse(
    modelId="anthropic.claude-3-5-sonnet-20241022-v2:0",
    messages=[
        {
            "role": "user",
            "content": "Describe the purpose of a 'hello world' program in one line.",
        }
    ],
    inferenceConfig={
        "maxTokens": 512,
        "temperature": 0.1,
        "topP": 0.9,
    },
)
Guía completa de integración de Bedrock
AutoGen
import os
from typing import Annotated, Literal

from autogen import ConversableAgent

import mlflow

# Turn on auto tracing for AutoGen
mlflow.autogen.autolog()

# Set up MLflow tracking on Databricks
mlflow.set_tracking_uri("databricks")
mlflow.set_experiment("/Shared/autogen-tracing-demo")

# Define a simple multi-agent workflow using AutoGen
config_list = [
    {
        "model": "gpt-4o-mini",
        # Please set your OpenAI API Key to the OPENAI_API_KEY env var before running this example
        "api_key": os.environ.get("OPENAI_API_KEY"),
    }
]

Operator = Literal["+", "-", "*", "/"]

def calculator(a: int, b: int, operator: Annotated[Operator, "operator"]) -> int:
    if operator == "+":
        return a + b
    elif operator == "-":
        return a - b
    elif operator == "*":
        return a * b
    elif operator == "/":
        return int(a / b)
    else:
        raise ValueError("Invalid operator")

# First define the assistant agent that suggests tool calls.
assistant = ConversableAgent(
    name="Assistant",
    system_message="You are a helpful AI assistant. "
    "You can help with simple calculations. "
    "Return 'TERMINATE' when the task is done.",
    llm_config={"config_list": config_list},
)

# The user proxy agent is used for interacting with the assistant agent
# and executes tool calls.
user_proxy = ConversableAgent(
    name="Tool Agent",
    llm_config=False,
    is_termination_msg=lambda msg: msg.get("content") is not None
    and "TERMINATE" in msg["content"],
    human_input_mode="NEVER",
)

# Register the tool signature with the assistant agent.
assistant.register_for_llm(name="calculator", description="A simple calculator")(
    calculator
)
user_proxy.register_for_execution(name="calculator")(calculator)
response = user_proxy.initiate_chat(
    assistant, message="What is (44231 + 13312 / (230 - 20)) * 4?"
)
Guía completa de integración de AutoGen
Seguimiento automático de varios marcos
Puede usar el seguimiento automático para varios marcos en el mismo agente.
El código siguiente combina llamadas directas a la API de OpenAI, cadenas LangChain y lógica personalizada en un único seguimiento para facilitar la depuración y la supervisión.
%pip install --upgrade langchain langchain-openai
import mlflow
import openai
from mlflow.entities import SpanType
from langchain_openai import ChatOpenAI
from langchain_core.prompts import ChatPromptTemplate

# Enable auto-tracing for both OpenAI and LangChain
mlflow.openai.autolog()
mlflow.langchain.autolog()

@mlflow.trace(span_type=SpanType.CHAIN)
def multi_provider_workflow(query: str):
    # First, use OpenAI directly for initial processing
    analysis = openai.OpenAI().chat.completions.create(
        model="gpt-4o-mini",
        messages=[
            {"role": "system", "content": "Analyze the query and extract key topics."},
            {"role": "user", "content": query}
        ]
    )
    topics = analysis.choices[0].message.content

    # Then use LangChain for structured processing
    llm = ChatOpenAI(model="gpt-4o-mini")
    prompt = ChatPromptTemplate.from_template(
        "Based on these topics: {topics}\nGenerate a detailed response to: {query}"
    )
    chain = prompt | llm
    response = chain.invoke({"topics": topics, "query": query})

    return response

# Run the function
result = multi_provider_workflow("Explain quantum computing")
Combinar el seguimiento manual y automático
Utiliza @mlflow.trace con el autoseguimiento para crear seguimientos unificados para los siguientes escenarios.
- Múltiples llamadas LLM en un flujo de trabajo
- Sistemas multiagente con diferentes proveedores
- Lógica personalizada entre llamadas LLM
import mlflow
import openai
from mlflow.entities import SpanType

mlflow.openai.autolog()


@mlflow.trace(span_type=SpanType.CHAIN)
def run(question):
    messages = build_messages(question)
    # MLflow automatically generates a span for OpenAI invocation
    response = openai.OpenAI().chat.completions.create(
        model="gpt-4o-mini",
        max_tokens=100,
        messages=messages,
    )
    return parse_response(response)


@mlflow.trace
def build_messages(question):
    return [
        {"role": "system", "content": "You are a helpful chatbot."},
        {"role": "user", "content": question},
    ]


@mlflow.trace
def parse_response(response):
    return response.choices[0].message.content


run("What is MLflow?")
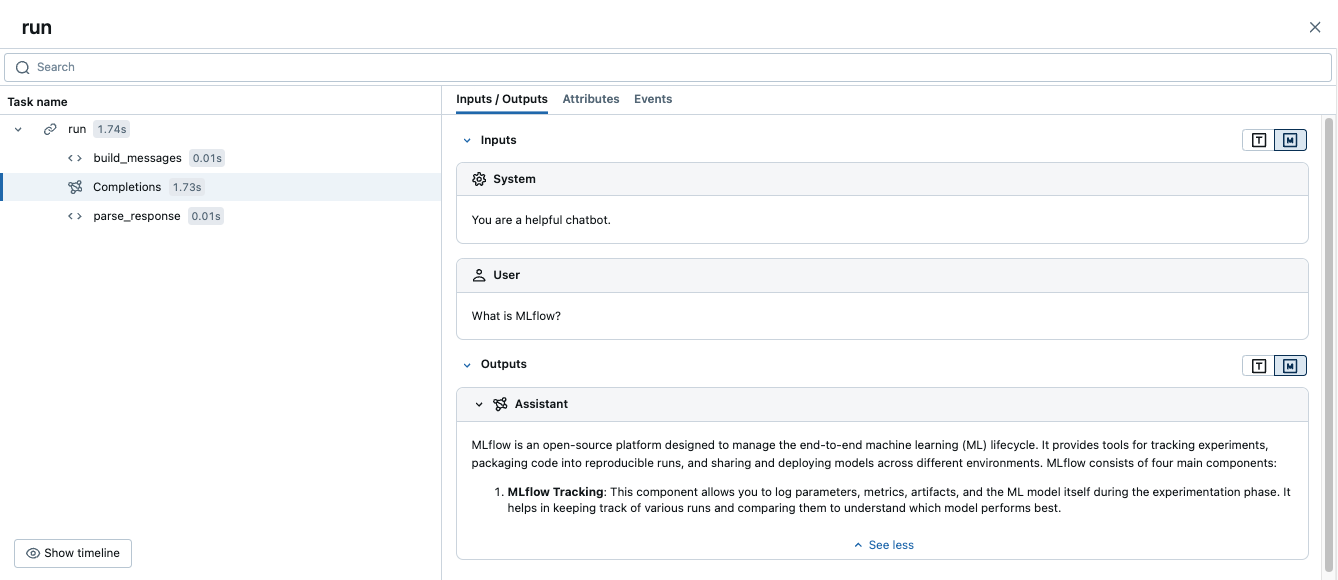
Al ejecutar este código se genera un único seguimiento que combina los intervalos manuales con el seguimiento automático de OpenAI:
Ejemplo avanzado: varias llamadas LLM
import mlflow
import openai
from mlflow.entities import SpanType

# Enable auto-tracing for OpenAI
mlflow.openai.autolog()

@mlflow.trace(span_type=SpanType.CHAIN)
def process_user_query(query: str):
    # First LLM call: Analyze the query
    analysis = openai.OpenAI().chat.completions.create(
        model="gpt-4o-mini",
        messages=[
            {"role": "system", "content": "Analyze the user's query and determine if it requires factual information or creative writing."},
            {"role": "user", "content": query}
        ]
    )
    analysis_result = analysis.choices[0].message.content

    # Second LLM call: Generate response based on analysis
    if "factual" in analysis_result.lower():
        # Use a different model for factual queries
        response = openai.OpenAI().chat.completions.create(
            model="gpt-4o-mini",
            messages=[
                {"role": "system", "content": "Provide a factual, well-researched response."},
                {"role": "user", "content": query}
            ]
        )
    else:
        # Use a different model for creative queries
        response = openai.OpenAI().chat.completions.create(
            model="gpt-4o-mini",
            messages=[
                {"role": "system", "content": "Provide a creative, engaging response."},
                {"role": "user", "content": query}
            ]
        )

    return response.choices[0].message.content

# Run the function
result = process_user_query("Tell me about the history of artificial intelligence")
Esto crea un seguimiento con:
- Intervalo principal para
process_user_query - Dos intervalos secundarios para las llamadas OpenAI
Pasos siguientes
Consulte las páginas siguientes:
- Seguimiento manual con decoradores: agregar intervalos personalizados para capturar lógica de negocios junto con llamadas LLM de seguimiento automático
- Depurar y observar la aplicación : use la interfaz de usuario de seguimiento para analizar el comportamiento y el rendimiento de la aplicación.
- Evaluación de la calidad de la aplicación : aproveche los seguimientos para evaluar y mejorar sistemáticamente la calidad de la aplicación.
Guías de referencia
Para obtener documentación detallada sobre conceptos y características mencionados en esta guía, consulte lo siguiente:
- Todas las integraciones - Explora más de 20 bibliotecas y frameworks compatibles
- Conceptos de seguimiento : descripción de los aspectos básicos del seguimiento de MLflow
- Modelo de datos de seguimiento : información sobre seguimientos, intervalos y atributos