Creación de una galería para almacenar y compartir recursos
Una instancia de Azure Compute Gallery (anteriormente denominada Shared Image Gallery) simplifica el uso compartido de recursos, como imágenes y paquetes de aplicación, en toda la organización.
Azure Compute Gallery permite compartir imágenes de máquina virtual personalizadas y paquetes de aplicación con otros usuarios de la organización, ya sea dentro o entre regiones, dentro de un inquilino. Elija las imágenes que quiera compartir, en qué regiones quiere que estén disponibles y con quién quiere compartirlas. Puede crear varias galerías que le permitirán agrupar los recursos de forma lógica.
La galería es un recurso de nivel superior que se puede compartir de varias maneras:
| Uso compartido con: | Personas | Grupos | Entidad de servicio | Todos los usuarios de una suscripción (o) inquilino específicos | Públicamente con todos los usuarios de Azure |
|---|---|---|---|---|---|
| Uso compartido de RBAC | Sí | Sí | Sí | No | No |
| RBAC + Galería compartida directa | Sí | Sí | Sí | Sí | No |
| RBAC + Galería de comunidad | Sí | Sí | Sí | No | Sí |
Nomenclatura
Los caracteres permitidos para el nombre de la galería son mayúsculas (A-Z) y letras minúsculas (a-z), dígitos (0-9), puntos . y caracteres de subrayado _. El nombre de la galería no puede contener guiones -. Los nombres de las galerías deben ser únicos dentro de su suscripción.
Creación de una galería privada
- Inicie sesión en Azure Portal.
- Escriba Azure Compute Gallery en el cuadro de búsqueda y seleccione Azure Compute Gallery en los resultados.
- En la página Azure Compute Gallery, haga clic en Agregar.
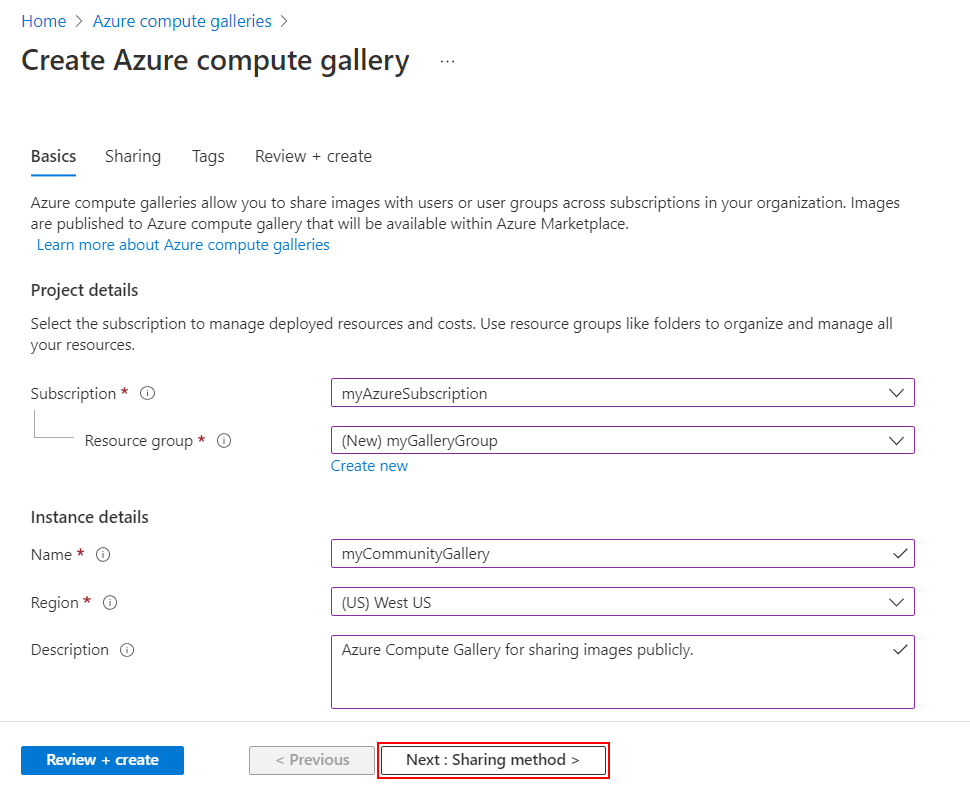
- En la página Create Azure Compute Gallery (Crear Azure Compute Gallery), seleccione la suscripción correcta.
- En Grupo de recursos, seleccione un grupo de recursos de la lista desplegable o seleccione Crear nuevo y escriba un nombre para el nuevo grupo de recursos.
- En Nombre, escriba un nombre como nombre de la galería.
- Seleccione una región en la lista desplegable.
- Puede escribir una descripción corta de la galería, como Mi galería para prueba y, a continuación, haga clic en Revisar y crear.
- Una vez pasada la validación, seleccione Crear.
- Cuando la implementación finalice, seleccione Ir al recurso.
Creación de una galería compartida directa
Importante
Azure Compute Gallery: la galería compartida directa está actualmente en VERSIÓN PRELIMINAR y está sujeta a los Términos de versión preliminar de Azure Compute Gallery.
Durante la versión preliminar, debe crear una nueva galería, con la propiedad sharingProfile.permissions establecida en Groups. Al usar la CLI para crear una galería, especifique el parámetro --permissions groups. No se puede usar una galería existente, la propiedad no se puede actualizar en este momento.
Actualmente no se puede crear un conjunto de escalado de máquinas virtuales flexible a partir de una imagen compartida por otro inquilino.
Para empezar a compartir la galería compartida directa con una suscripción o un inquilino, consulte Compartir una galería con una suscripción o un inquilino.
Inicie sesión en Azure Portal.
Escriba Azure Compute Gallery en el cuadro de búsqueda y seleccione Azure Compute Gallery en los resultados.
En la página Azure Compute Gallery, haga clic en Agregar.
En la página Create Azure Compute Gallery (Crear Azure Compute Gallery), seleccione la suscripción correcta.
Complete todos los detalles de la página.
En la parte inferior de la página, seleccione Siguiente: Método para compartir.

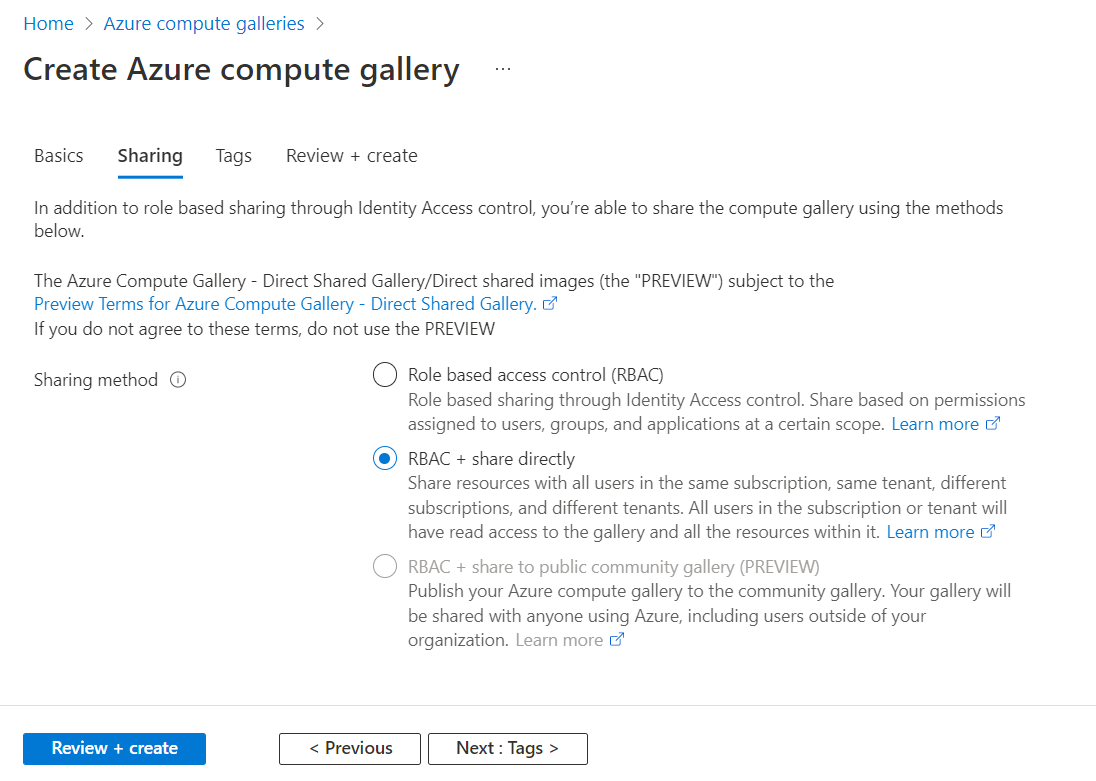
En la pestaña Uso compartido, seleccione RBAC + compartir directamente.

Seleccione Revisar y crear cuando haya terminado.
Una vez pasada la validación, seleccione Crear.
Cuando la implementación finalice, seleccione Ir al recurso.
Para empezar a compartir la galería con una suscripción o un inquilino, consulte Uso compartido de una galería con una suscripción o un inquilino.
Creación de una galería de la comunidad
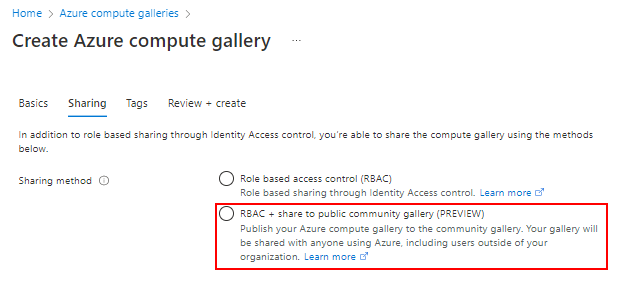
Una galería de la comunidad se comparte públicamente con todos los usuarios. Para crear una galería de comunidad, primero debe crear la galería y, a continuación, habilitarla para compartirla. El nombre de la instancia pública de la galería será el prefijo que proporcione, además de un GUID único.
Durante la versión preliminar, asegúrese de crear la galería, las definiciones de imagen y las versiones de imagen en la misma región para compartir la galería públicamente.
Importante
El servicio Azure Compute Gallery: galerías de la comunidad está actualmente en versión preliminar y está sujeto a la Versión preliminar de los términos de Azure Compute Gallery: galería de la comunidad.
Para publicar una galería de la comunidad, deberá configurar las características en vista previa en la suscripción de Azure. La creación de máquinas virtuales desde imágenes de la galería de la comunidad está abierta a todos los usuarios de Azure.
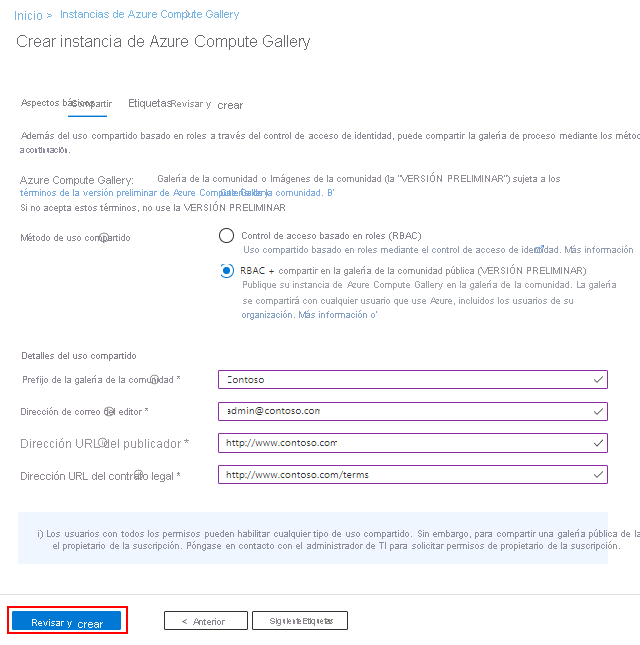
Al crear una imagen para compartir con la comunidad, deberá proporcionar información de contacto. Esta información se mostrará públicamente, así que tenga cuidado al proporcionarla:
- Prefijo de la galería de la comunidad
- Correo electrónico de soporte técnico del publicador
- Dirección URL del publicador
- Dirección URL del contrato legal
La información de las definiciones de imagen también estará disponible públicamente, por ejemplo, la que proporcione para Publicador, Oferta y SKU.
Requisitos previos
Solo el propietario de una suscripción, o un usuario o entidad de servicio asignada al rol Compute Gallery Sharing Admin en el nivel de suscripción o galería, puede permitir que una galería pase a ser pública en la comunidad. Para asignar un rol a un usuario, grupo, entidad de servicio o identidad administrada, consulte Pasos para asignar un rol de Azure.
El valor --public-name-prefix se usa para crear un nombre para la versión pública de la galería. --public-name-prefix será la primera parte del nombre público y la última parte será un GUID, creado por la plataforma, que es único para la galería.
location=westus
galleryName=contosoGallery
resourceGroup=myCGRG
publisherUri=https://www.contoso.com
publisherEmail=support@contoso.com
eulaLink=https://www.contoso.com/eula
prefix=ContosoImages

az group create --name $resourceGroup --location $location

az sig create \
   --gallery-name $galleryName \
   --permissions community \
   --resource-group $resourceGroup \
   --publisher-uri $publisherUri \
   --publisher-email $publisherEmail \
   --eula $eulaLink \
   --public-name-prefix $prefix
La salida de este comando le proporcionará el nombre público de la galería de la comunidad en la sección sharingProfile, en publicNames.
Para empezar a compartir la galería con todos los usuarios de Azure, consulte Uso compartido de imágenes mediante una galería de la comunidad.
Pasos siguientes
- Cree una definición de imagen y una versión de imagen.
- Cree una máquina virtual a partir de una imagen generalizada o especializada en una galería.
- Cree una aplicación de máquina virtual en la galería.

