Nota:
El acceso a esta página requiere autorización. Puede intentar iniciar sesión o cambiar directorios.
El acceso a esta página requiere autorización. Puede intentar cambiar los directorios.
Se aplica a: ✔️ Máquinas virtuales de Linux ✔️ Conjuntos de escalado flexibles
En este artículo se muestra cómo conectar discos nuevos y existentes a una máquina virtual Linux a través de Azure Portal. También puede conectar un disco de datos a una máquina virtual Windows en Azure Portal.
Requisitos previos
Antes de conectar discos a la máquina virtual (VM) de Azure, revise estas sugerencias:
El tamaño de la máquina virtual controla cuántos discos de datos puede conectar. Para más información, consulte Tamaños para máquinas virtuales.
Búsqueda de la máquina virtual
Siga estos pasos:
Vaya a Azure Portal para buscar la máquina virtual. Busque y seleccione Máquinas virtuales.
Seleccione la máquina virtual a la que desea conectar el disco de la lista.
En la página Máquinas virtuales , en Configuración, seleccione Discos.
Conexión de un nuevo disco
Siga estos pasos:
En el panel Discos , en Discos de datos, seleccione Crear y conectar un nuevo disco.
Escriba un nombre para el disco administrado. Revise la configuración predeterminada y actualice el tipo de almacenamiento, el tamaño (GiB), el cifrado y el almacenamiento en caché del host según sea necesario.

Cuando haya terminado, seleccione Guardar en la parte superior de la página para crear el disco administrado y actualizar la configuración de la máquina virtual.

Conexión de un disco existente
Siga estos pasos:
En el panel Discos , en Discos de datos, seleccione Conectar discos existentes.
Seleccione el menú desplegable Nombre del disco y seleccione un disco en la lista de discos administrados disponibles.
Seleccione Guardar para conectar el disco administrado existente y actualizar la configuración de la máquina virtual:
Conexión a la máquina virtual Linux para montar el nuevo disco
Para la partición, el formato y el montaje del disco nuevo para que la máquina virtual con Linux pueda usarlo, necesita SSH en la VM. Para más información, consulte Creación de claves SSH en Linux y Mac para máquinas virtuales de Linux en Azure. El ejemplo siguiente se conecta a una máquina virtual con la dirección IP pública 10.123.123.25 y el nombre de usuario azureuser:
ssh azureuser@10.123.123.25
Búsqueda del disco
Una vez conectado a la máquina virtual, debe encontrar el disco. En este ejemplo, se usa lsblk para enumerar los discos.
lsblk -o NAME,HCTL,SIZE,MOUNTPOINT | grep -i "sd"
La salida es similar a la del ejemplo siguiente:
sda     0:0:0:0      30G
├─sda1             29.9G /
├─sda14               4M
└─sda15             106M /boot/efi
sdb     1:0:1:0      14G
└─sdb1               14G /mnt
sdc     3:0:0:0       4G
En este ejemplo, el disco que se agregó era sdc. Es un LUN 0 y es de 4 GB.
Para obtener un ejemplo más complejo, este es el aspecto de varios discos de datos en el portal:
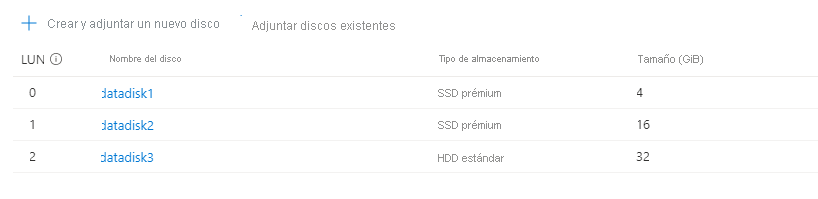
En la imagen, puede ver que hay tres discos de datos: 4 GB en LUN 0, 16 GB en LUN 1 y 32G en LUN 2.
En la salida de lsblk, puede ver que el disco de 4 GB en LUN 0 es sdc, el disco de 16 GB en LUN 1 es sddy el disco 32G en LUN 2 es sde.
sda     0:0:0:0      30G
├─sda1             29.9G /
├─sda14               4M
└─sda15             106M /boot/efi
sdb     1:0:1:0      14G
└─sdb1               14G /mnt
sdc     3:0:0:0       4G
sdd     3:0:0:1      16G
sde     3:0:0:2      32G
Preparación de un nuevo disco vacío
Importante
Si usa un disco existente que contiene datos, vaya al montaje del disco. En las instrucciones siguientes se eliminan los datos del disco.
Si va a conectar un nuevo disco, debe particionar el disco.
La parted utilidad se puede usar para crear particiones y dar formato a un disco de datos.
- Use la versión
partedmás reciente que está disponible para la distribución. - Si el tamaño del disco es de 2 tebibytes (TiB) o superior, debe usar la creación de particiones de GPT. Si el tamaño del disco es de menos de 2 TiB, puede usar la creación de particiones de MBR o GPT.
En el ejemplo siguiente se usa parted en /dev/sdc, que es la ubicación en la que normalmente estará el primer disco de datos de la mayoría de las máquinas virtuales. Reemplace sdc por la opción correcta para el disco. También vamos a formatearlo con el sistema de archivos XFS.
Use la utilidad partprobe para garantizar que el kernel reconozca inmediatamente la nueva partición y el sistema de archivos. Si no se usa partprobe , los comandos blkid o lslbk no devuelven el UUID para el nuevo sistema de archivos inmediatamente.
sudo parted /dev/sdc --script mklabel gpt mkpart xfspart xfs 0% 100%
sudo mkfs.xfs /dev/sdc1
sudo partprobe /dev/sdc1
Montaje del disco
Cree un directorio para montar el sistema de archivos mediante mkdiry, a continuación, use mount para montar el sistema de archivos. Después, agregue la unidad al archivo /etc/fstab para asegurarse de que la unidad se agrega automáticamente después de un reinicio.
Asegúrese de que el UUID (identificador único universal) se usa en /etc/fstab para hacer referencia a la unidad en lugar de simplemente al nombre del dispositivo (por ejemplo, /dev/sdc1). Si el SO detecta un error de disco durante el arranque, con el UUID se evita que se monte el disco incorrecto en una ubicación especificada. A los discos de datos restantes se les asignarán después esos mismos identificadores de dispositivo. Para buscar el UUID de la nueva unidad, use la blkid utilidad .
sudo mkdir /datadrive
sudo mount /dev/sdc1 /datadrive
sudo blkid
/dev/sda1: LABEL="cloudimg-rootfs" UUID="11111111-1b1b-1c1c-1d1d-1e1e1e1e1e1e" TYPE="ext4" PARTUUID="1a1b1c1d-11aa-1234-1a1a1a1a1a1a"
/dev/sda15: LABEL="UEFI" UUID="BCD7-96A6" TYPE="vfat" PARTUUID="1e1g1cg1h-11aa-1234-1u1u1a1a1u1u"
/dev/sdb1: UUID="22222222-2b2b-2c2c-2d2d-2e2e2e2e2e2e" TYPE="ext4" TYPE="ext4" PARTUUID="1a2b3c4d-01"
/dev/sda14: PARTUUID="2e2g2cg2h-11aa-1234-1u1u1a1a1u1u"
/dev/sdc1: UUID="33333333-3b3b-3c3c-3d3d-3e3e3e3e3e3e" TYPE="xfs" PARTLABEL="xfspart" PARTUUID="c1c2c3c4-1234-cdef-asdf3456ghjk"
Edición del archivo fstab
Nota:
La edición incorrecta del archivo /etc/fstab puede tener como resultado un sistema que no se pueda arrancar. Si no está seguro, consulte la documentación de distribución para obtener información sobre cómo editar correctamente ese archivo. Debe crear una copia de seguridad del archivo /etc/fstab antes de editarlo.
A continuación, abra el archivo /etc/fstab en un editor de texto. Agregue una línea al final del archivo, y use el valor de UUID para el dispositivo /dev/sdc1 que se creó en los pasos anteriores y el punto de montaje /datadrive. Si usó el ejemplo de este artículo, la nueva línea tendría el siguiente aspecto.
Cuando haya terminado de editar el archivo, guárdelo y cierre el editor.
Nota:
Después, la eliminación de un disco de datos sin editar fstab podría provocar un error en el inicio de la máquina virtual. La mayoría de las distribuciones proporcionan las opciones de fstab nofail y/o nobootwait. Estas opciones permiten que el sistema arranque incluso si no se monta el disco en el momento del arranque. Consulte la documentación de su distribución para obtener más información sobre estos parámetros.
La opción nofail garantiza que la máquina virtual se inicie incluso si el sistema de archivos está dañado o el disco no existe en tiempo de arranque. Sin esta opción, puede encontrarse con el comportamiento que se describe en Cannot SSH to Linux VM due to FSTAB errors (No se puede conectar mediante SSH a una máquina virtual Linux debido a errores de FSTAB).
UUID=33333333-3b3b-3c3c-3d3d-3e3e3e3e3e3e /datadrive xfs defaults,nofail 1 2
Comprobación del disco
Ahora puede volver a usar lsblk para ver el disco y el punto de montaje. A continuación, la salida debe tener un aspecto similar al ejemplo.
En la salida de ejemplo siguiente, puede ver que sdc ahora está montado en /datadrive.
lsblk -o NAME,HCTL,SIZE,MOUNTPOINT | grep -i "sd"
sda     0:0:0:0      30G
├─sda1             29.9G /
├─sda14               4M
└─sda15             106M /boot/efi
sdb     1:0:1:0      14G
└─sdb1               14G /mnt
sdc     3:0:0:0       4G
└─sdc1                4G /datadrive
Compatibilidad con TRIM/UNMAP para Linux en Azure
Algunos kernels de Linux admiten operaciones TRIM/UNMAP para descartar bloques no usados del disco. Esta característica es especialmente útil para informar a Azure de que las páginas eliminadas ya no son válidas y se pueden descartar. Esta característica puede ahorrar dinero en los discos que se facturan en función de la cantidad de almacenamiento consumido, tales como los discos estándar no administrados y las instantáneas de disco.
Hay dos maneras de habilitar la compatibilidad con TRIM en su máquina virtual Linux. Como es habitual, consulte la documentación de distribución para ver el enfoque recomendado:
Use la
discardopción de montaje en /etc/fstab, por ejemplo:```config UUID=33333333-3b3b-3c3c-3d3d-3e3e3e3e3e3e /datadrive xfs defaults,discard 1 2 ```En algunos casos, la opción
discardpodría tener afectar al rendimiento. Como alternativa, puede ejecutar el comandofstrimmanualmente desde la línea de comandos o agregarlo a su crontab para ejecutar con regularidad:Ubuntu
sudo apt-get install util-linux
sudo fstrim /datadrive
RHEL
sudo yum install util-linux
sudo fstrim /datadrive
SUSE
sudo zypper install util-linux
sudo fstrim /datadrive