Create the data service
Important
WCF Data Services has been deprecated and will no longer be available for download from the Microsoft Download Center. WCF Data Services supported earlier versions of the Microsoft OData (V1-V3) protocol only and has not been under active development. OData V1-V3 has been superseded by OData V4, which is an industry standard published by OASIS and ratified by ISO. OData V4 is supported through the OData V4 compliant core libraries available at Microsoft.OData.Core. Support documentation is available at OData.Net, and the OData V4 service libraries are available at Microsoft.AspNetCore.OData.
RESTier is the successor to WCF Data Services. RESTier helps you bootstrap a standardized, queryable, HTTP-based REST interface in minutes. Like WCF Data Services before it, Restier provides simple and straightforward ways to shape queries and intercept submissions before and after they hit the database. And like Web API + OData, you still have the flexibility to add your own custom queries and actions with techniques you're already familiar with.
In this topic, you create a sample data service that uses WCF Data Services to expose an Open Data Protocol (OData) feed that's based on the Northwind sample database. The task involves the following basic steps:
Create an ASP.NET Web application.
Define the data model by using the Entity Data Model tools.
Add the data service to the Web application.
Enable access to the data service.
Create the ASP.NET web app
In Visual Studio, on the File menu, select New > Project.
In the New Project dialog box, under either Visual Basic or Visual C# select the Web category, and then select ASP.NET Web Application.
Enter
NorthwindServiceas the name of the project and then select OK.In the New ASP.NET Web Application dialog, select Empty and then select OK.
(Optional) Specify a specific port number for your Web application. Note: the port number
12345is used in this series of quickstart topics.In Solution Explorer, right-click on the ASP.NET project that you just created, and then choose Properties.
Select the Web tab, and set the value of the Specific port text box to
12345.
Define the data model
In Solution Explorer, right-click the name of the ASP.NET project, and then click Add > New Item.
In the Add New Item dialog box, select the Data category, and then select ADO.NET Entity Data Model.
For the name of the data model, enter
Northwind.edmx.In the Entity Data Model Wizard, select EF Designer from Database, and then click Next.
Connect the data model to the database by doing one of the following steps, and then click Next:
If you don't have a database connection already configured, click New Connection and create a new connection. For more information, see How to: Create Connections to SQL Server Databases. This SQL Server instance must have the Northwind sample database attached.
- or -
If you have a database connection already configured to connect to the Northwind database, select that connection from the list of connections.
On the final page of the wizard, select the check boxes for all tables in the database, and clear the check boxes for views and stored procedures.
Click Finish to close the wizard.
Create the WCF data service
In Solution Explorer, right-click on the ASP.NET project, and then choose Add > New Item.
In the Add New Item dialog box, select the WCF Data Service item template from the Web category.
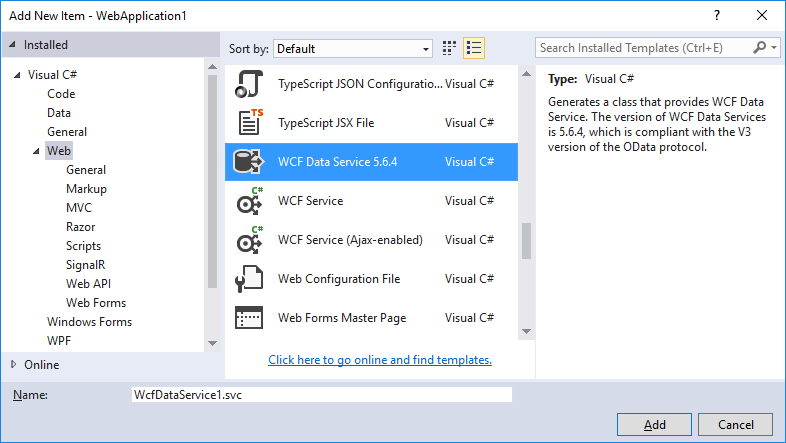
Note
The WCF Data Service template is available in Visual Studio 2015, but not in Visual Studio 2017 or later.
For the name of the service, type
Northwind.Visual Studio creates the XML markup and code files for the new service. By default, the code-editor window opens. In Solution Explorer, the service has the name Northwind with the extension .svc.cs or .svc.vb.
In the code for the data service, replace the comment
/* TODO: put your data source class name here */in the definition of the class that defines the data service with the type that is the entity container of the data model, which in this case isNorthwindEntities. The class definition should look this the following:public class Northwind : DataService<NorthwindEntities>Public Class Northwind Inherits DataService(Of NorthwindEntities)
Enable access to data service resources
In the code for the data service, replace the placeholder code in the
InitializeServicefunction with the following:// Grant only the rights needed to support the client application. config.SetEntitySetAccessRule("Orders", EntitySetRights.AllRead | EntitySetRights.WriteMerge | EntitySetRights.WriteReplace ); config.SetEntitySetAccessRule("Order_Details", EntitySetRights.AllRead | EntitySetRights.AllWrite); config.SetEntitySetAccessRule("Customers", EntitySetRights.AllRead);' Grant only the rights needed to support the client application. config.SetEntitySetAccessRule("Orders", EntitySetRights.AllRead _ Or EntitySetRights.WriteMerge _ Or EntitySetRights.WriteReplace) config.SetEntitySetAccessRule("Order_Details", EntitySetRights.AllRead _ Or EntitySetRights.AllWrite) config.SetEntitySetAccessRule("Customers", EntitySetRights.AllRead)This enables authorized clients to have read and write access to resources for the specified entity sets.
Note
Any client that can access the ASP.NET application can also access the resources exposed by the data service. In a production data service, to prevent unauthorized access to resources you should also secure the application itself. For more information, see Securing WCF Data Services.
Next steps
You have successfully created a new data service that exposes an OData feed that is based on the Northwind sample database, and you have enabled access to the feed for clients that have permissions on the ASP.NET Web application. Next, you'll start the data service from Visual Studio and access the OData feed by submitting HTTP GET requests through a Web browser: